Preparatory stage
The correct solution to the question of how to light a gas boiler should begin with checking the connection according to the diagram of all necessary equipment - this is:
- Pipeline decoupling.
- Batteries, heated floors, boiler and other consumers.
- Pumps.
- Expansion tank.
- Filtration installations.
- Thermal sensors.
- Control, monitoring and safety unit.
- Uninterruptable power source.
Installation, connection and testing of the system before a test run is carried out according to the following algorithm:
- A separate branch of the electrical network for the unit is being installed.
- The place where the boiler is installed is checked. The device should be placed at the recommended distance from the wall, window and door to avoid malfunction due to cooling and drafts. The base must be strong and perfectly level, verified by the building level. There should be no flammable materials or substances located nearby.
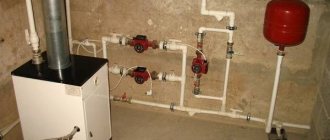
- The unit is connected to the water supply. The equipment pipes are freed from plugs and connected to the piping using filter modules with ball valves.
Connecting a gas boiler to pipelines Source utepleniedoma.com
- A gas pipeline is connected from the central gas main. The procedure is always carried out by gas service specialists, followed by installation of a meter with a seal.
- The chimney is connected and its draft characteristics are checked.
When all elements are connected, the unit is de-energized and, together with the system, is filled with coolant. After this, the equipment and pipes are checked for leaks. Then the thermostat is turned to the maximum level - as a result, the indication of switching operating modes should turn on.
See also: Catalog of companies that specialize in the design and installation of fireplaces and stoves
Filling with coolant
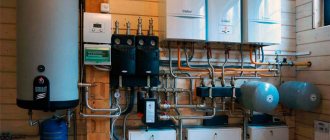
The only sure way to turn on a Danko gas boiler or analogs from other manufacturers is to strictly follow all the rules of connection technology. The first thing to do, when all the equipment has been assembled and checked, is to fill the system with coolant - most often water.
Connecting the unit to the water supply Source strojdvor.ru
The procedure is performed according to the following algorithm:
- The valve of the pipe, designed to supply coolant to the system, opens. This unit is usually located at the bottom of the unit, but some models may have a different device. Therefore, before starting filling, it is necessary to check the technical documentation.
- The circuit, pipeline, tank and batteries are filled with coolant over a certain period of time.
- As the system fills, the pressure is monitored using a pressure gauge. The indicator must comply with the manufacturer's recommendations. Typically, its value varies between 1.5-3 atm, but not higher than the maximum level.
- When the required pressure in the system is reached, the supply of coolant stops - the valve closes.
Monitoring pressure parameters in the system Source termopaneli59.ru
Note! If the system is open, it is better to fill it through the expansion tank. However, you need to know in advance how much coolant will be required. Therefore, the preliminary task of solving the question of how to turn on the boiler should be the correct calculation of the total volume of liquid being poured. Its value consists of the capacity of the heating circuit, expansion tank, pipes, batteries, boiler and other consumers.
Rules for filling the system with water before turning on the gas boiler
Before lighting a gas boiler and turning on the heating system, it is first filled with cold coolant, which, after heating, will circulate through the pipes and radiators. During the first launch, everything is carefully checked so that further operation is uninterrupted and the equipment does not require repairs.
The unit body has a special tap located near the pipe to supply coolant to the system. During the filling process, the pressure in the system is monitored thanks to the presence of sensors and pressure gauges. In modern boilers they are already installed and there is no need to purchase them additionally. When the device is filled with water, the mark on the sensor rises. When it reaches the 1.5-2 atmosphere mark, the water supply is shut off and thus completing the filling.
These pressure parameters can be changed as they depend on the manufacturer's requirements for the operating pressure in the heating system. But filling with cold water does not end there, since replenishment will be required after the structure is freed from air pockets.
Removing air pockets
No matter how carefully the system is filled, air pockets will inevitably form in it. Therefore, the next stage in solving the question of how to ignite the boiler is bleeding the air. It is performed according to the following scheme:
- Air is sequentially bled from the radiators, starting from the top to the bottom. Special valves are opened one by one - as a rule, these are Mayevsky taps - until coolant begins to flow from them.
- Next, the procedure is transferred to the circulation pump.
- The panel on the front side is removed from the unit and a cylindrical element with a slot for a flat slot is found. The cover is loosened by turning the fasteners with a screwdriver.
Bleeding air from the circulation pump Source ytimg.com
- The boiler starts and heating is established - at the same time the pump should begin to emit a buzzing and hissing sound - indicating the presence of air pockets.
- When water begins to exit the cylindrical element, its lid tightens. Then the procedure is repeated 2-3 more times.
- Then it closes and the front panel is assembled.
Further, before starting the gas boiler, the system must be supplemented with coolant. Since during the procedure of bleeding the air plugs, its partial loss occurred.
Pressure testing and flushing procedures
The essence of the next stage - pressure testing - is to pump coolant into the system in order to identify its weak points, where leaks are most likely to occur during further operation. It is performed using special pumping equipment at intervals of about 10 minutes.
In this case, the pressure gauge readings must be constantly monitored. If the pressure drops, it means there is depressurization. You need to find the problem and fix it.
Pressure testing of gas boiler equipment Source gradusplus.com
The second important procedure of this stage is washing. This is essentially cleansing the system of sediment, rust and other foreign particles inside the pipes, circuit and radiators. Before lighting a Danko boiler or an analogue of another line, open all the taps on the radiators and let in water under a pressure slightly higher than the operating parameters - about 4 atm. Upon completion of washing, the filter units must also be replaced or cleaned.
Features of equipment and manufactured models
Vulcan boilers are two lines of modern underfloor heating equipment for heating residential buildings and other buildings. Features and advantages of these units:
- Long service life - the average is at least 14 years.
- High efficiency – it is up to 92%.
- Stable operation in any conditions.
- Durable stainless steel burners.
- Complete energy independence.
- Open combustion chambers.
- Heated area – up to 300 sq. m.
In addition, Vulcan gas boilers are divided into parapet-type models and models with traditional chimneys.
The undoubted advantage of these boilers is the lack of dependence on the electrical network. Thanks to this, they will be able to work in populated areas where there is no gas supply. The presented models are made in a floor-standing form factor, they do not take up much space and have a good, albeit austere, appearance. Let's see what we can find on sale.
Gas boiler Vulcan AOGV 10 E
Before us is a typical model, made according to a single-circuit design using a traditional chimney.
It is intended for use in heating systems with forced or natural circulation of water and other types of coolants. There is no second circuit; small-volume, connected “indirect” boilers are used to prepare hot water. In order not to create unnecessary load and not waste heat, you can install an electric storage water heater in your home. The Vulcan AOGV 10 E boiler is connected to the gas mains, but can also operate on liquefied gas. The control system here is mechanical, with a similar protection system. The heat exchanger is made of steel with additional corrosion protection. The burner manufacturer is the Italian company Polidoro. The thermal power of the unit is 10 kW, gas consumption is up to 1.4 cubic meters. m/hour.
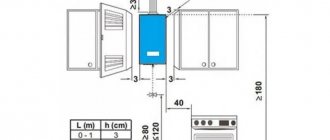
Gas boiler Vulcan AOGV 12 VE
This model is suitable for heating households and other buildings with an area of up to 120 square meters. m. Its power is 12 kW, so taking into account the required reserve, it is better to heat a maximum of 100 square meters. The boiler is built according to a two-circuit scheme, the switching is controlled by Italian automatics, as is customary in similar units from alternative brands.
A traditional chimney is used to remove combustion products. The boiler is connected to the gas main, consuming up to 1.56 cubic meters from it at maximum load. The efficiency is 90%, which is quite a high figure. The operating temperature of the coolant is from +50 to +90 degrees, the volume of boiler water is 19.3 liters.
Gas boiler Vulcan AOGV 9 VPE
Let's move on to parapet models.
They differ from traditional Vulcan boilers in that they do not require traditional chimneys to operate. Instead, double pipe-in-pipe (coaxial) chimneys are used, exiting from the rear and extending behind the wall. The presented model is dual-circuit and non-volatile. It is suitable for installation in new households, where conventional chimneys are rarely built. The unit is no different in appearance from its counterparts with open combustion chambers. The Vulcan AOGV 9 VPE boiler operates from a gas main with a maximum consumption of up to 1.4 cubic meters. m/hour. Its heat exchanger is made of durable steel, protected from corrosion by a special coating. Italian mechanical automation is responsible for controlling the temperature in the pipes and the second circuit. Ignition is carried out from a piezoelectric igniter. The boiler does not require connection to an outlet, and the two-way connection to the heating circuit ensures ease of installation.
Gas boiler Vulcan AOGV 16 VPE
Before us is one of the most powerful parapet-type boilers.
It is equipped with a closed combustion chamber; the combustion products released by it are sent outside through a coaxial chimney. Through it, air is drawn in for the burner to operate. The power of the device is 16 kW, which is enough to heat rooms up to 160 square meters. As in all other models, the heat exchanger here is made of steel, with additional treatment against corrosion. The control system is mechanical, made in Italy. It provides switching between circuits and maintaining the set temperature in the heating system. Ignition is carried out by a piezoelectric igniter. Connection to the electrical network is not required, thanks to which the Vulcan AOGV 16 VPE boiler can be operated in buildings not connected to gas mains.
Inclusion
The startup algorithm depends on the type of unit installed. For the mounted version, the diagram looks like this:
- The power supply is connected.
- Gas is supplied.
- The start key is pressed.
- The operating temperature range is set.
- When the system is equipped with an electronic type of burner, the first start of heating is carried out automatically, and if there is piezo ignition, after pressing the corresponding button.
Connecting a wall-mounted gas boiler Source otoplenie-gid.ru
Floor-standing equipment is turned on according to the following instructions:
- The control and temperature module is switched to the on position.
- The gas supply valve opens.
- Piezo ignition is set on the temperature selector.
- In accordance with the manufacturer's instructions, the piezo button is pressed.
- The heating value is adjusted.
Important! Before turning on a floor-standing AGV, as well as a similar boiler from another manufacturer, you need to completely ventilate the boiler room, make sure the draft is working properly and open the door.
Connecting a floor-standing gas boiler Source ogvk.ru
Possible problems
Often, even with strict compliance with all the requirements of the preparation technology and startup stages, the following series of equipment operational problems may arise:
- The igniter does not work. The probable cause is clogging and plaque formation. Needs cleaning. Thermocouple, solenoid valves, or supply valves may also be damaged. Needs repair or replacement.
- There is a popping noise when the main burner fires . Before turning on the gas boiler, the igniter center must be adjusted to the height of the flame, as it may be lower than the main burner. There may also be excessive pressure coming from the gas line. Another reason is a clogged or malfunctioning electrode in the electronic ignition system.
Video description
Video instructions for starting a gas boiler:
- Timing. To eliminate excessive fuel consumption, it is necessary to adjust the gas supply intensity using the control module according to the instructions.
Helpful information! The first time after startup, the heating will inevitably work with a certain amount of air, which in practice will be manifested by characteristic sounds. Since it is impossible to remove all the air from the system. However, over time, this effect will disappear due to the operation of the bleed valve on the expansion tank. The main thing is to periodically check the pressure; it should be within the recommended range.
Starting the heating system
So, you have checked the condition of the boiler and radiators, filled the system with coolant and prepared to turn it on for the first time. Then it all depends on what fuel the device runs on.
Solid fuel boiler
Starting a heating system using wood and coal is done as follows:
1. Make sure that the pressure in the system is at least 1 atm.
2. Open the damper that blocks access to the chimney.
3. Place the kindling material on the grate.
4. Load fuel into the combustion chamber.
5. Light the kindling material. Wait 10-15 minutes, then close the ignition valve.
6. When the temperature in the system rises to the desired level, adjust the thermostat so that it maintains the required heating of the air in the room.
Scheme for starting a solid fuel heating boiler
A gas boiler
Heating equipment of this type operates on a different principle, so the first start-up diagram looks like this:
1. First of all, make sure that the pressure in the system has reached the required level. For some models this is 2-2.5 atm, for others - 4 atm. Check this information in the operating instructions.
2. Remove the front cover of the boiler and locate the circulation pump. It is a metal cylinder, in the center of which there is a wide screw with a slot for a screwdriver.
3. Connect the boiler to the network and move the power levers to the operating position. The pump will turn on and you will hear a specific hum and gurgle - this is the remaining air circulating in the system.
We recommend: How to paint an OSB board on the outside - review and step-by-step instructions
4. Take a screwdriver and begin to carefully unscrew the circulation pump cover. And when the hole opens, air will come out - you need to completely release it from the system.
5. As soon as water comes out of the pump, screw the cap back on.
6. The system will now automatically open the electronic gas valve and turn on the electronic ignition.
Scheme for starting a gas heating boiler
At first, the boiler may make strange sounds - this is quite natural. The remaining air will gradually go into the expansion tank, and the system will operate almost silently.
If you still have questions about starting up your heating boiler for the first time, contact our staff for help.
Briefly about the main thing
Before lighting a gas boiler, it is necessary to perform a number of preparatory procedures:
- Connect and check the equipment.
- Fill with coolant.
- Eliminate air pockets.
- Carry out pressure testing and flushing of the system under the action of a pressure pump.
Next, in accordance with the manufacturer’s instructions and recommendations, the unit is started for the first time. During operation, it is necessary to monitor the operation of the boiler and the system, and in case of failure, promptly correct the malfunction.
Ratings 0
Instructions for preparing for launch
To use gas, you need to follow simple instructions. The first launch is carried out when the installation of equipment and piping are completed, and the correct installation is checked. All fastenings and location of the boiler must be made in accordance with fire safety rules. A certain distance must be maintained from the boiler to the wall. Which one you need to look at in the instructions for the boiler. For some models of gas boilers, this condition is not necessary. You need to make sure that there are no flammable objects or materials nearby. The boiler should not be placed near windows, as its operation will be disrupted. Great attention must be paid to ensuring that the body is mounted smoothly and there are no distortions.
After this, the equipment is connected to the cold water supply, all plugs are removed from the pipes, and a special filter with a ball valve is installed at the inlet. This helps protect the system from contaminants that could cause breakdowns. Ball valves must be installed on each pipe used for piping.
When solving the problem of how to start a boiler, great attention must be paid to the installation of gas pipes. In this case, it is not recommended to carry out the work yourself; for this purpose, an employee of the relevant service is invited who makes such a connection, sealing, and, if necessary, installs a gas meter.
What else needs to be connected before launch? It is necessary to install a separate power line for the boiler. The equipment is supplied with an electrical cable and plug; during installation, it is necessary to ensure that there is an outlet next to the boiler; it is better to separate it from the others. Next, a connection is made to the chimney pipe, its draft and performance are checked. The pipe itself must go outside; the conditions for its installation depend on what type of chimney is chosen. The last part of the preparation for starting is to disconnect the boiler from the electricity so that it can be filled with cold water. Next, the absence of leaks is checked, the thermostat is turned on to the maximum value so that the mode switch automatically lights up.
Return to contents