The prices for the services of an air conditioner installation technician are close to the cost of the equipment, so many people prefer to do it on their own. To perform technical work, you need to know how to install an air conditioner yourself in an apartment or office. The procedure is not complicated, but it requires care and attention.
Before installing the split system, check:
- Electrical wiring. If the house has old cables, aluminum wires, or no grounding, you cannot install an air conditioner. The power of electrical plugs is also important. They must withstand the current specified in the equipment passport + a small margin.
- The outer part of the walls. The method of fastening and the depth to which the brackets can be installed depend on the building material.
- Availability of socket. It should be no higher than 50 cm from the level of the floor, radiators, and various pipes.
If non-compliances with standards are identified, they must be eliminated before installing and connecting the equipment. Otherwise, the wiring will burn out or the equipment will not last long.
Standard equipment
After purchasing an air conditioner, the consumer receives:
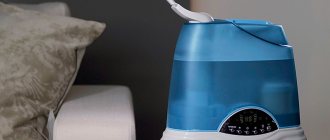
- 2 blocks – indoor and outdoor;
- Filters;
- Remote control (batteries not included);
- Copper tube (the availability of such a part depends on the manufacturer, since not everyone includes it in the kit);
- Drainage pump (in expensive models);
- Warranty card and registration certificate.
The absence of elements necessary for installation of a split system is explained by the fact that the conditions for installation are different and differ significantly. It is impossible to provide for the length of the cable, drainage pipe, the entire route, as well as the installation location and method of fastening.
Some companies additionally equip systems with devices for operation in winter. This:
- Oil heater. It prevents the liquid from thickening and thereby ensures reliable lubrication of the engine. Otherwise, oil will not flow into the compressor and it will run dry. This situation leads to rapid wear of split systems and a decrease in the efficiency of equipment.
- Heater for drainage tube. It heats up the condensate, preventing it from freezing and blocking the hose.
- Regulating device for controlling condensate pressure. With its help, the operation of the fan is controlled and the outdoor unit is not covered with a crust of ice.
A winter kit is purchased if you plan to use the equipment all year round.
Rules for installing an air conditioner in an apartment
According to the rules, the presence of two or more units in an air conditioner requires choosing a location for each of them before installation in the apartment. Before starting installation work, you will need accompanying documentation.
Do I need a permit to install an air conditioner?
Before answering the question of whether a permit is needed to install an air conditioner, you need to understand that, structurally, a split system is a system with an indoor and outdoor unit, which is mounted on the facade.
Multi-storey building, on the basis of Art. 246 of the Civil Code is common property with the right of disposal by all owners. Installation of equipment without approval is a violation:
- the device makes noise, buzzes, disturbing the peace of the neighbors;
- condensation can damage the façade of the building or get onto the balcony below;
- the overall block blocks the view or view and windows;
- There are risks of wall cracking, wiring shorting and fire.
Based on paragraph 1 of Art. 25 LCD installation of a split system is considered as a reconstruction or re-equipment of the premises. Clause 3.5.8 of Resolution No. 170 states that it is prohibited to install an air conditioner without permission from the management company and neighbors. Consent or refusal can only be obtained after a meeting of the residents of the house.
Residents of private homes can begin installation immediately after purchasing the device.
Permission is required if:
- installation work is carried out on the front part of the high-rise building;
- the user lives in a house that is valuable from a historical and cultural point of view;
- the split system is located above the pedestrian paths;
- There are no special fences on the window opening where the block is located.
The management company does not have the right to remove air conditioners. Art. 330 of the Criminal Code considers such actions as arbitrariness. Dismantling of devices is carried out only by court order.
Rules for installing the indoor unit of an air conditioner
According to the rules, the installation of the internal evaporation unit must be such that the air conditioner can create the most comfortable microclimate for people, eliminating directed flows of cold air into the head of a sleeping child or onto the owner’s favorite chair.
Indoor unit placement and air flow direction
In addition, there are rules for the placement of climate control equipment that must be followed. Before attaching the mounting panel to the wall, make sure that the location is correct.
Basic Rules:
- Ventilation openings in walls must not be blocked.
- The height difference between the outdoor and indoor units cannot be more than 5 m.
- It is better to mount the indoor unit on a load-bearing wall. A thin interior partition may not support the weight of the structure.
- It is necessary to ensure easy access to the filter.
- It is advisable to place the evaporation unit at a height of at least 2.3 m from the floor level.
- Do not install the wall system too close to the ceiling. For various models, this distance is at least 7–25 cm.
- Installation should be carried out near an electrical outlet. If it is necessary to extend the cord, you should not extend the cable, but replace it with a wire of the required length. When installing powerful air conditioners (more than 4.5 kW), the wiring must include a residual current device.
- It is advisable that direct sunlight does not fall on the indoor unit. Do not place it under fluorescent lamps either - this will damage the plastic of the case.
- When installing in the kitchen, make sure that the distance from the microwave oven is at least 1 m.
- The units are not installed in laundry rooms or bathrooms.
Installation materials and tools
To install a split system yourself you will need:
- 4-core cable with a diameter of 2 – 2.5 mm² (the exact parameter is indicated in the equipment passport);
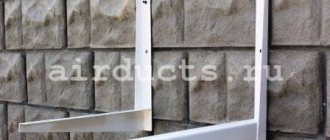
- L-shaped brackets for installing the outdoor unit. Their load-bearing capacity should be 4 to 5 times the weight of the outer housing of the air conditioner. Before properly installing an air conditioner in an apartment, calculate the safety margin. This is necessary for reliable fastening in difficult weather conditions - snow, gusts of wind, icing. The dimensions of the brackets must correspond to the dimensions of the outdoor unit.
- Seamless copper tubes with thick walls (if they are not included in the factory configuration). Diameter in 2 options – larger and smaller. To install the air conditioner, choose special soft copper that can be easily flared. This material is used in the refrigeration industry. The length of the pipes corresponds to the length of the route + 30 cm. To prevent dust from getting inside the pipes, they are transported with capped edges.
- Rubber insulation for copper pipes. The length of the segments is equal to the length of the route. For each diameter of copper pipes, select a separate insulation material.
- Corrugated hose with an internal plastic spiral. This consumable is used as a drainage pipe. Sometimes a propylene pipe is installed instead. The length of the drainage tube is 80 cm longer than the length of the route.
- Plastic box for communications.
- Dowels, bolts, anchors. The quantity and dimensions depend on the type of walls and brackets.
In addition, to install the air conditioner yourself, stock up on a hammer drill, pipe cutters, flaring tools, and a drill.
Note! For the outdoor unit of the split system, buy a visor. It will protect the case from snow, rain, dust and other debris. Installing a canopy will extend the life of the air conditioner.
For residents of the first and second floors, it is recommended to install an anti-vandal casing.
If the tank is installed above the drain pipe, a pump will not be required, since the condensate will drain naturally. In another situation, you will have to buy a drainage pump that will pump the resulting liquid.
How to install a cooler - instructions
The split system is installed in several stages:
- Determine where to hang the outdoor and indoor units. Mark the route for laying the wiring harness with communications.
- Drill through the wall and lay the lines. Secure the indoor module and connect freon pipes, wiring and drainage to it.
- Install the outdoor unit and connect all communications to it.
- Perform commissioning work.
It is important to follow this sequence of operations. You cannot first mount the support plate of the internal module and then drill a hole for the harness, because when drilling you may bump into the reinforcement, causing the tool to move to the side or upward. In the first case, the route will look clumsy, and in the second, you will not meet the requirements for the slope of the pipelines and the plate will have to be moved higher.
We will immediately give recommendations on the correct placement of units and route design:
- The indoor unit of the air conditioner must be hung in such a way that the air flow does not blow directly on you, otherwise you will get a cold. The optimal location is directly on an external wall or on a side partition near a window.
- The minimum distance from the ceiling to the air conditioning unit is 100 mm, but it is better to retreat 30 cm. A minimum clearance of 125 mm is needed between the body and the side wall in order to have enough space for curtains.
- The outdoor unit must be installed so that it can be safely serviced at height. The most convenient place is on the wall within an unglazed loggia or balcony. If they are absent, the unit must be placed under the window so that the technician can reach the service ports and all parts of the device - compressor, heat exchanger, and so on.
- The distance from the building structures to the rear wall of the outdoor module is 20 cm, to the sidewall – 300 mm, as shown in the diagram.
- According to the rules, highways are laid with a slope towards the street. Along the way there should be no stagnant areas in the form of loops facing up or down.
Advice. It is wrong to place an outdoor module on the wall next to the window. Although you can reach the service ports, you will not be able to disassemble the unit without completely dismantling it. A technician who comes to repair a compressor has every right to refuse to perform high-risk work (at height).
Installing the indoor unit
First of all, we advise you to unpack the product, take out the instruction manual and study it carefully. The fact is that the diagram given in the technical data sheet shows exactly how to correctly install and connect a split system of this particular model. Immediately remove the wall plate from the chassis. The next procedure is as follows:
- Drill through the outer wall so that the channel slopes towards the street. The optimal hole diameter is 50 mm. It is highly advisable to put a special plastic sleeve in it.
- Unpack the installation kit and immediately wrap the ends of the freon tubes to prevent dust and moisture from getting into them. Connect the other ends to the communications inserted into the niche on the back wall of the indoor module.
- Strip the ends of the electrical cable, lead it through the rear opening of the case and connect it to the terminals, sketching a small diagram on paper in order to remember the colors.
- Form a harness from the lines and cable, as shown in the diagram below, and then carefully wrap it with PVC tape. Do not twist the pipelines together!
- Now accurately position the block’s mounting plate and attach it to the partition with dowels, strictly observing the horizontal position.
- Together with an assistant, insert the harness into the hole, while simultaneously installing the internal module onto the plate (it is secured with latches).
Interblock communications in the harness
Advice. If you decide to install a split system while renovating your home, then it is better to lay inter-unit communications hidden, cutting grooves in the walls along the route. Do the same with the power supply cable. How to do it yourself is explained in the following video:
What you need to know for successful installation and connection of communications indoors. First, when twisting the refrigerant lines, rotate the union nut while holding the mating part with a wrench, and not vice versa, as is done in the photo. Otherwise, you will “break the head” of the factory tube and you will have to solder it. Also, do not tighten the nut with great force, so as not to squeeze out the rolling, which will subsequently cause a freon leak.
Second nuance: fasten the plate clearly in level; the built-in condensate tray is already made with the required slope. And one last thing: do not plug the power cable into the socket, it looks ugly. Hiddenly install a separate line with your machine from the distribution panel.
Since the article a priori cannot contain all the details, otherwise it risks turning into a story, we recommend watching a video of the installation, filmed by an experienced master:
Installing the outdoor module
When installing an outdoor air conditioner unit in an apartment, it is important to be careful and protect yourself with insurance. Have a helper hold your belt while you attach the fasteners, or use safety equipment. The installation technology is simple and looks like this step by step:
- Using a building level, mark drilling points on the wall and make holes for anchors.
- Insert the mounting bolts of the outdoor unit into the brackets with their heads facing down, calculating its position on the site. Secure them with special plastic washers to prevent them from falling out.
- Install the brackets, securing them with anchors. Place the external module on them, aligning the holes with the bolts. Using a spanner with an extension, install the mounting nuts and tighten them.
- Connect communications to the unit - screw the tubes to the ports and connect the cable to the terminals.
Advice. Do not rush to install the visor right away; it will prevent you from working with the service ports during the startup process. How to install the external part of the split system is shown in the video:
The final stage is launching the system
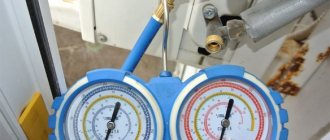
All new air conditioners are charged from the factory with freon contained in the outdoor unit. Your task is to fill the entire circuit without loss and start the split system. The work order is as follows:
- Connect the end hose of the gauge manifold to the service port spool on the gas side (it will accept a larger diameter tube). Connect the middle hose to the vacuum pump. In this case, all taps must be closed.
- Turn on the pump unit and open the manifold valves. During the first 10-20 seconds of operation, bleed the air through the fitting provided on the pump.
- Evacuate the system for at least 20 minutes if the length of the route does not exceed 5 m. The goal is to completely remove moisture from the circuit and pump out the air, which the pressure gauge on the manifold will inform you about (it will show a pressure of minus 1 bar).
- After half an hour, close the valve and stop the vacuum, then wait at least 20 minutes, watching the pressure gauge needle. If it starts to rise to zero, then your system is leaking and needs to be redone.
- Using a hex wrench, unscrew the service port valve on the liquid side, and then on the gas side, thereby filling the circuit with refrigerant.
- Turn on the air conditioner and check its operation. When the pressure in the system rises, quickly unscrew the hose from the manifold and install all the plugs.
Attention! If you use an adapter for R410 freon to connect pressure gauges to the port, then to disconnect, unscrew the nut of the adapter itself, not the hose! Otherwise, all the freon will escape into the atmosphere.
When finished, let the air conditioner operate in all modes and make sure that condensate flows from the drain and not in another place (for example, along the wall under the indoor module). You can get more information about installing a street block and starting a split by watching the latest video:
Let's say you accidentally released factory refrigerant into the atmosphere or the gas escaped through a poor-quality connection. Eliminate the cause of the leak, buy freon in a cylinder and refill the air conditioner using our recommendations.
Selecting a mounting location for the indoor unit
Before choosing a location for installing the split system, keep in mind that the electrical cable should only be installed horizontally or vertically. In the first option, keep the distances to the cornice - 5 - 10 cm, to the ceiling 15 cm, to the baseboard - 15 - 20 cm.
When choosing a location for installing a split system, take into account the data specified in the equipment passport and technical requirements.
Installation of the indoor unit is carried out based on the following parameters:
- The distance from the case to the ceiling should not be less than 15 cm; some companies recommend placing the unit 20 - 30 cm below the ceiling;
- There should be no more than 30 cm to the side wall;
- To the nearest obstacle in the path of the air flow – 1.5 m.
The outer housing of the split system is placed on the wall as close as possible to the window, on the balcony frame, if it can support the weight of the housing. In the second option for installing a split system, an additional safety margin is taken into account for snow, gusts of wind, and ice accumulation. If the housing is located on the ground floor, the external building is installed above the reach level.
For apartments located on the second floor and above, this arrangement is not necessary and the outer casing is mounted under the window or on the side. The main criterion in this case is the distance between the two blocks of the split system.
Note! When choosing a location for installing the external housing of the air conditioner, consider the ability of the wall/balcony frame to withstand the load. This point is especially important if the outer wall of the house is finished with tiles or insulation.
Manufacturers indicate the maximum distance between blocks. This is 1.5 - 3 m. If the technical documentation does not specify the distance between the split system housings, they can be installed back to back. This makes installation easier and reduces material costs.
Rules for installing the outdoor unit of the air conditioner
Outdoor unit design
Before proceeding with the installation of the outdoor unit, you need to make sure that the strength of the balcony railing or wall is sufficient to support the weight of the product. The most powerful models weigh up to 60 kg or even more. On average, household outdoor units weigh 10-15 kg and usually no problems arise with their placement. The wall and all fasteners used must have a minimum of two times the strength factor.
Rules for installing the outdoor unit of the air conditioner
Quite often, aerated concrete is used in modern housing construction. This is an excellent material with high thermal insulation properties, however, unfortunately, it cannot boast of great strength. If the external walls of your house are built specifically from aerated concrete, you should refrain from installing the air conditioner directly on the wall.
It is not recommended to hang the block on a ventilated facade, because... During its operation, quite strong vibration and noise can be created. In the situations described, the unit should be installed using a special damping seal, which is pre-fixed to the wall. The air conditioner itself rarely produces noise more than 25-30 dB, so in houses with walls made of a material denser than aerated concrete, no inconvenience usually occurs.
If possible, the air conditioner should be installed in a place where the wind blows it from all sides, but at the same time it is protected from precipitation and other negative influences. The best option is to place the unit under a pre-installed canopy or at least on a balcony. Residents of the upper floors of apartment buildings can install an outdoor air conditioner unit on the roof
It is only important to ensure that the main length does not exceed 15-20 m in total. Otherwise, there will be significant losses of cold in the system, and the air conditioner will consume electricity in vain
Installing an outdoor unit on a building wall
Take care to properly arrange the drainage of condensed moisture. Regulations require that this pipe be connected to a sewer. However, this requirement is almost never met, and the moisture simply drips onto the ground under the window. In such a situation, you need to at least make sure that water does not drip on passers-by.
The rules require that the distance between the outdoor unit and the wall surface be at least 10 cm. The problem is that the compressor must be sufficiently blown from all sides. If you install it closer than 10 cm to the wall, in summer the airflow will be insufficient, which will lead to damage to the unit.
Installation can only be carried out if you have the necessary insurance
Requirements for installation of the indoor unit
Before installing the unit indoors, check the location of hidden wiring and pipes. After choosing a safe location, taking into account the parameters specified by the manufacturer, mark the installation of fasteners. Check the location of the load-bearing elements with a level. They must be installed strictly horizontally.
When installing the indoor unit, pay attention to the bottom of the plate, as there are latches on it. They hold the body, so the fastening of this part must be rigid, without play.
Mistakes when installing an air conditioner yourself
When installing unprofessionally with your own hands, users can make a number of mistakes:
- laying pipes with kinks - increases the load on the compressor;
- installing an external unit on a balcony with glazing - normal air circulation is lost;
- location of the air conditioner next to welding machines;
- uneven arrangement of blocks - condensation begins to flow onto the floor;
- choosing equipment that does not have an auto-defrost option - in heating mode, the external unit freezes.
For normal operation of the air conditioner, you need to regularly clean the filters and drainage channels. When overloaded, the system becomes noisy - the fan is unbalanced or the bearings wear out. These breakdowns should only be repaired by a specialist.
Installation procedure
Before installation, carefully read the manufacturer's instructions. Make markings on the walls or balcony frame to install the blocks, taking into account safety standards and technical conditions. First install the inner and then the outer casing of the split system. Think over the route, places for attaching cables. With both cases secured and cables connected, check the system's operation. If there are no leaks, the units are securely fastened, you can use the air conditioner.
Installation of the indoor unit
Installation of the indoor unit is carried out according to the following algorithm:
- Using a drill, make holes for the dowel plugs;
- Insert them into the slots;
- Install the plate that will hold the inner housing of the air conditioner;
- Secure it with dowels;
- Check the correct position using a level;
- Pay attention to the fastening - it should be rigid, without gaps;
- Plan the route based on a slope for communications of 1 cm per meter of length (this installation allows for normal drainage).
Preparation of communication channels
Before installing an air conditioner, study the operating instructions for the equipment yourself. For safe operation of the system, pay attention to the rules for working with electrical cables. Do not twist electrical wires or connect different materials together - copper does not connect to aluminum. With an external connection type, the cable is closed with a box. The wire is fixed with special clamps every 50–60 cm.
For internal wiring, make a small recess of the specified length. The cables are laid in a corrugated pipe secured with plastic clamps.
The interconnect cable is selected 4 - 5 cores, with a cross section of 2.5 mm². When laying pipes outside, fix the cable on the wall every 30–40 cm. After installation, it is covered with a protective box. Secure it to the wall with special glue or screws.
Recommendations for installing air conditioners yourself
Recommendations for installing air conditioners yourself from experts:
- Automatic switches designed for boilers and washing machines are suitable for split systems.
- If the drainage pipes sag too much, condensation accumulates.
- If you have never done flaring before, practice on an unnecessary piece of pipe.
- It is better to carry out sealing together.
- After connecting the pipeline, you need to fill the holes with foam or fill them with silicone sealant.
Sources:
- https://www.rmnt.ru/story/appliance_climate/ustanovka-konditsionera-svoimi-rukami-pravila-instrumenty-ietapy-monta.1176439/
- https://tehnikoved.ru/klimaticheskaya-tehnika/konditsioner/ustanovka-konditsionera-svoimi-rukami.html
- https://stroychik.ru/elektrika/ustanovka-split-sistemy-svoimi-rukami
Necessary tool
To improve the quality of work, it is advisable to prepare the necessary tools in advance so as not to be distracted during the installation process. So, in order to install the outdoor unit, as well as the internal unit of the device, you will need:
- copper tubes having a diameter of 0.25 and 0.5 inches;
- electrical cable, cross section 1.5 mm;
- drainage hose – diameter 16mm;
- insulation for connecting copper pipes;
- dowel nails;
- plugs;
- perforator;
- Vacuum pump;
- drill with a diameter of 55 mm;
- rolling