Today, many men prefer to cut their own hair. This is not only very convenient, but also profitable, since it saves money significantly.
Unfortunately, not everyone knows how to set up a hair clipper correctly, but this will largely determine the quality of work and the service life of this device. We offer several recommendations for setting up the machines.
Why is it necessary to adjust the machine?
At first glance, it may seem that the machine is a completely ordinary and simple device that does not need to be configured, but can be used immediately. But this is far from true. It is very important to take care of your device so that it will last for many years.
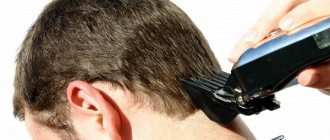
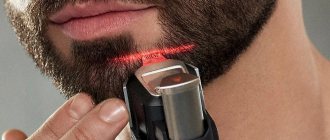
Over time, the knives of some devices may begin to cause some inconvenience during use, leave hair uncut, bite it, and even receive an electric shock. In this case, it is necessary to service the device and adjust the blades. Let's look further at how to set up a hair clipper.
Buying a hair clipper. Which one to choose?
To work, you need to purchase a reliable and convenient tool. Here are the parameters you should take a closer look at:
Machine type and power
- Vibrating machines. They have low power (8-15 watts) and removable knives. The vibration level can be adjusted. Suitable for home use.
- Rotary machines. High-power (20-50 Watt), designed for large flows of people. Good for professional work in hairdressing salons.
Method of charging the machine (battery or mains).
Battery-powered machines are ideal for home use. They are convenient to take with you, they take up very little space and there is no cord that always gets in the way.
However, a charge of 3 hours of continuous operation is more than enough for hairdressing salons. Especially when the spare machine is charging in the base.
Number of hair clipper attachments
The number of nozzles on different models varies from 4 to 7. Typically, each step is 1-3 mm.
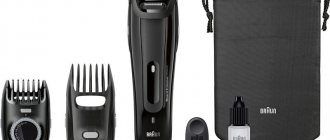
Machine accessories
A standard set usually includes the machine itself, a charging station - base (if a battery is used), a set of attachments, and oil.
Options for what to see
Pay attention to the inexpensive stand-alone Mustang Professional machine, designed specifically for beginners and students. It is also suitable for home use.
Mustang Professional products have already proven themselves well among professional hairdressers, as evidenced by reviews on social media. networks and at exhibitions - for example, Intercharm-2018.
Blade adjustment
Adjusting the blades of this device is a very important procedure. It needs to be done when the machine starts to work poorly. She may begin to cut her hair sloppily or bite her hair.
In order to adjust the blades of the clipper, you must clean it from dust and dirt. There may be hair left on them, which also needs to be removed. How to set up a hair clipper? To do this you will need a regular screwdriver. Use it to unscrew the screws that secure the blades to the body of the machine.
It is worth noting that different manufacturers place these mounts in completely different places, but the design itself does not change. Once you have managed to do this once, you don’t have to worry, because then everything will be much easier.
Initially, you need to loosen the bolts on the body and unscrew two screws. The end of the blade should be moved to the edge of the top. This position must be fixed and set correctly. This is the procedure that will allow you to get an excellent hair and beard cut.
There is another easier way to set up a hair clipper without focusing on the angles. Everything happens in the same way, but in this case the middle of the upper blade will serve as the mark. This is how most budget machines are configured.
If the device has been used for a long time, then most likely it will be necessary to lubricate all the elements of this device so that they can last as long as possible. Usually the blades are adjusted once, and after that the machine works perfectly for a long time. It is important to know that after each use it should be thoroughly wiped to remove dirt and hair residues. And the most important thing is to ensure that the device does not come into contact with water, otherwise it may break down.
The adjustment scheme is the same for all devices. Let's look at how to set up hair clippers from the most popular brands.
Vitek hair clippers
Vitek is considered a very high quality hair clipper. With its help, you can quite easily cut your hair up to a length of twelve mm, as well as down to the smallest length - three mm. The main advantage is that the blades are made of steel, and, as you know, this is an excellent material. The machine has a low noise level and low vibration. Many people don't like it to be too noisy, so this is a great option for them. The body is made of high-quality materials, which allows you to protect the machine from impacts and other damage. In this case, the machine will serve for a long time.
Machine model Scarlett SC-1263
This brand is quite popular among users. This machine has excellent quality and an inexpensive price.
Its power is 13 W. The length of the wire is about two meters, and it works from the network. The most common model has four attachments included. This includes scissors, a comb, a knife cover, an oiler and a storage case. It runs on battery power and charges within seven hours. The blades are very high quality and durable. Also has seven steps in length. Scarlett is an excellent choice for the category of people who do not consider it necessary to spend money on hairdressing services, but prefer to do their own haircut at home.
Basic Rules
No matter how light and convenient the cutting device is, you need to hold it with the blades down in your dominant hand. Right-handed people take it in their right hand, left-handed people take it in their left. To prevent the device from slipping during operation, many people choose models with a rough body, like the Moser Genio Pro. Then the head of the nozzle is pressed against the skin and, moving smoothly along the surface of the head, the device is directed against hair growth.
Let's take a closer look at how to properly hold the clipper while cutting hair:
● hair shortening begins from the back of the head, moving the device towards the crown. Movements should be soft and smooth. In this case, the head of the nozzle should not hang in the air, but lightly rest against the scalpel. With the 1400 Edition from Moser it's easy;
READ ALSO: How to properly dye your hair at home (advice from professionals)
● in places of transition from one zone to another, you should tilt your head. Do not remove the device abruptly, otherwise the strands will get stuck between the teeth of the nozzle;
● it is necessary to maintain the same angle of inclination. A lightweight and ergonomic version of the Hair Chrom2Style device, equipped with the best knife block, allows you to cut hair evenly in all areas;
● in the area above the ears, the cutting edge of the machine is directed perpendicular to the head. In this area they grow down from the crown, so the length is removed in the opposite direction - upward. The professional gadget Moser EasyStyle, which has as many as 6 attachments, copes with the task perfectly;
● on the top of the head the hair grows forward and should be cut from the forehead to the crown;
● to make a natural contour without the undercut effect, the blade should be brought parallel to the surface of the head, and then make a “take-off” movement with a small amplitude.
Don’t forget to use different attachments when cutting, otherwise your hair will have the shape of a ball. In the assortment of machines from the German brand Moser you can find excellent devices for home and professional use. Moser Genio Fading Edition with five length levels from 0.5 to 2 mm will allow you to implement all the latest techniques. Upgraded models even have trimmers for trimming beards and eyebrows. The German brand also produces them separately. T-Cut and Neoliner versions are available in our store.
READ ALSO: Short oblique bangs, fashionable in 2021 (photo examples)
How to set up the Scarlet SC-1263 hair clipper?
Such models are usually adjusted without removing the blade. You can get away with simply tightening the bolts. You may also need to lubricate worn-out elements of the device. Motor oil (working off) is best suited for this procedure.
The main thing to remember is that clippers of this particular model require constant adjustment, but the entire setup scheme is somewhat simpler than that of clippers of other models. Therefore, taking proper care of the equipment will not seem like such a big problem.
Proper machine care
To ensure long-term operation of the machine, you should follow some important rules:
- Before setting up, be sure to look at the instructions and study in detail all the information written in it. If you don’t do this, you can start doing everything wrong and worsen the condition of the device.
- After each haircut, the clipper should be cleaned thoroughly. As a rule, this is necessary for hygiene purposes and to ensure that the hair that remains after the procedure does not clog the motor and it does not overheat. If you do not take this seriously, the machine will simply burn out, and in this case you should not count on a guarantee. Based on this, you should clean the blades as best as possible using a special brush.
- Be sure to lubricate the blades, and do this often. A large percentage of people do not follow this rule because they consider it a waste of time, and then complain that the machine does not do its job well. The best option is to lubricate after each haircut. Immediately after this, you need to turn on the machine so that the oil evenly lubricates all the elements.
- Under no circumstances should you lubricate with substances other than the special lubricant included in the kit. If the lubricant runs out, you can use engine oil.
- Sharpening the blades is also a necessary condition. This can be done once every three months.
- The machine should not be left in a room where the temperature is around zero degrees. It must be kept at room temperature.
- If the machine is charged using a battery, then you first need to completely discharge it, and then charge it for about eight hours.
- Even if no one uses the machine for a long time, the battery still requires charging once every six months.
- Never adjust the blades by force. If you cannot get the blades into the desired position the first time, then you can assume that there is some kind of problem. Therefore, you must initially follow the recommendations and read the instructions for use again. Many models come with a special key for this procedure. If this option is not available, you can use a screwdriver.
- A situation may occur that the adjustment does not help at all, and the device continues to malfunction. In this case, you can purchase new knives. They cost an order of magnitude cheaper than a new machine. It is worth noting that many come with special blades and attachments.
How to adjust knives
First, turn on the Wahl machine and turn the side adjustment screw in a clockwise direction. This must be done until the device begins to make a loud enough noise. It occurs due to the fact that the coil collides with the armature. Now you need to turn the screw in the opposite direction so that the cracking noise completely disappears, and then make another half turn counterclockwise. This will allow you to tune the motor. Now you can adjust the knives. The most important rule is that for any manipulations with equipment, it must be disconnected from the network. This is important for security reasons.
Blade adjustment process:
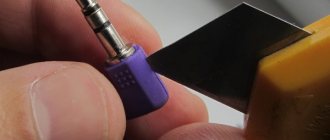
1. First of all, you need to unscrew the screws that secure the blades. This should be done with a screwdriver, and not with other improvised tools such as scissors. Otherwise, you can damage both.
2. Remove the blades and clean them using the brush that comes with the equipment. If they are very dirty, treat them with a special cleaning spray. Be sure to wipe with a dry cloth and let dry.
3. Place the blades in their original place and make adjustments. To do this, you need to tighten the clamping bolts so that the plates can be moved.
4. Move the movable blade so that its rightmost tooth extends beyond the side plane of the fixed blade. The leftmost teeth should coincide. The distance between the tops of the teeth should be approximately 1 mm, but definitely not less than 0.5 mm.5. Align the knives so that their teeth are parallel to each other (slight non-parallelism is allowed - but this does not affect the quality of the cut). Tighten the screws all the way, but not too tightly so as not to strip the threads.
After cleaning the equipment and installing the knives, it must be lubricated. To do this, you need to add a few drops of oil; it comes complete with the device and is sold separately. Then you need to turn on the device for 10 seconds so that the lubricant is evenly distributed over the blades.
If problems with the blades are present from the very beginning, literally from the first haircut, then in this case you don’t have to disassemble the machine. Simply clean the knives with a brush, loosen the bolts a little, and then align them. After this, tighten the bolts until they stop. If the adjustment does not help, the machine still does not cut well, then you need to contact an authorized service center to determine the reasons for the incorrect operation of the equipment.
*We would like to note that knives, knife blocks and all wear parts are not subject to warranty.