Many people, when purchasing a new hood, are not sure whether they can install it themselves, preferring to turn to specialists. This work does not cause any difficulties; it is enough to have basic skills in handling a drill and understand electricity. Another important point is the correct choice of model in accordance with the room. The productivity of the equipment should be 10 times the volume of the kitchen. The design of the product may be different, but the installation principle is almost the same. Let's look at the step-by-step process of installing a hood over a stove and the main features that may arise during operation.
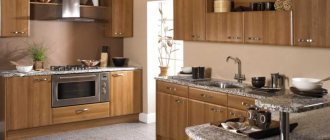
The hood is selected based on the area of the kitchen and the overall design
Features of installing kitchen hoods
Manufacturers produce different hoods, which differ in the method of attachment:
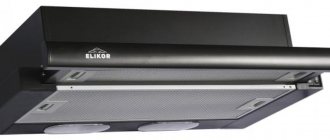
- built-in – installed in a cabinet in the form of a slider;
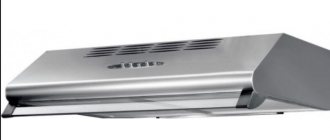
- flat - this is an independent device; it does not need access to the ventilation shaft. Polluted air is forced through a filter system and released back into the room;
- corner - this model is chosen if the hob is placed in a corner. The exhaust system can be supply through an air duct or recirculation;
- domed, inclined, fireplace - occupy the entire space above the stove, attached to the wall surface;
- island - installed on the ceiling above the hob, they take up quite a lot of space.
When choosing, it is important to follow the standards for placement above a gas stove or hob.
The corner hood fits very organically into the kitchen design
Advantages of the inclined hood design
In addition to the stylish and ergonomic design, the inclined hood has a number of other advantages. Such as:
- low noise level due to the use of advanced engines;
- greater productivity, which is achieved, among other things, thanks to the inclined working surface, which catches the flow of air rising from the hob during its natural movement;
- touch display, easy to clean compared to push-button display;
- automatic switching on and off and selection of optimal power for maximum performance.
The design of the inclined hood allows you to install it indoors without special skills. With proper installation of the device, microparticles of fat, burning and other unpleasant odors will be completely absorbed by the equipment, and the kitchen interior will have its own zest.
Subscribe to our Social networks
How to safely install a hood in the kitchen
A hood is an electrical appliance, so it is important to take care of safety during its operation.
- In any model, fat and moisture accumulate and a breakdown may occur, as a result of which current will pass through the body. In this case, there is a high risk of electric shock. Therefore, first of all, it is necessary to ground the device. Modern apartments are equipped with a grounding loop; you don’t need to do anything additional, just turn on the hood.
If there is no grounding, you must draw the circuit yourself. A 3-core wire with a cross-section of 2.5 mm² is suitable for this. It does not need to be carried outside or attached to radiators; it is enough to simply extend it to the electrical panel, where it is connected to a dead neutral. If wiring is already connected to it, you just need to secure your wire on top.
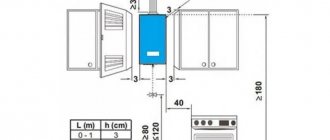
- When installing the hood, one more rule should be followed - the distance from the hob to the bottom border of the device must be within the limits specified by the manufacturer in the product data sheet.
- Another important safety parameter is that the throughput of the ventilation shaft should be higher than that of the exhaust device. Otherwise, contaminated air masses will return to the kitchen or to neighbors through other openings in the ventilation duct.
- The installation of the hood must be reliable, the fastening is strong enough so that it does not fall onto a hot stove during cooking. You need to be especially careful if the installation is carried out on drywall. In this case, it is necessary to additionally strengthen the place using wooden blocks.
Installing a Grounded Outlet for Safety
Features of installing an inclined hood in the kitchen
The method of installing an inclined hood depends on the principle of its operation. There are exhaust models - they do not purify the air, but discharge it into the ventilation shaft, recirculation models - they purify the air using carbon and grease filters, and combined models - which have maximum performance due to a combination of air exhaust and filtration.
ATTENTION! When installing diverter and combined devices, it is worth considering the presence of a ventilation hole and considering the layout of the air duct to it.
Materials and tools
If we have decided on the model, we proceed to installation. In addition to the device itself, we need:
- roulette;
- level;
- perforator;
- screwdriver;
- pencil.
To install drainage equipment, you will additionally need a ventilation grille with a hole for the air duct, a corrugated pipe and connecting clamps.
ATTENTION! The diameter of the hole in the ventilation grille and the diameter of the corrugated pipe must be the same.
Determining the installation height of an inclined hood
The installation height of the device is individual for each model; it is indicated in the operating instructions. Despite the fact that modern appliances are equipped with heat-resistant glass, there are standard recommendations for determining the height, which depend on the type of hob.
When installed above gas stoves, the lower level must be at least 55 cm, above electric stoves - at least 35 cm.
Mounting the hood
The first step is to mark the mounting holes on the wall, having first taken the dimensions from the outside of the device body. Horizontal lines on the wall are marked using a building level strictly horizontally. Check to see if there is any hidden cable running through the holes being drilled. To do this, you can use a hidden wiring detector.
Afterwards, using a hammer drill, drill holes in the wall in the designated places. If the wall is tiled, then first drill into the tiles with a drill for ceramics in non-impact mode, and only then use a hammer drill to drill into the concrete. Insert dowels into the resulting holes and screw in self-tapping screws, not screwing in about 6–7 mm to the end.
Hang the device on the screws, open the glass door, remove the grease filter and screw the screws in completely. Put the filter back.
Power connection
We connect to the power supply by plugging the plug into the socket. It is advisable that the socket be installed in advance at the level of the device or hidden behind its body. The average power of a household hood is approximately 160 W. To connect it, a wire with a cross-section of 1.5 mm2 will be enough.
Fastening corrugated pipe
The first step is to install a ventilation grille with a hole. We insert the corrugated pipe into the hole in the grille, secure it with clamps and coat the joints with sealant. The second end of the pipe is connected to the hood, the seams are treated with sealant. The pipe must be installed as straight as possible, avoiding steep angles.
ATTENTION! The more angles and turns there are in the duct, the less performance the hood will have. One turn reduces productivity by about 10%.
An air duct made of a corrugated pipe does not look very aesthetically pleasing and can spoil the interior of the kitchen. In order to hide it, install a decorative box made of plasterboard, which is painted to match the color of the walls or furniture, or is covered with both.
Before installing the box, you should check the operation of the hood and “run” it in all modes. If everything works properly, you can move on to the decorative box.
Tools and materials needed for work
Before starting work, you need to prepare the following tools and materials:
- air duct, additional elements if necessary;
- hammer drill A drill with an impact function is also suitable; this will make the work a little more difficult if the walls are concrete;
- screwdriver;
- measuring tape or tape measure;
- level;
- hammer;
- fasteners;
- if necessary, a sheet of plasterboard, metal guides;
- primer, paint, brush, putty and tool for its application.
If an expensive tool is not available, it is not practical to purchase it for installing one hood. Many stores offer equipment rental for a short time. Installation will take no more than 2-3 hours, rental will not be expensive.
How to properly install an inclined or dome hood over a gas stove: main steps
The installation of inclined and dome hoods is practically the same; it should not cause any difficulties and it is quite possible to do it yourself, saving a certain amount of the family budget. Let's look at the entire installation process step by step.
Installation of a recirculating hood
This treatment system does not require connection to a ventilation shaft, so it simply needs to be mounted on the wall. This is a good solution for private houses or apartments in which the stove is installed far from the ventilation system.
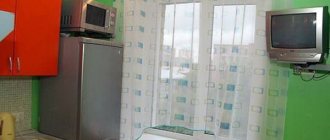
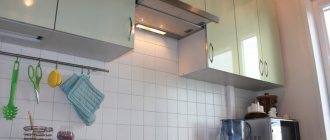
The recirculating hood can be installed under the upper furniture if the height allows
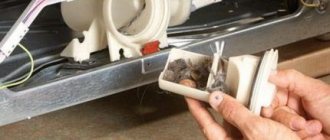
Check valve installation
First of all, install a firecracker in the ventilation system or a check valve. It is necessary to prevent the return of air into the room. It is not difficult to make it yourself; to do this, you can take a piece of tin and make a box, the diameter of which should be 3/4 of the cross-section of the air duct.
Next, you need to take a small sheet of aluminum 5 mm thick, cut out the damper and attach it to the box with a spring so that air flows push it out when leaving the room. When air flows back, the damper must be closed.
The spring can be made from wire 120 mm long, 5 mm wide and 0.3 mm thick. Its tension should close the forcedly open damper and return it to its original position.
Operating principle of a check valve
Hood installation
After installing the clapper, you should secure the hood to the wall. Manufacturers provide the availability of fasteners along with the equipment. It is necessary to carefully measure the distance, the placement standards are indicated in the product passport, check the horizontal position using a level and drill a hole with a drill or hammer drill. Then drive in the dowel and screw in the screws.
Mounting the hood to the wall using self-tapping screws
Duct installation
The easiest way is to install a corrugated pipe. It can be stretched to the required parameters or cut with scissors. During operation, the hood does not produce additional noise and has excellent aerodynamics. The air duct must be connected with one side to the branch pipe, the other must enter the ventilation shaft.
A check valve must first be installed in the channel, the body of which must be attached to the wall. You can secure the duct connections using clamps. After which the entire structure must be covered with a plasterboard partition or a plastic box.
If the ventilation shaft is located at a distance from the hood, you can extend the air duct over a long distance. It must be remembered that with each turn of the corrugation, 10% of the pipe’s capacity is lost. In addition, it does not look very aesthetically pleasing. Therefore, in this case, it is worth thinking about moving the hob closer to the ventilation hole.
When installing the duct, there must be a gap between the ceiling and the pipe. This must be done due to the fact that during operation of the hood there is a slight vibration of all elements, which can damage the ceiling.
Installation and connection of a plastic air duct
Types of inclined hoods
Inclined hoods are differentiated depending on the principle of their operation. Today there are several popular models on sale:
- Exhaust inclined hood. The hood absorbs dirty air and removes it from the room through the ventilation duct.
- The recirculating hood is equipped with special filters for cleaning indoor air.
Despite the high efficiency of exhaust hoods, which completely remove dirty air from the room, the model has one significant drawback - it requires a ventilation duct for connection.
There is ventilation in the kitchen, but the duct is rarely located directly above the stove, so you have to think about how to install a hood. If it is not possible to connect a vent hood, you should take a closer look at recirculation models that can be installed anywhere.
There are other combined hoods that can operate in several modes at once. A hood can remove and filter air, which is why it is very popular. Thanks to the ability to adjust the position of the hood, the design ensures full air circulation.
Difficulties can only arise during the installation process. It will not be possible to hang the device above the cabinet, because the hood rises and you need free space. Otherwise, the device is very easy to use and does its job well.
How to independently connect a kitchen hood to electricity
Before installing the hood, you should first check the length of the cord and the distance to the outlet. In this case, it is not advisable to use a carrier; it is better to immediately move the outlet, and you should not place it close to heating equipment or water. The best place is to lay hidden wiring above the cabinets.
You can move the outlet yourself or invite a specialist. Then the place needs to be plastered and decorated after the repair.
Features of installing a built-in hood
A built-in hood in its technical parameters does not differ from an inclined or dome model. The main difference is in the design, for example, the casing in a tall product performs a decorative function. When installed correctly, the hood is almost invisible in the kitchen; only the control panel remains visible. It is suitable for small rooms or kitchens decorated in country, classic or rustic style.
To install such a structure in a house, certain professional skills are required. To place it, you need a cabinet, which is installed at the required distance above the stove. You can use existing furniture for exhaust equipment or make a custom cabinet.
Let's look at the step-by-step process of installing a hood in already installed furniture.
- In the cabinet, remove the bottom and shelves. You can install additional fasteners for rigidity.
- You need to cut a hole in the top panel for subsequent installation of the air duct. It can be cut out with a jigsaw.
- Install the hood in the cabinet and secure it with self-tapping screws.
- Next, you should hang the cabinet with the hood in place.
- Install and secure the air duct.
- Connect and check the operation of the system.
A corrugated air duct in sight can ruin the design of any kitchen. It is recommended to hide it inside furniture or use a decorative model. An alternative is to install a plastic structure, which visually looks much better.
The sequence of installing the hood in the cabinet
Hood installation height
Manufacturers indicate the dimensions in the technical notes for the product, since they directly depend on the power of the equipment. The optimal height for installing the hood above the hob or stove should be in the range from 65 to 95 cm from the bottom edge of the model to the burners:
- for gas - from 75 cm to 90 cm;
- for electric – from 65 cm to 70 cm.
If you install the hood lower, individual elements may be damaged due to high temperature, steam and splashes.
It is possible to install a hood at a height of more than 90 cm only if the power of the equipment allows it.
Determining the mounting height
The installation height of an inclined hood depends on the heat resistance of the materials. Manufacturers indicate individual values for each model in the passport; in practice, safety conditions should be adhered to:
Important! The minimum level from the bottom edge of the hood to the gas stove must be at least 550 mm, to the electrical panel - at least 450 mm.
In fact, another method is often used: the bottom of the hood is marked in line with the bottom border of the kitchen wall cabinets. In our case, this is the first marking line.
Safe placement of the hood above the hob
For the convenience of the consumer, the hood is equipped with a paper template representing the pattern of holes on the wall, which must coincide with the mounting holes on the rear panel of the device. How to use the template:
- Using a tape measure, determine the middle of the hob, apply a level to the wall and draw a vertical axis of symmetry.
- We attach the sheet with the diagram to the back wall and align it with the holes on the case. We measure the distance between the bottom of the case and the edge of the paper, transfer the measurement to the wall and draw a second horizontal line;
- We fix the template on the wall with masking tape, apply marks on the wall with a sharp object and remove the paper.
Mounting template
How to choose an air duct for a kitchen hood
Air purification in the kitchen depends not only on the power and performance of the equipment, but also on the correctly selected air duct. The trading network offers the following elements:
- corrugated pipe made of round aluminum foil, the main advantage of which is low cost. The air duct bends well, so installation does not cause any difficulties. Additional elements for organizing air purification are not needed; you may only need clamps with which to secure the corrugation to the hood and ventilation grille.
Disadvantages include uninteresting appearance and vibration when the device is operating at high power;
- rigid plastic pipes - to install the ventilation duct, it is necessary to purchase transition parts: turns, connections. The elements are produced in round and rectangular sections. The finished structure has a presentable appearance and good sound insulation. The main advantage of rigid pipes is their small height, so they can be hidden even in a suspended ceiling.
When choosing an air channel, you should focus on the diameter of the outlet - the bell; in addition, it is important to correctly measure the distance to the ventilation shaft. For a corrugated pipe, the difference due to incorrect measurements will not affect the installation; for a rigid air duct, this can lead to the purchase of unnecessary parts.
A variety of elements of the plastic air duct allows you to perform complex piping
Optimal height values for different units
The installation height of the hood above the tile is determined taking into account two components - the type of hob and the design features of the location of the equipment for a particular kitchen.
It is necessary to understand that the height is never “tied” to the dimensions of the air intake, components or type of device. Distance between hob and hood
The only exception to the rule is kitchens with low ceilings, where it is not possible to maintain the recommended distance between the hob and the hood.
Choosing a built-in hood for the kitchen: rating of the best latest models
How to properly install a hood over a gas stove
1.1
Horizontal solutions
It is possible to determine exactly at what height to install the hood only if you have information about the type of stove used. Based on this, the distance between the inflow and exhaust is selected. This type of equipment is installed taking into account a number of parameters (type of hob, performance of the intake unit, etc.).
The relationship between human height and device installation height
But what distance is considered optimal in terms of safety and efficiency?
The standard for each device is different, but there are accepted standards that are primarily advisory in nature:
- the distance between the hood and the gas stove burners is from 65 to 85 cm;
- The minimum distance from an electric hob is 60 cm, and the maximum is 80 cm.
Minimum distance from the hood to the gas burners
The specified data is valid only for devices fixed strictly horizontally.
Video on installing a horizontal type unit
How to choose the right hood for the kitchen
1.2
Inclined units
Inclined type unit
When installing inclined models, it is extremely important that the distance between the stove and the hood corresponds to the following values:
- from 35 to 45 cm when working with an electric stove;
- from 55 to 65 cm – for gas burners.
In a real kitchen, it is customary to install ventilation units where operation will be not only efficient, but also convenient for the housewife. The distances indicated above are experimentally established values confirmed by years of practice. You can calculate them yourself, you just have to take into account a number of variables:
- kitchen area;
- planning features of the premises;
- approximate area of the cooking surface;
- performance and type of hood;
- growth of family members, housewives.
If you do not maintain the established distance and hang the unit too low, there is a high probability that the device will operate under constant heating conditions. And this is fraught with premature failure of the faithful assistant. In addition, if the hood is installed too low above the electric stove, it will simply be inconvenient to use.
Air conditioner for kitchen
Video on installing an inclined type unit
Choosing a built-in hood for the kitchen: rating of the best latest models
Factors influencing the distance between the stove and the hood
Separately, we should once again dwell on the factors that influence the distance between the installation of the exhaust device and the stove. The height depends on what they will be:
- kitchen size;
- features of its layout;
- hob (type and dimensions);
- power and type of exhaust device;
- the growth of the one who will cook on this stove more than others.
At the same time, it is also important to comply with all installation standards for the ventilation structure specified in the technical data sheet for it. Following all these recommendations will make it possible to use a device designed for air ventilation in the kitchen extremely effectively, and will rid it of unnecessary odors and fatty deposits that spoil the interior.
Following all these recommendations will make it possible to use the device designed for air ventilation in the kitchen extremely effectively, and will rid it of unnecessary odors and fatty deposits that spoil the interior.