The summer season is a conservation time for every housewife, during which it is necessary to prepare a large amount of supplies for the winter. To do this, you need not only to select and prepare the necessary products, but also to prepare jars in which they will be stored all winter. Most housewives sterilize jars over burning steam - this process is very labor-intensive, and quite unpleasant in the summer heat. To ensure that sterilization does not take much time, you can use a microwave; the entire process of preparing the jars will only take a couple of minutes.
Pros and cons of sterilizing jars in the microwave
Preparing jars for oven canning has both pros and cons.
pros
- This method is very fast compared to the conventional method. You will only need 5-6 minutes to sterilize, unlike the traditional method, where you will need to pour water into the pan, place the jars in it, wait for the water to boil and only then will they be prepared.
- You can prepare jars for preservation not only one at a time, but several at once, if they are small in volume.
- This method will help to avoid excess humidity in the kitchen, as with traditional sterilization, the water boils away in the pan and all the steam remains on the walls and windows.
Minuses
- to prepare for canning, a large jar (three-liter), you can prepare only one at a time.
- Iron lids cannot be sterilized in an oven, so they will have to be processed separately.
How long does it take to sterilize
The time spent on sterilizing one container depends on:
- microwave power;
- container volume;
- the amount of liquid poured inside;
- number of simultaneously processed containers;
- processing method.
The average amount of time spent processing one 0.5 liter can is 2.5-3 minutes. Process liter jars for 3 to 4 minutes, one and a half liter and two liter jars for 3.5-4.5 minutes, and three liter jars for 5-6 minutes. But even this time may be subject to change due to the factors described above.
The above-described processing time is valid for methods of sterilizing jars without blanks. Jars with blanks can be sterilized either faster or slower than the above time. You should focus on the level of liquid that boils away. You cannot heat the container inside the microwave if there is no liquid.
The data described in the table will help you choose the amount of time required to process the workpieces. Depending on the power of the microwave, the time must be increased or decreased. This table indicates the processing time at a microwave power of 1000 W.
| Container for processing, the volume of glass jars is indicated | Processing method, jar fullness | Recommended time, given in seconds |
| 0.5 l | Ferry, container empty | 120 |
| 1 l | 180 | |
| 1.5 l | 240 | |
| 2 l | 300 | |
| 3 l | 360 | |
| 700 ml | 150 | |
| 0.5 l | Dry method, empty container | 120 |
| 1 l | 180 | |
| 1.5 l | 240 | |
| 2 l | 300 | |
| 3 l | 360 | |
| 700 ml | 150 | |
| 0.5 l | The container is filled with jam | 360 |
| 1 l | 420 | |
| 1.5 l | 480 | |
| 2 l | installation is not possible due to the size of the can | |
| 3 l | installation is not possible due to the size of the can | |
| 700 ml | 360 | |
| 0.5 l | The container is filled with salads or pickles | 150 |
| 1 l | 180 | |
| 1.5 l | 200 | |
| 2 l | installation is not possible due to the size of the can | |
| 3 l | installation is not possible due to the size of the can | |
| 700 ml | 170 | |
| 0.5 l | The container is filled with fruits or berries | 120 |
| 1 l | 180 | |
| 1.5 l | 240 | |
| 2 l | installation is not possible due to the size of the can | |
| 3 l | installation is not possible due to the size of the can | |
| 700 ml | 150 |
We invite you to familiarize yourself with the New Year of the Pig Lottery
Based on these data, the time expected to be spent processing the required amount of container is calculated. If you need to process large batches of 3-liter jars intended for canning cucumbers, tomatoes, sauerkraut or compotes, this method may not be practical.
Sterilization of jars is a mandatory step in food preservation. Preservation for an entire winter or year is impossible without first removing all microorganisms. Although the main contaminants are removed during classic washing, some microorganisms remain living inside the jars. They themselves are not dangerous, but their waste products can cause serious toxic poisoning
This is why such serious attention is paid to the process of sterilizing dishes before preservation.
Preparing for sterilization
Sterilization is considered one of the important stages of canning that should not be skipped. The fact that you have carefully checked the jars and washed and rinsed them well does not provide a 100% guarantee that the food in it will not ferment or spoil. No matter how well you wash the jars, microbes may still remain on them, which can later enter the human body along with the food and not only cause poisoning, but also lead to death. For example, botulinum toxin can be stored and develop in canned foods, even in a space without air.
Preparing the container means that you need to carefully check whether there are any cracks in the containers, since the jars may explode during the sterilization process, and then thoroughly wash and rinse under running water.
Types of covers
Please note that there are several types of lids that are used for preparations for the winter.
Types of covers:
- Glass lids . Many housewives believe that they have outlived their usefulness, because they are practically not on store shelves now. The principle of operation is very simple, they are reusable, they must be boiled before seaming. They are closed using a special clamp.
- Screw caps with thread. In fact, they are disposable, but most often housewives use them many times. They are also coated with a special paint and fit only on those cans that also contain threads.
- Regular tin lids for sealing . They can be of two types: yellow and silver. Gray lids are not covered with a layer of varnish. They interact more quickly with preservation, especially those that contain various acids. Thanks to this, the lid becomes covered with rust from the inside, which can often be observed after opening a jar of cucumbers or tomatoes. Therefore, it is recommended to roll up all vegetable salads, as well as preparations of cucumbers and tomatoes, with yellow lids, which are coated with a special varnish or paint. It prevents the metal from interacting with the ingredients of the workpiece.
- Plastic covers . They are unusual, that is, not the ones sold for glass jars. Such lids cannot be simply pulled onto the workpiece. To stretch, they are preheated in very hot water, then stretched over the neck. After cooling, they shrink, which prevents air from penetrating into the workpiece.
Covers for workpieces
Sterilizing jars using steam
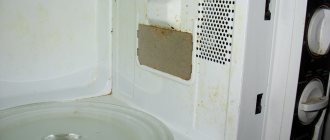
As soon as the containers are washed, you need to pour some water into them, fill the jar with water 2 centimeters from the bottom. For sterilization, it is better to take filtered water, since it will not leave limescale during the processing process. Then put all the jars in the microwave, do not cover them with lids under any circumstances, and then turn on the microwave oven for 3 minutes for half-liter jars, and for three-liter jars it will take 5 minutes.
In order to understand whether the jars have been sterilized or not, you can look through the glass of your microwave; as soon as the water boils, the entire sterilization process will take 2-3 minutes; while the water boils, steam will be released, which will disinfect all containers.
After sterilization, take a dry towel or oven mitts and remove the containers. It is important to know that the towel or potholder should never be wet, as this will lead to a temperature difference and the glass will burst. After you take out the jars, you need to drain the excess liquid from them and fill them with food for preservation.
Methods and step-by-step instructions for sterilization in an oven
Properly sterilized jars in the microwave do not contain small bacteria and microorganisms.
See also
Delicious recipes for canned tomatoes with honey for the winter, preparation steps
Read
Sterilize with steam
How to proceed:
- Containers that have been screened for damage should be rinsed thoroughly and scalded with boiling water.
- You need to pour a little water into each container, the level of which should be within two centimeters. Water must be boiled or filtered. During boiling, the water will evaporate, and limescale will remain on the walls.
- Place the jars on a turntable. It is important to ensure that the container does not touch the walls of the household appliance. Also, there should be no resistance during rotation of the rotary element.
- A standard microwave oven can accommodate 4-5 half-liter jars. If it is necessary to sterilize three-liter containers, then they must be placed one at a time, laying on their side. To prevent the jar from moving during processing, it must be placed on a rolled towel.
- The amount of time depends on the volume of the cans. Half-liter and liter containers are sterilized for 4 minutes at a power of 1000 W. Large containers are sterilized at a power of 650 W for 7 minutes.
- In practice, each housewife selects the required time herself. For reliability, it is necessary to sterilize containers 2 minutes longer than indicated above. The most important thing is that the liquid in the jar boils.
- After the beep, the cans can be removed. It is important to take your time and remove them using an oven mitt or towel, as they are very hot.
- Drain off the remaining liquid and wait until the jar is completely dry.
- If several jars are being sterilized, they must be taken out one by one, the remaining water drained and placed upside down on a towel.
- Before moving on to filling containers, you need to make sure that the temperature of the workpiece and the jar is almost the same. A sudden change in temperature can damage the container.
- This method is only suitable for containers made of glass.
Dry sterilize
For some, the method described above seems not entirely reliable, since liquid remains in the jars after processing. If this method is not suitable, you can use another - dry method.
Stages of the procedure:
- Wash whole jars without visible damage with clean water and soda. Rinse well and place on a towel over the neck.
- When the container is completely dry, proceed to the disinfection process.
- Take a glass with a capacity of 250 ml and fill it ⅔ volume with water.
- Place it in the center of the rotating plate.
- Place jars around the glass. Microwave power should be within 700 W, time - 5 minutes. How many minutes it will take to process depends on the volume and number of cans.
- The water in the glass should boil.
- After the timer turns off, remove the dish from the microwave oven. You can proceed to the conservation process. The main thing is to avoid temperature changes.
See also
TOP 20 delicious recipes for preparing bell peppers for the winter
Read
Dry processing
Many housewives also sterilize glassware without water. To do this, you need to put them in the microwave dry, but be sure to place a glass of water in there. Half the volume of water is poured into the glass, since if there is less water, it will not be enough, and more will lead to overflowing of water during processing. After everything you need has been placed in the oven, it needs to be turned on for 5 minutes. The evaporation of water from a glass can also serve as a guide. After sterilization is complete, all you have to do is remove the dry containers from the oven.
#1 Report. First experience. Microwave sterilization. Wheat.GT. Be careful, there are a LOT of photos.
Good afternoon, forum residents. Today I decided to share my success in growing mushrooms. This is my first attempt at growing mushrooms and I really hope that everything ends successfully.
Almost a month has already passed since the beginning of the whole process, so I’ll tell you how everything went.
I purchased a ready-made spore suspension of Golden Teather mushrooms. The day before, I prepared wheat grain (ordinary feed grain, there is nothing special in it): I washed it thoroughly several times, filled it with grain (1 liter of grain), filled it with water (3 liters of water), threw in one crushed tablet of Levomycetin. He insisted in this form for about 18-20 hours, until the next day he collected the spore suspension from the post office. Then I drained the water and set the grain to boil: I threw it into boiling water for 10-15 minutes. After cooking, I drained the water, put the grain on a clean towel and soaked it with the edges of the towel until it became less wet.
Since I don’t have a pressure cooker or oven, I took a different route and decided to sterilize the grain in the microwave. Sterilization was carried out in this way: I took 0.5L plastic jars (washed them with water, wiped them with napkins), poured one tablespoon of perlite into the bottom of them, and filled the jars 2/3 with grain on top. I put the open jars in the microwave, put a full cup of hot water in the center, and turn it on for 30 minutes. Then put more jar lids inside and turn on for another 10 minutes.
As the end of 40 minutes approached, I wiped my hands with 95% alcohol and when the sterilization was completed, I opened the microwave and quickly closed the jars. I closed the microwave and left them to cool until the next day. After this time, the grain cooled down and I inoculated (there was a hole in the lids of the jar, sealed with a band-aid) with a syringe through the band-aid, after inoculation I sealed the injection site with another band-aid. And on each jar I got 2 patches, one pierced with a needle, the other intact.
I got 5 jars and 5 milliliters of spore suspension; I poured 1 milliliter into each jar in 4-5 directions around the jar. I placed the cans in a dark box which was heated with shoe dryers, the average temperature was 29.5-30 degrees. On the 14th day, I shook the jars so that the middle and top grew better (the top turned out to be a bit dry). Afterwards, the mycelium grew less actively. On days 17-18, I mixed the overgrown grain with the substrate. I used ready-made soil for cacti as a substrate and did not add anything. The soil was sterilized in the same way as the grain.
Ratio: 1 liter of overgrown grain per 3 liters of substrate. I kneaded it, began to scatter it into trays, which were not enough due to the fact that there was a lot of ready-made mixture of grain and soil, so I had to use cans of the grain itself and another additional tray. The covering layer of soil in each tray turned out to be small: up to 1 cm.
And I ended up with 3 planned trays, 2 grain cans and one deep tray. Each tray was wrapped in two layers of film, and about 100 holes were made in each film with a needle. I did all this on August 4th. I didn’t take much photos, but here’s what I have:
When finished, I returned the trays to the box in which the grain had grown; everything barely fit there, but a stand for the same microwave helped save the situation; I placed the trays on the floors.) The substrate stood on the fouling for 4 days. On August 9, I removed the films from the trays and put them in the greenhouse.
I have a greenhouse from a small plastic container, put one uniform layer of expanded clay on the bottom (roughly speaking in one pebble), poured water to the bottom up to half of the expanded clay. Also in the greenhouse there is a glass of water in which I placed an aquarium compressor tube with a spray stone. Humidity is 95% minimum as the hygrometer does not show above 95%. Temperature 23.5-24.7 degrees.
4th day after exposure to the greenhouse (13th):
A lot of white dots (seals) appeared on all the cakes.
5th day in the greenhouse:
THE FIRST mushroom has already APPEARED, so far it is only a few millimeters in size, but I still managed to take a photo:
6th day in the greenhouse:
There are already a lot of babies, and the first one has grown quite a lot in one day.
Many keiki began to grow on the sides; I took the kuiki out of the jars and from a large container:
As of today, everything is going well, I’ll post today’s photos in the evening. Modified on August 16, 2021 by GribGerasim
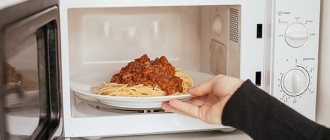
Sterilization together with workpieces
This method is the most popular among many, as it saves a lot of time. To do this, prepare the jars, fill them with the necessary products for preservation, add a little water and put the filled dishes in the microwave for 6 minutes, but do not close the jars with lids. After sterilization, all that remains is to take out the jars with the preparations, pour brine into them and roll up the previously sterilized lids.
How to sterilize jars in the microwave
First of all, the jars need to be properly prepared. They are washed thoroughly so that no dirt or detergent remains on them (you can even use soda). Then you need to dry the containers and check them for chips and cracks.
To save a lot of time on the sterilization process and save yourself from unnecessary hassle, you can use a microwave oven. You can safely place glass containers in it. The main thing is not to do this with lids.
Three sterilization methods can be used in a microwave oven:
- wet (jars of water);
- dry (jars without water);
- with blanks.
Let's look at each of these methods.
How and how long to sterilize screw, screw-on, nylon sealing caps?
Sterilization options:
- Depending on which lids you use, the sterilization method is selected. Now there are a lot of methods that involve the use of new fashionable devices, mainly multicookers, steamers, and microwaves. Yes, indeed, ordinary plastic lids, that is, nylon or glass, can be easily sterilized in the microwave. To do this, fill a large bowl halfway with water, place the lids in it and place in the microwave for a few minutes. The same manipulation can be repeated on the stove. Thus, as a result of boiling water, the lids are disinfected.
- Another disinfection option is the use of chemical reagents. For these purposes, use a weak solution of potassium permanganate. The water should be light pink. Use a solution of furatsilin or medical alcohol. These reagents are absolutely harmless to the body in small quantities and do not require exposure to temperature. This will prevent the rubber from melting, which will not contribute to the destruction of the gasket.
- Typically, tin lids without rubber bands can be safely sterilized in the oven. This method is ideal if you sterilize jars using this method. That is, jars are placed on the grill itself, and a metal baking tray with lids placed evenly on it is placed underneath. Thus, the lids need to be sterilized for no more than 10 minutes. Heating up to 150 degrees in the oven is allowed, no more. Please note that lids with rubber bands cannot be sterilized this way because they will simply melt. Therefore, if you have tin lids for sealing using a special key, we recommend removing the rubber bands from the lids and then sterilizing them separately by immersing them in boiling water.
Sterilization of dishes