/Accessories and decor/Decoration/
Is your old refrigerator still functional, but very worn out and rusty in places? Or maybe it seems to you that this large metal “box” does not fit into the interior? Or do you just want to add a little variety to your kitchen? In this material we will talk about 8 ways to decorate a refrigerator, from DIY painting to decoupage, and also present 80 photo ideas for original modifications.
Method 1. Painting with slate paint and painting with crayons (+ master class)
The slate-coated refrigerator door is an ideal place for notes: shopping and to-do lists, recipes and reminders, messages for household members and cute notes. And, of course, it’s very convenient for children to draw on such a “board” while mom cooks. To turn your refrigerator doors into whiteboards, you can choose one of the following four methods:
Method 1. Painting with slate paint. This method is somewhat more complicated than the others and, moreover, it eliminates the possibility of returning the surface to its original appearance. But you can paint not only the doors, but also the entire body of the equipment with slate paint, and the coating itself will be more durable.
Method 2. Finishing with chalk wallpaper. Chalk wallpaper is easier to work with, and most importantly, it can be peeled off without leaving marks on the surface of the equipment. However, the coating is not very durable and needs to be changed periodically. In addition, it is more difficult to use chalk wallpaper to decorate rounded doors, corners, and to go around handles, displays, and protruding parts when gluing. If you want to cover the entire body, the coating will have visible seams. For this reason, it is best to decorate only the door or part of the door with chalk wallpaper.
Method 3. Attaching a magnetic slate board. Such a board can be mounted and dismantled as easily as one large magnet, and you can not only draw on it, but also attach small magnets. Most often, ready-made magnetic boards are not too large, and it is possible to purchase a large panel only to order.
Method 4. Attaching the slate board to neodymium magnets. This method is good because it allows you not to paint the refrigerator and, if desired, you can easily remove the chalk board.
How does such a large chalk board hang on the refrigerator? The secret is simple - several neodymium magnets are glued to its back- How does such a large chalk board hang on the refrigerator? The secret is simple - several neodymium magnets are glued to its back
Next, we will tell you how to decorate your refrigerator with your own hands with a removable slate board with a frame as in the photo below.
Please note that the refrigerator does not have its own handles; its doors open using handles screwed to a chalk board
What you will need:
- Thin sheet of plywood (3-6 mm);
- Slate paint, primer (preferably), paint brush/roller, ditch;
- Moldings for framing boards;
- Jigsaw or hand saw;
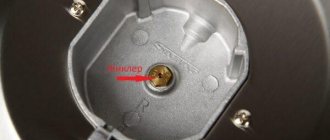
- Neodymium magnets with holes for screws (the price of one magnet is about 80 rubles, their number and adhesion strength depend on the weight of the board).
This super magnet, the size of a ruble coin, can easily hold 3 kg of weight.
- Screwdrivers (according to the number of magnets), screwdriver;
- Stickers on furniture legs (they are needed to avoid scratches on the surface of the doors, as well as chips on the magnets themselves. Such stickers are sold in Ikea and hardware stores. If desired, you can glue pieces of thin rubber or fleece-type fabric to the magnets);
- Furniture handle for each board/door and screws for fastening.
Instructions:
Step 1. We measure the parameters of one or two refrigerator doors.
Step 2. Cut boards from a sheet of fiberboard exactly to the size of the doors.
Step 3. Paint the board with primer and wait for it to dry. Next, apply the first layer of slate paint, let it dry, apply the next layer and again leave it for the time recommended by the manufacturer. Finally, apply a third coat of paint (optional).
Step 4. While the paint is drying, unscrew the original handles of your refrigerator.
Step 5. We cut and install the moldings on the board (you can use wood glue). If desired, the moldings can be painted.
Step 6. Now we glue a protective cover on each magnet, then screw all the magnets onto the back side of the board. Be careful and strictly (!) follow the rules for working with neodymium magnets.
Neodymium magnets are small magnets, but very powerful. They are sold in special online stores in a variety of shapes, sizes and capacities (adhesion strength is indicated on the packaging). For our project, flat magnets are suitable so that the gap between the board and the door is not too large. The main thing is that the total adhesive force of the magnets exceeds the weight of your board twice (!), otherwise it will slide down.
Step 7. Hurray! The board is ready. Now we attach furniture handles to it.
Step 8: Now it's time to install the board(s). Try opening each door by pulling the handle, if the board doesn't move and the door opens easily then your project is complete. If you feel that the board is not magnetized to the door tightly enough, add a few more magnets.
See also: We make refrigerator magnets (and not only) from improvised, waste and natural materials
Choosing a painting method
Having chosen the coloring composition and clearly defined the purpose of painting, we move on to the question of how to paint an old refrigerator. We are talking about processing methods. At this stage, it is important to prepare a certain set of tools.
Pay attention to: Painting walls with water-based paint: surface preparation, choice of paint and step-by-step instructions for painting
Roller or brush
You can repaint a home refrigerator a new color using a brush, but the tool paints a small area in one motion, so the processing will take a long time. If handled improperly, a brush leaves streaks behind. Therefore, you need to carefully dip the tool into a container with paint and varnish, taking only a small amount of the composition. Subsequent layers are applied on top of those that have already dried; rushing is unacceptable. It is convenient to use a small brush to treat hard-to-reach areas, and for the front side and sides it is better to use a roller of a suitable width. A roller and brush are suitable for painting with acrylic paints. This composition will allow you to apply a design to the facade, and varnish will help fix it. You need to paint with tools in one direction; it is better to work while standing. You can protect a painted refrigerator with automotive varnish by spraying it according to the instructions for the dried paint.
Roller and brushes for painting
Spray bottle
A sprayer will also be a useful tool when painting refrigerators. When spraying, the painting speed increases, so updating the surface of an old refrigerator will not take too long. When working with a spray bottle, it is convenient to combine colors by separating areas on the outside of household appliances with masking tape. It leaves practically no traces behind, the remnants of the adhesive layer are easily removed. Regular tape will not work for this purpose. Pre-prepared stencils will help you decorate a plain surface in an original way, and a spray bottle will simplify the implementation of ideas. During operation, you should disconnect the unit from the power supply. Moreover, this must be done regardless of the chosen processing method. Vinyl stickers can be an additional decoration for equipment for cooling and freezing food.
Electric sprayer
Method 3. Film or magnetic panels with photo printing
Want to turn your refrigerator into a realistic phone booth, a retro soda fountain, or a bottle of your favorite drink? Or maybe you just want to put a beautiful photo of yourself on your door? Then your choice is vinyl film or magnetic vinyl (magnetic panel) with photo printing. Both coating options can not only decorate the refrigerator, but also protect its facades from scratches and dirt.
Decorating a refrigerator with film with photo printing
- Film with photo printing differs in that it is glued by smoothing it manually or under the influence of warm air (at home this is done with a hairdryer). The latter easily fits even on rounded doors and corners of the refrigerator. Both types of film are suitable for decorating the entire body of equipment.
How to glue a sticker with photo printing on the refrigerator with your own hands? The first step is to degrease the surface with any degreaser or alcohol solution. The handles on the door must first be removed, and other protruding parts should also be removed. Then the film is carefully applied and simultaneously smoothed with some flat object (for example, a bank card), bubbles and folds are smoothed out. Next, the film is folded along the edges, also smoothed, and the excess is cut off with a stationery knife. Finally, the handles are screwed into place.
- Magnetic panels are flexible sheets of vinyl 0.5 mm thick with a magnetic back side and photo printing on the front side. Essentially, these are just large magnets that are made exactly to the size of the doors (but no more than 60 cm in width). Most often, doors are decorated with magnetic panels, but they can also be used to decorate the sides of the refrigerator. Magnetic vinyl is easy to install and remove without leaving any traces.
DIY refrigerator decor
Having decided to transform the appearance of the refrigerator, you need to carry out preparatory work. First of all, decide how much money you have; perhaps some stylistic decisions are beyond your means. Choose a decoration method that you are able to implement. Don't take on too much, a damaged refrigerator is not a cheap pleasure.
The end result of your efforts should be consistent with the overall interior design. It would be a good idea to familiarize yourself with several master classes before starting work.
The next step is to create a graphic sketch of the future masterpiece, think it over carefully, write down a list of materials necessary for the work, and now it’s time to buy everything you need. Before starting the decorating process, the refrigerator must be turned off, defrosted, washed, and dried. Clean off the old paint and degrease the surfaces on which the color will be applied.
Decoupage
Working with the decoupage technique, which involves pasting over pre-cut designs, requires some skill, so you shouldn’t try to make an expensive thing with your pen. Experience in this matter is highly desirable. When choosing a suitable pattern, make sure that the color scheme does not deviate from the overall kitchen color scheme. Special decoupage napkins can be bought at a handicraft store; designs are offered here to suit every taste. If you don’t find a suitable print, you can easily create it in a graphic editor; all you have to do is print it.
When printing an image from a file, use only laser printing techniques. Inkjet printer ink will blur into ugly spots when exposed to moisture.
The top layer with the pattern is separated from the decoupage napkin and glued on using liquid water-soluble glue; regular PVA will do. After drying, you need to cover the image with a special varnish in several layers. With ordinary paper, things are more complicated - the picture is covered with several layers of acrylic varnish and dried. Then they allow the paper base to acidify in water, carefully clean it off by placing the workpiece on a lined absorbent napkin with the image down. The result of the manipulations is a thin film with a pattern, which is glued to the decorative object.
Stickers
The process of applying stickers does not need a detailed description. If the stickers you purchase are small, and the interior is not pretentious, then your children can also handle their application, it will turn out fun. Plus, it's another way to have a great time together. Just remember to clean the part to be decorated from any dirt.
To avoid the appearance of bubbles under the surface of the stickers, it is better to apply them on a flat surface, without large dents or chips.
It is better not to use this technique to decorate too old equipment. If you plan to apply a more complex sticker, you need to be a little more careful. It is better to apply the sticker by removing the base gradually, smoothing out any imperfections as necessary.
Do not forget about harmony with the overall interior:
| Loft | Strict monochromatic motifs are suitable. |
| Provence | Graceful floral motifs, view from the window of a lavender field. |
| Rustic | Poppies and a wicker fence will become the highlight of the kitchen. |
Artistic painting
Having minimal artistic talent, you can try your hand at artistic painting. The set of materials is minimal - acrylic-based paints, several brushes for painting. The outline of the future image is drawn onto a grease-free background using a lead pencil. Its complexity depends on the richness of your imagination and level of skill - from simple ornaments, funny cats, dogs to landscape compositions and still lifes that are striking in their realism.
For those who master complex types of strokes, a good solution would be to paint with motifs of the national style - Gzhel, Petrikov, Khokhloma. Now all that remains is to paint the preliminary sketch with acrylic paints, apply a protective layer of varnish on it, so the painting will not be erased prematurely. Such a “refrigeration” picture becomes a real work of art.
Airbrush
Due to the complexity of execution, this technique is difficult to recommend as a home decorating idea. Only a professional can decorate household appliances using airbrushing in a paint shop, since the work uses professional equipment for applying paint under pressure. It would be a stretch to classify drawing using aerosol cans and a pre-prepared stencil as amateur aerography. In this case, it is enough to prepare or download a ready-made stencil of the design you like, and cut out the contours with a stationery knife.
Using adhesive tape, attach the sheet with the stencil to the surface, and carefully spray the paint in an even layer. After removing the stencil, use a thin brush to correct the contours of the design or paint it in a contrasting color. By successfully combining several stencils and paints of different colors, you get a simple but attractive composition.
Film
Pasting with self-adhesive film is technically more difficult than applying a sticker. There are several tricks that guarantee a really good result. It is worth cutting out the contours with a margin. The hand can always tremble, the film will slide off, but a sufficient supply will prevent an empty area from forming. All irregularities must be removed, the surface must be perfectly smooth, so an additional layer of metal primer is applied. There should not be the slightest greasy stain left on the surface.
The film is glued in stages from the center to the edges. At the same time, inclusions of air are removed with your hand and a soft spatula. You need to be very careful to ensure that the film lays flat and without wrinkles. When the film is pasted, the excess is removed with a stationery knife. The edges are pressed tightly. A responsible approach to the preliminary preparation of the surface to be glued ensures an attractive, defect-free appearance and long service life of the self-adhesive film.
Magnets
Collections of various magnets are a decorative idea that is almost 100% likely to be found on any refrigerator. It doesn’t matter what model, what size the unit is, where it is located - in the kitchen, in the hallway, in a cramped dorm room, magnets will be the most universal option to hide minor defects. We will not dwell on the little things that are found in every home - roundels with views of cities visited, souvenirs brought from the sea. Such magnets serve rather as a pleasant reminder of a vacation without any particular artistic value.
Creative people prefer to make magnets with their own hands. The materials used for this craft are polymer clay, wood, and salt dough. Needlewomen often embroider magnets with a cross on plastic canvas, sew from thick fabric, felt, and felt a variety of figures from wool. For example, the symbol of the year - Monkey, Snake, Rooster - will be a wonderful decoration. A small magnetic base is glued to the finished product.
Organizer
In large families with a lot of daily worries, the refrigerator is used as an organizer and a way of communication. On a magnetic board you can write good wishes to family members, remind about urgent matters, make a shopping list, and today's menu. Just cheer everyone up by drawing a funny face. Magnetic boards are produced in a variety of shapes, the sizes can be miniature, impressive - for those who like long letters. In order to organize family life, notepads with spring pens, tear-off calendars, and stickers with reminders are attached to the door.
If you want to please your children, turn the facade into a blackboard; a special coating is offered in hardware stores. All reminders can be left here, although this option for designing household appliances is easily soiled. Business people will appreciate the electronic magnet. The gadget is designed for storing short videos and images. It stores a list of today's tasks, a built-in alarm clock, and a calendar. Housewives will find a cooking timer useful.
Method 4. Painting in a bright color, matching the headset or walls (+ master class)
You can update an old refrigerator or fit appliances into the interior simply by painting it with metal paint. The main thing here is to choose the right color.
- If you paint the refrigerator to match the wall or cabinetry, it will seem less bulky. This technique is especially good for small kitchens.
- If the interior of your kitchen seems too boring to you, then the refrigerator can be painted in a very bright color.
- In a kitchen interior in a retro, country or Provence style, a refrigerator in red or pastel color - powder pink or soft blue - will look great.
The best and easiest way to paint a refrigerator with your own hands is with spray paint. Ideally, it should be a particularly resistant alkyd enamel or acrylic paint for metal. Canned paints will also work, but in this case it is important to use a quality paint brush to achieve a perfectly smooth finish.
Instructions:
Step 1. Lightly sand the surface to remove the gloss. If there is rust or chips somewhere, then we also remove them and smooth them out with sandpaper.
Step 2. Clean and degrease the surface with an alcohol solution.
Step 3. Use masking tape to cover everything that we want to protect from painting; cover the refrigerator compartment with film. Don't forget to lay film or newspapers on the floor and open the window.
Step 4. Shake the can well and begin to spray the paint in an even thin layer and let it dry, then apply the second and third coat (if necessary). Remember that instead of one thick coat of paint, it is better to apply two thin ones.
- To improve the durability of the paint and make it easier to apply, it is advisable to first coat the surface with a primer.
Step 5. Cover the surface with matte or glossy varnish, which will make the new coating more durable and moisture resistant.
Decor ideas
Whether it's a rarity with rounded sides and a strange-looking handle or a brand new beauty in the high-tech style, there is always a way to decorate the refrigerator with your own hands:
- The cheapest way to hide body defects or simply decorate the facade is with stickers, fortunately there are a great many of them on sale;
- Small dents can be hidden under decorative magnets or a magnetic board;
- If you love ornaments, intricate geometric abstraction, buy colored tape. The lines are guaranteed to be smooth; no one would think that the bright, intricate pattern was created by an amateur artist;
- The easiest way is to stock up on high-quality paint of a suitable color and repaint it with an even layer of one tone. Such a solution does not require special courage from the creator - it can be repainted instantly;
- You can create an artistic masterpiece on the door using airbrush;
- The scratched case is perfectly hidden under the self-adhesive film, the main thing here is to be careful when pasting;
- Decorating with decoupage will require a little more skill, but the result can be original.
Method 5. Hand painting (+ video tutorial)
Hand painting can turn a refrigerator into a unique art object or simply into a very nice and “animate” piece of furniture. You can paint the technique with paints and brushes, special acrylic markers or airbrushes.
It is better to trust complex compositions to professionals, but you can draw a simple picture with your own hands, use a stencil or masking tape (to create stripes). Here is a large selection of photos of simple ideas for painting a refrigerator that even a beginner can implement.
Painting a refrigerator using a stencil
Painting a refrigerator using masking tape
From this video tutorial you will learn how to decorate an old refrigerator with your own hands using a stencil in the form of a lace tablecloth.
How to decorate an old refrigerator
From an old refrigerator, if you change it - restore it and decorate it with wallpaper, colored film, or stencils, you can make quite a decent thing. The most budget-friendly design is using wallpaper. Perhaps you have pieces of wallpaper left over from renovations - they may come in handy.
Another way to change the appearance of old equipment is to decorate and cover the refrigerator with self-adhesive film. You can buy or make stencils yourself - they can be used to decorate problem areas on the surface (scratches, dents, and so on).
Decor with self-adhesive film
Decor with stencils
In the video - the decor of a large old refrigerator under a telephone booth:
(Rate this article)
Method 8. Decor with self-adhesive film
Remodeling a refrigerator with self-adhesive film is a budget-friendly and simple alternative to photo printing and painting. All you need to do to change the design of the refrigerator: degrease the surface and remove the handles, glue the film, simultaneously leveling it with a non-sharp flat object, then wrap it around the edges, trim off the excess and return the handles to their place.
- Unfortunately, self-adhesive film, unlike film with photo printing, does not have a lamination layer and wears out quickly. In addition, it fits worse on uneven and rounded surfaces.
Support the project - share the material with your friends on social networks:
Prepare the refrigerator for painting
Methods for painting surfaces are fundamentally different from each other. It all depends on what kind of result you want to get: a plain surface, reliefs, patterns or thematic paintings.
When painting a refrigerator in multiple colors, use paint of different shades, but from the same brand, so that you apply the same number of layers. Photo: happymodern.ru
There is nothing easier than painting the surface of the refrigerator in one color. Choose a shade, prepare your brushes and start updating your old refrigerator.
It is important to prepare your work surface well:
| Step 1: Sand If there are cracks, chips or irregularities, the surface must first be sanded. Actions can be performed with a drill or sandpaper |
| Step 2. Putty Deep dents and scratches need to be puttied before painting. |
| Step 3. Degrease Painting the refrigerator is permissible only after degreasing the body. You can use detergents or any solvents |
| Step 4: Remove hardware All removable elements must be removed from the refrigerator. If there are parts that will not be painted and cannot be removed, cover them with masking tape |
There are two ways to paint the refrigerator body:
Method 1. Brush or roller. Depending on the size of the equipment, select the size of the brush. Disadvantage: It is difficult to achieve uniform coloring.
Method 2. Aerosol paint. Guarantees instant and uniform application. The disadvantage is that a spacious work area is required, since the mixture is sprayed around the equipment and gets on the floor, furniture and walls. It is better to paint outdoors using a respirator to avoid an allergic reaction from inhaling paint fumes.
Wood imitation
You can update your old refrigerator so that it blends in with the rest of your kitchen decor. If the cabinets in the kitchen are made of wood, then a white refrigerator will stand out from the general background, and not everyone can afford a built-in one.
In this case you will need:
- Wallpaper imitating a wooden surface.
- Plywood.
- Paint to match the cabinets.
- Metal color paint.
First, you need to wash and dry the refrigerator thoroughly. Then cover it with textured wallpaper (they can be replaced with self-adhesive film). Decorate the unit door along the upper edge with plywood overlays. Paint them to match the color of the kitchen furniture, and paint the handles with metallic paint.
You can choose any color scheme of wallpaper (film) and paint, it all depends on your imagination and the general style of the kitchen room. The refrigerator does not have to match the color of the rest of the furniture; it can be combined with it in a different shade and become an interesting accent.