A small part of any gas stove, without which it cannot work properly, is the nozzle. They have to be changed very rarely, and only in the case when the incoming blue fuel is changed to liquefied from cylinders instead of stationary gas. You can replace the nozzles in a gas stove with your own hands, only for this you need to know all the nuances of dismantling.
The principle of operation of the nozzle
The classic solution for kitchen stoves is the gas supply system. It includes the burner, transport channels, shut-off valves and, in fact, the burner itself. Regardless of the model type and price segment, these elements remain unchanged.
The volume of supplied gas and its pressure fall on the shoulders of the shut-off valve and burner. This tandem is most often called a jet and an injector, where the first is part of the second. Both liquefied gas - propane (in cylinders) and natural gas - methane (pipeline) can be used as fuel.
For correct operation of the equipment, clearly adjusted gas supply proportions are required. That is, fuel must be supplied at a certain speed and in equal shares. This is precisely why a jet is needed in the system.
In addition, it is necessary to select injectors taking into account the type of fuel. For example, an element designed to work with propane will smoke dishes and emit harmful substances if installed in a system operating on methane.
To maintain the required volume of gas and pressure, an adjustable hole is provided in the nozzle. On new plates, the elements are calibrated to optimal/universal parameters. The latter are calculated based on the power of the equipment and the maximum rate of fuel combustion.
System Features
Jets are very similar to regular bolts: a hex head and threads. Among others, the element is distinguished by a small hole in the central part. The diameter of the nozzle is calculated based on the type of gas, the power of the stove and the characteristics of the fuel supply system.
Jets for gas stove
With equal power ratings of equipment for propane, the hole size is slightly narrowed, while for methane it is noticeably wider. If you install nozzles for natural fuel on a burner running on bottled gas, the tongues will be much longer than they should be. On the plus side, a specific noise will appear, and the flame will turn orange. Replacing the part with an element with a narrower nozzle will help here.
What kind of gas is in household stoves? Jet for a gas stove: replacement features
The nozzle for a gas stove is a very important element that requires replacement from time to time. Most often, this procedure is performed if it is necessary to change the type of fuel. For example, if the old stove should be taken to the dacha and connected to a cylinder stove, although it has always been running on natural gas, then the nozzles should be replaced. If this is not done, the device will begin to smoke heavily and fuel consumption will be much higher. The fact is that the presented element has a different cross-section, which is intended for one or another type of flammable substance.
If the nozzle for the gas stove is not replaced and it is left in the apartment, then the burners will work very poorly. The first signs that a new nozzle needs a new nozzle are smoking or low heat. The element is a small bolt that has holes of different diameters in the center. For example, for propane a nozzle with a large hole is required, for propane - with a small one.
Replacing the nozzle for a gas stove is quite simple, but during operation all safety rules must be followed: the supply of flammable substances must be turned off. Now you can remove all the burners and use a special wrench (7 mm) to unscrew the nozzles. This must be done one by one. Each element has a corresponding number.
In order to replace jets for gas stoves in older models, you must remove the top part of the device. There is no other way to unscrew the bolts. The process of assembling the plate is done in reverse order.
In addition to nozzles, the device is equipped with special nozzles that are installed in each burner. Thanks to them, the gas is atomized. Gas stove nozzles have different diameters, depending on the size of the burner. In addition, the size of the presented element depends on what kind of combustible substance is used. If the type of gas changes, then new injectors should be installed.
Modern stove models can be sold with two sets of blowers. It should be noted that not all injectors can be easily found on sale. Although, if your stove is from a well-known manufacturer and you go to a specialized store, then there should be no problems finding it. If the purchased elements do not fit, then you should not try to reduce or increase the diameter of the holes yourself. This can only be done efficiently in a factory environment. In addition, you may make a mistake with the angle of inclination of the passage channel, which will lead to the wrong direction of the gas stream. In the worst case, an explosion may occur.
Read also: Bending thick sheet metal
If stores do not have suitable equipment, then you can contact manufacturing plants or service centers. To replace the injectors you will need a socket wrench. The procedure itself is not difficult. The new elements can then be adjusted.
So, both the nozzle and the nozzle for a gas stove are mandatory elements, without which the device will not be able to work. It is advisable to choose those spare parts that are intended specifically for your device.
A small part of any gas stove, without which it cannot work properly, is the nozzle. They have to be changed very rarely and only when the incoming blue fuel is changed to a liquefied version from cylinders instead of stationary gas. You can replace the nozzles in a gas stove with your own hands, only to do this you need to know all the nuances of dismantling and visually distinguish the nozzle from other parts.
All modern gas stoves can operate on natural or main gas, as well as from a replaceable cylinder containing liquefied gas. When propane is used, it is necessary to change not only the jets on the stove, but also the gearbox.
The jets are made in the form of a small bolt with a thread and a hole in the head - through it gas is supplied to the stove burner. Next, in the burner it is mixed with air, this mixture is ignited, an open flame is formed, on which food is cooked.
Nozzles are available in two types: for natural gas
the hole is slightly larger in diameter, and the part itself is shorter and visually different;
For liquefied gas,
bolts with longer threads are made.
If you need to replace one such part on a gas stove when it is not working quite correctly, then experts advise replacing the entire set at once - you don’t know when the next one will fail you.
This is what the jets look like - a complete set for the Hephaestus gas stove:
Jet sets
Almost all jets have the same slot size - 7 mm. On large industrial equipment or, conversely, on mini-plates, you can find non-standard format parts. The length of the jet also depends on the type of fuel. Elements running on liquefied gas are slightly longer than those running on natural gas.
Recommended hole diameters for different types of fuel:
Most manufacturers equip their models with universal nozzles that operate on regular natural gas. As a rule, models from the mid-price and premium segments allow you to regulate this moment, that is, switch the fuel type to propane and back using a nozzle. If this is not possible, then the corresponding set of jets can be purchased at almost any specialized store.
The elements themselves are made of brass. They can easily withstand severe temperature changes, are resistant to corrosion, and at the same time durable. In addition, during cooking the jets practically do not heat up. On old-generation equipment, these elements were combined: one part was made of brass (the nozzle itself), and the other part was made of aluminum (the base into which it is screwed). In this case, when replacing, you must be careful not to strip the threads.
As for the thread pitch, in the absence of documentation, determining this is not so difficult. In stores you can find two standard sizes - 0.75 and 1.0 mm. With rare exceptions, there are non-standard options, but such exotic ones are suitable for the same specific equipment, not intended for domestic needs.
Almost all models are from 2009. and were previously equipped with jets with a pitch of 1 mm. Modern equipment is equipped with elements with a thread of 0.75 mm. It’s easy to find out exactly what pitch the part has: apply the old jet to the ruler. If the thread clearly follows every millimeter on the scale, then the pitch is 1 mm, and if it lags, then 0.75 mm.
Important! When switching equipment from methane to propane, you will need not only new nozzles, but also a gas reducer.
Replacing jets for gas stoves for bottled gas
Jets for gas stoves
Modern gas stoves usually operate on mains (natural) gas and liquefied gas, i.e. balloon. Whatever gas your stove runs on, high-quality jets are required for its normal, full functioning.
The jet is a very important component of your gas appliance, without which it is impossible for gas to enter the burner, i.e. The operation of a gas stove, a Neva or imported gas water heater, as well as a gas boiler is also impossible.
Jets (nozzles) are made in the form of a small bolt, in the upper part of which there is a hole in the middle. It is through this hole that the gas enters the burner, mixes with air, and when this air-gas mixture is ignited, a flame is formed on which food will be cooked.
Jets for gas stoves differ in their purpose:
- for natural gas
- for bottled gas (liquefied)
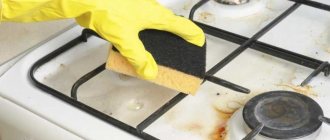
How to tell if your stove's jet is working well
Jet for gas stove
In what cases does the device for supplying gas to the burner require replacement?
Imagine that in the summer you are leaving for the country, taking with you everything you need for a normal life away from the city, including a gas stove. But here’s the problem: the gas main does not go into your house and you have to use bottled gas.
Jets for different types of gas differ significantly from each other, so replacing them in this case is simply necessary. By the way, as for the hole located on the bolt, the diameters of these holes differ and their size depends on the type of gas (on bottled gas, the nozzles have a narrower hole, because the pressure of the gas coming from the cylinder is higher than that of natural fuel), and on the power of the burners themselves.
Read also: External lighting of a residential building
Each burner has its own jet attached, and even by the size of the burner you can already determine its power. The larger and more powerful the burner, the greater the amount of air-gas suspension it needs to operate, so the larger the burner, the wider the diameter of the nozzle hole.
Let me give you one example: if your gas stove runs on natural fuel, and this is, as a rule, NG G 20 gas (i.e. 20 mBar), then the smallest burner will require a jet with a hole of 0.75 mm, a medium burner - 0 .92 mm. and the largest is 1.15 mm. A powerful oven burner will operate smoothly and without problems if a jet with a hole diameter of 1.20 mm is attached to it.
When using liquefied gas, as I already said, nozzles with a narrower opening diameter are required. Most often, conscientious manufacturers of gas stoves sell their products with a set of jets for different types of fuel, but if this does not happen in your case, you will have to purchase this set yourself, especially since they are sold in many building materials stores.
Jets for bottled and natural gas
How much do they cost and where to buy jets?
For those who would like to save on their own safety, I would like to give an approximate cost of jets for gas stoves of various brands. If your home has an Ariston or Indesit stove or heater running on liquefied gas, then the nozzle for such a stove will cost you 200 rubles (for one set or set).
For a Zanussi stove running on natural gas, such a set will cost 230 rubles. A set of jets for Belarusian Hephaestus costs 150 rubles, but for a set for a Gorenje , you will have to pay about 700 rubles.
You can often find jets (nozzles) on sale in specialized stores that sell gas equipment, gas hoses and spare parts for gas stoves. If they are not in stock, you can order them directly from the manufacturer. Do not forget that the same devices are not suitable for domestic Russian-made stoves and imported products, and be sure to take this into account when purchasing them.
Replacing jets yourself
So, you have made your choice, all that remains is the process of replacing the jets (injectors). Here, of course, I would advise you to seek help from a specialist, but knowing that our people prefer their own hands to any master, I will say that this matter is not at all difficult. You just need to strictly follow the safety requirements necessary when working with gas appliances.
Therefore, we begin replacing the jets by shutting off the gas pipe. Then we remove the burners, the stove table cover, and begin to unscrew the old ones using a hex key, and immediately screw in the new ones in their place. As you can see, nothing complicated. If you decide to change devices in the oven, then first remove the burners - upper and lower and continue working according to the same scenario as when replacing jets in a gas stove. Let's watch the video.
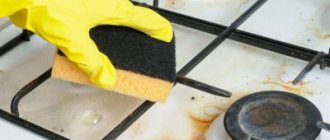
Possible injector malfunctions
Jets are quite reliable elements and can last for many years. They are changed, as a rule, in two cases: a manufacturing defect or a change in fuel type. For normal operation of the parts, it is enough to simply clean them of dirt.
Factors indicating clogged injectors:
- flames with a red-yellow tint;
- the burner often goes out;
- The flame intensity changes periodically;
- The burner is difficult to light or does not light at all.
Part replacement is required only when the flame comes off the divider and is poorly controlled by the fuel supply system. Most often this is a factory defect of the injector. If a similar problem occurs on all burners, then the gearbox is most likely faulty.
Jet maintenance
For most popular models from well-known brands, there is no need to remove the nozzles for subsequent cleaning. It is enough to remove the burners to open access to contaminated parts. In some cases, it may be necessary to dismantle the hob if it is a closed type.
A regular needle or copper wire is suitable for cleaning the nozzle. We pass the tool into the hole and rotate it around its axis. When the needle has reached the bottom, turn on the gas and only then remove it. Thus, the jet from the nozzle pushes dust and fine dirt out. Two to three seconds is more than enough to clear the air.
Cleaning the nozzle
If there are problems with on-site maintenance, or the design of the stove does not allow for this, the nozzle must be completely removed, cleaned, rinsed and dried. In a good half of cases, the detailed procedure is described in the operating instructions for the equipment.
Required tool:
- jets – 8 mm wrench (7 mm for propane);
- burner fastening – 14 mm;
- pipeline nuts – 17 mm.
On some specific slabs, the fastening may differ from that indicated. As a universal option, you can use a wrench with a variable head diameter.
The principle of operation of a gas stove
From the gas main or from a cylinder under pressure, gas is supplied to the gas pipeline, which is an integral part of the gas stove. Next, the fuel passes through the nozzle, enters the body of the burner, where it mixes with air and only then ignites, passing through the dividers.
Main gas differs from bottled gas in terms of pressure parameters - this is the main and most common reason why nozzles need to be replaced. In other cases, most often you can limit yourself to simple maintenance without resorting to replacement.
Changing injectors
Working with gas appliances always involves extreme caution - all steps should be carried out strictly according to the instructions. This is especially true when it comes to the use of physical force: one excessive force, and replacing a nozzle turns into a major overhaul for your gas stove.
Replacing jets is a fairly simple operation, but if you have absolutely no skills in working with such equipment, it is better to invite a service specialist.
The basis for successful DIY gas stove repair is strict compliance with all safety requirements. First, let's prepare a simple set of tools. You will need a Phillips screwdriver and a set of open-end and ring (star-type) wrenches:
- for jets - 8 mm (for liquefied gas - 7 mm);
- burner nuts - 14 mm;
- The tip of the oven pipeline is 17 mm.
We shut off the gas supply to the stove and prepare a table for storing various parts that have been removed for the time being. All photographs were taken during the dismantling of the Brest 300 slab; for other products, the replacement of such parts will not differ much.
Stove burners
- The cooking panel has standard devices, as shown in the photo. To get to them, you need to remove the grille.
- Now carefully remove the dividers and remove the burners from their sockets.
- To get to the jets, we need to remove the burner table cover, which is secured with screws.
- Different models have specific fastenings; we only had to unscrew two screws, and after that the cover can be lifted easily.
- Our gaze revealed two strips of metal - traverses, on each of which the burner bodies are reinforced, which have the same design, and the difference is only in the length of the aluminum pipeline. At the end of this tube there is a nozzle into which blue fuel is supplied, and then through a hole at the end of the nozzle it exits into the burner leg, mixes with air and is supplied to the divider. If the divider holes are clogged, then the flame does not escape from all points - cleaning or blowing of the holes is required.
- The burner body is rigidly fixed to the traverse and holds the entire structure vertically. Here we should make a small digression and talk separately about special devices - there is a myth among users about a unique set of tubular wrenches, with the help of which it is easy to replace jets on any model of gas stove. Anyone, even someone who does not have a technical education, immediately sees that such a key will not fit into the nozzle due to the special structure of the entire structure.
The first photo clearly shows how the nozzle is secured to the pipeline in our case, and next to it are other designs of gas burners from more modern types of stoves, where the nozzles are screwed into the body from above; there is no need to disassemble the table. Such options are much more expensive, but are easy to replace jets. - To release the tip, you need to find a special lock - this is a plate with a slot and a hole in the middle, it looks like a clothespin. We squeeze one side of the clamp carefully, without using force, pull it out of the socket - the tip with the nozzle is free, press the tube and it comes out down from the fastening ring.
- Now you can start replacing. There are two options: pull off the tips from all pipelines and unscrew the jets on the table, or try to remove the jet on the spot. The first is preferable, because the nozzles stick to the tip body so much that it can be very difficult to unscrew them - to do this, it is sometimes carefully clamped in a bench vice. If you are afraid of confusion, then all tips have markings.
- When you pull off the tip, an O-ring remains inside, so when assembling it you need to take it out and put it on the tube. The nozzle thread is not sealed - there is no technical need for this. The rings are also not lubricated by anything, because the internal pressure of the main gas pipeline is much lower than in water pipes.
At this point, the replacement of nozzles on the table is completed, assembly is carried out in the reverse order, but first you need to change the jets in the oven.
Oven nozzle
- We open the lower technical drawer of the stove, and completely open the oven door to the lowest position.
- The nozzle is located behind the left wall of the oven in a special housing into which an arc-shaped burner is inserted. To get to it, you need to pull out the floor, there is a slot for this, pull it towards you, it should come out without resistance. We put it aside.
- We unscrew the two screws securing the burner and remove it from the oven. A hole opens on the left through which gas enters the burner. There is an injector hidden there that needs to be replaced.
- Considering that during long-term operation the nozzle could become strongly stuck to the nozzle body, you should not try to rip it off - if the thread breaks, you will have to buy a new body.
- We unscrew the three screws securing the left side wall of the stove, and move it to the side.
- There is a nut at the end of the pipeline - it must be unscrewed using a 17 mm wrench to remove the nozzle body. It unscrews without any problems.
- To unscrew the two screws securing the housing to the wall of the oven, you need to move the pipeline a little, after that we take out the nozzle.
- We carry out the replacement in a calm atmosphere at the table - the jet got very stuck, so we had to lubricate it with a special product and wait a few minutes.
Assembly is done exactly the opposite, with all precautions.
That's all the nuances of replacing nozzles in a gas stove. You just need to remember that you only need to install your own jet, and strictly according to the markings - for each stove model there are special sets of these small but very important devices on sale.
Required Tools
Replacing jets should be entrusted to gas service specialists who have the necessary knowledge and qualifications and will be able to correctly adjust the gas supply when switching to another fuel. It is not recommended to remodel a gas stove yourself.
If the user decides to change the nozzles with his own hands, he will need the following tools:
- crosshead screwdriver;
- set of open-end and ring wrenches.
How to change nozzles on a gas stove
First, the stove is disconnected from the gas, if it was connected. After this, they proceed according to the following algorithm:
- Remove the top cover of the gas stove by unscrewing the screws to get to the burner.
- Then they find the latch, squeeze its ends and carefully remove it. After this, the tips with nozzles are removed from the traverse with burners.
- The tip is released from the socket and removed from the gas pipeline tube. The o-ring is removed from it and placed on the tube.
- Use a socket wrench to unscrew the jets counterclockwise. New ones are installed in their place.
- Carry out reverse installation. The accuracy of reassembly determines how smoothly the burner will burn.
It is easier to change modern models of gas stoves to use a different fuel. To gain access to the burner, only the grates with burners are removed. Then remove the tips and install new nozzles.
Replacing the jets in the oven is carried out as follows:
- open the oven door and the lower compartment of the device;
- pull out the floor of the oven compartment;
- unscrew the burner fastenings;
- carefully, so as not to break the thread, unscrew the nozzle (it is located on the left in a special housing);
- install a new nozzle and reassemble.
If the jet has become stuck during operation, unscrew the three fastening screws and remove the left side wall. Using a 17 wrench, unscrew the nut and move the pipeline to the side. Then unscrew the two screws that secure the nozzle body to the wall. The stuck thread is treated with WD-40 or kerosene and the nozzle is unscrewed. A new one is installed in its place and the oven is installed in the reverse order.
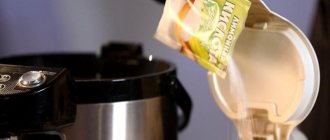
After replacing the nozzles, the stove is connected to a cylinder or central gas supply using a flexible connection. If the equipment is connected to a gas main, one end of the hose is connected to the gas pipe through a plumbing fitting or fitting. The thread of the drive is pre-winded clockwise. An O-ring is inserted into the hose nut. The parts are connected and tightened using a gas wrench. The other end of the flexible liner is connected to the thread of the plate outlet, using flax or fum tape for fastening.
If the device needs to be connected to a cylinder, one end of the flexible hose is connected to the stove nozzle through a fitting and secured with a worm clamp. The other end is attached to the gearbox and also tightened with a clamp. The reducer is connected to the cylinder using paronite gaskets; it must be positioned horizontally. The fasteners are tightened using an open-end wrench.
Then check the tightness of the connection. All connections are coated with a soapy solution and gas is released. If the soap does not foam, then there are no leaks. After this, the gas is lit in the burners one by one. A blue flame without yellow or red tints indicates that the job was done correctly.