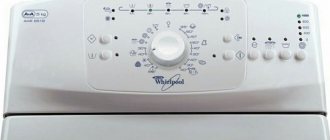
Today, in almost every apartment building you can find a Whirlpool brand washing machine, and more than one. Both assemblies are common in our country: Slovakia and Italy. The latter are bought less frequently and are more expensive, but machines assembled in Slovakia can be found in all household appliance stores.
Perhaps, it was the European assembly standards that helped Whirlpool machines establish themselves as machines of high quality and enviable durability. That is why repairs are rarely required, but if breakdowns do occur, you can often repair Whirlpool washing machines (Whirlpool) yourself.
Typical Whirlpool machine failures
If we thoroughly list all possible breakdowns of SMA, we would be forced to write a whole manual in 10 volumes. Therefore, we will focus only on malfunctions that are typical for this brand.
We've used data from reputable service centers to create valuable instructions for those planning to do their own Whirlpool washing machine repairs.
The most common failures:
- After washing, the water remains in the tank.
- Washing modes freeze, do not start at all, or programs run incorrectly.
- All washing modes are carried out in cold water.
- The SMA leaks in the manhole area.
Important! These seemingly harmless faults may hide serious damage. They need to be eliminated immediately so as not to completely break the SM.
Disassembling a household appliance
A Whirlpool top load washing machine can be accessed from the inside by disassembling it.
A competent analysis begins with the preparatory stage:
- Disconnect the device from the power supply (the plug must be removed from the socket). Remove water from the appliance. Disconnect from the sewer. Pull out the device so that you can approach it from all sides. Drain the remaining water from the tank.
In addition to these measures, you need to ensure that you have tools for disassembling the Whirlpool device, a multimeter for measuring the condition of components and rags. The latter will be needed if the water remaining in the washing machine spills onto the floor. The essence of technology analysis is to gain access to the desired node.
You may be interested in: How to clean grout from tiles
How to remove the cover and disassemble the tank?
The top cover must be removed to access the spa and basket. The work is carried out with the removal of clamps. The top cover slides forward until the latches click.
How to remove the top cover can be clearly seen in the video:
You can watch the video to see how to disassemble the tank:
Parsing from above
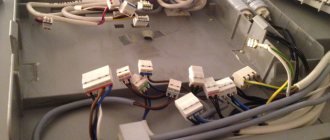
If the priority is the pressure switch or control module, the analysis starts at the top. The control panel is removed carefully so as not to break the latches holding it in place.
A narrow and durable object, for example, a spatula, can help with this, with which you need to lift the control panel. Article at the top. Electrical cables come out from it and are secured with terminals.
To avoid confusion during reassembly, it is recommended to photograph the position of the contacts before disconnecting.
How to remove the control panel and gain access, for example, to the filling valve - in the video:
From below
If the goal is to gain access to the drain pump or motor, the washing machine will need to be literally put in place. This must be done with all precautions as there is still a risk of residual water getting onto the electronic components of the washing machine.
You will also need to remove the left side of the housing to allow easier access to the pump. Before removing the engine, remove the drive belt.
The most vulnerable parts of Whirlpool machines
Based on the problems described above, we can identify the most vulnerable areas of Whirlpool washing machines. Many modern models have a self-diagnosis system that, using a fault code, will tell you which part has failed.
But what to do if the machine does not turn on at all, and there is nothing that could help you find out the cause of the breakdown? Listen to the advice of experienced repairmen, they are sure that the most vulnerable parts in a Whirlpool machine are:
- Thermoelectric heater – heating element.
- The engine and its moving elements.
- Hatch cuff, pipes.
- Controller (control module).
Attention! Whirlpool machines, like any other machines, suffer from blockages. Both filters and hoses become clogged. If you carry out cleaning in a timely manner (3-4 times a year), you can avoid breakdowns of the water drain and fill system.
Top 10 problems with Whirlpool washing machines
Whirlpool top-loading automatic washing machines have the same set of built-in features and modes as front-loading machines. The dimensions of such devices are compact, suitable even for small apartments. The difference is in the design.
Main difference:
- In the detergent dispenser position (located under the lid) In the load mode (at the top) In the control position (at the top) In the form of a basket with valves (opened and closed manually).
The design of the drum of top-loading machines allows, after stopping work, to signal the laundry during the washing process.
Despite the reliability of Whirlpool equipment, theoretically any part of the device can break, and any unit can fail. But the 10 most common faults are listed below.
Spontaneous opening of the valves
If the Whirlpool drum flaps open spontaneously, you should stop working. Otherwise the drum may jam. This situation is most often associated with overload or uneven distribution of laundry in the drum.
Damage to the drum curtains
Whirlpool drum flapper failure usually occurs due to user error and careless handling. In this case, depending on the complexity of the defect, it may be necessary to replace the damaged parts with or without disassembling the tank.
Drain pump
The drain pump is a part that is designed to drain water from a Whirlpool bathtub after washing or rinsing. If water removal is difficult, not carried out or very slowly, diagnostics of the unit is required.
The pump may be broken or clogged. If debris is wrapped around the impeller or a foreign object is stuck in the pump, the pump must be cleaned.
This procedure is carried out during partial disassembly of the housing. Most often, the breakdown is caused by the ingress of foreign objects.
If your Whirlpool impeller is damaged, you will hear the pump motor running. If the engine burns out, there will be no sound. This fault condition can be identified as F03 by the washing machine's self-diagnosis results. The solution to the problem when the pump fails is to replace it; if it is clogged, clean it.
Leaky cuff
Whirlpool top load washing machines also have a rubber coating. During operation - vibration and stress - this part can break and leak water. The defect does not always appear, more often with intense rotation.
You may be interested in: How to use a geyser coffee maker
How to fix this - in the video:
heating element
Heating element problems are common on Whirlpool washing machines, both front-loading and top-loading. Breakage occurs with prolonged use.
Over time, the heating element becomes crusty due to hard water and detergent residue. In addition, clothing lint, granules and small debris settle on it.
Failure of the heating element is manifested by the following symptoms:
stopping work when trying to heat; automatic stunning device (RCD); The cycle works with cold water without heating it.
When trying to heat water, the heating element begins to overload and burns out. To accurately analyze the problem unit, you need to gain access to the heating element and check it with a multimeter.
Crash Whirlpool accompanied by code. This could be F22, F12 or F08. The burnt heating element is replaced with a new one.
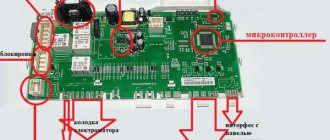
Control module
The Whirlpool control module is responsible for coordinating the operation of the entire washing machine.
Basically this is an electronic board with radio elements. They can burn due to power surges or water penetration. The breakdown is manifested by improper operation of the washing machine.
The problem may affect various nodes. This could be, for example, a missed discharge, a violation of the rotation of the drum, interruption of the cycle at an unexpected moment, etc. At the same time, the device itself shows on the display an error code corresponding to the failure of a specific unit - from F01 to F26.
To diagnose and repair the module, it is removed from the housing. A multimeter and other equipment are used for analysis. Such work requires accuracy and special knowledge, so it is better to entrust the repair of the module to a specialist.
The specialist detects the problem and replaces the burnt elements. If the problem is more complex, the board has severely damaged areas and cannot be repaired, it is replaced with a new one.
Drive belt problems
The drive belt in a Whirlpool washing machine serves the same purpose as in front-loading machines - it transmits rotation from the motor to the drum pulley. The belt may become loose or stretched and begin to slip.
If the belt is tight, the washing machine will run unevenly and will not be able to increase the spin speed. If the belt has slipped out of the pulley grooves and simply fallen, the washer will not be able to rotate the drum.
If the belt loosens the first time, you can re-tension it on the pulley and continue working. But when the situation repeats regularly, it is worth replacing the part. You should also take care that the belt is not tight against the pulley.
If, after replacing the belt, the jump from the pulley repeats, you should pay attention to the drum itself, and especially to the bearing assembly.
You may be interested in: Popular methods for cleaning bronze at home
Bearing wear
The Whirlpool washing machine uses bearings when the drum rotates. These are metal parts.
Problems with them usually begin when the gland loses its tightness and allows water to pass through. With constant humidity and the presence of moisture, the metal begins to suffer from corrosion. As a result, the bearing assembly is destroyed.
This problem manifests itself in noise during the spin phase, and after a while during washing. The drum stops moving smoothly and literally begins to “dangle” in the tank. Even if you wiggle it a little, he will begin to make free movements.
Once you have access to the outside of the tank, you may be able to see leaks on the surface. Also, during operation, the drum jams, “seizes” at the lowest point. Rust can not only go outside the tank, but also into the drum, making things dirty.
Motor brushes
Motor brushes are the parts that are part of the motor. These are elements that physically wear out over time, decreasing in size due to abrasion.
As a result, the brushes cease to perform their functions due to the fact that they have become short. This results in a drop in Whirlpool motor power and the inability of the device to achieve full rotation. With severe abrasion (up to 10 mm or less), the drum stops rotating even during washing.
Such a faulty situation may be accompanied by an engine spark and error F15. The problem is solved by replacing the brushes.
No water supply
If the quality of tap water supplied to your Whirlpool washing machine is poor and contains rust particles and debris, the washer inlet filter may be clogged. It is located where the supply hose is connected.
The solution to the problem is to clear the block. If the water in the system is constantly of poor quality, it is advisable to install a cleaning filter in the apartment. This will prevent clogs in the washing machine.
Water does not leave the tank of the Whirlpool machine
You are probably familiar with the situation when you loaded the laundry into the tank, selected a convenient washing mode, went about your business in the kitchen, then came to get the laundry, and there was a disaster. The machine is malfunctioning: it is full of water and foam, the wash has not finished, the laundry is wet.
You restart the program, but everything is in a circle - the washing program is not executed because the water remains in the drum. This problem is caused by one of three factors:
- Debris has accumulated in the water drain pipe or drain filter.
- A clogged drain hose or a blockage in the sewer system.
- Failure of the electric drain pump (pump).
However, before you devote time to finding the causes of the failure, prepare your SMA for this:
- Turn off the power.
- Manually drain any water remaining in the drum. This can be done quickly using the emergency drain hose - it is usually located near the water drain filter.
- Place a container or place a rag on the floor and waste water will flow out there.
Next, remove the waste water filter:
- Place a cloth or container under the hatch behind which the filter is located.
- Unscrew the plug counterclockwise.
- Clean and rinse the unit under the tap.
- Put everything back in place.
- Twist the drain hose, clean and rinse it, and install it in place.
It doesn't hurt to check the drain for blockages.
To carry out all the steps, you do not need to know how to disassemble a Whirlpool washing machine - this is an easy job that any user can do.
If your actions did not help get rid of the problem, the drainage system is clean, there is no blockage in the sewer, and the washing machine still does not drain water from the tank, it will still have to be disassembled. The real cause of the breakdown may be hidden in the pump and drain pipe.
Important! Almost all Whirlpool models are designed in such a way that the pump and pipe can only be reached from the bottom. You'll have to turn the car on its side.
How to find, check and clean the pump and pipe:
- Remove the detergent dispenser.
- Disconnect the machine from all systems: electricity, water supply, sewerage.
- Turn the SMA over, placing it on the side wall.
- Unscrew the bolts and remove the bottom.
- Arm yourself with a tester and measure the resistance of the pump.
- If you find a problem, change the pump.
- If the pump has nothing to do with it, then proceed further.
- Loosen the clamps of the water drain pipe.
- Remove the pipe.
- Clean and rinse it.
- Reinstall the pipe.
This breakdown is typical for machines with any type of loading. The design of the top-loading Whirlpool washing machine is somewhat different from that of conventional washing machines, but the problem with it must be solved according to the same scheme.
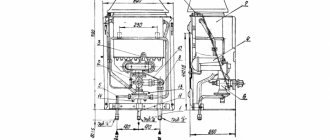
Construction and disassembly of the Whirlpool washing machine with vertical loading
Not only front-facing models are prone to breakdowns. However, repair work is described only for them. We decided to correct this oversight.
Almost all verticals are arranged the same way:
In such machines, bearings and other parts wear out more often, because all components are located close to each other. To repair the problem, you still need to get to it.
How to disassemble the Whirlpool washing machine:
- Disconnect the device from the network and water supply.
- Use a flathead screwdriver to pry the control panel latches. If necessary, remove the wiring chips.
- To remove the top panel, remove the screws from the back. Lift it up, secure it with a ribbon or chain so that the lid does not fall.
- Unfasten the balancing ring latches on the centrifuge. Put it aside.
- Unscrew the screw and remove the centrifuge activator.
- Unscrew the axle washer and remove the drum from the tank.
Assembly is carried out in reverse order. Along the way, you can inspect and replace the necessary elements.
If the structure of your vertical loading machine is different from that described, watch the video on how to change the bearing on a vertical loading machine:
Take care of your equipment and look after it. Then you won't have to repair it. Standard care rules are described in the manufacturer's instructions.
Whirlpool machine freezes, cold water when washing
Often, after starting the washing machine, the control panel begins to behave inappropriately: the display blinks, and all the LEDs blink along with it. The program you have chosen may also not work.
If this is your case, then immediately turn off the SM and wait 60 seconds. Then turn it on and, if the problem persists, you should call a technician, since the control module is damaged, and repairing it yourself is almost impossible. You will need not only a diagram of the control module of the Whirlpool washing machine, but also experience in such repairs.
If the washing machine does not want to heat the water and does not wash clothes well, then you can determine the breakdown without the help of special devices and carry out independent repairs.
The most likely reason for this behavior is a breakdown of the thermistor (temperature sensor) , but the heating element could also fail. Be that as it may, it is worth checking both elements together. Next, follow this simple procedure:
- Turn the machine so that the front wall is in front of you - this will make it more convenient to work.
- Unscrew the bolts and remove the back panel.
- Next, remove the bracket by unscrewing the bolts so that it does not interfere with working with the heater.
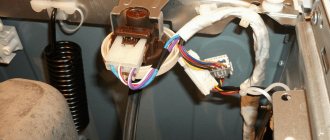
- You won’t see the entire heating element at once - only its tail is visible under the tank, to which four wires go, two of which are connected to the heater itself, and the rest to the temperature sensor.
- Remove all wires.
- Take a tester and measure the resistance of the temperature sensor contacts. Check the readings at room temperature, and then by heating the sensor in warm water, they should differ significantly if the sensor is working.
- Next, measure the resistance on the heating element itself. Its normal values are: 20-40 Ohms.
With such a problem, the breakdown will most likely be confirmed, so you will have to replace the sensor (which is easier) or the heating element.
Important! If you do not have a tester at hand, immediately remove the heating element from the tank by unscrewing the fasteners. You will quickly determine the malfunction if the heating element is covered with a thick layer of scale, or dark spots appear on it. If there is just a little scale, then the heating element may not have burned out, but if the water stone is 1 cm thick or more, the breakdown is obvious.
You can easily change the heating element with your own hands as follows:
- The contacts and wires have already been removed, so next remove the plastic shield.
- Unscrew the fastener - it is located in the center of the shank.
- By carefully pulling the contacts, shaking the heater in different directions, remove the heating element. The rubber gasket will be an obstacle, so be patient - there is nothing you can do about it.
- Having taken out the heating element, remove the gasket.
Important! Mechanics recommend installing a new gasket along with the new heater, since leaks due to wear of the gasket are detrimental to this important unit.
- There is probably debris and scale in the hole where the heating element was, so carry out a general cleaning; Only after this can you install the gasket.
- Install a new heating element, tighten the fastener.
- Replace the plastic shield.
- Connect the contacts to the heater and sensor.
- Restore the location of the bracket, and finally mount the machine panel back.
Whirlpool Error Codes
The list of malfunctions that you can deal with yourself is not limited to those described above. Knowledge of the machine's structure and the ability to understand its messages will allow you to solve most of the possible problems.
In any case, before you start repairing Whirlpool washing machines, you need to identify the malfunction and find its cause. The manufacturer has taken care of ease of repair; for this purpose, the firmware includes an automatic testing system, the result of which, in the form of an error message, is displayed on the indicator.
Problem with water getting into the machine. Errors: F01 (FH), F09, F13, F23
The first thing you should check when such errors occur is the presence of water in the water supply and its pressure. If the pressure in the system does not correspond to the nominal value, washing will have to be postponed until the water supply normalizes.
It is worth paying attention to the condition of the inlet valve. It contains a mesh that acts as a filter; if necessary, it should be washed or replaced.
If water flows into the machine normally, but an error still occurs, the reason may lie in the sensor that monitors the water level. It is worth checking the sensor itself, its connection, and possibly the control module.
The water supply is emergency shut off. Error F02 (FA)
This error may occur if the inlet valve is blocked. It must be checked and, if necessary, replaced. The same error may appear in the event of a water leak. It is worth carefully inspecting the installation site of the machine. If a puddle appears, the wash will have to be rescheduled until the problem is eliminated.
Problems with drainage. Error F03 (FP)
If the machine refuses to drain water, you need to check the entire drainage path. The reason may be a clogged filter, drain hose, or excessive bending. Such errors can be caused by a broken or clogged drain pump. In rare cases, the cause may be a controller malfunction.
Problems with water heating. Errors: F04, F05, F12
The machine does not heat water or its temperature parameters do not correspond to the values set in the program. The causes of this problem may lie in the heating element or temperature sensor. In any case, for repairs you will have to disassemble the device, test the heating element with an ohmmeter, and replace it if necessary. The same goes for the sensor.
Temperature sensor
There is no signal from the tachogenerator. Error F06
A tachogenerator is a small device that is installed on the engine to control its speed. Most often, the cause of this error is a spring washer that has flown off or a break in the conductors going to the device.
Motor controller problem. Error F07
The source of the fault is the controller board. To repair it, you need to remove it and replace parts that have failed.
Heating system problems. Error F08
The heater of a washing machine is one of its most vulnerable components. When in contact with water of poor quality, it becomes covered with scale, which significantly reduces its characteristics. This error may mean:
- the heater burned out or broke;
- The pressure switch does not work;
- controller is faulty;
- The temperature sensor is damaged or burned out.
To troubleshoot, it is necessary to disassemble the machine, check and, if necessary, replace the heating element or faulty sensor.
Problems with the electric motor. Errors: F10, F15, F26, F27, F28
The appearance of any of these errors indicates a failure of the electric motor or connection circuit. To eliminate them, you need to check the temperature relay and control triacs on the board. Burnt parts will have to be replaced.
Errors F27 and F28 indicate the impossibility of rotating the motor in the opposite direction and its rotation is too slow, respectively. To correct the situation, it is necessary to check and, if necessary, replace the reverse and winding switching relay.
Problems with motor windings are more difficult to diagnose. It is possible that one or more windings may burn out, break in them, lack of contact, or damage to the insulation. In most cases, the engine will have to be replaced, with the exception of worn commutator brushes.
Various communication problems. Errors: F11, F19
Most often, the source of these errors is the inconsistency of the electrical network parameters with the required values. It is necessary to check the voltage in the outlet and take measures to normalize it. It would be a good idea to use a stabilizer to connect the machine.
Control system malfunctions. Errors: F14, F16
Errors appear in the event of various malfunctions in the controller. To correct the situation, you may need to re-flash the module, or possibly replace it completely.
Also, the cause of errors may be hidden in faulty wiring, a break in one or more wires running from the control module to actuators and sensors. In this case, it is necessary to “ring” each conductor and, if necessary, replace the damaged one.
Wrong detergent. Errors: F18, Fod
The sensor detects an excessive amount of foam, which can cause machine failure. It is necessary to replace the detergent and repeat the wash.
Problems with the controller. Errors: F20, F21
The first of these errors appears if normal program execution is impossible due to a malfunction of the control unit, the second due to the inability to transmit commands from the module to the actuators. To eliminate them, you need to disassemble the machine, check the integrity of the wiring and components of the controller board.
Violations in the water level control system in the tank. Error F24
The reason is that the pressure switch, the sensor that controls the water level, is not working. Replacement required.
Water level sensor
Firmware update problem. Error F31
This error indicates that an attempt to update via the Internet failed. You may need to check your router settings or contact your provider.
Problems with the hatch. Errors: F31, FDU
The appearance of these errors indicates that the hatch is not tightly closed or the corresponding sensor is not working. It is worth trying to open the hatch and close it again; if the error does not disappear, replace the sensor.
You can deal with most Whirlpool washing machine breakdowns at home. For this, a small set of standard tools, the ability to use them and, of course, desire are enough. Of course, you should not try to repair a machine whose warranty period has not yet expired, and you should not undertake repairs without having experience working with electrical equipment. It is important to soberly assess your strengths and, in case of the slightest doubt, contact a repair shop.