Thanks to the adequate ratio of quality and cost, Candy brand washing machines have found many fans among our consumers.
But, as we know, there is no perfection in the world: wonderful Italian devices sometimes break down.
Fortunately, the majority of faults can be repaired and it is quite possible that you can cope with the problem yourself after reading this article. So, Kandy – washing machine: do-it-yourself repair.
Basic problems and DIY repairs
If your Kandy washing machine has problems, you can try to repair it yourself. Of all the numerous elements that make up a washing machine, probably only the frame and decorative trim cannot break. All the rest, with one probability or another, may fail.
Here are the problems that have to be solved most often:
- The machine cannot be turned on.
- The water in the tank remains cold.
- Luke doesn't want to open up.
- Water does not fill well or does not drain.
- Increased vibration and unusual noise are observed when the machine is operating.
The self-diagnosis function is a great help for the repairman.
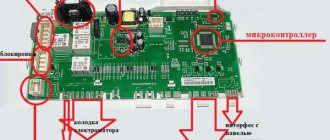
If something goes wrong, the built-in controller itself determines the malfunction and reports it in some way. If there is a display, such as in the ActivaSmart model, an alphanumeric code is displayed on it. Owners of cars without a display (Aquamatic model) can guess the nature of the malfunction by the number of LED flashes on the control panel.
For amateur repairs, you will need the simplest tools - wrenches, screwdrivers, pliers, etc.
You can find out the condition of the electrical part using a multimeter and a phase indicator screwdriver.
A special tool has to be used only when replacing bearings - they are pressed into place, so a puller will be needed.
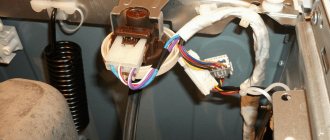
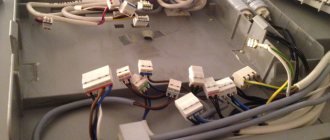
Before dismantling a particular unit, we strongly recommend that you take a photograph of the wires connected to it so that there are no connection problems during assembly.
Well, now let's see how you can return this useful device to working condition.
Disassembly of the device taking into account the type of loading
The need to completely disassemble a washing machine does not arise often. This may be required if you have problems with :
- tank,
- cross,
- bearings,
- oil seal, etc.
The process of disassembling a washing machine begins with opening the case. For ease of operation, it is advisable to place the washing machine in a free space in order to have access to the device from all sides. The best option for choosing a place to dismantle equipment is to carry out repairs in a specialized workshop.
Frontal
In front-loading Kandy washing machines, you need to remove the top cover and the back wall of the case . This ensures sufficient access to the nodes.
The parsing process must be sequential. It may start by removing the service panel or disconnecting all motor contacts.
Removing the control panel is conveniently combined with disconnecting the dispenser. The control module is also detached and moved to the side.
Complete disassembly of the washing machine involves removing the hatch door . This part is held in place with screws. But first, the rubber cuff is released (the clamp that secures it from the outside is removed) and tucked inside the drum.
The upper counterweight is removed. The tank is disconnected from the pipes and shock absorber mounts. Depending on the model of the washing machine, there may be different types of pipe clamps and shock absorbers.
The tank in washing machines can be a non-separable or collapsible part.
In the first case, if it needs to be opened for some reason, then after removing the part from the washer body, up to 20 holes are made along the seam, adhering to which the cut is made using a hacksaw. You need to work very carefully, making sure that the cut is no deeper than 50 mm .
If you act carelessly, you can easily damage the drum. With a collapsible design, everything is simpler - all the screws are unscrewed at the junction of the two parts. Disassembly of the tank may be necessary to gain access to, for example, the shaft. To operate the tank, after cutting, place the hatch down and unscrew the central screw. The drum is separated from the walls of the tank using a hammer and wooden blocks for support. If the problem is in the oil seal or bearings, it is also possible to replace them with new parts.
The removed tank must be thoroughly rinsed from the inside.
An example of disassembling a Kandy front-loading washing machine is in the video:
Vertical
To disassemble a Kandy top-loading washing machine, you will first need to remove the service panel. You can carefully separate the control panel by lifting it from all sides , helping yourself with a screwdriver. This part should be moved upward and then towards the rear wall to open access to the wiring.
At this stage, you should photograph all the terminal connections, and only then disconnect them. The removed panel can be set aside.
The next step is to remove the side panel, which is secured with screws . The panel is pushed along the lower edge of the body towards itself and moved down. After removing the side panels, access to the fasteners on the front wall of the device opens.
After dismantling the side wall, proceed to the next stage. Remove the drive belt. Further disassembly is similar to front-loading machines.
Candy won't turn on
In this regard, the repair instructions contain the following recommendations:
- Unplug the power cord from the socket, reinsert it, and try again to start the device.
- If the machine does not turn on again, check the functionality of this outlet using some other known working electrical appliance.
- The most common reason for such a failure is oxidation or burnout of the contacts on the power button. This element is checked using a special tester and, if necessary, replaced with a new one.
The cause of the “strike” may also be a faulty control module (the indicator flashes 14, 15 or 18 times in a row). To repair or replace it, you must contact a workshop.
Kandi doesn't heat the water
The reason that the washing machine has become “cool” in its duties is, in most cases, a breakdown of the heating element (error code “E05” or the indicator flashes 16 times every 5 seconds).
It can simply burn out from the exhaustion of its resource, like a light bulb, or it can “die out” prematurely - due to a thick layer of scale.
The heater is manipulated in the following order:
- After unscrewing the corresponding screws, remove the back wall.
- Find the heater shank sticking out from the bottom of the tank (two wires are connected to it).
- Determine the resistance of the heating element using a multimeter. If it is good, the device will show 20 - 30 Ohms, if it is burned out - “infinity”.
- If the heating element is faulty, unscrew the nut holding it (between the contacts) and carefully remove it from the tank. If it gets stuck, gently hit it a couple of times with a rubberized hammer (or a regular one - on the attached wooden block).
- Before installing a new heating element, the inner surface of the tank around the hole must be cleared of scale.
To make sure that the heating element is working, just turn on the machine for heating and look at the electric meter - the rotation speed of the disk or the blinking frequency of the indicator should increase sharply.
A less common reason is failure of the temperature sensor (E05 or 5 blinks). To check, first measure its resistance at room temperature, then after heating with hot water. For a non-working element, the resistance will remain constant.
Indesit washing machines have become widespread due to their affordable cost. The unit is of high quality, but any equipment is not immune from breakdowns. Indesit washing machine - faults and do-it-yourself repairs.
We will consider the main problems associated with connecting a washing machine here.
If there is not enough space in the bathroom, then the washing machine has to be installed in the kitchen. In this topic https://aquacomm.ru/cancliz/mnogokvartirnyie-doma/santehnika/kak-podklyuchit-stiralnuyu-mashinku-na-kuhne.html you will find tips on connecting the device for beginners and experienced ones.
Basic malfunctions of Candy washing machines
Failures can vary from simple to quite complex, which can lead to expensive repairs. To determine the reasons for the failure, diagnosis is necessary, which can be done on your own. Experienced craftsmen put the following faults first:
- Blockage or technical malfunction in the drain system. The machine stops draining water and stops after washing without starting the spin cycle. If the seal is broken, a leak may occur while spinning things. A signal of a problem may be a characteristic noise during the drainage of water. As a rule, it is heard if the pump is clogged.
- Wear and tear on the moving parts of the washing machine. Oil seals, engine, shock-absorbing elements, bearings - all of this is under constant load. If any of the elements fails, vibration appears in the machine, especially during the spin process. If you listen closely, you can hear light tapping or grinding sounds in the drum.
- Failure of the water heating element. This problem is most common with older models. The water stops heating, or the machine does not wash at all.
- Electrical and electronics problems. The wiring and its connection points to the sensors cause the washing machine to stop working. In most cases, due to increased humidity, oxidation appears at the terminals, but sometimes the wiring “burns.” Voltage fluctuations cause failure of sensors and the control module. Failure of the pressure switch is accompanied by problems with draining and taking water; poor spinning indicates that the tachometer is broken.
The door on the washing machine does not open
If the hatch locking device breaks down, error code E01 is displayed or the indicator flashes 1 time. The cause of the failure lies in the electronics, so it is better to invite a specialist.
If its appearance is not expected in the near future, you can open the lock yourself. This will become possible if you remove the front cover from the de-energized machine and tilt it back slightly.
It happens that the lock itself requires replacement. To dismantle it, you first need to carefully remove the hatch seal by prying up the clamp holding it with a screwdriver. After this, two screws securing the lock will become accessible.
Assembling the washing machine
As with any other equipment, reassembling the washing machine should be done in exactly the reverse order. All screws and clamps must be securely fastened.
When installing the cuff, make sure that its “^” sign coincides with the vertical axis of the machine, and that the drain groove is on the opposite side.
Remember that minor repairs to a washing machine can only be done with basic technical knowledge and in compliance with safety rules. If you were unable to repair the equipment, you can always seek professional help.
Watch the video of repairing a washing machine with your own hands:
Other breakdowns
If the machine cannot get rid of waste water (error “E03” or 3 flashes), the problem is most likely a clogged filter. The pump could also break down. Do the following:
- With the front lower panel removed, locate the drain filter on the left side of the machine.
- Place a container under the machine, unscrew the filter and free it from accumulated dirt.
- Also inspect the tank pipe to which the filter is attached. It often becomes clogged with silty deposits, which must be carefully removed with a screwdriver.
- After turning on the machine, run it in drain mode and look at the pump impeller (it can be seen through the hole in the filter plug). If the pump is working properly, it will rotate. It happens that the impeller rotates, but the operation of the pump is accompanied by a strong hum, and when the impeller rocks from side to side in a direction perpendicular to the axis (the machine, of course, must be turned off), you can feel that it is very loose. In this case, the impeller may jam from time to time, which is the cause of drainage problems. Such a pump needs to be replaced, for which you will have to remove the back wall.
It will also be useful to clean the inlet filter, for which you need to disconnect the inlet hose. It also often becomes clogged with sand and rust, as a result of which water begins to flow into the machine very slowly (error “E02” or 2 blinks).
Washing machine filter
The reason for the lack of normal drainage can also be a malfunction of the level sensor, also called a pressure switch (located under the top cover). If the tube attached to it becomes clogged with dirt, the sensor will not be able to function. After removing the dirt, you can check the operation of the pressure switch by blowing into the tube. A working device should respond with a click.
If the machine starts to make a loud noise, one of the bearings most likely needs to be replaced. To do this, you need to remove the tank, which in Candy machines is done through the top. In some models, the tank is solid and to replace the bearings it needs to be sawed and then welded. This can only be done correctly in a workshop. At home, replacing bearings is only possible for machines with a holding tank. To get to it, you need to remove the panels - top and back.
It is also better to dismantle the front panel so as not to accidentally scratch it when removing the tank.
Before you remove the tank, you need to do the following:
- disconnect all the hoses connected to it (the clamps are opened with pliers);
- remove the powder distribution hopper;
- unscrew the counterweight;
- remove the belt from the drum pulley;
- disconnect the wires from the heating element;
- after unscrewing the bolts and disconnecting the wires, remove the engine (slides out along the guides);
- remove the hatch by unscrewing the screws located under the sealing collar (the clamp securing the cuff is pryed off with a screwdriver).
Having disassembled the tank into two parts, remove the pulley from the drum shaft, and then carefully knock the shaft out of the bearing. You cannot hit the shaft directly - you need to place a wooden block. Next, you need to use careful, uniform blows around the perimeter to knock the bearing out of the tank.
The new bearing is installed in place using a simple device consisting of a pressure washer, a threaded rod and a pair of nuts. One nut is screwed onto the rod from one side - it will put pressure on the pressure washer that presses the bearing. The second nut is screwed onto the rod on the other side (rests against the tank) - it must be rotated slowly.
In small apartments, residents prefer to save time on everything as much as possible. Let's look at how to choose a compact washing machine under the bathroom sink and how to install it.
This information will help you decide on the choice of kitchen faucet. Characteristics of devices by manufacturer, material and mechanics.
Review of narrow top-loading washing machine Candy CVFTGP384TMH-07
Some people prefer front-loading washing machines, but there are also many fans of vertical ones. This time we are testing the Candy CVFTGP384TMH-07 model, which can be a good choice for a small apartment or limited bathroom space. Also, for an obvious reason, top-loading washing machines are well-deserved among older people - you don’t have to bend over too much when loading and unloading laundry. During the testing process, we must understand how well this washing machine washes and whether it is convenient to use.
Characteristics
| Manufacturer | Candy |
| Model | CVFTGP384TMH-07 |
| Type | vertical washing machine |
| Country of Origin | China |
| Guarantee | Russian Federation and Republic of Kazakhstan: 12 months, Republic of Belarus: 24 months |
| Life time* | 7 years |
| Cotton loading, maximum | 8 kg |
| Energy efficiency class | A |
| Washing class | A |
| Spin class | B |
| Maximum spin speed | 1400 rpm |
| Delayed start | up to 24 hours |
| Interface | touch screen display |
| Smooth drum opening | Yes |
| Automatic parking with hatch up | No |
| Drum volume | 50 l |
| Noise level during washing | 52 dB(A) |
| Spin noise level | 78 dB(A) |
| Weight | 56.5 kg |
| Dimensions (W×H×D) | 400×865×600 mm |
| Network cable length | 1.5 m |
| Retail offers | find out the price |
* To put it very simply: this is the period during which parts for repairing the device are supplied to official service centers. After this period, any repairs in official service centers (both warranty and paid) are unlikely to be possible.
Equipment
The washing machine is packed in foam with wooden spacers to provide rigidity and wrapped in plastic film. It was easy to unpack and dispose of the trash easily.
In addition to the washing machine itself, the kit also includes:
- hose for connecting to the water supply;
- hose for connecting to the sewer (installed on the machine);
- a set of plugs for transportation holes;
- user guide;
- guide for connecting the Smart Fi+ wireless control function;
- warranty card;
- a sheet with addresses of service centers in Russia, Kazakhstan and Belarus;
- a leaflet offering to register the device on the manufacturer’s website and receive an additional 6 months of warranty (offer valid only in Italy, Spain and France).
At first sight
The appearance of the Candy CVFTGP384TMH-07 is no different from most top-loading washing machines: it is a white parallelepiped with a glossy finish, a hatch in the upper part and controls located next to it.
The side walls of the machine are decorated with square stampings, which act as stiffeners.
The back panel is metal. At the top there is a socket for connecting the inlet hose - it is equipped with a mesh that protects the machine from possible contamination and rust from tap water.
The mesh is made of plastic and does not want to be removed manually (as on previous machines that the author had to install). We did not pick it out with anything metal, because... there was a possibility that we would simply break it.
A standard size, permanently corrugated drain hose exits from the bottom of the rear panel.
Only the front legs of the machine are height adjustable. Between them there is a lever with a roller, making it easier to move. In the transport position, it slightly lifts the device, unloading the front legs, and blocks the drum with a special rod inside the housing.
In the center of the bottom panel there is a technological hole that provides access to the motor and drive without additional disassembly of the device. The washing machine is supplied with the opening open and must be covered with the supplied plastic plug during installation.
The detergent container has three compartments: on the left for washing powder, on the right for liquid detergent and in the middle for conditioner. To clean it, you need to press the blue button at the top: then the container will separate from the tank lid.
The drum is made of stainless steel. Its plastic doors close with a metal latch and open by pressing a blue button.
Drum doors are heavier than the walls and when rotated they almost inevitably end up in the down position. The machine is not equipped with a device that automatically turns the drum with the hole facing up.
The exhaust filter plug is located at the bottom of the front panel. Above it is a sticker with the serial number of the device.
What's inside?
As usual, we partially disassembled the washing machine and looked inside to evaluate the location and execution of the main components.
The drum drive is hidden behind the left side wall of the housing
The drive electric motor is located under the drum
Exhaust filter block
The hatch cover latch and the mate are plastic
Device control board with Wi-Fi and NFC modules
Instructions
The user manual is an A5 brochure on thin paper with a lot of drawings and photographs, but rather average printing quality. Some of the illustrations didn't seem very clear to us.
Like the Candy GVSW40364TWHC-07 we reviewed a little earlier, the instructions were written for several models of washing machines at once: a number of functions described in the documentation did not work quite as expected, some features were absent in our model, and some of the available ones were not described in the manual.
The kit also includes a warranty book and a brochure of useful tips for efficient and gentle washing of clothes.
The simplicity of the device compensates for some shortcomings in the documentation: the controls are intuitive and quickly mastered. Let's take a closer look at it.
Control
The control panel consists of a round program selector and a display with red LED indicators.
At the bottom of the display there are touch buttons:
- temperature: select washing temperature (20, 30, 40 and 60 °C);
- spin: selection of spin speed (from 0 to 1400 rpm);
- night and day: enable low noise mode when washing;
- delayed start (up to 24 hours in 1 hour increments);
- degree of contamination (heavy, medium, small) with an indicator of the selected mode above the button;
- selection of additional functions (pre-wash, extra rinse, light ironing) with an indicator of the selected option above the button;
- start/pause.
The child lock function is activated by simultaneously pressing the temperature and spin buttons.
The display also includes indicators:
- expected duration of washing;
- lid lock;
- Wi-Fi module operation;
- button lock (child lock function).
On the right side of the display, under the SmartFi+ logo, there is an NFC antenna.
The selection of programs is carried out by rotating the selector on the right side of the panel. Candy CVFTGP384TMH-07 has a solid set of modes with the ability to manually adjust the washing water temperature and spin speed over a wide range. In the table below we show the default values for each program and the possible range of manual settings.
| Program | Default water temperature, °C | Possibility of temperature change, °C | Duration of the program | Default spin, rpm | Possibility of changing the spin speed, rpm |
| Perfect 20° | 20 | — | 1000 | 0—1000 | |
| Colored 40° | 40 | 20, 30, 40 | 2:01 | 1000 | 0—1000 |
| Hygienic 60° | 60 | — | 1000 | 0—1000 | |
| Perfect Rapid | 40 | — | 1000 | 0—1000 | |
| Fast | 30 | 20, 30 | 0:14 | 1000 | 0—1000 |
| Hand/Silk | 30 | 20, 30 | 0:48 | 800 | 0—800 |
| Wool | 40 | 20, 30, 40 | 0:48 | 800 | 0—800 |
| Rinsing | — | — | 0:28 | 1000 | 0—1000 |
| Drain/spin | — | — | 1000 | 0—1400 | |
| Baby clothes | 60 | 20, 30, 40, 60 | 2:11 | 1000 | 0—1400 |
| Delicate | 40 | 20, 30, 40 | 0:54 | 400 | 0—400 |
| Mixed | 40 | 0, 20, 30, 40 | 1:55 | 1000 | 0—1000 |
| Cotton | 40 | 0, 20, 30, 40 | 3:51 | 1400 | 0—1400 |
| White cotton | 60 | 0, 20, 30, 40, 60 | 2:49 | 1000 | 0—1400 |
Smartphone control
To control the washing machine, the user of Android smartphones is invited to download the Candy simply-Fi application. A similar application exists in the AppStore, but it has limited functionality (the manufacturer probably believes that fans of Apple devices are not part of the company's target audience), and it was not considered in our review.
At the time of writing, the application's rating was 2.4 out of 5 possible (11,570 votes). It's not too much.
According to the operating instructions, the device can be controlled in two ways: via Wi-Fi or using NFC. However, we were unable to use the NFC function: the Google Pixel 2 with Android 10 used in the test was unable to communicate with the wireless interface of the washing machine. The application developer is aware of the compatibility problem with the tenth version of this operating system, but at the time of writing it has not been resolved.
When you first launch the application, you are prompted to enter existing login data or register a new account. To do this, in addition to your first and last name, you need to enter your email address (it is verified by sending a confirmation) and mobile phone number (it is not verified during registration). The user must also indicate their country of residence. All fields are required.
After activating your account, the application prompts you to add a new device. In our case, this is a washing machine without a dryer (first point). After selecting the device, you need to enter the date of purchase and the serial number, which can be specified in two ways: through a photo of the QR code on the drum cover (for machines with horizontal loading) or, as in our case, by manually dialing the number from a sticker located above the filter plug.
After this, the application requires access to data about the device’s location, which it kindly warns about in advance.
The next step is to connect the machine to the wireless network. Control is only possible on the 2.4 GHz band, which may be a problem for users who have moved entirely to the less noisy 5 GHz band. But in our office, fortunately, both frequencies are still working.
At this stage we encountered a problem. When the Wi-Fi function is enabled, the washing machine creates its own network with the SSID “WIFIWASHMACHINE-<random letter combination>”, and the application must connect to it to configure the device. However, when trying to connect to a newly created network, the program requires access to the Internet, which the washing machine does not yet have. For some reason, the developers did not provide for such a collision, and the application crashes at this moment.
However, if you connect to the WIFIWASHMACHINE-* network before the application requires it, registration occurs normally: you can now tell the washing machine the SSID of our working network and complete the connection procedure.
After that, we make sure that there are no active offers for the product at the moment, and we see that the washing machine has appeared in the list of our appliances.
The “Settings” section is small: here you can see information about the previously entered machine serial number and date of purchase, as well as links to the operating instructions and feedback form posted on the manufacturer’s website.
You can control washing in two ways: by selecting preset programs (this method is no different from selecting a program using the manual selector on the control panel) or by setting the desired washing parameters from the “Menu a la carte” section.
In manual mode, the user can select the type of fabric, degree of soiling, spin speed, if necessary, turn on the additional rinse mode and set the delayed start mode.
Preset modes can also be adjusted manually.
The “Smart test” function allows you to conduct a four-minute test of the operation of the door lock, electric motor, heating element and other device systems. To turn on in this mode, the drum must be empty and its lid closed.
During washing, the application informs about the progress of the process, and when it is finished, it sends a standard system notification.
Unfortunately, despite the need to connect the device to the Internet, the application only works if the user is on the same network as the washing machine. Unfortunately, it is impossible to use the function of turning on the desired program from a distance or at least receive a notification about the end of washing at a party or in a store.
Perhaps, without the ability to remotely control household appliances, the value of the application seems doubtful to us.
Exploitation
Before use, you must unscrew the four transport screws holding the drum and connect the washing machine. The connection is standard and does not cause any difficulties. Candy CVFTGP384TMH-07 is designed for connection only to cold water supply. The supply hose of the device is simple and is not equipped with frills such as aqua-stop or aqua-protection.
It is very convenient to level the machine after installation using the transport lever that raises the front legs. However, it does not help much in moving: two fairly wide rear supports with a good rubber coating do not allow the device to slide freely on either linoleum or tiles.
Thanks to the design of the legs, the washing machine pleased us with its stability: despite its compactness, we were never able to make it “jump”. Even with a full load and maximum spin speed, it does not budge.
Operating the device, as we already wrote, turned out to be intuitive, and even reading the poorly organized user manual did not confuse us. But the location of the washing modes on the selector did not seem entirely logical: in our opinion, the most frequently used modes should be placed closer to the original position of the selector. For example, the “Quick Wash” program requires as many as five additional movements - how fast is it if it doesn’t turn on with one button?
I was also somewhat disappointed by the inability to start pre-wash in the same program with the additional rinse mode: these functions are activated only one by one.
Loading detergents into the machine seemed unusual: most often, two large compartments in the corresponding container are used for the main and pre-wash. Upon further study of the instructions, we found out that in this model the left compartment is intended for washing powder, and the right one is for liquid detergents. If a prewash is required, the powder or gel should be added directly to the drum.
The machine makes a very rough estimate of the program execution time. For the first couple of minutes of washing, it works in load assessment mode: “Kg check” lights up on the display, and the LEDs around the time indicator blink. After completing this stage, the predicted operating time decreases (sometimes quite significantly). However, you should not believe this unconditionally: the washing or spinning stages can be significantly delayed. This is especially noticeable during the last rinses - the remaining ten minutes turn into fifteen, twenty or more.
As already noted, this model does not have a drum leveling system, but it has a tendency to turn its “back” to the user. Having to manually turn a wet, heavy cylinder every time to get to the doors is frustrating.
Despite the noted shortcomings, during operation the machine pleased us with good washing quality, good spin and low water and energy consumption.
Care
Regular cleaning of the machine comes down to rinsing the detergent container from any residue and cleaning the outlet filter.
The manufacturer recommends removing any remaining powder or gel from the cuvette after each wash to avoid blocking the flow from the dispenser to the drum. To do this, remove the container by pressing the button on the top of it and rinse it.
The frequency of cleaning the drain filter is not regulated by the manufacturer. For this procedure, you should open the hatch on the front panel of the device (note that it opens with some difficulty, and you have to use a hard thin object: a knife, screwdriver or the handle of a teaspoon), unscrew the plug (it is recommended to place a piece of water-absorbing fabric under it to preserve the floor is dry), remove and wash the filter.
Use a damp cloth to clean the outside of the washing machine. Abrasive cleaning agents or solvents must not be used.
Our measurements
We decided to try to at least approximately estimate the drum capacity of washing machines. The shape of a drum is, of course, different from a cylinder, but the only way to even approximately estimate its volume is to imagine it as a regular figure.
In this case, we have a cylinder with a radius of 22 cm and a depth of 30 cm. Its volume is 45,593 cm³, that is, approximately 45.5 liters.
Wash
As an experiment, we decided to track the work of the main program (“Clap”), as they say, minute by minute. This is what we got.
| Time | Time on display | Action | Water consumption |
| 0:00 | 3:51 | start of the program, periodic rotation of the drum | |
| 0:01 | 3:50 | adding water for washing | |
| 0:02 | 3:50 | washing has started, periodic slow rotation of the drum | 9 |
| 0:04 | 2:14 | the weight of the laundry is determined, the program operating time is calculated, water is added to the tank in accordance with the weight of the laundry being washed | 12 |
| 1:52 | 33 | Main wash completed, drum stopped, water drained | |
| 1:54 | 31 | spin | |
| 1:58 | 30 | adding water for the first rinse | |
| 1:57 | 29 | first rinse, continuous drum rotation | 19 |
| 2:05 | 24 | drain, drum stopped | |
| 2:10 | 21 | spin | |
| 2:13 | 20 | adding water for the second rinse | |
| 2:14 | 19 | second rinse, periodic rotation of the drum | 26 |
| 2:17 | 16 | adding water | 29 |
| 2:21 | 13 | drain, drum stopped | |
| 2:23 | 10 | draining continues, drum rotates slowly | |
| 2:27 | 10 | spin | |
| 2:37 | 4 | end of the washing program | |
| 2:38 | End | drum unlock, beep |
The table shows the total water consumption at the end of each stage. Thus, the entire wash cycle, consisting of a main program at 40 °C and two rinses, took 29 liters. The total amount of electricity consumed was 0.587 kWh.
Spin
We were also interested in the real efficiency of pressing, which we decided to measure in grams of water per gram of cotton using the formula: (weight of pressed material - dry weight) / dry weight. 10 terry white towels from Ikea with a total weight of about 2 kg were used as reference linen.
| Spin speed, rpm | Remaining water per gram of dry laundry, g |
| 1400 | 0,50 |
| 1200 | 0,65 |
| 1000 | 0,75 |
| 800 | 0,89 |
| 400 | 1,45 |
The noise level was measured in a room of approximately 8 m². The sound level meter was located at a level of 1 m from the floor and at a distance of 1 m from the washing machine, in the center of the front side.
| Operating mode | Noise level, dBA |
| General noise level in the room | 32 |
| Wash | 57 |
| Drain | 66 |
| Intermediate spin | 67 |
| Rinsing | 58 |
| Final spin 1400 rpm | 76 |
Practice tests
To evaluate the basic function of the washing machine, we took a set of the already mentioned white terry towels and stained them with stains of common and difficult to wash organic soils. Let's see how the standard Candy CVFTGP384TMH-07 programs cope with them.
Cotton
We applied red wine, soy sauce, ketchup, vegetable oil, blood and cocoa to a set of six towels (each towel has a different substance). The stains were dried at room temperature for 24 hours, after which we ran a test wash.
Red wine
Soy sauce
Ketchup
Cocoa
Blood
Vegetable oil
We used powder for white linen from one of the manufacturers that is well known both in Russia and throughout the rest of the world. The dosage was calculated according to the instructions on the package.
Contaminated laundry was washed using the standard “Cotton” program at a temperature of 40 °C. The operating time was determined automatically by the washing machine and was approximately 2:15. The result can be seen in the photos below.
Red wine
Soy sauce
Ketchup
Blood
Cocoa
Vegetable oil
Using the standard program for cotton at a temperature of 40 °C, stains from vegetable oil and ketchup that were 24 hours old completely disappeared. Traces of soy sauce were barely visible, and blood, red wine and cocoa did not wash off very well.
To completely remove the stains, we washed the towels again on the White Cotton cycle with a pre-wash at 60°C and found no traces of deposited substances. In the next test we will try to use this mode from the very beginning.
White cotton program with pre-wash
We stained the towels with those substances that proved to be the most persistent in the previous test - red wine, blood and cocoa - and, like last time, they stood for 24 hours.
Blood
Cocoa
Red wine
The laundry was washed on the White Cotton program at 60°C with a pre-wash. The red wine and cocoa stains came off perfectly, but the blood left noticeable marks.
Thus, we admit that the washing machine successfully dealt with most artificially created organic contaminants even in one wash. The only stain that remained noticeable disappeared happily after applying bleach and another wash in hot water.
conclusions
The Candy CVFTGP384TMH-07 top-loading washing machine has earned the title of a reliable device during operation and practical tests. Thanks to its compact size, it will fit perfectly into the interior of even a small apartment. The excellent washing quality and good load volume of this model are combined with good energy efficiency. But as for older people, they are unlikely to be happy about having to manually “wind up” the drum so that it stands with the loading hatch facing up.
However, some problems with ergonomics do not affect the quality of work and the final result, because the main thing in a washing machine is that it washes well, right?
pros:
- small size
- good economy
- large loading volume (up to 8 kg)
- good washing quality
- spin up to 1400 rpm
Minuses:
- no drum parking
- high noise level during high-speed spin
- management is not always logical
- low-functional smartphone application