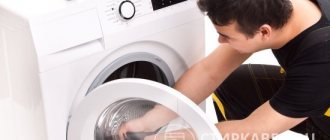
In case of wear or damage to the rubber cuff of the washing cuff, equipment owners can independently replace such an element. The cuff serves to ensure a tight fit of the door to the body of the washing machine and avoids leaks. When replacing, it is necessary to install a cuff with full tightness to ensure further normal operation of the equipment.
It is better to entrust the repair of washing machines to professionals!!!
We present to you our unique catalog of private craftsmen and service centers —
Select your city and artist in the filter: by rating, reviews, price!
How do you know when a replacement is needed?
During intensive use, the rubber cuff may be subject to physical wear, damage, or break due to stress. In such a situation, you need to replace the rubber band yourself. Due to damage to the rubber seal, water leakage may occur, which is why it is important to monitor the condition of the cuff and take action if damage is detected.
The reasons for replacing the cuff are the following factors:
- physical wear and tear during operation. Rubber is exposed to temperature changes, exposure to hot and cold water, and chemicals. Vibrations and friction of the drum, the intensity of washing have a significant impact on the wear of the cuff;
- friction. The rotation of the drum with things has a mechanical effect, especially when setting high spin speeds;
- damage from small sharp objects and clothing items. Locks, zippers, and decorative details often damage the cuff, after which leaks occur.
Why does the cuff get damaged?
Due to damage to the sealing rubber, a leak may form in the MCA. What is the hatch cuff exposed to:
- Natural wear and tear. Rubber is exposed to various temperatures, hot and cold water, and detergents. Strong drum vibrations and friction also affect the service life of the seal.
- Friction. In addition to the constantly rotating drum and the laundry in it rubbing against the cuff, there may be other reasons. In this case, you need to eliminate the item causing wear.
- Damage from foreign objects and items of clothing. Small items from pockets, locks and zippers - all this can make a hole in the sealing rubber of the washer.
Preparation
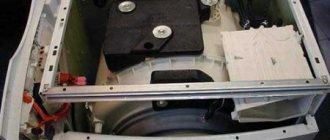
To simplify the procedure for installing a new cuff, it is recommended to carry out preparatory work and remove the front panel from the washing machine. In different models, it is secured with latches or self-tapping screws, which must be unscrewed from the grooves with a screwdriver.
Replacing the rubber band is also possible without removing the front panel, but this task will be more difficult to complete, especially if the user does not have experience in disassembling equipment.
First, inspect the cuff seat. After several years of active use, dirt, blockages, and scale accumulate in the holes and on the internal surfaces of the devices. It is necessary to wash the circle around which the cuff is placed with a sponge and cleaning agent to ensure maximum tightness and prevent the development of mold and mildew. At this point, the preparation of the seat for the new cuff is considered complete.
Removing the cuff
Before removing the seal from the washing machine, you must first purchase a new one, identical to the original one. There will be no problems with the purchase, since a new cuff can be purchased almost anywhere: in a service store or online store. The main thing is to choose an identical part. Therefore, before visiting the store, carefully write down the full name of the washing machine model and its serial number. The new seal should bend well and be soft to the touch.
Now let's move on to the question of how to remove the cuff. The procedure for removing a part in all automatic machines basically follows one step-by-step scheme:
- Removing the fixing front clamp connecting the hatch cuff to the outer casing of the SMA.
- Removing the front panel of the washing machine.
- Removing the second clamp that secures the seal to the washing machine tank.
Removing the first clamp
Removing the cuff should begin with dismantling the first (front) clamp. Follow the recommendations below.
- Unplug the CM power cord from the outlet.
- Take the tools. You only need screwdrivers (in most cases, two are enough: a Phillips and an asterisk).
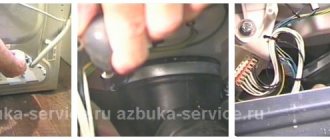
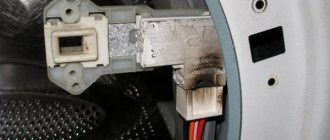
- Find the latch (if it is a plastic clamp). Grab and pull the place where the latches are located. In the case of a wire rim, which can be tensioned using a spring or a screw, you will have to either unscrew the screw or lightly pry the spring with a screwdriver. Most often, the spring is located on the side near the locking lock or at the bottom of the loading hatch.
- Unclench and pull out the metal/plastic rim.
- Place the rubber inside the tank.
Before removing the rubber band from the washing machine drum, pay attention to two special triangle-shaped marks. One is located on the seal itself, the other on the drum. It is important that they are placed parallel and coincide. If there is no mark, put it yourself. This will be useful to you in the future when you put on a new part.
Removing the front panel
To completely remove the seal from the washing machine, in most cases you will have to remove its front panel. This should be done as follows:
- Unscrew the bolts from the back wall of the SMA and remove the upper part of the washer.
- To remove the screws holding the front panel in place, pull out the powder tray.
- Unlock the latches that hold the control panel in place and carefully remove the control panel.
- Remove all bolts from the front of the housing.
After these steps you can easily reach the second clamp.
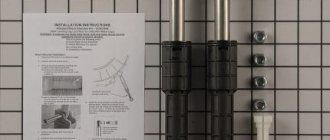
What will you need?
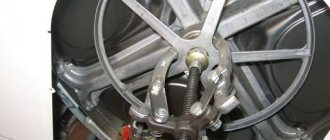
To remove and install the new rubber, you will need small pliers and a small flathead screwdriver with a blunt tip to avoid damaging the rubber seal. For self-replacement you will also need:
- a new cuff, which must fully correspond to the parameters of the old one and be suitable for a specific model of washing machine;
- internal and external clamps. If the previous clamps are not worn out and are subject to further use, you can install them. However, if there is damage, it is better to purchase new ones, especially since they are inexpensive;
- fine abrasive sandpaper, soap, water and sponge. These items will ensure the preparation of the seat and simplify the installation of a new cuff.
Using a soap solution, you can lubricate the place where the cuff will be installed; thanks to this lubrication, the elastic will clearly fall into place. Never use machine oil or WD-40! They can subsequently stain things and make it difficult to remove.
How to replace?
First of all, you should purchase the rubber seal you need. Since cuffs from other machine models may not fit yours, even if they look the same, be sure to tell the seller when purchasing a seal the model of the washing machine on which you are going to install the cuff. Only after making sure that the purchased cuff is exactly the same as your damaged seal, can you begin replacement, which includes the following steps :
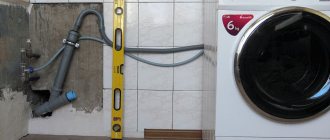
- We clean the edge of the tank from contaminants (salts, powder and others). For this task, you will need a warm soapy solution. After removing all the dirt, do not wash off the film formed from the soap solution, as it will help in installing the new cuff.
- Install the rubber seal on the tank. Please note that doing this with a new rubber band will not be too easy. Place the upper part of the seal against the tank (its upper edge) so that the marks coincide, then use two thumbs to tighten the cuff. To do this, your fingers should slide from the center to the sides. In this case, the cuff will not slip off at the bottom, but will fit completely onto the hem.
- We check whether the cuff is installed correctly. The water drainage holes should be positioned strictly at the bottom center, and the tongue, which is found in most elastic bands, should be at the top. In addition, after installing the rubber band, no gaps should form, since leaks are possible due to a loose fit.
- We tighten the inner clamp. You need to act depending on the fastening of the clamp. If its fixation is ensured by a tensioned spring, you need to put the spring part of the clamp on a screwdriver (if you did not remove the front wall, then insert the screwdriver into the locking hole). This way you can freely stretch the spring and put the clamp in its place. If tightening with a screw, simply unscrew the screw, place the clamp in its place, and then tighten the screw to the required torque. It will be even easier to attach a plastic clamp held in place by latches. If your model of machine has a wire clamp, carefully tighten its ends using pliers, and then remove the knot into the existing cuff recess.
- We put the rubber seal on the front wall and tighten the second clamp. We carry out all manipulations with the second clamp in the same way as with the internal one, depending on the features of its fastening.
- Check the tightness of the installed cuff. To do this, you should turn on any short washing program without loading laundry into the machine, and make sure that water does not leak out of the bottom of the cuff.
Related article: DIY London curtain: sewing technology, features
It also happens that the front panel on the washing machine cannot be removed. This is not very convenient for changing the cuff. There is a way out of this situation, and in the following video they describe in detail and tell how to replace the sealing collar on such washing machines.
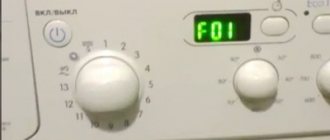
Step-by-step removal instructions
The procedure for removing the rubber cuff is not difficult. For accuracy, we will provide a step-by-step algorithm of actions:
- disconnect the device from electricity, water supply and drainage pipes;
- using a flat screwdriver, remove the metal or plastic clamp from the door cuff, which in most models is removed in the same way;
- find the latch or clamp spring on the fastening circle (it is located at the bottom of the door or near the lock);
- Using a flathead screwdriver, pull the spring towards you and loosen it. If there is a bolt, unscrew it from the groove and also release the locking latches;
- remove the ring by prying it up with a screwdriver, but try to avoid punctures and damage;
- Unclench the metal ring on the water fill hole and remove it;
- remove the sealing collar and tuck it in the direction of the drum;
- Locate the triangular mark on the rubber band and drum.
These marks must strictly match to avoid leaks and other malfunctions.
- To completely separate and remove the rubber cuff, disassemble the front panel of the washing machine;
- remove the cover by unscrewing the bolts at the back;
- remove the powder container;
- Unclench the latches securing the control unit, remove the panel and carefully place it on the body;
- remove the lower closing panel and unscrew the bolts, provide access to the inside of the seal;
- To completely remove the cuff, remove the fixing clamp from the back using a flat-head screwdriver;
- after this, the cuff can be easily removed, and a new sealing rubber is installed in the vacant space.
To help you understand the cuff removal procedure, watch the video below.
Installing a new rubber band
Installing the cuff is one of the most critical stages of repair, since it is necessary to maintain a tight fit and tightness. The step-by-step algorithm of actions is as follows:
- unpack the clamps and set aside the inner and outer ones separately;
- use the markings to position the cuff in the correct position. In most models, the triangle corresponds to the top of the seal, and the bottom has a hole for the hose;
- insert the rubber onto the tank in strict accordance with the markings, insert it into the drum;
- unscrew the two screws and remove the locking lock;
- insert the tip of the screwdriver into the lock, this will help fix the clamp motionless;
- install the inner clamp;
- put the lock in place;
- spread the rubber along the outer circumference of the body;
- use a soap solution to treat the surface and joint area;
- install the outer clamp and install the door in place.
Try closing the hatch, and if it comes out without force, then you have installed the sealing collar correctly. To check the tightness and tightness of the fit, run a test washing program. The rubber is installed tightly if there is no leakage.
It is better to entrust the repair of washing machines to professionals!!!
We present to you our unique catalog of private craftsmen and service centers —
Select your city and artist in the filter: by rating, reviews, price!
How to replace and install a new one?
When the old rubber cuff has been removed, you can immediately begin installing the new part. This must be done very carefully:
- There should be a triangle-shaped protrusion on the top. It is joined so that it matches the mark on the typewriter. To make installation easier, the groove of the rubber band can be lubricated with a couple of drops of liquid soap or shower gel.
- In the lower part you need to navigate by the marks and drain holes.
- The replacement process starts from the top. While holding the elastic in position, you need to tuck the seal inside.
- Moving left or right, you need to gradually put the elastic band on the tank.
- After the seal is put on, you need to check that all marks match.
- After installing the rubber band, you need to put on the clamp. This can be done by turning the edge of the seal inward. To make it easier to install the clamp, it should be pryed and guided using a screwdriver, constantly monitoring the position.
- After the clamp is put on, you need to check its location and the quality of fixation of the elastic band. If wrinkles or creases are detected in the elastic, it is straightened, eliminating the defect.
- If you have doubts about the quality of the first stage of installation, check the tightness of the rubber seal. To do this, manually fill the tank with water, using, for example, a ladle or a large mug. If there is a leak, it must be repaired immediately. After testing, the water must be drained.
- The outer part of the cuff is mounted by pulling the elastic band onto the body evenly along the entire perimeter of the hole.
- The outer clamp is installed in the recess along the entire part so that it fits into the recess intended for it.
If, after putting on the rubber band, it turns out that the marks have shifted, the part should be removed and reinstalled.
The video will show you how to change the cuff on an Indesit washing machine:
Checking work
After installing the rubber cuff and the door into the latches, you need to check whether everything is fixed correctly and whether there are any leaks during the washing process. To do this, run the wash in test mode and make sure there are no leaks under the door.
If there is a leak, it is necessary to disassemble the door again, remove the cuff and reinstall it, observing all the requirements. Check around the entire perimeter to ensure that the rubber fits snugly and does not bulge. The new rubber band should provide a complete seal.
Causes of damage to the hatch sealing rubber
Most often, damage to the integrity of the rubber cuff is caused by natural wear and tear, but the defect may also be the result of careless handling of equipment. The seal has fairly high strength and good resistance to mechanical stress during operation of the machine.
Damage may result from:
- friction during the washing process on hard objects (for example, shoes, zippers, etc.);
- careless placement of things in the drum;
- inaccurate removal of things from the drum;
- foreign objects getting into the seal - coins, buttons, keys forgotten in a pocket, etc.;
- damage by pets.
In addition, rubber wears out as a result of exposure to detergents and water.
To prevent moisture stagnation, you should allow the drum to dry after washing. You should also carefully wipe the cuff itself, paying attention to all the grooves on its surface.
If the cause of the cuff damage is not determined, replacing it may become a regular occurrence.
How to extend the service life?
To increase the service life of the rubber cuff and avoid its premature replacement, you must follow simple rules:
- After washing, it is recommended to wipe the rubber seal dry to avoid it drying out and the appearance of fungus; also remove small blockages and sand from the fold of the cuff;
- reduce the use of gel detergents, as they settle on the seal, forming a thick layer of mold over time;
- use citric acid for cleansing and prevention.
If these rules are followed, the cuff will last a long time. And if damage is detected, the best solution would be to replace the cuff to avoid further damage to the washing machine.
Causes of damage
The cuff is most often replaced due to the appearance of ruptures or cracks in the seal that allow water to pass through during washing. As a result of the formation of such damage, the owner of the machine will see water leaks under the hatch, and upon examining the cuff itself, he will notice cracks or tears, which may have different sizes. The reasons for this situation are the following factors:
- Natural wear of the seal. During operation of the machine, the cuff is constantly subject to friction between the drum and the laundry. It heats up during washing and then cools down. In addition, it is affected by detergents. Over the years, this leads to brittleness and brittleness of rubber.
- Poor quality washing powder. Under the influence of cheap powder and detergents of dubious quality, the rubber of the cuff begins to deteriorate, so saving on powder leads to expenses for replacing the seal.
- Excessive dosage of detergents. If you use an excessive amount of powder or liquid, the structure of the sealing rubber may also be damaged, which will require the cuff to be replaced.
- Parts of clothing that could damage the seal. Such elements can be metal and plastic fittings. In addition, screws, nails and other objects can get into the machine from clothing pockets, which can cause tears in the cuff.
Over time, if the sealing collar is not cleaned, mold may grow on it. Therefore, it is necessary to periodically clean the washing machine. You can see how to do this in the following video.
Related article: What wallpaper to choose for a beige kitchen, examples of interiors
Possible faults and solutions
The rubber cuff is one of the elements of the washing machine that cannot be restored or repaired. That is, if the rubber is damaged or worn, it must be replaced with a new one suitable for this device model.
We told you in detail, provided photos and video materials for replacing the rubber cuff yourself. If you have difficulties with replacement, contact the service center, the technician will quickly replace the rubber seal at your home without wasting time and energy. If you notice damage to the rubber band, we recommend that you immediately take measures to replace it, since further use of the washing machine with a damaged cuff can cause serious malfunctions.