Share on facebook
Share on twitter
Share on vk
Share on telegram
Share on whatsapp
Surely many of you, having bought yourself a new monitor, have wondered what can be done from an old monitor. I was also puzzled by this thought, although I was puzzled by this thought for a very long time, but then there was not such a large selection of different devices. But the Chinese brothers are not asleep and are inventing devices with an unprecedented combination of capabilities. One of these devices was a TV set-top box, which I purchased to add capabilities to my old TV.
- Nexbox A95X TV Box: making Smart TV from a regular TV
But having connected it to the TV set-top box, I was a little disappointed in the clarity of the picture; it was a little difficult to use the set-top box, but the ability to remotely control it from a smartphone or tablet . As a result, the set-top box exceeded my expectations because it was used to watch a bunch of videos from a home server, but the functionality of the set-top box turned out to be much wider and in the end this small box turned a simple TV set into a computer controlled by a remote control . Why am I doing all this? Read on and you will understand everything.
A little about the monitor
Since my parents do not like to throw away equipment, the Samsung SyncMaster monitor (CRT monitor), after purchasing an LCD monitor, was carefully taken to storage in a barn at the dacha and safely forgotten there. Once again, while putting things in order in the “junk storage”, my father came across a monitor and wondered whether it was possible to watch news on it at the dacha. But he could only get the answer from his advanced son, that is, from me, which he did by calling me one evening.
The monitor itself:
Because a monitor, to put it simply, is a kinescope with a scanner without a radio receiver, which is in the TV, and without a sound system. In other words, it is a TV, but simplified and devoid of some parts. In fact, the monitor contains only a power supply, a scanner and a video amplifier. The only signal source is the VGA(D'SUB) plug, which supplies an analog signal. What does this mean? This means we just have to find a device that will be the source of the signal.
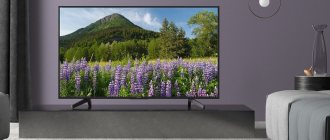
If you have a newer monitor, then it’s probably even easier, because some monitors, if we’re talking about LCD, were equipped with speakers, and newer ones even have an HDMI input. If you have one, then you have a very wide choice of options on how to make a TV out of a monitor.
How to make a TV from a monitor
You can't do without additional accessories. Even if you have to deal with a more expensive set-top box or a budget adapter. Therefore, you need to carefully study the methods described below and choose what suits you in terms of costs.
Smart TV set-top box
Most devices connect via HDMI. If the screen, like the P2418D, has such a connector, consider it a done deal. One end of the HDMI cord is connected to the set-top box, the other to the screen.
If the device is equipped with other sockets, you will have to take an adapter from HDMI to VGA or DVI. Or connect through a converter.
Additionally useful:
- An adapter with an audio output, since VGA and DVI only transmit images. Soundless;
- speakers that need to be connected to the audio jack on the converter;
- access to the Internet, otherwise the set-top box will be useless, because Without access to the World Wide Web, a “smart” gadget will not work.
A nuance: only online broadcasting of channels + Internet surfing will be available.
Useful: Which is better for a monitor: DVI or HDMI - comparison of 2 interfaces
TV tuner
This compact device receives a television signal and transmits it to the screen. Modern options, such as the 2E-T2001, have multiple inputs for connecting the same HDMI. Therefore, a wire with the appropriate connectors and the receiver itself are enough to turn the monitor into a TV.
Using a tuner is a reliable way to make a TV from a monitor (for example, VG240Y) without a computer. And that's why:
- Through the “tulips” you can additionally connect other devices to the receiver, for example, a projector, DVD, etc.
- The presence of a mini jack allows you to easily connect external acoustics to the tuner. Some options have a built-in speaker; you can do without speakers.
- The kit includes a remote control, which means you can “click” channels on the monitor in the same way as on TV.
Important: if the display does not have a suitable connector for a direct connection, the tuner can be connected via VGA to HDMI or HDMI-DVI adapters.
A television tuner, like a TV set, will require connecting an indoor or external antenna. But you won’t need access to the Internet.
Phone or tablet
Mobile gadgets are equipped with USB connectors in micro format or Type-C. Often these jacks do not match the ports on the monitor. Exit to the surface.
| Instructions | Monitor connectors | |
| HDMI | VGA | |
| What do you need | MHL adapter | USB-C to VGA adapter |
| Procedure | 1. Connect the converter to your phone or tablet. | |
| 2. 2.Connect one end of the cord to the adapter on the HDMI or VGA side, the other to a similar connector on the monitor. | ||
| Installing drivers | Not required | |
It's easier to watch TV channels via the Internet. You can go to the official pages of TV channels or use online cinemas, such as Megogo. If there is no Internet access on the display, you can display videos or pictures stored in the memory of your tablet or phone.
Read: How to connect a tablet to a TV or monitor: 7 ways for all occasions
Computer or laptop
We choose based on the availability of equipment that the user has:
| Instructions | PC | Laptop |
| Preparation | Check the presence of 2 identical connection interfaces on the monitor and PC or laptop. If there are no matches, purchase the appropriate adapter. | |
| Basic steps | Connect both devices with a cable, taking into account the type of connector on the devices. | |
| Settings | Go to screen settings to change resolution, orientation, etc. if necessary. | You can change the operating mode of the external display. For example, select “Duplicate” or “Second screen only.” |
Useful: How to connect a monitor to the system unit: 4 steps
Purchasing a special board
First you need to purchase a universal board or skyler.
Instructions on how to make a TV from a computer monitor (such as the G24C4).
- Unscrew the back panel of the screen.
- Find and disconnect the expansion board from the cable.
- Install a new one, solder the cable.
- Using a jumper, set the current to the matrix (this is 12 V, but it’s more reliable - look in the instructions for the board).
- Install an IR sensor (inside or outside the case).
- Place the removed parts back.
- Replace the back cover.
- Start testing the monitor as a TV.
This process is clearly shown in the video at the end of the article.
Important: if the device’s warranty has not expired, it is better to abandon the idea of transforming the screen into a TV. If something goes wrong, you will have to repair it at your own expense.
First experiment: Smart TV from a monitor
Remembering that I had an adapter from HDMI to VGA lying around, I decided to look for it and, having found the adapter, I took the set-top box and went to my parents. After wiping the monitor from dust and dirt, we connected it to the network and then to the set-top box. Despite the small diagonal, using the set-top box was very, very comfortable due to the clearer picture, since the monitor, unlike a TV, is designed for high resolution and the relatively small font is easy to read.
HDMI to VGA adapter
Now you’re probably thinking: “Cool, I’ll buy myself a console!”, but don’t rush. This was just an experiment because we don’t have sound, VGA only provides a picture. Therefore, if you want to go this way, you will have to purchase an HDMI to VGA adapter with an audio output, something like this:
You can order a similar adapter on Aliexpress, here is a link to the seller: buy an HDMI-VGA converter.
When you go to the product page, all you have to do is find the adapter that suits you, it’s not at all difficult, the main thing is to pay attention to the fact that the adapter has a power connector and an audio output.
Thus, we can make a “smart TV” from a monitor, but we will also have to buy active speakers, which will also have to be connected to the audio jack on the adapter. As a result, we will give the monitor a second life and get a good option for the kitchen or work.
Advantages
Within the dacha, there are no advantages due to the lack of full communications.
Flaws
- This set-top box is useless without the Internet.
- Cost of the set-top box.
- The need for an adapter.
- Lack of speakers.
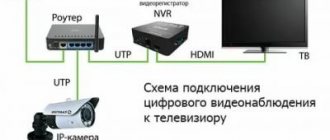
Monitor attachment for digital TV reception
Find out the cost of the set-top box
As you can see, there is still the same VGA, but in addition to it there is also HDMI. By the way, if you connect this set-top box via HDMI, the sound will come through it. For example, my TV in the kitchen has HDMI, but it does not have digital TV, and if you connect such a set-top box to it, the sound will come from the TV. In addition, this set-top box was also equipped with a USB connector, which makes it possible to watch videos from a flash drive and more.
Just like the first version of a TV tuner for a monitor, this set-top box has RCA (CVBS) sockets.
But unlike the first set-top box, where it is an AV input, in this case these sockets are an AV output, that is, this set-top box, in addition to a monitor and relatively modern TVs, can also be connected to very old TVs.
Features of the console
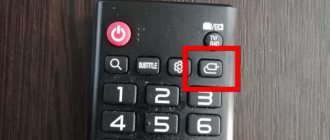
Since the set-top box accepts digital TV, in addition to everything else, we get a lot of goodies. But first we need to find channels, this is done simply. Press “menu” on the remote control and use the volume buttons to select the appropriate menu item (see photo):
Select “auto search” and press the volume up button. We see the picture:
After some time we will see the found channels and radio stations:
The search for channels is completed, as you can see in our city there are 20 of them, in other cities the number of channels may be different .
By pressing the “info” button on the remote control, you can see what is going on and what will happen next. If you click this button again, you will see more detailed information:
Using the “up” and “down” buttons we switch between gears, and with the yellow and blue buttons we scroll through the description if it is not completely displayed.
To display the program guide, we need to press “EPG” on the remote control:
Use the “left” and “right” buttons to scroll through the channels, and use the “up” and “down” buttons to scroll through the programs.
And here the most interesting thing awaits us. If we press the “OK” button on a particular gear, we will see a strange picture, but if we press the red button, we will see this:
This is adding a schedule for recording a program. Click “OK” again and the task will be added to the queue. The most interesting thing is that we can easily turn off the set-top box, it will turn on itself and record the program. The only thing needed to successfully complete this task is the presence of a flash drive in the USB connector of the set-top box.
A flash drive is also needed for the “timeshift” function, or “pause” in Russian. Yes, you heard right, the set-top box can pause TV . But the set-top box will not be able to keep the TV paused for a long time, since the volume of the recorded stream is limited by the settings of this function. By default the volume is 1Gb, but you can increase it. This is done in the menu:
To do this we need to select “PVR Configure” and click “OK”.
Select “Record device” and click “OK” again.
Actually, here we select our flash drive, and just below we set the amount of memory available for recording.
You've probably wondered why choosing a flash drive if there is only one connector. Nobody forbids us to connect a USB-hub to the connector, and to it a flash drive, an external hard drive, and a card reader.
Three radios are a nice bonus:
Flaws
- No audio output
- There is no built-in speaker, you will have to connect external speakers
- Unable to connect computer
Advantages
- Digital TV reception
- Availability of USB
- Availability of HDMI
- Availability of AV output
Here you can buy a monitor attachment.
Find out the cost of the set-top box
But if you plan to connect your monitor via VGA, then I advise you to purchase this adapter
With it, you can connect regular computer speakers or headphones to the console. Order on Aliexpress.
Second instruction
If you have an old broken monitor or laptop with a working matrix, then it can be converted into a full-featured TV with great functionality and the presence of all modern ports (RF, VGA, USB, HDMI, AV).
First of all, you will need to purchase a universal TV board.
Its cost starts from $10-11, and depends on the chip (and therefore functionality), the availability of ports and the order package. You can purchase it without any problems on AliExpress, etc. I ordered it for $11 with the minimum equipment: the universal TV board itself, a remote control, an infrared sensor.
To understand the monitor matrix, you need to find a datasheet for it, in which you must find the following characteristics: supply voltage, maximum resolution, LVDS pinout. This data will be needed to select the firmware of the universal TV board and connect the matrix to it.
In the archive, the link to which is at the end of the article, there is a file ND-LA.MV9.P-2 - this is a manual for a universal board. On page 9 there is a table with the pinout of the LVDS interface of the universal board. Your task is to make sure that it matches the pinout of the cable from the monitor matrix. Those. in some cases it coincides, in some it is necessary to rearrange several pins of the cable, and in some cases it is necessary to make the cable completely from scratch. I had a monitor with an HSD190ME13-D matrix, the cable had to be completely rebuilt. I am attaching a photo of the rebuilt cable.
Having found out the supply voltage of the matrix, you should set the jumper on the universal board to the appropriate position: 12, 5 or 3.3 volts. If the voltage is greater than the operating voltage of the matrix, its controller may burn out. Don't miss this moment.
To power the universal TV board you need a 12v 2A power supply. But I powered it through the inverter control loop. My monitor's inverter had a +13v output. When connecting the board, connect the BLON contact to the inverter ON/OFF contact, and ADJ to the screen backlight brightness control contact.
The sound amplifier is designed for two 3w speakers.
I connected different speakers, but settled on smaller ones that can be hidden in the monitor case. They are taken from large headphones. Also, in terms of size/sound quality, the Speaker speakers from 8 ohm 0.5 watt system units showed excellent performance. The sound of the amplifier surprised and pleased, because... turned out to be clean, deep, without noise even at maximum volume.
As for the connector for connecting the LEDs, keyboard and IR sensor, it is better not to look at the instructions, because... For me it was different in pinout. But everything necessary to connect these interfaces is written on the back of the board. To check the operation of the IR remote control, the sensor can be connected directly, but for its stable operation it should be connected according to the diagram given on page 7 of the manual. I connected the LED only to see the firmware process, then I removed it. I didn’t connect the buttons, but whoever wants to do this, everything is clear there and I won’t dwell on this issue.
So, if everything is connected, then you can start flashing the firmware.
To do this, download the archive given at the bottom of the page, select the LAMV29.bin firmware. Universal board, can come with both an analog tuner and DVBT (it also supports analog channels). Find the firmware depending on the tuner, the number of buttons on the port and the matrix model. If your firmware for your matrix is not in the archive, then you can select another firmware according to the following parameters: maximum screen resolution and matrix supply voltage. So for my HSD190ME13-D matrix I used the firmware from the HT17E13 matrix.
Copy the corresponding firmware file LAMV29.bin to the flash drive in the root directory. Insert the flash drive into the USB socket, connect power to the universal TV board. The LED should light up rapidly. When the firmware is finished, the LED will start to light up more slowly (after about 20 seconds), you can turn off the power and remove the flash drive.
Now you can safely turn on your TV and make all the necessary settings. The firmware contains broken Russian language. The default language is Chinese. To change the language you need to press MENU (the central round button), the left button twice, then down, and left again. There is a hidden Service Menu with more detailed settings, for example, set the screen aspect ratio (16:9, 4:3), select the menu size, etc. To enter it, press MENU and enter 1147 on the remote control keyboard.
An archive with instructions and firmware LAMV29.bin for different matrices can be downloaded here:
Download the manual and firmware LAMV29.bin Universal LCD Controller Board ANALOG and DVBT TUNER
I present another selection of LAMV29.bin firmware for a universal TV board of this type with a tuner on an 840 chip. This archive was recommended and sent by the seller himself at the request of the user “Austin”. The archive does not contain instructions, but only firmware. It can be downloaded here:
Download firmware LAMV29.bin Universal LCD Controller Board TUNER 840 (09.22.2014)
According to new data, the latest universal TV boards released have differences from the previous ones (they have a tuner on an 842 chip), therefore, the first firmware archive may not be suitable. For new versions of boards, you should use the LAMV29.bin firmware from the archive dated October 2015 (the archive does not contain instructions, only firmware), which can be downloaded here:
Download firmware LAMV29.bin Universal LCD Controller Board TUNER 842 (10/16/2015)
If you have a V59 board model and you need firmware for it, then go HERE.
I am adding information from user valerkin , whose bootloader crashed due to an unfinished firmware process:
If a critical error was made when flashing the board, it stops working. To correct the situation, you need to reflash the flash memory (octopus microcircuit), for this you need a programmer, for example, such as CH341, the microcircuit is desoldered, flashed, soldered in. If you don’t have a programmer, I think any service center will do it for pennies.
Flash firmware file: https://best-chart.ru/user_files/25L8006E.bin