A wall-mounted microwave oven bracket is a useful household device that allows you to make a room more ergonomic. The article talks about their varieties, features of choice and offers the option of homemade creation.
For ease of reading, the article is divided into 3 parts:
- types of fastenings, principles of operation;
- advice on choosing a product and where to install it in the house;
- master class on creating a shelf bracket between cabinets.
A clear example of mounting a microwave oven.
Microwave bracket on the wall: what is it for, how to use it?
A bracket is a support for attaching something to vertical surfaces . In the case of a microwave oven, it is a means of placing it on the wall without additional supports.
A wall-mounted microwave bracket allows you to place the oven anywhere in the room, regardless of the presence of cabinets or bedside tables - just screw it to the wall and install kitchen equipment. It allows you to achieve maximum ergonomics in a room at minimal cost.
The cost of such a device rarely exceeds several thousand.
Necessary tools for installing the microwave on the bracket
To hang this kind of shelf on the wall, you don’t need many special tools. For clay walls, a hammer and a screwdriver are sufficient. Concrete walls require the use of a more powerful tool - an electric drill or a hammer drill.
In the case of frame walls, it all depends on the material from which the supports are installed. You will need a drill and a drill bit for metal or wood.
For marking, you need any writing object; it is most convenient to use a simple pencil - it writes clearly on most surfaces and is easy to wipe off if something happens. A measuring tape and a building level will be useful for correctly marking.
For dowels you will need a hammer.
Types of microwave wall mounts
Microwave wall mounts are no different. Two main categories to divide:
- fixed;
- telescopic.
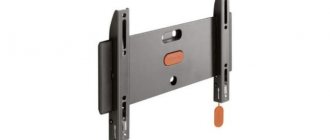
Fixed brackets are standard 90 degree mounts. There are no sliding parts - most fixed brackets come with a clear long leg where the microwave sits. This provides additional reliability and ease of use, but sets strict restrictions regarding their size - the bracket is selected exclusively for the microwave.
Fixed bracket
Telescopic ones are a more advanced option. They feature a horizontal bar extension system. This ensures greater versatility of the bracket. If you change the microwave, you don’t have to buy a new mount - just adjust the length of the old one.
Such a system is implemented using a screw with a regulator for the range of movement of the slats. This solution has a significant disadvantage - telescopic guides are less durable than fixed ones
The choice of fastenings depending on the wall material
The reliability of fastening depends to some extent on the installation technology. And in this case it is necessary to take into account the material of the load-bearing wall. There is no universal solution, but the question of how to mount a microwave on the wall with your own hands remains. Walls are built from a variety of materials, and there are several microwave mounting options to consider.
Option 1
If attachments are attached to walls made of fragile materials, such as frame partitions, walls made of gypsum plasterboard, or porous material, embedded elements should be provided at the construction stage. Mortgages are gratings or slats made of wooden beams or metal profiles. Self-tapping screws are used as fasteners, and the hinged structure is attached specifically to the mortgages.
When fastening lightweight structures, the brackets are fastened without mortgages using a butterfly dowel, which opens when the hardware is screwed into it.
Option 2
Concrete and brick are very durable materials and can withstand significant weight with conventional fasteners. A problem may arise if the diameter of the drill does not exactly match the diameter of the dowel plug or the diameter of the anchor. The part of the dowel called the plug can be made of nylon or plastic. Nylon ones are more reliable, but their shape also matters. The more prominent they are and the more notches on them, the better. The screw screwed into the dowel must exactly match the diameter and pitch of the thread in the dowel hole.
Option 3
When attaching to a wall consisting of cellular concrete, use dowels designed for working with aerated concrete and foam concrete. They have a more complex shape than brick or concrete. The most popular are spiral dowels. They are screwed into pre-drilled holes. Next, mounting screws are installed into these dowels. Objects that are fixed to the wall must create loads, a force vector that will be strictly perpendicular to the fastener.
Option 4
Hollow ceramic blocks are widely used in construction. In such walls, ordinary fasteners do not hold at all. For such material, a special type of fastener is used - a chemical anchor.
The installation procedure is as follows:
- a hole is drilled in the block;
- a chemical anchor sleeve is installed;
- a dowel is inserted into the sleeve;
- using a gun, glue is injected through the dowel;
- A mounting screw is screwed into the dowel hole.
Option 5
Fastening to a wooden wall is carried out using wood screws with a length of more than 30 mm.
How to choose
When purchasing a microwave wall mount, look at:
- device weight;
- the required distance from the wall where the bracket will be fixed;
- product manufacturing material;
- price and brand.
Microwave weight
Installing a microwave oven on a bracket involves a large load on the guides. Weight affects the stiffness of the material and the bending of elements.
The maximum permissible weight is specified for each bracket. It is indicated in kilograms, which is convenient for comparison with the weight of a microwave oven. It is advisable to take it with a reserve of 2-4 kilograms - this guarantees the stability of the structure.
For heavy microwave ovens, the bend edges must be rigid and angled. Choose fasteners with welded corners or a square cross-section.
Microwave bracket distance under cabinet
If the mount is installed under a cabinet, additionally measure the distance. Each bracket has its own height indicators - they are equal to the height of the vertical bar. In rare cases, the fasteners will be lower than the microwave.
Optimal distance to the wall.
When choosing fasteners for the cabinet, take into account the height of the micro cabinet. The height of the bar should be at least equal to it - this way the microwave will fit perfectly into the space.
If the strip is smaller than the height of the microwave, additionally measure the distance from the bottom shelf of the cabinet to the horizontal strips.
Material of manufacture
In the case of a bracket, the material makes a huge difference. The lighter and stiffer the material, the stronger the structure. Aluminum and copper are not suitable for fasteners due to their softness, and the best solution on the market is cast steel .
Avoid all products using powder casting - they do not have the necessary strength and will crack under the weight of the stove, leading to failure of the stove and injury to the user. Powdered metal is distinguished by its characteristic surface grain, which is obtained by fusing powders of various metals.
Tetrahedral products are preferred. Such “pipes” have the greatest strength due to the rigidity edges that tetrahedral pipes have. They are rarely available in telescopic form, so take accurate measurements of the dimensions when selecting.
Brand and price
When choosing a bracket, do not turn to unknown “no-name” manufacturers - under the guise of paint, you can find powdered metal in them, which will quickly break. Domestic brands are an excellent choice as they offer value for money.
The cost for a set of fasteners starts from 500 rubles for the cheapest products and reaches 2-3 thousand. Do not focus on price, look at the shape, material and dimensions of the product.
If the wall is made of plasterboard
In this case, installation is more difficult. You can do this with your own hands in two ways:
- Place the microwave on brackets secured with extended anchor bolts. Suitable if there is a concrete or brick wall behind the drywall.
- Use spacers.
The first method is preferable. The load will be transferred to the base walls. In this case, the bolts should be no more than 1.2 cm in diameter and up to 5 cm in length.
In any case, you first need to make markings. When the dimensions are known, it is easier to hang the microwave. This will help avoid installation errors.
Subscribe to TechnoCouncil on social networks so you don’t miss anything:
Choosing a location to install the microwave oven bracket
When choosing a location for installing a bracket for a microwave oven, follow two important rules:
- do not place the mount on a walkway or in places where people are often present;
- Do not place the mount too high or low.
In the first case, the bracket with the microwave restricts access to the room, making passage inconvenient. This leads to injuries and breakage of fasteners, followed by the fall of the stove.
Example of a wall bracket with a maximum load of up to 40 kg.
When installing the stove next to a passage, maintain a distance of 300 mm from doors and corners - this will make it difficult to accidentally touch it and drop it.
In the second case, remember the average height of a person is 1.7 meters. It is inconvenient for people with short stature to place and take out hot soup from a two-meter height. When choosing a height, consider the height of the shortest family member.
Do not mount low - it does not look aesthetically pleasing and is inconvenient. If the bracket is placed too low, small children gain access to the microwave, and this is extremely dangerous for themselves and those around them.
The optimal height is the zone from 1200 to 1500mm, perfect for any person.
Mounting device on a horizontal bar.
When choosing the location of the fasteners, pay attention to style compatibility - the more laconic and organic the stove looks, the better. A great method is to place the mount under cabinets in a “dead zone” that is not typically used while working in the kitchen.
DIY microwave shelf
You can make a shelf yourself. This will ensure good ventilation for the microwave, moving it to any place and not “tying it” to the kitchen furniture.
Choose plywood, board or hard plastic in a matching color. You will also need tubes 2.2 cm in diameter and 2.2 m long, 16 metal connectors.
On the horizontal, mark the fastenings of the 3x3 cm flange connectors at the corners. The holes to be drilled are equal to the diameter of the posts.
Rods are attached to them, to which flanges are screwed with self-tapping screws. A clamping screw is used for fixation. It is best to place it facing the wall, otherwise it will be conspicuous.
To maintain the exact shape, four identical pieces of 60–70 cm should be sawn off from the main rod. Then insert the rods into the base and connect the entire structure. Place a hanging mount on the back side.
Skill and imagination will help you make a stand, including a corner one.
Before hanging, it is worth painting your product with three layers of varnish, as it will constantly be exposed to temperature and moisture.
We think that the tips given in this article will convince you of the advantages of wall-mounting a microwave oven and will help you decide on the options for mounting it.
All the work can be done by an invited master. The choice depends on your skills and ability to pay.
How to hang a microwave on the wall
A microwave oven is an almost integral part of every kitchen, but not everyone knows the specifics of its installation. We’ll talk about the types of microwave mounts and the features of this process further.
How the microwave is attached to the bracket
The most common mounting method is the usual placement of the legs in the fastener bed - this ensures the stability of the microwave and free access of air to various ventilation shafts in the housing. The method is not always available due to the location of the legs on the body.
The best solution is to place the microwave oven body directly on the slats - this allows the entire surface of the device to be placed evenly.
Comes with clips included.
Some brackets have special fasteners - clips, latches and others. In this case, please refer to the installation instructions.
Types of wall mounts for microwave ovens
Devices designed for wall-mounted installation of a microwave oven are of two types - brackets and a stand, which differ in their design, but are similar in the method of mounting on the wall.
Brackets for microwave oven
Brackets are two L-shaped holders, in which one shelf is attached to the wall surface, and the second serves as a base on which the equipment is installed. A shelf intended for installing a microwave oven may have a telescopic design, making it possible to adjust the length of this element to the size of the model of the household appliance. The shelf, designed for mounting to the wall, has holes for attaching the bracket.
Bracket for microwave oven model “Holder MWS-2002”
The brackets are made of metal and can be made without painting, in the case of using stainless or other non-corrosion steel, or painted with powder paint.
Microwave oven stand
A stand or, in other words, a shelf hung on the wall and intended for installing a microwave oven, can be of various shapes and designs, made in a factory or independently from scrap materials. The main element of such a product is a shelf, fixed to the wall surface using corners, brackets or other structural elements using fasteners, as in the case of using brackets. The shelf can be made of metal or durable plastic, wood or glass, and the structural elements that provide fastening to the wall are made of metal.
Option for installing a multifunctional wall-mounted stand made of metal
DIY bracket with shelf
To avoid resorting to expensive offers, we recommend limiting yourself to a homemade mount. The master class below shows the process of creating a shelf bracket for a microwave oven over an electric stove. A similar DIY microwave wall mount would be an excellent solution for any kitchen.
Material selection
Materials:
- corner 300x500mm;
- sheet of plywood for the shelf;
- screws and dowels;
- film for finishing the shelf;
Choose a corner made of solid steel - avoid powder fakes, as is the case with purchased brackets. Plywood with a thickness of 10mm is sufficient - make sure that it does not bend under the weight of the microwave oven.
Tools:
- level;
- screwdriver;
- hammer drill or drill;
- hacksaw.
These tools are the most comfortable for doing the job, but if you don’t have a hammer drill, a screwdriver will do the job—no special depth is required for the dowels.
Fastening the corners
First, measure how far apart the corners should be. To do this, mark the edges of the structure and add 10mm to them. Measure the height in a similar way - since the shelf is on the same level as the bottom edge of the cabinets, start the calculation from there.
| 1. The corners are attached to the wall using the bottom screw, previously measured using a level, tape measure or ruler. | |
| 2. A second one is fixed at the required distance, after which a level is placed on the top bar of the corners. | |
| 3. Make sure the corners are level, otherwise the shelf will be sloping and will look unsightly. After alignment, mark the holes for the dowels. |
After installing the dowels, tighten the screws. Do this with a level - the corners will come out most evenly.
Shelf preparation
For the shelf, a sheet of plywood 10mm thick was taken.
| 4. Cut the sheet to the required size with a margin of 2-3mm. | |
| 5. After sawing, sand the entire sheet and cover with finishing film. When working, you should try to get rid of bubbles without piercing with a needle - this will lead to swelling of the plywood due to a leaky coating. |
Shelf fastening
The final step is to attach the shelf. To do this, place it on the corners and screw it into the lower part with screws. Take screws less than the thickness of the plywood - for 10mm, screws 8mm long are perfect.
How to Attach Brackets
The classic bracket looks like the letter “L” and can withstand up to 70 kg of load. Having chosen the appropriate model and durable fasteners, you can get to work.
Installation steps:
- Decide on a location. The MVP should be located away from the gas (electric) stove, refrigerator, sink, TV and closer to a grounded outlet.
- Mark the distance between the fasteners on the wall. Measure slowly, carefully and accurately, with a tape measure and level, so that you don’t have to redo it.
- Drill holes with a drill. This video will help you:
- Special plastic elements are inserted into the holes into which self-tapping screws will fit.
- Now you can attach the L-shaped beams.
- Apply all the bumpers and anti-slip pads.
- Install the oven.
Ready! You installed the microwave yourself. Congratulations on a successful installation!
Related article: How to remove old oil paint from walls
How to install a corner stand-holder for a microwave oven with your own hands
To install the brackets, a hammer drill and self-tapping screws are required.
First of all, choose a place to place the microwave oven. In this case, the requirements for operating the device specified in the instructions must be observed. This applies to its location relative to other household appliances, the sink, as well as the walls and corners of the room.
The placement of sockets plays an important role. The place where the microwave is turned on must have free access, which meets the manufacturer’s requirements for safe use of the device.
Brackets cannot be attached:
- close to the sink (water splashes should not fall on the device during operation);
- place under an electric oven (this will cause condensation);
- at a height below 80 cm above the floor (to protect children from the heated body when the grill or convector is on);
- at a distance closer than 10 cm to other household appliances (to ensure ventilation of the microwave housing).
You may also be interested in information about what a kuppersberg built-in microwave oven looks like and how it is used.
How to hang a microwave oven on the wall correctly
The location of the appliance in the kitchen can be very diverse: above a small refrigerator, in a corner, above a floor stand, etc. The main thing is that the chosen location complies with the rules of ergonomic space. By following our recommendations, you can choose the most practical place for your microwave oven.
- We attach construction tape around the perimeter of the marks so that less construction debris falls onto the floor;
- Drill four holes according to the previously marked marks. We choose a drill of such a size that it is slightly smaller than a butterfly dowel or the same size if using an anchor;
Drywall today is an integral part of modern renovation. They cover the walls and ceilings in all areas of the apartment, including the toilet with bathroom and kitchen. But in this situation, many people have problems with how to hang a rather weighty object on such a wall, because the material may not withstand the load.
This issue is especially relevant for the kitchen, where there is little free space and you need to fit a lot of appliances.
- measure the length of the microwave;
- we measure its boundaries on the wall;
- depending on the types of brackets along the edges of the device, we determine where they are screwed into the wall;
- We mark them with crosses. In such a situation, do not forget to check the marks for evenness according to the building level.
- clearly consider the location of the device;
- You only need to use the fastening system for your model;
- Before purchasing fasteners and brackets, make sure they are in good working order and durable. There should be no chips, cracks or deformations on the fastening elements. Therefore, it is best to use steel products;
- You can only hang the device on the wall using anchor bolts or butterfly dowels. Otherwise, the structure will not be strong and may tear out the fastenings after a while.
How to make it yourself
By placing the stove on a special shelf, you can get free working surfaces and a convenient approach. Using the necessary materials and tools, you can equip this part of the interior yourself.
Required materials and tools
All tools and materials can be purchased at specialized and furniture stores.
Required:
- pencil and tape measure;
- mounting angles;
- hacksaw;
- drill and screwdriver;
- grinding machine;
- corner rounding pattern;
- carpenter's clamps;
- devices for drilling inclined surfaces;
- self-tapping screws;
- wide board or furniture boards with an edge;
- wood tinting agent;
- wood varnish;
- sandpaper;
- wood glue.
It is necessary to think about the size, shape and design of the product in advance.
Making a universal shelf
You can make the simplest option - a single-tier shelf mounted on the wall using mounting angles.
Before starting work, you need to decide exactly where to place the product, as well as prepare all the material in advance.
To work you will need:
- furniture panels with edges - three pieces;
- mounting angles - 20 x 30 cm in size;
- metal rod: diameter - 22 mm, length - 2.2 m;
- flanges (a part intended for connecting pipes) with fasteners;
- drill with attachments and screwdriver;
- hammer drill
You need to choose steel flanges - sillumin flanges will not support the weight of the microwave. The size of the product depends on the dimensions of the microwave oven.
What should be done:
- Mark the centers of the flanges with a pencil. The distance from the corners should be 3 x 3 cm.
- Drill holes in the central shelf with a diameter of 22 mm. Attach the flanges on both sides on the same plane.
- Cut the metal rod into four equal sections, the length of which is 65 mm.
- Secure the rods to the flange using clamping screws. Tighten the screws tightly.
- If the structure is single-level, it will consist of one plane. Its size should be slightly larger than the size of the stove. You need to firmly attach two mounting angles on the side where the shelf will be attached to the wall.
This option is universal. And it will not spoil the overall appearance of the kitchen space.
Rack
A small wall-mounted rack is a good option for installing and storing not only a microwave oven, but also other small household appliances, as well as various kitchen utensils. Such racks are mobile and perfect for any interior.
Even if you remove household appliances, the rack will still be useful for kitchen small items.
You need to prepare:
- three furniture boards;
- metal rods with a diameter of 22 mm;
- flanges - 16 pieces;
- metal corners measuring 200 x 300 mm;
- clamping screws.
Before you start work, you need to make a drawing and blanks.
Manufacturing process:
- Mark the places where the flanges are attached on the furniture boards. The distance from the corners is 30 mm.
- Drill four holes with a diameter of 22 mm in the middle shelf.
- Fix the flanges on the middle shelf on both sides.
- Cut 70 mm parts from the metal rod - four pieces.
- Fasten the parts to the flange with a clamping screw.
- Attach the shelves to each other.
- Install corners behind the rack for hanging on the wall.
The last step in the work will be to install the rack in a convenient location.
Shelf made of brackets
A good solution is to use bracket holders that are designed for wall mounting of a microwave oven. They come with rubber pads and plugs.
The bracket is quite easy to attach yourself. It has the maximum level of security. The base is adjustable (the length of the grip arms is adjustable up to 50 cm), which allows you to customize the design to suit any model. The bracket can support weights up to 35 kg.