Why do you have to disassemble the coffee grinder?
The most ridiculous and unpleasant situations can be the reason for disassembling the coffee grinder.
On numerous thematic forums, consumers indicate the following problems with the device:
- A broken part (for example, a switch, an electrical cord coming off, a decrease in speed and a complete stop of the electric motor).
- The knife has become dull and needs to be replaced.
- Contact of grinded products with electrical components.
- Curiosity, a desire to know what parts a coffee grinder consists of.
Each device model is disassembled differently. To avoid breaking the coffee grinder, you need to follow the instructions from the manufacturer or the advice on the seller’s website.
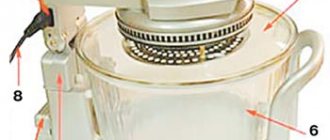
The principle of disassembling a Bosch coffee grinder
German Bosch equipment is known for its high quality products, durability and versatility of devices. In the assortment of coffee grinders, manufacturers often choose two photo models - Bosch mkm-6003 and Bosch MKM-6000. Both partings are characterized by high power, but the disassembly of each model has its own differences.
German technology Bosch
To disassemble the Bosch mkm-6003 coffee grinder, you must first remove the impeller - in a clockwise direction. Then loosen the wire and pull the motor towards you. If there is debris on it, you can clean it off with a soft brush. It is better not to touch the engine of the Bosch mkm-6003 coffee grinder, but if it malfunctions, contact a specialist. A detailed description of each disassembly operation can be seen in the video on the Internet.
Bosch coffee grinder
Disassembling the second model is much more difficult; you can’t do it with your hands alone. The best assistant for opening the Bosch MKM-6000 coffee grinder will be two flat-head screwdrivers (no more than 1.5 mm thick, distance from the slot - 8 mm, width 4-6 mm).
Disassembling a Bosch coffee grinder
Work process (for two people):
- Take the coffee grinder in one pair of hands, set it horizontally and hold it tightly.
- In the second pair of hands, take a screwdriver and, at a distance of approximately 8 mm from the hole for the electrical cable, drive it into the crevice between the side cylindrical part and the bottom to a depth of 8 mm.
- The first screwdriver needs to be inserted at an acute angle, pointing upward from the bottom of the device; with the second screwdriver you need to help the first one to make a gap.
- The floor increases the angle of pressure of the screwdriver inserted into the gap, the coffee grinder is opened.
Before disassembling the Bosch coffee grinder, you should get a camera to take photos of the step-by-step work. This will help you quickly and correctly assemble the device.
How to quickly and without damaging the device disassemble the Soviet ZMM coffee grinder
Soviet manufacturers of household appliances for the kitchen tried to make them as functional and easy to use as possible. The ZMM coffee grinder, even after many years of operation, performs its functions perfectly, but if problems arise, the device can be disassembled. This should be done in the following sequence:
- Remove the knife using a screwdriver - insert it into the slot on the bottom of the device and unscrew the part in a smooth counterclockwise motion.
- Unscrew the plastic nut by turning the pliers counterclockwise 90 degrees.
- Remove the glass and plastic cup holder.
- With a gentle movement, remove the metal washer from the axis holding it.
- By simultaneously pressing the fixing plate and the lock, the parts are also turned counterclockwise and the platinum is removed (after it comes out of the grooves).
- Next, you need to remove the power button after the locking spring is bent.
- Remove the mud washer from the axle.
- — Release the wire after performing the following manipulations: bend the ring at the bottom of the ZMM coffee grinder body, unscrew the two screws securing the electrical wire.
- Remove the device motor.
Coffee grinder ZMM
The technology for disassembling the ZMM coffee grinder is somewhat reminiscent of opening the Mikma Ekma IP-30. Some models of coffee grinders are not recommended to be disassembled at home at all. One of these models is considered to be Vitek 1540. The only thing that can be done with this device is to disconnect it from the power supply and thoroughly clean the inner surface and knives. The manufacturer recommends doing everything else at a service center or in the office of a qualified technician.
Disassembling the Russian coffee grinder Mikma IP 30
Most uninformed buyers fail to disassemble the IP-30 coffee grinder from a Moscow company the first time.
You can correctly disassemble the Ekma coffee grinder in the following sequence:
- Remove the plastic cover.
- Hold the impact mechanism splitter with one hand, and with the other hand take a screwdriver and smoothly unscrew the screw on the bottom of the coffee grinder.
- Remove the divider.
- Use pliers to turn the plastic holder (from right to left and vice versa) located inside the metal bowl.
- Remove the holder from the bowl.
- Remove the protective clip and bowl from the device body.
- Turn the metal bar from right to left and separate it from the grooves of the coffee grinder body.
- Pull out the contact from the base of the power button, carefully move it to the side, and remove the electric motor from the housing.
- Remove the oil seal from the engine shaft and the rubber shock absorbers from its shields.
- — Inside the case, remove the spring that controls the operation of the turning button and remove the button.
- Release the power cord by first unscrewing the screws securing the bar.
The technology for disassembling the Mikma Ekmu IP-30 coffee grinder is quite complex, so at home it is better to do it using the video example.
Manufacturers of household appliances use a variety of technologies. Most devices are characterized by high strength and tight fastening of parts. For example, it is precisely because of the manufacturing technology that it is difficult to disassemble a Bosch coffee grinder (model Bosch MKM-6000), while its analogue, the Belarusian model Vitek 1540, can be opened in a few minutes.
How to properly disassemble it yourself
The sequence of disassembling the coffee grinder depends on the method of fastening its structural elements: latches, bolts, screws.
Soviet and Mikmah IP 30
Devices produced before the 90s of the last century had high build quality and retain functionality to this day.
To eliminate the malfunction, disassemble the coffee grinders in the following sequence:
- Remove the knife: use a screwdriver to unscrew the slot on the bottom of the glass clockwise.
- Remove the glass by first unscrewing the plastic nut 90 degrees.
- The washer is removed from the drive shaft.
- Remove the latch from the upper cup holder by simultaneously pressing the latch and the lock and turning them clockwise.
- By pressing the spring, remove the switch.
- Remove the protective washer from the shaft.
- Remove the engine after disconnecting the wire, bending the ring and unscrewing the screws.
See also
Step-by-step instructions for finishing a balcony with laminate with your own hands
The MIKMA IP 30 coffee grinder has another disassembly option:
- The divider is removed by unscrewing the screw on the bottom of the device.
- Remove the holder from the metal cup holder by turning it with pliers.
- Remove the cup holder with protective housing.
- Separate the metal bar from the coffee grinder body by moving it counterclockwise.
- Move the contact from under the button and remove the engine.
- Remove the oil seal and shock absorbers on the shaft.
- Remove the spring, remove the button.
- Unscrew the screws and release the electrical cable.
This completes the disassembly process, and you can begin repairing the coffee grinder.
Bosch
Bosch rotary coffee grinders begin to disassemble from the bottom of the glass: lightly squeeze the plastic body, use a screwdriver to pick up the resulting gap. The latches come off and the cover is removed. To remove the knife, use a screwdriver from below to hold the bolt on the shaft on which the knife is mounted, while unscrewing the divider. Unscrew in the direction of shaft rotation.
To disconnect the plastic top from the metal cup holder, where the grinding occurs, the latch is hooked with a screwdriver.
The MKM-6000 model is opened by two people: one holds the coffee grinder in a horizontal position, the other inserts a screwdriver in the place where the latch is located (1.5 centimeters from the cable inlet). A thin blade of a screwdriver is inserted at an acute angle, and a second screwdriver is used to widen the hole and remove the latches.
Other brands
Other options for disassembling coffee grinders differ in the way they remove the blade and bottom. The divider with the plastic plug above the bolt is removed without affecting the axis: the plug is removed, the knife is unscrewed clockwise. The bottom is fastened not with latches, but with screws, removing which gives access to the inside of the case.
Device
All coffee grinders are divided into two types according to the grinding method: burr grinders and rotary screw grinders. There are also differences between manual and electric, but the latter have firmly and thoroughly supplanted their mechanical counterparts.
What does a rotary electric coffee grinder consist of:
- frame,
- metal bowl,
- two-, less often four-blade propeller,
- transmitting rod,
- motor and wire
- lid.
This is how both expensive and cheap models are designed: “Bosch”, “Mikmah”. Soviet electric coffee grinders were also assembled in the same way.
To disassemble them, you need to follow these steps:
- Remove the cover.
- Detach the bottom. In Soviet devices it is fixed with screws using a Phillips screwdriver; in modern devices it is usually simply pryed off and removed.
- Tighten the locking screw in the center with a screwdriver.
- Carefully unscrew the rotor screw with your hand or a pair of narrow-nose pliers (in the same direction in which it grinds the coffee).
- Remove the screw and bowl.
- Dismantle the main body.
Important Before disassembling the coffee grinder, it must be disconnected from the power supply.
Burr coffee grinders are generally disassembled according to the same principle.
- Use a screwdriver to pry it off and remove all the turntables.
- Use the same method to disconnect the bottom (it is advisable to get on the 4 stopper teeth).
- Unscrew the 4 screws around the perimeter and remove the top part.
- Remove the coffee tank (cup).
- Remove the remaining grains with a spoon and then with a vacuum cleaner.
- Remove the disc that regulates the grinding (rotating clockwise).
- Remove the upper stationary blade of the millstone.
- For further cleaning, remove the shock-absorbing springs.
Depending on the model and brand, the algorithm will be slightly different; Miss Clean magazine recommends following the instructions for the specific model.
Device structure
Today's electric coffee grinders come in two types: burr and impact. The lion's share of the space in the device body is occupied by the electric motor - up to 80%. The remaining area is allocated for coffee beans. For example, in millstone models, the coffee grinder consists of three sections. The first is filled with a portion of raw materials for processing. In the second, grinding occurs directly. And in the third, finished products are assembled.
Burr coffee grinder
The impact type design has knives. It is they who grind the grains into powder at high rotation speed. Sometimes such a mechanism is called a rotary mechanism. And it only has one hopper that holds the roasted coffee beans. This is where processing takes place. And the ground raw materials are simply poured into another container. In its design, this coffee grinder is very similar to a blender.
Impact coffee grinder
Important! All devices are equipped with motor blocking when the lid is open and overheating protection. Many models have added an additional pulse mode, which, by briefly stopping the engine, helps when crushing harder products. For example, when you need to make powder from sugar.
Rotary coffee grinders often have a timer installed. It is needed to regulate the degree of grinding. The longer the process, the smaller the product yield. In millstone designs, this role is played by the grinding depth regulator. To do this, increase or decrease the gap between the millstones. Unequal grinding fractions are needed to prepare the drink according to different recipes.
Advice! To brew coffee in a cezve, you need to grind the beans into dust. To brew espresso, a coarser grind is required.
How to disassemble and repair a coffee grinder with your own hands
Modern household appliances are not durable. And if you use the device for other than its intended purpose, then the rate of its failure increases significantly. This can happen with a coffee grinder if you grind sugar and other, harder types of products instead of coffee beans. But, regardless of whether the device broke down due to improper operation or for other objective reasons, you should not rush to contact the service center. Most likely, it is quite possible to repair the coffee grinder yourself.
Device structure
Today's electric coffee grinders come in two types: burr and impact. The lion's share of the space in the device body is occupied by the electric motor - up to 80%. The remaining area is allocated for coffee beans. For example, in millstone models, the coffee grinder consists of three sections. The first is filled with a portion of raw materials for processing. In the second, grinding occurs directly. And in the third, finished products are assembled.
The impact type design has knives. It is they who grind the grains into powder at high rotation speed. Sometimes such a mechanism is called a rotary mechanism. And it only has one hopper that holds the roasted coffee beans. This is where processing takes place. And the ground raw materials are simply poured into another container. In its design, this coffee grinder is very similar to a blender.
Important! All devices are equipped with motor blocking when the lid is open and overheating protection. Many models have added an additional pulse mode, which, by briefly stopping the engine, helps when crushing harder products. For example, when you need to make powder from sugar.
Rotary coffee grinders often have a timer installed. It is needed to regulate the degree of grinding. The longer the process, the smaller the product yield. In millstone designs, this role is played by the grinding depth regulator. To do this, increase or decrease the gap between the millstones. Unequal grinding fractions are needed to prepare the drink according to different recipes.
Advice! To brew coffee in a cezve, you need to grind the beans into dust. To brew espresso, a coarser grind is required.
How to disassemble
It is not difficult to disassemble the device if you know the circuit diagram of the device. The design of all coffee grinders is almost the same, but the assembly differs between brands. And the famous company Bosch has two models with different disassembly methods.
There are easily people who still successfully use Soviet household appliances. Coffee grinders produced in a long-defunct country are not inferior in productivity to their modern counterparts. They will open a list of instructions for proper disassembly of such devices.
Soviet coffee grinders and Mikma IP 30
The ZMM brand coffee grinder, made to last in Soviet times, has to be disassembled, if not for repairs, then at least for cleaning and maintenance work. The sequence of actions is as follows.
- Release the knife. To do this, you need to find a slot at the bottom of the case, insert a screwdriver into it and unscrew it counterclockwise.
- Using a spanner wrench or pliers, unscrew the plastic nut, which is located immediately under the knife, half a turn (left or right).
- Remove the plastic cup holder along with the glass.
- Remove the metal washer from the retaining axle.
- To remove the plate, you need to simultaneously press it together with the lock and turn it counterclockwise until it comes out of the grooves.
- Bend the retaining spring and release the switch.
- Remove the dirt washer from the axle.
- Move the ring at the bottom of the housing and unscrew the screws securing the electrical wire.
- Remove the engine.
Important! When removing the knife, there is a danger of tearing off the slot. After this, further disassembly will be impossible. To prevent this from happening, you need to first spray it with a can of WD-40 and wait a few seconds. This will make it much easier to unscrew.
Another Soviet model, EKMU 50, has a completely similar sequence diagram for disassembling. But for the modern MIKMA electric coffee grinder EKMU IP-30 from a Moscow manufacturer (a subsidiary version of the Soviet prototype), the algorithm is the same up to the fifth point inclusive. Then you need to do the following:
- Do not remove the bar, but carefully lift it and move it to the side;
- before disconnecting the conductor, you need to slide it out of the button body and move it to the right;
- remove the electric motor;
- remove the oil seal from the motor shaft;
- release the shields from the rubber shock absorbers;
- remove the spring from the groove inside the device to remove the button;
- Unscrew the two screws hidden under the rubber ring on the bottom to disconnect the power cord from the case.
Straume 3 is another coffee grinder made in Riga during Soviet times. But you can see how she understands it in the video:
Bosch
Perhaps the easiest way to disassemble of all coffee grinder samples is the Bosch mkm-6003 model. The algorithm of actions is as follows: to remove the knife, you just need to unscrew it clockwise, and you can pull out the motor by loosening the power cord and pulling the motor towards you. That's all.
One person can no longer handle the Bosch mkm-6000 model. Need outside help or access to a good vice. First, you need to fix the unit in the hands of an assistant or clamp it in clamps so that it is strictly horizontal. Next, use a screwdriver or feeler gauge to pry up the bottom in the area where the power cord is attached. Then, having driven the first screwdriver to a depth of one centimeter, the second one needs to feel for the latches and carefully separate them. In this case, you should hold the bottom so that the motor, which is pressed against it, does not fall out. The apparent simplicity of the process should not be misleading, since the main difficulty lies precisely in the latches, the separation of which requires great skill and patience.
Şərh • 19
- 1. The title should have indicated “Repair of electric coffee grinder EKMU 30 model IP 30 from the MIKMA plant,” 1992.” 2. RESTORATION OF THE BOWL ATTACHMENT. After removing the “impact mechanism” (as the “knives” are called in the factory instructions), the bowl SHOULD NOT come off so easily! It is attached to the steel bracket inside the ECMU only with a black plastic sleeve with protrusions (the author of the video holds it in his left hand at 89 seconds of the video). This bushing must be removed and installed using pliers (more convenient) using the parallel slots on it. Removal: Carefully turn the bushing COUNTERclockwise for approx. 90 degrees, lightly pressing on it (there is an elastic rubber gasket at the bottom). The freed bushing will rise slightly along the shaft. Installation: carefully place the protrusions of the bushing into the recesses of the bracket, and lightly pressing the bushing on the rubber gasket under the bracket, turn the bushing approx. 90 degrees clockwise.
Mikhail Kirmel Il əvvəl how to choose such a rubber gasket? mine fell to pieces.
- Tamerlan Galaev 15 gün əvvəl They did it right because the finer the grind, the tastier Coffee and a coffee grinder should grind coffee beans into dust.
- Vladimir Lanfinikov 10 ay əvvəl @Nikolai Fetisov That's why I asked: . I don’t see any other way out now except to saw the coffee grinder, or melt the plastic part of the knife. Because it is simply impossible to disassemble it otherwise.
- sirabe19 3 il əvvəl +1 Yulia Erofeeva I found it. Step-by-step disassembly instructions homereparetmaster.blogspot.ru/p/blog-page.html
Do-it-yourself cleaning and sharpening of coffee grinder knives
You can clean and sharpen coffee grinder knives at home. This does not require special tools or means, just available materials.
Before work, you need to make sure that the equipment is in working order. then disconnect the device from the mains to avoid accidents and damage to the coffee grinder.
Sharpening knives with disassembling the coffee grinder
Clear your workspace and remove any foreign objects. Prepare a screwdriver with different diameter bits. Remove the lid and place the coffee grinder upside down. The blades will be visible from above. Remove the rubber gasket. A slot will appear inside that looks like a bolt head.
Place the device on its side. Select a screwdriver according to the diameter and insert it into the slot. Hold the knife blade with one hand (prepare protective material, such as thick fabric, in advance), and with the other, turn the system counterclockwise.
The knife will soon be disconnected from the engine. Next, you can use musat and carefully sharpen the blade.
Instructions for sharpening without disassembly
To sharpen the legs of a coffee grinder without disassembling the mechanism, you need to use egg shells. You will need 3 egg shells and a soft sponge or cloth. They must not contain metal elements. Instead of shells, you can use 1 tablespoon of rice cereal.
Crumble the shells into the bean compartment and close the lid tightly. Next, turn on the device for 2 minutes. After this time, disconnect the coffee grinder from the electrical outlet and pour out the resulting dust. It can be used instead of fertilizer for home and garden plants.
As a result, the knives should become sharper. An additional benefit of this sharpening method is that the bean container can be cleaned in hard-to-reach areas.
When finished, wipe the inside of the grinder with a slightly damp sponge to remove any remaining dust and dirt.
How to grind coffee and use the unit correctly
True gourmets of the drink claim that when preparing coffee, the most important thing is its correct grinding. There is a whole science that describes all the nuances of this seemingly simple operation. Due to the fact that the popularity of drinking coffee has recently become enormous, specialized professionals in this field of cooking have emerged. Sometimes their opinions differ. However, when it comes to grinding coffee beans, experts are inclined to believe that proper grinding occurs either in a manual coffee grinder or in an electric one equipped with millstones. A rotary coffee grinder grinds less evenly, and the resulting final product contains particles of different sizes. In addition, at high speeds of the knives, the coffee burns, which leads to a change in its taste.
The grinding time should not be long. As well as the time from grinding to brewing the drink. The longer the coffee is ground, the more essential oils evaporate. Therefore, the optimal grinding time is considered to be no more than 20 seconds.
Over time, the coffee grinder began to be used not only for coffee. You can crush nuts, eggshells, cereals, salt, sugar and other bulk food products in it. For example, at home using a coffee grinder you can make powdered sugar from ordinary loose sugar.
To obtain powdered sugar, you need to load a certain amount of granulated sugar into the coffee grinder container and turn on the engine for a few minutes. To obtain high-quality powder, you need to bring the consistency of the powder to the state of fine dust. For a fragrant smell, add a little vanillin or vanilla sugar.
In culinary practice, powder mixed with fragrant nutmeg is also used. To do this, first grind a well-dried nut, and then add sugar to it and grind it all together.
It is not recommended to grind products that have a persistent odor in the same coffee grinder. For example, you should not crush pepper in it, the persistent smell of which can then be transferred to the coffee drink.
Causes of breakdowns and prevention
The simplest and most common cause of malfunction of any coffee grinder is clogging. Powder and external debris often get under the propeller and get stuck there; in cheap models, they accumulate inside the housing, threatening the motor with overheating.
Sometimes the device refuses to work not because of a breakdown, but because of sensitive sensors. Modern rotary coffee grinders are equipped with fuses that prevent the motor from starting if the lid is not completely closed. If coffee powder gets into the grooves for the spikes, the sensors detect insufficient tightness. Such a gap is often not noticeable to the eye.
If you use the device for purposes other than its intended purpose, for example, grinding salt or pepper, there is a high probability of jamming the rotary screw. Salt also causes rust, which is not at all desirable. To wash the bushing and screw, it is better to use alcohol, which evaporates quickly and does not increase the humidity inside the device.
Burr coffee grinders are more likely to suffer from electronic malfunctions than from clogging. In particular, the capacitor fails - it can be completely replaced if you have a soldering iron and solder in the house; it is not difficult to find an analogue in any radio parts store.
Analysis of the electrical fault of the Zauber Z-490 coffee grinder is in the video below.
There are also complaints on forums that the rotation screw does not unscrew. If it is clogged at the axle or rusted, it is enough to dab it with alcohol and leave it for a while. If the plastic base in which the blades are held is flattened or otherwise deformed, it will either have to be drilled out or a screw/nail fused into it and then removed.
Prevention
To avoid problems, just follow a few simple rules:
- Store the device in a dry place, do not wash, but only sweep or wipe.
- Clean the device from time to time (small ones with a brush or brush, large ones with a vacuum cleaner and a brush), this is vital for millstone models; semi-professional devices need general cleaning every 2000 servings.
- Do not exceed the permissible load, this applies to both the volume of loaded grains and the duration of one grinding session. The instructions for most rotary coffee grinders indicate a limit of 2-5 seconds, after which the device needs to “rest” for the same amount of time.
- Use the device only for its intended purpose.
Modern coffee grinders are often more powerful than Soviet ones, but are inferior to them in terms of durability, especially when it comes to rotary ones. Millstones are designed for more frequent use, but, as practice shows, they are often let down by electronics. Today there are many service centers ready to service the coffee grinder, but if you follow simple rules, the unit will last a long time without repair.
Repair of standard breakdowns
The following will describe methods for repairing coffee grinders that do not require in-depth knowledge. Namely:
- the device does not turn on;
- knives rotate unevenly;
- malfunctions in the motor;
- broken power cord;
- other typical simple breakdowns.
When the device does not show signs of life, then first of all you should look for broken contacts and broken wires. If the inspection does not reveal a problem, then the reason lies in the electric motor, which can only be fixed in a workshop, since special knowledge is required.
Important! When the knives are spinning with jamming, then the burnt-out motor winding is clearly to blame. At home, it is simply not possible for a person ignorant of such matters to rewind the winding.
But if the engine is working hard and there is a burning smell, you can try to do it without a specialist. Most likely the issue is contamination of the bearings or sliding bushings. To fix the problem, you need to release the shaft and wipe it with alcohol. If there is obvious corrosion, you can treat it with WD-40 or carefully with sandpaper. Brushes may be responsible for interruptions in engine operation. In this case, cleaning or complete replacement is required. You can wipe the entire collector with alcohol if dirt has accumulated on it.
Places of kinks and breaks in the power cord immediately catch the eye. If it is not possible to replace it with a new one, then the wires at the break point should be cleaned, re-soldered and re-insulated. There are also cases when the locking mechanism fails due to contamination of the push mechanism. This issue is easily resolved by disassembling and cleaning the non-working unit.
Advice! Some coffee grinders (notably the Delonghi KG 79) have a weak link in the form of a capacitor on the electrical board. Over time, it swells and needs to be replaced with a new one.
Coffee grinder malfunctions and ways to eliminate them
If you follow the operating rules, even with regular use, the coffee grinder will last for many years. But the electric motor is usually equipped with plain bearings, in which the lubricant is produced after just a couple of years of operation, and this is the most common cause of its failure. For trouble-free operation of the coffee grinder, you need to disassemble it once a year and lubricate the bearings with machine oil.
Usually, in a coffee grinder, either the knives do not rotate at sufficient speed or it does not turn on. All the most likely breakdowns of coffee grinders, recommendations for finding and repairing them are presented in the table.
| Table of common coffee grinder malfunctions and ways to eliminate them | |||
| External manifestation of the malfunction | Possible cause of malfunction | Troubleshooting | Repair method |
| The coffee grinder turns on, but the blades rotate slowly | The grease in the electric motor bearings has thickened or run out | If the bearings are insufficiently lubricated during operation, the coffee grinder produces increased acoustic noise and a burning smell may appear due to overheating of the electric motor windings | It is necessary to disassemble the coffee grinder and lubricate the sliding bearings with machine oil |
| Mechanical wear of the upper bearing of the electric motor due to lack of lubrication. In this case, there is often a deviation of the knives relative to the center of rotation | Rock the knife holder to the sides. If the play is more than 0.5 mm, then the bearing is worn out | Replace the bearing with a new one | |
| The coffee grinder does not turn on, the knives do not rotate | The cord is not plugged into the outlet | Check | Insert the cord plug into the socket |
| No voltage at the socket | Check the presence of voltage in the outlet using a working electrical appliance | Connect the coffee grinder to a working outlet | |
| The power cord is faulty | Visually check the plug and cord for mechanical damage, check the integrity of the cord wires with a multimeter | If faulty, replace the cord | |
| The switch that blocks the engine from starting when the cover is removed is faulty | You need to open the coffee grinder and test the switch with a multimeter. When the cover is removed, the resistance between the contacts should be equal to infinity, and when closed, it should be zero. | You need to disassemble the coffee grinder and first check the free movement of the pusher. If the pusher is in order and the switch can be disassembled, then use sandpaper to clean the contacts from carbon deposits. If it is impossible to repair the switch, replace it | |
| Motor brushes are worn out | Carry out an external inspection of the brushes. Their entire surface must firmly adhere to the lamellas of the rotor commutator, have no cracks or chips, and move easily in the holders | If brush wear is detected, replace | |
| Broken motor rotor or stator windings | Visually check the windings for mechanical damage and local darkening, check the integrity of the windings with a multimeter | If a winding break is detected, then repairing the coffee grinder is not economically feasible. | |
| The thermal fuse has tripped to prevent the electric motor from overheating due to its malfunction or prolonged operation of the coffee grinder. | Check the integrity of the thermal fuse with a multimeter. Its resistance should be zero. To check in the absence of the device, you can temporarily short-circuit its terminals | If a broken thermal fuse is detected, replace it with a serviceable one. If the new thermal fuse blows again when the coffee grinder is running for a short time, then the electric motor is faulty | |
How to fix problems of the second category
Problems of the second category represent damage to the electromechanical part of the coffee grinder.
| Types of coffee grinder malfunctions | Remedies |
| Broken power cord or poor contacts in the socket. | Using a voltage indicator, find the location of the power failure. The current is restored, the contacts are cleaned, and the junction is isolated. |
| Damage to the switch and jamming of the engine blocking drive. | The faulty switch is removed from the device body and a new one is installed in its place. The engine blocking drive with the cover open is thoroughly cleaned and its free movement is checked. |
| Interruptions in engine operation. Short-term changes in the speed of rotation of the working shaft. Stops when the start button is on. | The brushes may wear out and need to be replaced. Engine manifold contamination. The collector is cleaned and wiped with a cloth soaked in cologne or alcohol. |
More complex repairs associated with rewinding the windings of electric motor coils are, as a rule, not justified and require a lot of time. It's easier to replace the entire motor.
A common and characteristic failure of coffee grinders is the failure of bearings. Although they are protected by special rubber boots, during grinding fine dust still penetrates onto their working surface. This leads to jamming of the electric motor armature. The problem is easily solved - the bearings are cleaned and lubricated with some mineral oil. After this, they can last for a very long time.
The choice of coffee grinder depends on the purpose of its purchase and the volume of planned processing of coffee beans. Coffee grinders from such world-famous companies as Krups, Bosch, Scarlett, Delonghi have proven themselves well. Professional units are capable of passing large quantities of coffee through themselves, while household ones are designed for preparing a coffee drink within the family circle. They also differ in weight, power and other performance indicators. When choosing, you should also take into account the dimensions of the machine, which in some models reach 2.4 m.
Rules for operating and maintaining coffee grinders
In order for the coffee grinder to work as long as possible, you need to follow simple operating and maintenance rules.
- Do not leave ground coffee in the device for a long time.
- After each grinding, wipe the inner bowl and knives with a damp cloth.
- The device should not be immersed in water when washing; it is better to limit it to wet wiping.
- Machines with plastic housings may overheat and fail during long continuous operation. Such failures are common in the Moulinex and Saturn brands. If you take short breaks in grinding every 20 seconds, you can increase the life of the coffee grinder.
- You should try to avoid chopping other foods. This is what a blender is for.
- Dull knives and millstones should be replaced promptly. The latter must be replaced after grinding 300 kg of grains, and the former - much more often.
By following simple rules for the care and operation of the device, regularly carrying out preventive maintenance and promptly performing minor repairs, you can extend the life of your favorite coffee grinder, which will delight you with many more years of faithful service.
Acceptable ingredients for grinding in a coffee grinder
The main purpose of a coffee grinder is to grind coffee beans, but in addition, some models of devices can be used for crushing bulk ingredients. To avoid damage to the device, before using it, you should study the instructions in detail, since some products may fail if used for other purposes.
Considering the fact that not all dry products can be crushed using a coffee grinder, let’s consider the main ingredients that, in addition to coffee beans, can be crushed:
- - breadcrumbs for breading;
- - large-grain dry cereals, such as peas, lentils;
- - dried herbs;
- - dried apricots;
- - spices.
Remember, it is strictly forbidden to grind sugar in a coffee grinder. Otherwise, in more than 95% of cases, device failure cannot be avoided.
This is due to the fact that the rotation speed of the coffee grinder blades during operation can reach 14,000 rpm, as a result, when powdered sugar gets into the heated bearing, it melts and turns into caramel. At the same time, the “sticky” liquid has a viscous effect on the bearing, gluing it to the axis on which the blades are located. Thus, after some time, when you turn on the coffee grinder, the device begins to make strange sounds and does not respond to commands from the control panel.
Disassembly and repair of VITEK coffee grinder
The brand's products are not complicated. They are quite reliable. However, they do not shine with information content. If a breakdown occurs, the device simply does not turn on. To carry out diagnostics and repairs, the machine must be disassembled. This is done using the following algorithm.
- With the body on its side, turn the ring regulator at the bottom and remove it.
- The bottom part is removed from the body. This is done with a screwdriver, pressing the latches (4 pieces).
- The ring contacts are removed as a single unit with the power cable. It is released by unscrewing the fixing screws.
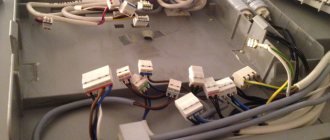
- This opens access to the false bottom protecting the engine and control board. The part is removed after unscrewing the self-tapping screws.
- The wires inside the cramped housing are quite short. It is recommended to free them from the board by opening the corresponding connector using a thin screwdriver.
- Other connections on the connectors are also released. This should be done for greater freedom of operation. It is recommended to carefully note the position of the wire routes or photograph their positions before disconnecting.
- The boards are removed from the case.
- The knife is unscrewed in a clockwise direction. To do this, you will have to fix the motor shaft. On the reverse side there is a slot for a straight screwdriver.
- The motor is removed from the housing.
Coffee grinder motor
At the final disassembly, a block of additional parts is removed from the rotor. It is important to remember their position, as well as the order in which they are placed.
Engine Maintenance
The coffee grinder motor is checked: they try to rotate the rotor with their fingers. If this cannot be done, the engine will have to be disassembled for complete cleaning and lubrication. But even if the rotor rotates freely, it is recommended to apply a little silicone grease to the bushings.
In this case, the shaft must be manually moved up and down. This allows the lubricant to penetrate deep into the bushing. Engine maintenance ends with checking the condition of the brushes. If they are excessively short, the parts are replaced.
Typical repair for loss of contact
Checking the operation of electrical circuits begins with the contact block of the sole. To do this, it is included in the network. When using a multimeter or voltage indicator, you should make sure that there is 220V at the contacts. This will indicate that the unit is working properly.
Checking with a voltage indicator
Then they check the safety limit switch and the accidental start blocker. This is a small microswitch. You should check its normal operation using a multimeter or other device. When you press the limit switch, the circuit should close.
The engine is checked after connecting the control board. The latter is inserted into the standard housing socket. The engine is placed on the table nearby, its contact connector is connected to the control board.
To start, you must manually close the safety switch. You should not do this with your fingers, since shorting the motor windings can result in an electric shock.
It is most convenient to rest a plastic rod or other suitable object on the head of the microswitch. Then the power cord is inserted into the contact block, the corresponding board comb is connected and it is checked whether voltage is supplied to the motor. This is done by a pointer. One probe is installed on the common wire, the other on the output of the safety limit switch.
Checking motor voltage
If there is no voltage on the engine, it is worth testing the cable coming from the sole and the reliability of the contacts in the comb. To check the motor, you need to connect the common line contact of the board (on the connector) to the corresponding motor terminal with a separate wire. Then they do (with the circuits in normal condition):
- insert the power plug into the socket;
- select grinding using the regulator;
- the corresponding LED on the board should light up;
- press the START button;
- the engine starts.
If at any stage of this process a failure occurs, it becomes clear where to look for its cause. In voltage transmission circuits to the board or motor. It's worth moving the connectors. If necessary, you need to solder their contacts on the control board.
Soldering contacts
In the most difficult case, you will have to test the engine. This can be done using standard methods using a multimeter. If an interturn short circuit or a break in the windings is detected, the motor will have to be changed or rewinded.
After successful repair of the electrical circuits, the coffee grinder is assembled. This is done in reverse order according to the disassembly algorithm described above.
We repair coffee grinders with our own hands
Modern coffee grinders are, without a doubt, reliable and productive, but they are designed for specific tasks. For example, a coffee grinder may need repairs if it grinds sugar instead of coffee beans. Other models, especially those manufactured by Bork and Bosch, suffer from moisture penetration into the motor shaft area. But in any case, if the engine does not burn out, you can repair the device yourself.
Disassembly technology
There are two types of devices:
- blade coffee grinders;
- burr mills.
The latter have a separate algorithm for disassembling the grinding mechanism. The answer to the question of how to completely disassemble a burr-type coffee grinder depends on the specific model of the device. The general scheme is the same. The conical knives of the mill are attached to the drive shaft with three or four bolts. It's easy to unscrew them. However, when reassembling, you need to carefully ensure that the heads are completely seated in the seats.
Important! If you assemble the mill device without tightening the bolts, you can burn the coffee grinder, or constantly find fine metal dust in the grinding due to the fact that the protruding fastener heads protrude into the movement zone of the grinding mechanism.
Despite the fact that there are several standardized types of coffee grinders and accepted layout schemes for the devices themselves, products from different brands are often disassembled according to a unique algorithm. For example, the Bosch company in one series has models with different methods for separating parts.
Old Soviet coffee grinders
Soviet coffee grinders are still actively used in many homes. They are simple and reliable. The most common model is the 3MM coffee grinder. It has to be disassembled not only for repairs. The same operation is needed for regular preventive maintenance of the device.
Soviet coffee grinder ZMM
- To disassemble the 3MM, you will need to remove the knife, this is done with a screwdriver. You need to unscrew the slot at the bottom of the part.
- The washer placed under the knife is turned half a turn in any direction. This can be done with a wrench or regular pliers.
- After turning the washer, you can remove the glass and cup holder.
- The retaining washer mounted on the axle is removed.
- The plate is in a cylindrical thread. The part is pressed and rotated counterclockwise. The bar must be recessed and twisted simultaneously with the blocker until the parts are released.
- To release the switch, you need to bend the spring retainer plate.
- Remove the dirt washer.
- To release the engine, you need to move the ring piece away. This will give you access to the fixing screws that need to be unscrewed.
After these operations, you can remove the engine.
Advice! The most difficult job when disassembling a 3MM is removing the knife. To avoid damaging the fastener spline, it is recommended to spray the joint with WD40 penetrating fluid.
Another common Soviet model EKMU50 is disassembled according to the same principle. But the EKMU IP30 MIKMA product provides a different algorithm of actions.
It is different after removing the retaining washer. I don’t twist the bar, but just move it to the side, lifting it a little. Further:
- disconnect the conductor, this can be done after the element is pulled out of the starter body slightly to the right;
- the motor is removed, the oil seal on the shaft is removed;
- rubber shock absorbers are dismantled;
- the spring-loaded plate securing the button is removed (removed from the groove).
After this, just unscrew a couple of screws covered with a rubber ring at the bottom of the case to remove the power cable.
The brand’s product line includes a coffee grinder that even a child can handle. This is MKM6003. In order to disassemble the model, you just need to unscrew the knife by rotating it clockwise. After this, loosen the power cord clamp and pull out the engine.
There are brand products that are almost impossible to disassemble alone. For example, MKM6000. For normal work, you will need a second pair of hands. Or a bench vise with a large fixation distance between the jaws.
The machine is fixed strictly horizontally. Then use a screwdriver and a knife to release the latches holding the bottom. The tool is driven into the connection line of the parts in the area of the power cord. Consistently moving along the gap, press out the latches. This must be done carefully, since the bottom part is a power part; it holds the engine in its position.
Disassembly Tips
Don’t think that all coffee grinders are difficult to understand. For most, it is enough to disassemble the case by unscrewing several screws. However, you shouldn’t think about the extreme simplicity of the process either. If something doesn't go according to plan, it is recommended to look for information on proper disassembly.
BORK J700 has a secret: you need to remove the grinding degree control knob to gain access to the control board. There is also a subtlety in the sequence of disassembling the Elmaz coffee grinder. Its bottom must first be turned in a plane, and only then removed by removing it from the hooks.
Typical problems and solutions
To repair the engine or determine its performance, you need a multimeter and knowledge of where to measure winding resistance. Therefore, we will only touch on relatively minor problems that can be fixed even with minimal skills in working with the tool.
Power cable failure and locking failure
A broken power cable is visible to the naked eye. But if the bend point is close to the housing, you can identify the breakdown by simply moving the wire. If the device begins to show signs of life, it means you will have to change the cable.
Locking failure occurs due to clogging of the pressure mechanism (located on the groove line of the cover) or lack of pressure on the inner plate. It's easy to check the locking - press on the protruding plastic element with a thin screwdriver. If the coffee grinder comes to life at a certain position, you need to disassemble it and remove dirt.
The device does not start
There may be several reasons: from a cable break inside (to eliminate such a problem you will need skills in working with a soldering iron) to motor failure. In this case, verification will require special knowledge. In this case, repairs are not cost-effective; rewinding or purchasing a new motor is required; it is often easier and cheaper to buy a new coffee grinder.
The knife rotates unevenly, the speed decreases sharply as the grinding mass increases
One of the reasons is partial failure of the motor, burnout of one of the windings. Repairs can be a problem. Diagnosis, rewinding or expensive replacement will be required.
During operation there is a burning smell and a strained engine sound.
The most common reason is contamination and oxidation of bearings or sliding bushings. This problem is very often observed with Bosch coffee grinders of the 6000 series. To eliminate contamination, you need to carefully disassemble the device, check the ease of sliding of all blocks, and lubricate the bearings. For Bosch 6000 models the following is done:
- the sliding sleeve is removed from the shaft (upper part);
- the shaft is treated with alcohol;
- if there are obvious signs of corrosion, it can be removed using special products or WD 40.
The shaft can be treated with sandpaper, you need to act carefully. The procedure shown in the following video is not a commonly used one. With diligence and constant repetition of this type of maintenance, the clearance in the sliding sleeve can be changed, which will lead to various types of problems.
Disassembly and repair of VITEK coffee grinder
The brand's products are not complicated. They are quite reliable. However, they do not shine with information content. If a breakdown occurs, the device simply does not turn on. To carry out diagnostics and repairs, the machine must be disassembled. This is done using the following algorithm.
- With the body on its side, turn the ring regulator at the bottom and remove it.
- The bottom part is removed from the body. This is done with a screwdriver, pressing the latches (4 pieces).
- The ring contacts are removed as a single unit with the power cable. It is released by unscrewing the fixing screws.
- This opens access to the false bottom protecting the engine and control board. The part is removed after unscrewing the self-tapping screws.
- The wires inside the cramped housing are quite short. It is recommended to free them from the board by opening the corresponding connector using a thin screwdriver.
- Other connections on the connectors are also released. This should be done for greater freedom of operation. It is recommended to carefully note the position of the wire routes or photograph their positions before disconnecting.
- The boards are removed from the case.
- The knife is unscrewed in a clockwise direction. To do this, you will have to fix the motor shaft. On the reverse side there is a slot for a straight screwdriver.
- The motor is removed from the housing.
At the final disassembly, a block of additional parts is removed from the rotor. It is important to remember their position, as well as the order in which they are placed.
Engine Maintenance
The coffee grinder motor is checked: they try to rotate the rotor with their fingers. If this cannot be done, the engine will have to be disassembled for complete cleaning and lubrication. But even if the rotor rotates freely, it is recommended to apply a little silicone grease to the bushings.
In this case, the shaft must be manually moved up and down. This allows the lubricant to penetrate deep into the bushing. Engine maintenance ends with checking the condition of the brushes. If they are excessively short, the parts are replaced.
Typical repair for loss of contact
Checking the operation of electrical circuits begins with the contact block of the sole. To do this, it is included in the network. When using a multimeter or voltage indicator, you should make sure that there is 220V at the contacts. This will indicate that the unit is working properly.
Checking with a voltage indicator
Then they check the safety limit switch and the accidental start blocker. This is a small microswitch. You should check its normal operation using a multimeter or other device. When you press the limit switch, the circuit should close.
The engine is checked after connecting the control board. The latter is inserted into the standard housing socket. The engine is placed on the table nearby, its contact connector is connected to the control board.
To start, you must manually close the safety switch. You should not do this with your fingers, since shorting the motor windings can result in an electric shock.
It is most convenient to rest a plastic rod or other suitable object on the head of the microswitch. Then the power cord is inserted into the contact block, the corresponding board comb is connected and it is checked whether voltage is supplied to the motor. This is done by a pointer. One probe is installed on the common wire, the other on the output of the safety limit switch.
Checking motor voltage
If there is no voltage on the engine, it is worth testing the cable coming from the sole and the reliability of the contacts in the comb. To check the motor, you need to connect the common line contact of the board (on the connector) to the corresponding motor terminal with a separate wire. Then they do (with the circuits in normal condition):
- insert the power plug into the socket;
- select grinding using the regulator;
- the corresponding LED on the board should light up;
- press the START button;
- the engine starts.
If at any stage of this process a failure occurs, it becomes clear where to look for its cause. In voltage transmission circuits to the board or motor. It's worth moving the connectors. If necessary, you need to solder their contacts on the control board.
In the most difficult case, you will have to test the engine. This can be done using standard methods using a multimeter. If an interturn short circuit or a break in the windings is detected, the motor will have to be changed or rewinded.
After successful repair of the electrical circuits, the coffee grinder is assembled. This is done in reverse order according to the disassembly algorithm described above.
Conclusion
Self-repair of the coffee grinder can be carried out periodically. Maintenance procedures include lubrication and cleaning of contaminants. To prevent emergency situations, you should not operate the coffee grinder in modes not recommended by the manufacturer. For example, grind sugar into powder, grind herbal seasonings, process large masses of grinding. Each equipment has its own operating rules and if you do not violate them, the device will work for a long time and without failure.
How to disassemble
Coffee grinder devices have a simple disassembly scheme that anyone can handle. The main thing is to study the sequence of the algorithm.
All coffee grinders come in two types:
- with a knife device;
- burr mills.
Models with a millstone device have a separate mechanism for disassembling the grinding mechanism. Moreover, each model may have a different parsing process. But they have common features:
- It is worth paying attention to the fact that the devices have conical knives attached to the drive shaft with 3-4 bolts. They can be easily unscrewed with a screwdriver;
- When reassembling, it is important to ensure that the bolt heads fit exactly into the seats;
- If the bolts are loosely tightened and not fully tightened, this may subsequently lead to failure of the device. Also, small metal particles will constantly be detected in the grinding, this may be due to the fact that the protruding parts of the fastening elements will be in the area of movement of the grinding device;
- Disassembling the casing of coffee grinders is quite simple. To do this, several screws are unscrewed on the lower plane, at the bottom of the device. Access to the mounting components may be open or may be blocked by the legs of the device;
- a separate group of grinders may have latches. To do this, you should use special probes or screwdrivers, with which you can bend the latches.
Engine
An important part of the device is the motor. In order to dismantle and inspect this element, it is recommended to remove the knives. They can be removed using several methods:
- When the knife moves clockwise, a left-hand thread is usually applied to the joint surface. To remove, a screwdriver is placed in a special slot and turned clockwise;
- When the knife moves counterclockwise, the connection has a right-hand thread. Accordingly, the screwdriver probe is also placed in the slot and turned counterclockwise.
Engine and knife
Over a certain period of time, the fastening part becomes clogged with particles from grinding. It can also be negatively affected by oxides. To remove all this, you should use special lubricants; these products can also make the process of unscrewing the knife blocks much easier.
If the clamping nut has a conical thread and is made of bronze metal, then it is worth warming up the area with the connection a little. You can use a soldering iron to warm it up.
The subsequent process may depend on the grinder model. In any case, disassembling the device must be careful and accurate, during it it is necessary to monitor the limiters, all elements must be correctly removed from the grooves.
After the knives are removed, you only need to perform a few steps:
- The fixing nut from the plastic base is unscrewed. It provides fastening of the grinding glass;
- When unscrewing the fastener, you should keep an eye on the felt base gasket. Under no circumstances should it be lost;
- then the axle washer, which is made of a metal base, is removed;
- then the blocker plate is removed. To do this, it is carefully pressed downwards and removed from the area with restrictive grooves.
Typically, for most models of coffee grinders, the disassembly process ends with removing the dirt washers and dismantling the power cable and switch. Often, during the process of disassembling the device, it can be revealed that the breakdown occurred precisely because of the washer, for example, it burst or completely collapsed.
Repairing a coffee grinder is not difficult, the main thing is to properly disassemble the device. During disassembly, the sequence must be followed, which will also need to be followed during the process of putting the device back together.
If during disassembly it is revealed that some element is broken or destroyed, then it is better to find out the details of the component parts for the coffee grinder model; this can be found on the Internet or in the instructions. Then you can go to a store or market to purchase the part exactly by number and series.
How to disassemble the device
The most popular model is the Bosch rotary coffee grinder. You can put about 75 g of grains into it at a time, and stainless steel knives can grind them into the finest dust.
If the Bosch mkm 6000 coffee grinder does not turn on, you first need to disassemble it and get to the insides hidden in the plastic case
The Bosch coffee grinder must be disassembled carefully: turn it upside down, squeeze the body, turn the bottom and then the latches will open. How to repair a Bosch coffee grinder depending on the breakdown:
check the circuit with a tester;
clean parts;
lubricate the moving mechanism.
If the motor burns out, take it to a service center or buy a new one.