Instructions for replacing the refrigerator seal
You can change the rubber band on your refrigerator at home.
The list of necessary tools and equipment depends on the method of attaching the old tape.
To replace you will need:
| in the groove | on self-tapping screws | on glue |
| hair dryer screwdriver | screwdriver or screwdriver | putty knife solvent glue |
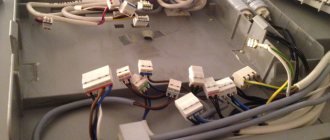
Step 1. Removing the old seal
- Turn off the refrigerator and defrost.
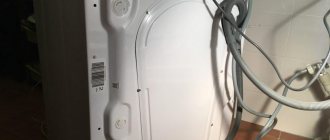
- Remove the door and place it on the floor. It is inconvenient to install the part suspended, and it may not fit tightly.
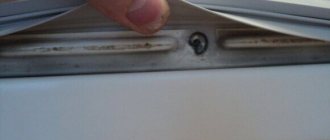
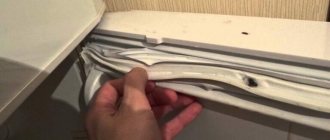
- Simply pry the rubber band inserted into the groove with a screwdriver and then carefully pull it out along the entire perimeter.
- If the part is attached to self-tapping screws, you just need to unscrew them.
- Removing the glued tape is more difficult. It needs to be torn off or cut off. Then clean with a spatula and treat with solvent. The surface must be smooth and clean.
Step 2. Selecting a new seal
When buying a seal, you need to consider:
- refrigerator brand and model. Ideally, if there is a “native” part on sale. It will fit exactly in size;
- size. You need to measure the length and width of the old part. If the parts for a specific model are not in the store, buy a universal one that fits in size. Take the old seal with you to compare the length, width, groove size, profile type;
- quality of a new part. The elastic band may be damaged during transportation or storage. The part must not have creases, cracks, deformations, stains, or seals.
REFERENCE! For old small refrigerators “Yuryuzan”, “Mir”, “Polyus”, the required part will most likely not be found. As a last resort, if nothing suitable in size could be found, the dimensions are adjusted. The tape is cut and glued.
Online stores supply seals according to customer sizes. The application will need to indicate the exact dimensions, profile type and color. You can send a photo of a cross section of the tape.
ATTENTION! The purchased part must lie flat at room temperature for 24 hours to straighten out.
Step 3. Installation of the seal
It is advisable to use the same installation method as originally used.
- In the groove To make the tape more elastic and easier to fit into the groove, the profile can be slightly heated with a hairdryer. Then insert the fastener into the slot along the entire perimeter and seal. This is done at the factory using special equipment. The same pressure cannot be created at home. For reliability, you can additionally use glue or self-tapping screws, screwing them in every 15 cm.
- Self-tapping installation. Secure into existing holes with slightly larger self-tapping screws.
- Gluing. Degrease the surfaces to be bonded with white spirit. Glue (“Moment”, “BF” or similar) is applied according to the instructions. The door is not installed until the glue has completely dried.
REFERENCE! The rules for replacing the seal on the freezer are the same, but you need to use frost-resistant glue.
Step 4. Checking the quality of work
Upon completion of the work, you need to carefully inspect the rubber band, make sure that it fits tightly to the door and does not allow air to pass through, and that the door itself is level. Return the door to its place and turn on the refrigerator.
The refrigerator should open with little effort. You can check the tightness with a piece of paper.
Video: Replacing the seal in the refrigerator with your own hands
Refrigerator repair - door seal replacement
Watch this video on YouTube
Video: How to change the seal on the refrigerator door
Video: How to change rubber on a refrigerator door?
Watch this video on YouTube
Installing a rubber seal on a refrigerator
Refrigerators differ in the way the sealing tape is attached to the door:
- The seal is glued (for budget models and old-style models).
- The tape around the perimeter is fixed with screws.
- The rubber band is inserted into the grooves.
If the sealing material is slightly damaged (dented, bent), it is worth trying to correct the local defect using a production hair dryer.
Rubber heated to 70˚C becomes more flexible. It is easy to give it the desired shape. After the alignment procedure, close the door tightly and wait until a new corrected contour is formed. Instead of a hair dryer, you can use a steam iron.
If the shape of the rubber band is distorted around the entire perimeter, you can try to restore it by completely dismantling it and placing it in hot water for a while. High temperature will warm up and soften the rubber. After wiping the seal, you can try to correct the defective areas.
If the condition of the seal does not allow it to be brought into the desired condition using the methods listed above, it must be replaced.
The possibility that the fittings are not adjusted cannot be excluded either. In such circumstances, it is enough to simply change the condition of the door hinges.
You can understand that this is the reason by looking at the tilt of the sash, which is easy to identify. You just need to carefully inspect the refrigerator from all sides: from the sides and from the top. You can also evaluate whether the bottom of the door is parallel to the floor when open.
Important! You can order the service at a service center, and the seal will be replaced by a specialist. But the price of such work is quite high, so it is recommended to try to do it yourself, without resorting to the help of specialists.
How to remove old rubber seal on a refrigerator door
There are several dismantling methods:
- Separate from the door surface using a blunt spatula.
- Pry off the seal with a non-sharp object, such as a screwdriver. Next, insert the tool, held with one hand, into the slot and guide it around the perimeter. Pull the rubber above it upward with your other hand.
- If the elastic is screwed on, you just need to remove the screws or self-tapping screws.
Be sure to read:
Which refrigerator is better: No Frost or drip, pros and cons
Surface preparation
It is advisable to clean the groove where the rubber is inserted after removing the seal.
Otherwise, voluminous solid particles (food crumbs, remnants of collapsed rubber of the old seal) may remain inside and they will certainly affect the quality of the new tape.
Particular attention should be paid to both the door and the sealing rubber, which will stick together if we are talking about an appropriate design.
Before applying the glue, both contacting surfaces must be cleaned of dust, old glue residues (acetone is suitable for this) or degreased (wipe with alcohol or solvent for acrylic paints).
Gluing gum in the refrigerator: how and with what to glue
The process depends greatly on the type of glue used. Non-aggressive and non-toxic compounds, such as Moment, are best suited.
Another important requirement: the glue must be flexible after drying. Rubber is a moving material, and the fragile connecting layer will crumble after a short period of time. Moisture resistance of the glue, although an optional characteristic in this case, will not be superfluous.
Other ways to replace rubber bands
At the factory, the seal is pressed into the groove using a special machine under great force. This method is not available for home repairs.
Therefore, it would be useful to provide additional adhesion force: the rubber can be glued or screwed. In the second case, holes are drilled around the perimeter at intervals of 15-20 cm.
If the factory fastening is made with screws, but their holes have become broken over the years of use, screws of a larger diameter are used.
Rules of care and use
In order for the seal to serve for a long time and not require repairs, you need to provide it with proper care.
- Remove crumbs from the groove of the tape using an old toothbrush.
- Treat the rubber band with silicone grease so that it does not lose softness and elasticity. Renew the lubricant after each wash. Do not lubricate with oil.
- Open the refrigerator and freezer only by the handle, without prying the rubber band.
- Replace weak rubber bands in a timely manner so as not to cause compressor breakdown.
How to choose a seal for a refrigerator
Modern sealing tapes are not rubber, but polymer, but they are still called “rubber bands.” Double-chamber tapes are most often used, but single-chamber tapes can also be found.
According to the mounting method, the easiest seal to install is with a groove. This tape can be easily removed to wash or replace.
The shape and structure of a part with a groove is indicated by its profile code. For example, if you need an oval edge of the tape, look for a spare part with profiles E1, E3, EA
For a tighter fit of the door, there is a magnetic insert in the seal. Tapes without a magnet have profile code C1 or C2. The common P1 and P2 profiles are with a magnet.
If the door does not have a groove, you will have to use screws or glue. They will ensure a strong connection, but should be used carefully. Self-tapping screws can damage the door, and the glued tape must be cut out the next time it is replaced.
How to determine if the refrigerator seal is damaged
The seal is needed to ensure that the refrigerator closes hermetically. If the rubber band bursts or crumbles in places, the door comes off and air enters the refrigerator from the room. The compressor runs continuously and ice forms on the rear wall.
Attention! Ice may also appear in high humidity conditions in the refrigerator.
A sheet of paper will help determine whether the seal is faulty. You need to close the door, holding the sheet. If it can be removed freely, the elastic band does not perform its function and needs to be replaced. Do this test several times, clamping the paper in different places.
If there is a gap between the door and the refrigerator compartment and the seal is not damaged, you need to adjust the door.
Stage two: update
Not only a person, but also all objects around him age over time. Rubber bands in the refrigerator are no exception. From light, moisture, temperature changes, mechanical stress (slamming the door), the seal gradually collapses.
On average, sealing bands in a refrigerator last 3-5 years. Then they gradually become compressed, and the door no longer closes tightly.
Rubber contains synthetic rubber and polymers that absorb light and heat energy. Chemical processes occurring inside change the seal externally. All rubber becomes dense over time. At the same time, it loses flexibility and breaks easily. Microscopic cracks appear on the surface in which moisture accumulates. This further accelerates the destruction process.
Is it possible to somehow rejuvenate the tires? At the initial stage of aging - yes. There are several proven methods for this.
Attention! All procedures for restoring sealing rubber bands are carried out with the refrigerator turned off. It is better to defrost old models and temporarily move frozen foods to the balcony or other cool place.
Method number 1 - using lubricant
Many people know that plastic windows need periodic lubrication. The rubber bands around the sashes are lubricated twice a year. This increases their service life by 2-3 times. So the window seal is not much different from the one in the refrigerator. When lubricated, the rubber remains elastic longer. Lubricant protects it from the negative effects of the environment, and to some extent softens it.
We recommend: 12 New Year advent calendar ideas to delight children and adults!
To lubricate the sealing rubber bands of the refrigerator, you can use:
- care product for plastic windows;
- silicone grease;
- machine oil;
- VD-40.
The lubricant is applied to a clean, dry surface. It is best to rub it in thoroughly with your fingers (wearing gloves). You need to process all the folds and leave the sealant for half an hour. Then excess lubricant is removed with a dry cloth.
The method is also recommended for preventing aging of the seal.
Method number 2 - using ammonia
If a suitable lubricant is not at hand, you can use ammonia. It acts rougher and is able to change the structure of the rubber for both the better and the worse. It is important to strictly adhere to the recipe and exposure time:
- We dilute ammonia in warm water in a ratio of 1 to 7.
- We wipe the rubber several times for half an hour.
- Wash off the solution with warm, clean water.
- Dry it.
It is most effective to soak the seal in ammonia solution. But not all refrigerators have it removed. You need to see if the elastic is simply inserted into the groove or is additionally glued.
Method number 3 - using a hair dryer
It is known that when heated, any rubber softens. A household hair dryer will help heat it up quickly. However, heating alone is not enough. After cooling, the seal will become the same as it was.
For the method to work, you need to heat the elastic and simultaneously stretch the folds with your hands. It's better to act together here.
The hairdryer is held at a distance of 20-30 cm. To increase efficiency, the rubber treated with lubricant is stretched. At the end, the seal is heated again. Without allowing it to cool completely, close the door and press it with your hands for 3-5 minutes. This is necessary so that after cooling it becomes uniform in thickness.
Method number 4 - using boiling water
The most barbaric method, but sometimes it is the only one that helps solve the problem with an elastic band that comes off. Boiling water instantly softens the material. But its destruction may also occur. The fact is that the composition of the seals is very different: natural, synthetic rubber, a mixture of different polymers. Therefore, in each specific case the result is different. If you decide to take a risk, the procedure is carried out as follows:
- Option #1. The door is opened. A large basin or tray is placed under it. Boiling water is slowly poured onto the gum on top (it’s most convenient to do this from a kettle). Then quickly, while it has not yet cooled down, stretch the folds with your hands. Close the door tightly. After 3-5 minutes, wipe off the moisture and dry everything thoroughly.
We recommend: Where to add sun-dried tomatoes, how and what to eat with, to make it tastier
- Option #2. The seal is removed from the grooves. Heat 3 liters of water with the addition of a glass of salt (or without). After boiling, pour the boiling water into a plastic bowl. Lower the seal for 10 minutes. Take it out and level it by hand. Set in place.
Approximate cost of seals
The price for this part depends on the brand of the refrigerator, originality and size:
- A spare part for a Biryusa refrigerator measuring 110*53 with a P1 profile costs 400 rubles.
- To repair Atlant, you will need 500 rubles.
- A spare part for a “Nord” refrigerator of dimensions 55*93 with a P2 profile costs about 1,000 rubles.
- Original parts for Stinol cost about 1,000 rubles.
- A seal for Daewoo refrigerators can be found at a price of 1000 - 2000 rubles.
You can do minor repairs to household appliances yourself. The main thing is to choose the right spare part and act carefully.
Video: Replacing the refrigerator gasket
Video: replacing the rubber seal on a refrigerator with your own hands
Watch this video on YouTube
Do you want to understand better than others?
- Replacing the rubber seal on the door of a Xiaomi refrigerator - First step. First you need to turn off the power to the refrigerator. If the door is small, it can be left in place. If the sash is impressive, it is better to dismantle it and...
- Replacing the door seal on an LG refrigerator - To properly replace the seal, it is important to follow the instructions. Step-by-step instructions for replacing the rubber seal on the door of an LG refrigerator The first step is choosing...
- Replacing the rubber seal on the door in the Saratov refrigerator - To correctly replace the seal, it is important to follow the instructions. Step-by-step instructions for replacing the rubber seal on the door in a Saratov refrigerator The first step is choosing...
- Replacing the rubber seal on the door of a Pozis refrigerator - To correctly replace the seal, it is important to follow the instructions. Step-by-step instructions for replacing the rubber seal on the door in a Pozis refrigerator The first step is choosing...
- Replacing the door seal on a Bosch refrigerator - To properly replace the seal, it is important to follow the instructions. Step-by-step instructions for replacing the door seal on a Bosch refrigerator The first step is choosing...
How to change the seal on the door of a Stinol 101 refrigerator
Before replacing the rubber band on the Stinol refrigerator, you need to prepare the following tools and materials:
- flat screwdrivers – 2 pcs.;
- sealing rubber of the required profile and size;
- a screwdriver (or a drill with an attachment) and 20-25 small (16 mm) galvanized metal screws with a drill tip;
- installation hairdryer.
Replacing the gum
You can replace the cuff either with the refrigerator turned off or with the refrigerator on. To repair the Stinol device, you do not need to remove the door. You should begin replacing the corrugation of the upper chamber or freezer by carefully dismantling the old seal, which is fixed between the metal outer and plastic inner body of the door.
For dismantling you need:
- open the door;
- Pull the seal away from the metal part of the body (inward) with your left hand, and insert a screwdriver between the tin and the corrugation with your right hand;
- insert the second screwdriver next to the first and lead from it to the corners of the door, simultaneously moving the seal away from the metal;
- In the same way, move the cuff away from the inner plastic part of the device body.
Prying the inner edge of the corrugation with a screwdriver, you need to remove it completely from the expanded groove. This should be done carefully so as not to damage the plastic of the door.
Replacing rubber on doors
Installation of the elastic band into the groove widened with a screwdriver begins from the corners. After the entire inner part of the cuff is hidden inside the trim, you need to close the door and check its fit around the entire perimeter. Displaced areas should be carefully adjusted with a screwdriver, then, opening the door again, check the fit again.
In order for the new sealing rubber band on the Stinol refrigerator to fully expand and take its place, it needs to be slightly warmed up using a hair dryer. This must be done with the door open.