If you need to connect a gas stove, it is better to contact the experts in their field. Of course, this work is performed for a fee. Theoretically, you can connect the gas stove yourself. This article contains information about the main stages of connecting equipment, but is not a call to action, since any manipulations with gas are dangerous and should be performed by professional workers.
Connecting a gas stove with your own hands
What do the regulations say?
The current legislation of the Russian Federation clearly defines the circle of persons allowed to perform work.
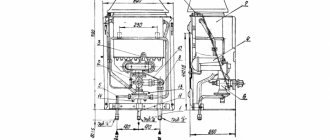
Scheme for connecting equipment and installing meters
The activities of gas services directly extend to connecting equipment, planned and emergency repairs, installation of meters and other manipulations.
Note! If you connect the stove yourself, its operation is possible only after a specialist has inspected the connecting nodes in order to detect leaks and officially approved the equipment for operation.
Each gas appliance must be registered with a specialized organization so that it subsequently undergoes a routine inspection to ensure safe operation of the equipment.
Room ventilation requirements
Safe work with gas equipment - what to consider
Safety precautions when connecting gas-powered equipment include following the following rules:
- before turning on the burner or oven of the stove, it is necessary to carry out a visual inspection of the equipment, make sure that it is in good condition and there are no leaks - this is indicated by the specific smell in the room;
- the kitchen area where the gas stove is installed is equipped with a ventilation hood;
- If the device is not expected to be used for a long time, then turn off the gas valve. When dismantling the stove, the pipe must be sealed and sealed by gas service workers.
The assortment of stores offers many models of hoods of various types and sizes. There are plenty to choose from for a specific kitchen, taking into account the features of its layout and kitchen furniture. And installing this device yourself is within the capabilities of most good owners who know how to use a basic set of household tools. And there will be a special publication to help, which will discuss step by step how to connect a hood in the kitchen with your own hands.
Types of hoods
There are a number of rules that should be followed when operating a gas stove:
- You cannot repair equipment yourself without possessing professional skills and knowledge;
- you cannot change the design of the equipment without permission;
- the operation of the stove must be controlled;
- You cannot use the stove as a heating device by lighting gas on the burners;
- It is necessary to limit access to the stove for small children and incapacitated family members.
Documentation
The process of connecting and registering gas equipment occurs on the basis of a package of documents that the homeowner provides to the gas service specialist. This includes:
- identification card of the owner of the premises (passport);
- certificate of family composition;
- title documents for residential premises;
- registration certificate of the residential premises;
- documentation for equipment and meter;
- subscriber book;
- payment receipts;
- service agreement.
It is necessary to provide a package of documents
Preparation for installation
The wall near the stove must be finished with fire-resistant material.
Installing a gas stove in an apartment begins with submitting documents, preparing the place and purchasing equipment.
- A gas stove is selected based on needs. If your family cooks often, you need a four-burner oven with an oven. Such a device takes up a lot of space and places high demands on the air exchange rate. If you are not keen on cooking, you can get by with a 2-burner hob.
- Before buying a stove, you should consult with a specialist from the company hired for installation.
- No furniture should be placed above the stove. In the kitchen, in the selected area, the hanging cabinets are removed and a hood is selected.
- If a section of the wall in this place is decorated with wooden panels, clapboard, or thin decorative plastic, the finishing is removed. Since repair work will be difficult after connection, the walls are lined with tiles, glass, and ceramics in advance.
- To officially register gas equipment, the owner must have in hand a certificate confirming the registration of his home, a registration certificate for the apartment, a passport for the stove being installed and a gas meter. If a new device is installed instead of an old one, the old service agreement and subscriber book are required.
The work team has all the tools and materials for installation.
Where to install the stove
The floor under the gas stove must be level so that the hob is positioned strictly horizontally - this will have a positive effect on the safety of the stove and the quality of food preparation.
Rules for leveling the slab height
Most stoves are equipped with legs with height adjustment. This makes it possible to install the equipment on uneven ground. If the floor is crooked and the legs are not adjustable, then you can continue to place a lining under them of the required height from a solid material - chipboard, thick cardboard.
The taps must be in good working order, easy to turn and easily accessible for an adult.
The second thing that should be provided is free access to valves and connecting units. This will allow you to quickly take action to eliminate malfunctions or gas leaks.
Gas hose location
The third rule is to choose the correct location for installing the stove. For each model, the manufacturer recommends a gap between the back wall of the stove and the wall of the room. The size of the gap is specified in the operating instructions for the device.
How to connect a gas stove?
If you imagine step by step how to properly connect a gas stove in the kitchen, it will look like this:
- Choose a location.
- Unpack it and screw on the legs.
- Place the stove in the chosen place, leaving space between it and the wall according to the instructions.
- Apply a level to check whether the slab is level. If there is a skew, then use the legs to straighten it out. The equipment should not tilt to the side, swing or move freely due to the slightest movement.
- Connect the stove to the gas pipeline, using a sealant.
- Apply the solution and make sure the connection is tight. If there are no bubbles, there is no leak either.
- Invite the gas service to check the connection. Do not turn on the stove or cook until she arrives!
Also read: How to use a toaster: what it is and what it can do
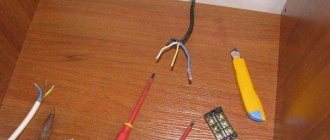
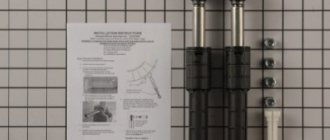
Tools
To make your own connection, in addition to a hose and a ball valve specially designed for domestic gas systems, you will need to purchase sealing material.
Set of tools
You will also need to dilute a medium-concentrated soap solution so that, using a brush dipped in it, you can check the connections for tightness and only the likelihood of a gas leak.
Leak check
The main connection element is a hose, the physical characteristics of which must take into account the specifics of its application. This must be a certified product that meets the requirements for gas equipment and related elements. The hose must be durable and flexible.
Bellows hose
The market is not the place where you should purchase a gas hose. For this purpose, there are specialized stores and branded sales points where you can get qualified advice about the product and a receipt guaranteeing exchange if a defect is discovered during installation of the equipment. Considering the specific operating conditions, it is clear that not every hose will be suitable. Those designed for water (with red and blue marks) in the gas system will become unusable in less than a month. Gas hoses are available in three varieties. An important indicator for all types is the flexibility and strength of the product.
The best gas hose is the one that has a certificate. It must clearly state the service life of the product and the conditions under which it is operated.
PVC hose
The most popular type is the rubber hose. It is characterized by high strength, flexibility and affordable cost. Vulcanized rubber is used for its production.
Gas adapter
If the connection thread on the stove is 3/8′, then use a special adapter. If necessary, this part can be purchased at a hardware store.
Rubber hose
A corrugated metal-plastic tube is called a bellows hose. It is characterized by excellent performance properties - it is resistant to intense pressure and its changes, elastic, and equipped with a durable protective shell. The cost of such a hose is higher than that of other analogues, but the recommendations of gas service workers boil down to the use of this particular type of hose to ensure a high-quality and safe connection.
Bellows gas hose
The connecting gas hose has special requirements:
- the hose length is limited and does not exceed 1.5 m;
- the entire length of the hose must have the same diameter;
- the product must be smooth, without twisted areas;
- the product must have a long service life, confirmed by certificates;
- The surface of the product must be free of cracks, cuts, suspension and other defects.
Note! During operation, the hose should be located away from hard and sharp corners, as well as flammable materials. The best option is a free location behind the stove.
A metal pipe is rarely used as a connection element due to the high labor intensity of the process and the need to use specialized professional equipment.
The principle of connection using a pipe
Connection method: hose or pipe
There are two ways to install a gas stove at home and connect it to a gas source:
- With a hose.
- Pipe.
Today, the connection is most often made using a hose. At the same time, it is subject to requirements, which we will discuss below.
When you buy a hose, you should immediately check its strength, flexibility and ask the seller for a quality certificate . After all, you are dealing with a source of increased danger - gas, and you cannot take risks.
The connection to the central gas pipeline is made directly. You do not build additional lines or nodes. If these are found during the check, you will be asked to reconnect.
Where to buy a hose? This can only be done in a special store or at branded points of sale. The seller must tell you about the characteristics and issue a receipt by which you can exchange the product .
Also read: How to clean a coffee machine from scale and coffee oils
When purchasing, check the labeling; the labels should be yellow. Red and blue colors are used for water hoses. They are not so durable and if used when installing a gas stove in a kitchen unit, they will burn out.
You can buy one of three hoses:
- Rubber . It is reliable, bends well and is inexpensive. At the same time, the rubber hose is not afraid of high temperatures up to 50 degrees. And it won't let you down for a long time. When purchasing, please note that the thread of the plate must match the cross-section of the hose you choose. Typically 1/2. If it is 3/8, then you need an adapter.
- Rubber with braid . This is an improved version of the rubber hose. The braid makes it stronger and reduces the likelihood of leakage to zero. You can install a gas stove yourself and use such a hose if the equipment operates in cold, hot, and so on. The hose is not afraid of damage, rust and moisture.
- Bellows . This is a corrugation made of metal and plastic. It is manufactured to be pressure resistant, stretch easily and remain durable. This is perhaps the most reliable hose of all. And the service life is as much as 25 years. Its price is justified.
Also read: Why the microwave does not heat: cause and prevention
Note that all three hoses meet the requirements:
- Length . No more than 1.5 m.
- Same width along the entire length . Does not expand or contract in all areas.
- Durability.
- No damage or fractures . No cuts, rust, knots.
When installing a built-in gas stove or a regular one, the hose should not come into contact with hard surfaces, corners, or be located close to heating appliances. It is correct when the hose is located at the back wall of the stove and does not touch any surface.
Sometimes a new gas stove is installed using a pipe for connection. But this method is more complicated than with a hose. The pipe must be copper or steel, that is, durable. But in the future, the slab will not be able to be moved or moved to another location.
Sealing the system
Special seals allow you to eliminate the possibility of leakage in connection nodes and ensure their tightness.
Types of material for joint sealing
Loctite 55 is available in the form of sealing fiber and is a practical, modern material, specially designed for communications of various levels of complexity. The threaded section is wrapped, creating a tight connection and securely fixing it in a given position.
Loctite 55
The second type of sealant is FUM tape. There are three varieties on sale:
- material marked 1 has additional Vaseline lubricant. The seal is designed for operating conditions with an aggressive environment;
- material marked 2 without lubrication is used under conditions of exposure to oxidizing agents;
- material marked 3 is universal. Can be used both in industrial and domestic conditions. Available in the form of thin threads in film.
FUM tape
With the help of FUM tape, the pipe elements are firmly connected to each other and maintain the tightness of the system for many years.
In addition, to seal communication systems, paronite gaskets of the required diameter are used from a flat composite sealing gasket material with a layered structure - paronite. It contains asbestos, rubber and powder fillers. The material provides high-quality sealing of flange joints.
Paronite gasket
Precautionary measures
Due to the fact that natural gas, which is supplied to private houses and apartments, is explosive, when connecting the stove to the public main, you must adhere to the following rules:
- The connection is made using flexible hoses designed for gas supply. Such products must be appropriately marked indicating the date of production.
- The length of the hose should not exceed four meters. If the slab is installed at a greater distance from the main line, then a pipe of the required length is welded to the main line. And only after that the hose is connected.
- The hose is placed in an easily accessible place. Gas pipes must not be covered with non-demountable structures.
- When connecting a gas stove, you cannot use two or more flexible hoses connected to each other.
- Flexible hoses must not be painted. This may cause depressurization due to damage to the polymer surface. Adhesive tape is used to hide the hose.
If a stove with an electric oven is installed in the apartment, then in this case you will need to run a separate line from the electrical panel to connect the device. When installing equipment, it is important to ensure that the distance from the outlet to the gas pipe is more than 500 millimeters. In addition, the power cable must be located at a distance of 100 millimeters or more from the hose.
Dismantling of old equipment
Before installing a new stove, you must remove the old one.
The sequence of actions is as follows:
- shut off the gas;
- to check the tightness of the tap, open the burners and check that gas does not flow. At the same time, release the remaining gas from the hose;
- remove the connecting hose;
- The stove is disconnected when it is ensured that there is no gas flowing from the pipe.
Dismantling an old gas stove must be carried out in compliance with safety precautions
Note! After the flexible hose is disconnected, it is recommended to place a damp rag in the empty hole of the pipe and secure it with FUM tape. Carry out work in a well-ventilated area.
Basic elements when connecting using a flexible hose
Safety requirements when working with gas equipment
Connecting a unit operating on gas first of all requires compliance with safety precautions:
- Before turning on the stove, you need to make sure that the equipment is in working order and that there is no corresponding smell in the room;
- The room must be equipped with ventilation that functions without failures throughout the entire period of operation;
Gas stove hood diagram - After completing operation of the device, turn off the fuel supply valve.
Important! If you smell gas in your apartment or house, you should immediately turn off all taps and ventilate the room. You need to call a specialized service, do not use electrical appliances or open fire until the situation is resolved.
In addition, to prevent a possible accident when operating the device, it is unacceptable:
- repair a faulty unit in the absence of appropriate knowledge and experience;
- change the design of the device;
- leave switched on equipment unattended;
- heat the home using lit burners;
- allow small children and incapacitated persons near the equipment.
By strictly following the basic rules for using the stove, you will be able to preserve the health and life of not only yourself, but also those around you.
Required permitting documents
Connecting new equipment requires permission from the gas service. Even if you do the installation yourself, you will have to call specialists to check the reliability of the connections and allow the device to be used. To do this, you will need to prepare the following documents:
- passport of the owner of the living space;
- certificate of family composition;
- state registration certificate;
- document on the right of ownership of housing (deed of gift, purchase and sale);
- technical passport for the house, for the meter;
- subscriber book;
- paid receipts;
- contract for the provision of services.
Healthy! Having completed the necessary check, Gorgaz employees provide the resident with a form for concluding an agreement, enter the relevant information into the subscription book, and also make a note about the training completed and set a schedule for verification work.
Connecting a gas stove: step-by-step instructions
When planning to install new equipment yourself, you must strictly follow all the rules. It is also better not to delay installation, since the warranty begins to apply from the moment of purchase, and not after commissioning.
Plate location
You should decide in advance on the place where the device will stand. Usually this is near the gas pipe, as was planned during the construction of the house. If you want to change the location of the unit, it is better to coordinate your actions with Gorgaz and obtain the appropriate permission.
The floor surface should be as smooth and hard as possible; a small gap should be left between the wall and the slab. Modern devices often come with adjustable feet, which can be used to level the stove even if there are uneven surfaces.
Diagram of the correct location of the slab Recommendation! If the package does not include special legs, you can use spacers made of pressed wood or other dense material.
Selection of tools and materials
To connect the equipment according to all requirements, you need to make sure you have the necessary tools and parts at hand:
- Gas and adjustable keys;
- Screwdriver for tightening the clamp;
- Bubble level;
- Sealing tape or thread;
- Gasket (usually included with the stove);
- Ball valve made of yellow brass, specially designed for use with gas installations;
- Flexible yellow hose of suitable length;
- Soap solution to check the tightness of connections.
Important! If you are installing a combined device with the possibility of electric ignition, you will also need an outlet and an electrical cord.
Removing the old stove
First you need to dismantle the old unit. To do this, turn off the gas supply, then unscrew the connecting hose. After the main valve is closed, it is better to open all the burners to make sure that the closed tap is tight and release the remaining gas from the hose. Disconnect the stove only after making sure that fuel is not coming from the pipe.
Advice! After disconnecting the flexible hose, it is better to close the outlet of the pipe with a damp cloth and wrap FUM tape on top. When performing manipulations, it is better to ensure access of fresh air to the room.
Replacing the faucet
Installation of a new valve may be required in two cases:
- a leak was detected during inspection;
- if you have an outdated petal model that needs to be replaced with an updated version.
A new valve only needs to be installed in two cases
All replacement actions must be carried out quickly and smoothly, since after unscrewing the old tap, gas will flow into the room. The procedure is safe if at this moment the window is open and there is no source of open flame.
The open hole must be plugged with a damp cloth, the threads must be cleaned of dirt and old sealant, and then a new layer of sealant must be applied. Next you need to remove the gag and quickly screw on a new valve, tightening it with a key.
A solution of soapy water will help make sure the connections are tight.
Installing a new slab
This step involves the correct placement of equipment in the selected location. In this case, it is important to level its position relative to the horizontal surface, for which it is better to use a building level.
Even minor differences in height should be eliminated using adjustable legs or wooden spacers. At the end of the work, you need to make sure that the unit is stable, does not wobble or fall to the side.
Correct installation of the stove
Connecting the stove
Connecting equipment to a gas supply source is possible in two ways:
- Through a steel or copper pipe - such a connection is reliable, although today it is rarely used due to the laboriousness of the process and the inability to move the stove from its place in the future;
- Through a flexible hose - a more modern and simpler option; the tightness of the connection is ensured by winding seals at both ends and clamping clamps. After installation, the device can be moved to a permissible hose length of 1.5 meters. Correct and incorrect connection via flexible hose
Important! If the diameter of the outlet hole does not match the dimensions of the connecting pipe, you will need to additionally purchase an adapter from a specialized store.
Electric ignition connection
To perform the manipulation, it is important to have a grounded socket near the stove; if there is not one, it will need to be installed. If you do not have the appropriate skills, it is better to seek help from a professional electrician. After this, simply insert the plug into the socket to activate the function.
Checking for correct connection
Upon completion of all work, it is important to make sure that all connections are tight. To do this, a soap solution is again used, which is sprayed or spread on all joints. After this, open the valve.
If bubbles appear in the treated areas, then you will have to repeat the steps to attach the hose - unscrew it, wind more sealant and tighten it.
The absence of bubbles indicates the tightness and reliability of the units.
Checking for gas leaks using a soap solution
Features of connecting the stove to a gas cylinder
The advent of cylinders for filling with fuel made it possible for residents of holiday villages to provide their home with gas supply, forgetting about expensive electric power. If you need to connect yourself, you need to consider the following features:
- The distance between the cylinder and the stove should be over 1.5 meters. It is even better if the gas container is placed outside the living space, where there is no access for strangers;
- It is imperative to have a good exhaust hood in the room where the equipment will be used;
- Since the gas pressure in the vessel exceeds the pressure of a standard gas pipeline, a reduction reducer must be used. Some models of devices already contain sets of adjustable gearboxes.
The connection process itself is similar to a simple connection to a gas pipe - using a flexible hose using seals and clamps.
Important! Most often, emergency situations in the form of an explosion of gas equipment occur due to improper connection. It is best to call a specialist who will check the tightness and eliminate the presence of leaks.
Responsibility for independently connecting the gas stove
Incorrect installation of equipment can lead to serious negative consequences and even threaten the lives of the population. In this regard, it is strongly recommended to involve gas specialists in such manipulations. Even if the actions are performed independently, after this it is necessary to obtain official permission from Gorgaz to allow the device to be used.
Connection process
Table 1. Gas stove connection process
| Photo | Description |
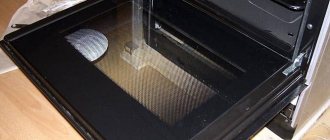
| Perform a visual inspection of the equipment. | |
| Inspect the installation site - the floor must be level. If it is uneven, then the slab is leveled using adjustable feet. | |
| We install the hose through a paronite gasket. | |
| First, the hose is baited by hand. | |
| Then tighten tightly using a tool. | |
| In a similar way, fix the hose to the stove pipe. | |
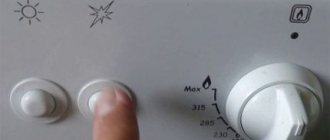
| The burners are freed from the fixing stickers. | |
| Open the gas. | |
| Check the operation of the burners. | |
| To prevent gas leakage and check the tightness of the joint, the connection point is washed. | |
| The soap solution is also applied to the connection point to the stove. |
Where to go to install a gas stove
Gas stove - the design is very simple. There are only 2 operating elements - valve and burner .
Considering that you can connect to the gas pipeline even through a flexible hose rather than a pipe, installation and connection of the device looks very simple. However, the features of the gas supply system itself and the characteristics of the fuel make simple equipment dangerous.
- Gas is flammable. Even a slight excess of its concentration in the air leads to the creation of an explosive situation. And during connection, leaks are inevitable and only an experienced technician will be able to minimize their number.
- The operating mechanism involves supplying gas under some pressure to the burner . If the methane-butane mixture is supplied with insufficient pressure, there is a risk of the draft overturning. In this case, the likelihood of a fire increases sharply. During connection, when the operation of the burner needs to be adjusted, a person without experience risks starting a fire.
- Connecting a gas stove involves blocking the line and reconnecting through a regulating device. Standard regulation depends on the standards adopted by the network. You need to know them.
- Gas equipment, although it is the property of the owner, is an accountable object of the gas service , since he acts as a consumer. To control the gas supply, take into account consumption and adjust the operation of the device, documents on registration, current condition, etc. are required.
- To determine the amount of gas used, a meter is installed. The device undergoes standardization and is registered with the relevant services, since it needs to be serviced, readings taken from it, and operation checked. Only a special employee has the right to inspect and repair the meter. And since he cannot connect the gas meter to the equipment without documents, it is impossible to take into account the gas supply during self-installation.
The installation of a gas stove is carried out by the gas company of the area, which has an SRO certificate. Installation is carried out by experienced employees with a license to service gas equipment. To install the service, submit an application. The stove must be registered with Gosgaz. If the installation is performed by Gorgaz, registration is performed automatically. If it is a private gas service, after installation you need to invite a Gorgaz representative to inspect the device and register it.
Where did you go to install the stove?
To Gorgaz
90.32%
To private service
9.68%
Voted: 31
Expert advice
To summarize, we can highlight a number of rules that experienced craftsmen adhere to:
- access to hose connections and valves must be free;
- the hose should be positioned freely behind the stove, without bending or pressing against the wall;
- the hose cannot be painted, as paint can damage the material of the product and cause it to crack;
- all work is carried out with the gas turned off;
- if necessary, plug the pipe, use a damp cloth made of thick fabric;
- upon completion of the work, be sure to wash the docking units to detect possible gas leaks. The appearance of bubbles indicates insufficient tightness of the unit.
Attention! If , after connecting the stove during the inspection process, a hissing sound is heard and a characteristic smell appears, then it is necessary to open the windows to ventilate the room and invite emergency service personnel.
Built-in equipment is very popular in the kitchen.
Standards
The gas service is obliged to take part in the initial connection, reconnection, any repairs, meter installation, and so on..
Even if you did all the work yourself, you definitely need to call a specialist who will check the connections, including whether there are any gas leaks, and issue permission to use the gas stove. You will also receive a contract for the provision of gas supply services and a subscription book.
When you decide to change the gas stove, you can again do it yourself, but you still need to report the replacement to the gas service.
Gas stoves installed in the apartment are registered by the service. And once every six months, its specialists come to you to conduct a routine inspection.
Also read: Atlant refrigerator does not turn on: do-it-yourself repair and diagnostics
The law provides for a fine for connecting a stove without notification or moving a gas pipe. But if you connect the stove, but do not use it, but call a technician for an inspection, then sanctions cannot be applied to you. The master will inspect the work, register the new gas point and the connection will become legal.
Connection cost
The state is trying to control prices for gas connection services so that they are affordable to the majority of the population. Otherwise, this will lead to an increase in the number of illegally connected equipment. And this is a direct threat to security. And not only the owners who took the risk, but also their neighbors.
Installation of the stove by a qualified technician
Regulated tariffs for work are not established. We can only say that the cost of connecting a gas stove ranges from 1 to 3 thousand rubles. A number of factors influence the final price. Among them:
- the region where the customer lives;
- price list of the company the homeowner contacts;
- the difficulty of connecting in a particular house or apartment.
Work is paid upon completion. You should definitely ask the specialist for a receipt, which is also a document confirming the work officially carried out. If the installation was carried out by third-party specialists, calling a gas service employee to check the correct connection will also cost money.
We connect the gas stove ourselves
Carrying out work on your own is permissible in extreme cases, provided that the owner of the house has the appropriate knowledge and strictly adheres to safety rules on his part. The step-by-step process can be described as follows.
Step 1. Shut off the gas supply to the stove using the existing ball or petal valve.
Closed gas valve
Step 2. Check the fuel supply to the burners. If, when you try to light the gas, the fire does not appear, the stove can be turned off.
Hardware check of gas supply to burners
Step 3. Unscrew the hose from the stove and the gas supply tap.
Disconnecting the hose from lowering
Step 4. If necessary, replace the gas valve with a new one.
- Open windows or vents, or use special ventilation equipment.
- Close the new tap by turning the lever and wind a sealing thread or tape onto the external thread.
- Using an adjustable wrench, unscrew the old part from the gas supply system. Clean the threads on the pipe and screw a new closed valve to it. If the lowering pipe is equipped with an external thread, the sealant is wound onto it, and the valve is subsequently connected using a pipe with an internal thread.
- Check the connections for leaks using special equipment or the “old-fashioned” method. A strong soap solution is applied to the joint. If bubbles appear, the work must be redone and checked again for leaks. You will have to work especially carefully with FUM tape, since it often breaks under the influence of the thread.
Installation of the hose to the riser and slab
Step 5. Place the stove in the unit or in a separate place where it will be located in the future. Leave the distance to the wall in accordance with the requirements in the technical data sheet of the equipment. If necessary, level the legs using a building level.
Connecting a stove built into a kitchen unit
Step 6. Check the presence of gaskets in the flexible hose kit. If there is an external thread, seal it with thread or FUM tape.
Winding-FUM-tape
Step 7. If the threads on the plate do not meet the standards, attach the adapter, sealing the joints.
Hose gasket
Step 8. Screw on the hose using a wrench
It is important to carry out the work carefully. Otherwise, gas will enter the room from the supply system
This occurs due to the fastening being too tight, damaging the sealant, or when the connection is loose.
Gas hose connection diagram
Step 9. Conduct a final tightness check of the entire connection.
Checking the tightness with a soap solution
Any homeowner should know the basic principles of proper connection. Even if you do not install gas equipment yourself, this will allow you to monitor the work of invited specialists. Safety depends not only on the professional. You can connect a kitchen stove with your own hands only if you have sufficient experience and skills.
How to replace an old ball valve
In some cases, it will be necessary to replace the old ball valve. This need arises when a given component allows gas to pass through or is not suitable in size. Replacement should be carried out quickly, since gas will enter the room during the procedure.
See also
Step-by-step instructions on how to install a bathtub and attach it to the wall
At this stage, you will need to insert a piece of wet rag or a plug of the appropriate size into the pipe. But if there is a thread on the gas pipeline, then you do not need to install a plug. The procedure is then performed according to the following algorithm:
- Forced ventilation is turned on and the windows are opened.
- A sealing tape is wound onto the threads of the gas pipeline.
- The new ball valve is screwed onto the pipe. At this stage, it is recommended to be careful to avoid hitting the key on the gas pipeline, excessive force and sudden movements. Such actions may cause a spark to form. To avoid unpleasant consequences, it is recommended to put a sponge on the key, securing the latter with electrical tape.
Upon completion of work, check the tightness of the connections. To do this, the ball valve is coated with a concentrated soap solution. If the applied composition does not bubble, then the connection is sealed. Otherwise, you will have to remove the tap and repeat the described steps, applying an additional layer of sealing tape to the threads.
Upon completion of the described work, you can begin connecting the stove to the gas main. To do this, the device is first installed in a permanent place and leveled. Next, the following work is carried out:
- Linen tow is screwed onto the external thread (if any) of the hose.
- An adapter is screwed onto the outlet of the plate through the seal. This procedure is necessary in cases where the diameter of the gas hose does not match the dimensions of the device nozzle.
- The hose is screwed to the stove nozzle and the gas pipe using a wrench. It is also not recommended to use excessive force at this stage. If necessary, after completing the work, you can tighten the nut.
When installing the stove, avoid kinking the hose. The hose connected to the gas pipe must hang freely.