Why do you need a hood in the kitchen?
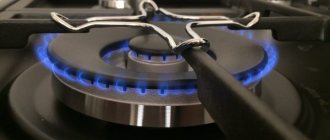
When cooking food, especially during frying, a lot of heat and pungent odors are released. Steam comes out, and smoke comes from the gas. This causes the ceiling to smoke and damage the kitchen wall or apron set. That is why a hood, which is a forced ventilation device, is necessary in this room.
The hood can fit perfectly into any interior
Its main advantages:
- it gets rid of pungent odors;
- quickly removes steam and smoke directly into the common house pipe;
- ensures the absence of traces of high humidity, as well as various other deposits on the walls and ceiling.
Disadvantages occur only in certain types of ventilation units; for example, a cheap hood may be too noisy. But this is also easy to come to terms with.
Calculation of a kitchen hood
But before choosing the type of exhaust system suitable for the given conditions, it is necessary to make an approximate calculation of the volume of removal of contaminated air.
Calculations are made primarily based on the size of the kitchen. The calculation of the electrical part is carried out according to the existing model of the hood.
Suppose the dimensions of the kitchen are 3 m x 4 m. Thus, the area of the room in this example is S = 12 m2. If the height of the walls is 2.5 m, then the volume of the kitchen will be V = 12 x 2.5 = 30 m3.
The performance of the hood (how many cubic meters per hour) is calculated as the product of the size of the room by the coefficient K. For electric stoves, K is approximately equal to 12 units, and for gas stoves - 20. It indicates the number of complete air changes in the entire room per hour.
In our case, we will use a gas stove. We get the following extraction capacity: P = 30 x 20 = 600 cubic meters per hour.
For a unit of this size, as practice shows, you will need a fan with a power of no more than 1 kW. When calculating electrical wiring, we will take this characteristic into account.
For a power of 1 kW, according to standard design standards for electrical conductors, a wire cross-section of 2.5 mm2 is sufficient. This parameter is used in lines in apartments. Therefore, any nearest outlet in the kitchen is suitable for installation.
The cross-sectional area of the air ducts is taken according to the following rules:
- It should be no smaller than the outlet of the hood.
- The cross-section of the air duct should be no larger than the area of the opening of the common house duct.
When installing a ventilation pipeline, you need to remember one more golden rule: the fewer bends in the line, the better the performance.
Grounding for the hood is not required.
Often in new buildings, a special two-wire wire is already installed in the kitchen specifically for the hood. Typically, in an apartment of a newly built house, this cable sticks out of the wall directly under the ventilation duct opening at a height of about a meter above the intended surface of the slab.
After calculations, you need to select the type of hood.
Types of hoods
The variety of exhaust hoods is quite large, so it can be difficult to decide which hood to choose. All of them are divided into circulating and evacuating, that is, they differ in the way air masses are removed.
The circulation device draws in air, purifies it through a built-in filter and then releases it into the room. This hood has its advantages:
- Easy to install (you can do it yourself).
- Does not require installation of additional communications.
- Does not affect the functioning of standard ductwork.
At the same time, it does not clean well enough, since the filter often does not cope with its task. Consequently, incompletely purified air returns to the apartment. They cost more than evacuation filters, and the filters require periodic replacement, which is an additional waste of money.
The advantage of an evacuation hood is the removal of excess heat from the kitchen area. Of course, it is more difficult to install than a circulation device, but the result of the work will be much higher. Installation of an evacuation type hood is complicated by securing the corrugation or duct through which the air will pass.
We recommend that you read: Industrial ventilation
Depending on the location of the hood, there are:
- desktop;
- ceiling or island;
- fireplace;
- built-in (integrated).
A tabletop hood is a socket located in a horizontal position above the working part of the stove. It is an integral element of professional kitchen equipment.
Ceiling or island mounted to the ceiling. Typically, such a hood is located in the same place where the stove is installed - in the center of the kitchen, which is why it is called an island hood. Installation of the device will require a complex system of false ceilings and air ducts, which requires a professional approach.
A fireplace hood usually decorates the design of large luxury kitchens. The installation diagram and design are drawn up individually. Installation is carried out by specialists.
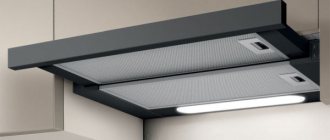
Judging by the technical characteristics of the available type of hoods, we can conclude that the best option for an ordinary family would be a built-in (integrated) device with simple installation and an affordable price. The retractable hood does not take up much space and is very convenient.
Types of kitchen hoods
The different needs of users force manufacturers to develop offers that would optimally suit the needs of a specific buyer. Therefore, the range of kitchen hoods that the modern market of household appliances offers us is quite wide. Let's try to understand their diversity.
According to the method of purifying air masses
There are many ways to purify the air in the kitchen.
Depending on which of them is used in a particular model, hoods are divided into:
- Evacuees. These models exhaust air from the kitchen outside through air ducts made in the form of a metal box or corrugated pipe. For such a device to work, there must be a ventilation duct or a simple hole. Usually the air duct is equipped with a valve that prevents the occurrence of reverse draft.
- Circulating. This model has a carbon filter, similar to a gas mask. In fact, this is not a hood, but a filtering unit that purifies the air from the main “odors”: there is no air exchange with the external environment. Such a device is attractive due to its simplicity of installation, but it is not able to protect, for example, from gas leaks.
Circulating hoods can be adjacent to standard kitchen ventilation. Their disadvantages usually include high cost and expensive maintenance: carbon filters require periodic replacement.
The circulation model of a kitchen hood will not help you if carbon dioxide or carbon monoxide has accumulated in the room, and an evacuating model can easily cope with this problem
A special feature of an evacuating hood is that it also removes excess heat, which always forms during the cooking period. The circulation model does not have such a function.
Division by type of construction
In addition to the main function, buyers pay attention to other distinctive characteristics of various models. The exhaust device should fit well into the overall interior of the room, be convenient to use, and also: it would be nice if you could save money and install it yourself.
Therefore, modern hoods differ not only in their air purification power, but also in their installation method, design, material of manufacture and the presence of additional options.
A fireplace or dome hood is often found in our homes: it is important that the area of the lower part of its dome matches the area of the stove installed in the room
According to the type of design, exhaust devices are divided into:
- Dome. This model got its name due to the shape of the air intake. It looks like a truncated pyramid, the dome of which is located directly above the slab. An air duct extends from an opening in the top of the dome, transporting air outside the kitchen through a hole in the wall or through a ventilation duct.
- Built-in. This hood is located inside the furniture in the kitchen. Quite often, a built-in hood is equipped with a retractable panel, which allows for economical use of room space and, at the same time, provides comfortable control of the equipment.
Types of filters for kitchen hoods
In circulation hoods, two types of filters are mainly used:
- Coal - absorbs excess odors;
- Grease-catching - takes on the job of accumulating small particles of fat and other combustion products;
In flow-through hoods, only the second type of filter is used, because there is no need to clean the air from odors if it will still leave the premises and be cleaned naturally.
Types of filters for kitchen hoods
Many may think that this principle can also apply to a grease trap, because there is also no point in cleaning air from grease that will no longer enter the kitchen. The logic is as follows: without this type of filter, grease will accumulate on fans and ventilation ducts, leading to contamination and reduced performance. Of course, today they sell cheap models without any filters, but independent and regular care will be more expensive in terms of effort and time.
Grease filters are made using padding polyester or non-woven fabric, which constantly need to be replaced. They are considered disposable. You may find a better option - a cassette filter made of aluminum, which you can clean yourself without the need for replacement. Modern hoods are equipped with several filters that do their job better, but changing or cleaning more than 1 filter is more difficult.
As a conclusion to grease filters: if you use padding polyester or aluminum filters for a long time without replacement and maintenance, the hood will function worse.
Carbon filters must be replaced regularly, but within the time limits specified by the manufacturer (can be found in the product documentation). The indicator may depend on the operating mode.
Modern models have an indicator that shows when it is necessary to replace the carbon filter in the kitchen hood. Today they are already producing equipment that monitors the degree of contamination of filters of all types using electronics, which count down the replacement time when the power is turned on. As soon as the deadline has expired, a signal or notification appears on the screen.
Natural and forced ventilation
SNiP establish the following standards for kitchen ventilation systems:
- The air exchange volume for kitchens equipped with gas hobs must be at least 100 m³ per hour.
- For kitchens equipped with electric stoves, this figure is slightly lower - 60 m³ per hour.
There are two types of ventilation systems used to provide air ventilation in kitchens - natural and forced.
Natural and forced ventilation
Natural ventilation
Natural ventilation systems operate on the principle of pressure differences between indoors and outdoors. In this case, no mechanical devices, such as fans, are used to create air flow. Air contaminated with harmful gases is removed from the room through ventilation shafts, usually installed in the thickness of the walls during the construction of the house.
Attention! For natural ventilation to work effectively, the volumes of exhaust air must be equal to the volumes of supply air. Supply ventilation is responsible for the flow of fresh air into the premises.
There are two types of natural ventilation:
- Organized. Air enters through specially designed supply ventilation ducts and valves.
- Disorganized. There are no special devices for air flow from outside. The influx occurs through leaks and microcracks in window frames and doors, walls and ceilings.
With the beginning of mass use of plastic windows and metal entrance doors equipped with sealing gaskets, problems with unorganized ventilation may arise. To ensure the flow of sufficient volumes of fresh air, it will be necessary to install recuperator valves mounted in walls or window frames.
The advantage of natural ventilation is its low cost and completely autonomous operation, independent of the availability of electricity or mechanical fans. The main disadvantage is the insufficient air exchange rate, which often does not meet the requirements of SNiP for kitchens.
Forced ventilation
Mechanical devices - fans - are used in forced ventilation. They are usually mounted on exhaust ducts, but additional installation of fans near the supply openings is possible. If the ventilation ducts are long, additional fans are installed inside the air ducts.
Wall Fan Design
An undoubted advantage of forced-type ventilation systems is their greater volume of work per unit of time than natural ventilation. Thanks to this, the minimum volumes of air exchange established by building regulations are easily ensured - up to 100 cubic meters. m per hour if there is a gas stove in the kitchen. The downside is the dependence on the availability of electricity and uninterrupted operation of fans.
Types of hoods by configuration
Naturally, a kitchen hood is installed primarily to create a comfortable microclimate during and after cooking.
However, given its dimensions, manufacturers pay a lot of attention to design. Modern exhaust systems can become a real decoration of the kitchen interior.
We recommend the product
Kitchen hood Faber Cylindra PLUS WH GLOSS
In stock
Capacity in withdrawal mode, m³/hour: 680 | Noise level (max), dB: 51, 69 | Depth, mm: 435 | Height, mm: 890 | Width, mm: 370 | Hood operating mode: air exhaust, recirculation | Hood installation: wall mounted | Type of kitchen hood: decorative, wall-mounted |
All hoods can be divided into:
- Hanging (flat) - mounted above the stove or oven. Can be installed under a wall cabinet.
- Dome - characterized by increased power. Installed in large kitchens.
- Island - placed in the center of the room. They do an excellent job of removing foreign odors.
- Fireplace - they got their name because of their similarity with fireplace analogues. Fits perfectly into modern interiors.
- Built-in – mounted in a special box or kitchen cabinet.
- T-shaped - a type of suspended analogues. They got their name because of their resemblance to an inverted letter T.
- Corner - can be built-in or hanging. Used for non-standard layouts.
- Telescopic - a type of built-in. When working, part of the body extends above the work area.
Hoods are also divided into ceiling and wall hoods, depending on the installation method.
Any exhaust system (flow or recirculation) must meet strict sanitary requirements. During the thermal processing of food, the air in the room should change 10-12 times. This will effectively remove steam, combustion products, soot, unpleasant odors, carcinogens and carbon dioxide.
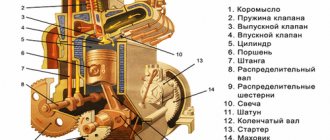
Schematic diagram of a kitchen hood
Any hood includes the following elements:
- Fan with electric motor. A multi-speed asynchronous motor rotates the exhaust fan, which forces air flow through grease-retaining filters.
- Filters. All hoods are equipped with reusable or disposable grease filters. Carbon filters are present only in circulating models and act similarly to activated carbon. They are replaced every 3-4 months of operation.
- Lighting lamps. The hob is illuminated using incandescent, LED or halogen lighting fixtures.
- Speed switching diagram. In different models, speed switching is carried out in different ways: using touch devices, using buttons or using a slide switch.
Ensuring the safety of the structure
The exhaust equipment kit must include a fan, which means that the hood must be connected to an outlet. If you have just started renovations in a new apartment, be sure to provide a separate outlet for the hood, because this equipment must always be connected.
The occupancy of the outlet by a single device allows you to hide it behind the elements of the furniture set. But don't forget to make it easy to access. There is one more important rule: the socket should be located no closer than 60 cm from the sink and from the stove.
Remember that this hood is an electrical appliance that can cause electric shock, so electrical safety issues must be taken seriously.
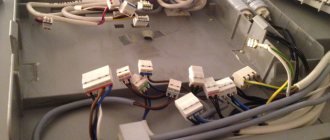
The kitchen, like the bathroom, is a room that can be both hot and humid at the same time. Excess moisture and grease from cooking settles on the hood grate. This creates favorable conditions for electrical breakdown on the metal casing from the fan motor. It is for this reason that the device should be connected to the electrical network using three wires.
The connection diagram for the fan included in the kitchen hood clearly demonstrates that three wires are required: phase, neutral and ground.
The wiring must include zero, phase and ground. The ground wire can be easily identified by its yellow insulation and longitudinal green stripe. Modern houses are equipped in advance with European sockets and a grounding circuit. In this case, it is enough to connect the grounding wire to the corresponding terminal of the plug. It is easy to distinguish it from others by its icon in the form of three parallel lines of different sizes.
Older buildings may not have grounding loops. In this case, you need to take care of protection yourself. In the event of a breakdown on the housing, grounding will allow the circuit breaker to turn off. In addition, it is necessary for potential equalization.
As additional protection, it is recommended to make the wiring for the hood socket a separate cable with RCD and circuit breaker protection.
Dimensions
The size of the air intake panel should match the width of the hob, or better yet slightly exceed it, then the operation of the kitchen hood will be optimal. The standard width of hoods is 60, 90, 120 cm. If your hob is 60 cm wide, it is better to hang an air purifier 90 cm wide above it. At the same time, take into account the overall design of the kitchen: a structure that is too massive above the stove will look out of place.
The distance between the hood and the electric stove must be at least 65 cm. Above the gas stove, the structure must be hung at a distance of at least 75 cm. Take this into account when choosing an air purifier.
Installation stages and types of kitchen hoods
All forced ventilation units for the kitchen are divided into two main classes.
- Open hoods, fully visible.
An open hood is installed between cabinets - Built into a closet, semi-hidden.
With built-in hoods, only the lower part is visible
Also among open devices there is a classification by location. Such hoods can be island or wall-mounted, and the latter can be corner.
Depending on the control method, the classification is as follows:
- remote (with remote control);
- push-button or touch.
Variety of exhaust devices
Recirculation hood without connection to the ventilation duct
Manufacturers produce kitchen appliances in various options in terms of design, size, appearance and placement methods.
According to the principle of operation, devices are divided into the following types:
- Flow-through. The drawn-in contaminants are fed into the general ventilation system or through a separate channel and discharged to the street through a hole in the wall.
- Recirculation. The air is forced through filters and returned to the room.
Based on the type of installation, products are divided into the following categories:
- Mounted. Hung on the wall directly above the stove. They have a horizontal bottom panel.
- Built-in. Depending on the model, they are attached to a shelf above the stove or next to the hob.
- Hanging. Installed on the ceiling, air ducts can be masked with suspension or tension systems.
By design, hoods are divided into the following types:
- Smooth. They are a rectangular structure located parallel to the floor.
- Inclined. The filter is tilted and opens by opening the decorative front cover.
- Dome. They are the most powerful, since large motors and fans can be installed in a large case.
- T-shaped. They belong to the category of hanging products. Installed above the work surface located in the center of the kitchen (island type).
Manufacturers produce products whose body has a natural steel sheen, painted white, brown or black. There are models decorated with patterns, ornaments and paintings.
electrical safety
The exhaust device belongs to the category of electrical devices that pose a risk of electric shock. As a result of the settling of fat and moisture in the mechanism, a breakdown of electricity from the fan motor to the metal frame is possible. In addition, the room itself is also dangerous due to elevated ambient temperatures and high humidity.
Let's figure out how to properly make a hood, fulfilling all electrical safety requirements.
Important: the product is connected to the network with 3 wires: phase-0-ground. Before installation, perform reliable grounding. To do this, connect to a dead neutral. Do not ground the hood to a drain or gas pipe.
The protective grounding process is performed as follows:
- Open the introductory panel in the house or entrance. This requires caution and attention, because the voltage is 220 V.
- The wires come out of a pipe built into the wall.
- Locate the threaded pin with the ground connections connected to it. This is a solid neutral, which is already grounded in a special place. Do not disconnect other ground connections - this is life-threatening.
- Throw the terminal up and tighten with the nut.
- Connect a 2.5 mm² wire to the device installation location.
- Connect the hood to the electrical network through a 6.3 A circuit breaker.
Wiring for equipment is laid depending on the design of the kitchen. If the connection is made automatically, it is mounted behind the wall cladding, in a PVC box, under the baseboard, and when plugged into a socket, behind the furniture.
If there are problems with conducting electricity to the hood, it is better to use the services of an electrician.
What is the purpose of the hood and how is it designed?
A ventilation device - a kitchen hood - uses a motor with a fan to suck in smoked air, helping to cleanse the atmosphere in the kitchen.
The device is capable of removing odors, grease, and smoke. It also maintains comfortable humidity and temperature (this only applies to exhaust hoods).
The design of modern hoods allows them to be used according to one of two principles:
- Flow-through, exhaust method or with an air duct.
- Circulating or without duct.
Inside such universal devices there is a filter system - coarse and carbon, to capture odors. Depending on the selected mode, the hood can purify the air and return it to the room, or divert the dirty flow outside.
The housing can have different sizes, shapes and designs, and can be controlled mechanically or automatically. There are many subtleties, let’s look into them in more detail.
Many people refuse supply and exhaust ventilation due to high energy costs for heating air coming from the street. Supply and exhaust ventilation with heat recovery can help with this problem. Read how this system works.
Read about how to choose the right voltage stabilizer for a gas boiler here.
Did you know that you can build supply ventilation yourself? At this link https://microklimat.pro/sistemy-ventilyacii/pritochnaya-svoimi-rukami.html you will find detailed instructions for arranging natural and forced ventilation.
Making a kitchen hood with your own hands
Before installing a hood in the kitchen, check the serviceability of the ventilation ducts in the house. If the ventilation is clogged or partially dirty, the traction force decreases and the hood does not work at full capacity. Therefore, first they clean the system and ensure air flow into the kitchen.
The devices are made of heat-resistant, corrosion-resistant and durable materials. Stainless steel is often used to make the case, then coated with enamel.
A simple and inexpensive way is to install the equipment in a cabinet above the hob. To do this, install a corrugated pipe and an electric fan inside. If there is no such cabinet, and the exhaust unit itself does not look aesthetically pleasing, the hood is made of plasterboard. The manufacturing process is labor-intensive and expensive, but the result is impressive.
From plasterboard
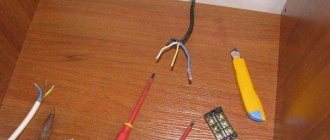
To make a kitchen hood with your own hands, you need to prepare the following tools and materials:
- Drywall.
- Galvanized metal profile.
- Corners.
- Corrugated pipe.
- Fastening elements.
- Paint, putty.
- Insulating material.
- Perforated
- Screwdriver.
- Scissors for cutting metal.
- Laser level or tape measure.
- Brushes, spatula.
The hood manufacturing process is carried out in several stages:
| Marking. | To do this, you need to determine the area where the ventilation hole will be located. If it is located away from the slab, the corrugated pipe is placed in a plasterboard box. |
| Creating a frame. | The frame for the hood has special features. The easiest way to place an air vent is in a straight line, without corners or deviations. Galvanized metal profiles are mounted to the wall using anchors along the entire perimeter. If the pipe runs with bends, first make markings on the ceiling, lay the first profile down in parts and secure it with self-tapping screws. Then install the second part and the transverse strips. The frame elements should be covered with plasterboard. |
| Manufacturing of the body. | A lower frame is made from the profile and secured. After this, parts of the frame are cut out and connected to the base. To enhance rigidity, the sides are equipped with additional jumpers. |
| Connection to the ventilation system. | A hole is made in the air duct for the corrugation to exit and the presence of draft is checked. For silent operation, they are sheathed with insulating material. |
| Decorative finishing. | Corners are attached to the corners, after which drywall must be applied to all elements of the device, treated with putty and painted. |
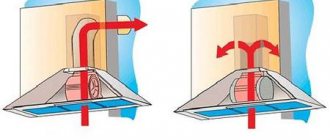
How a kitchen hood works
How does the hood work? In order to understand how a kitchen hood works, it is necessary to give an example of several modes - recirculation and air exhaust.
In the first case, this principle is perfect for owners of private houses. The development and creation of a ventilation duct system takes a lot of money and effort. Recirculation absorbs air, passing it through carbon filters, and releases it back into the room. The disadvantage of this mode is low performance.
In apartments where there are ventilation ducts and an established ventilation system, it is best to install a kitchen hood with air exhaust. The principle of operation is that the absorbed air moves into the channel and is discharged outside the house.
The kitchen hood operates using electricity. There are many connection variations: some connect an electrical cable to the equipment, others purchase hoods that connect to the network using an outlet.
Correct connection of the air duct to the ventilation system
For this you will need:
- plastic air duct
- offset check valve
- tee splitter
In the end, you should end up with something like this.
How does it all work? When the hood is turned off, the valve will be open and warm air from the kitchen will quietly flow by gravity into the ventilation duct. As soon as you turn on the exhaust hood, the valve immediately closes automatically, blocking the air flow into the room.
In this case, all odors from the stove will easily go outside. When switched off, the pressure in the box drops and the valve automatically opens, connecting the ventilation shaft to the apartment.
Features of air duct installation
Correct selection of the hood, pipes, and connecting elements may not give the desired result if an error is made when installing the air duct to the ventilation shaft.
For high-quality operation of the exhaust equipment, you need to know how to connect the hood, and also take into account the following points:
- The piping assembly should be as straight as possible. Bends and deflections are not allowed. When using a corrugated air duct, you need to stretch it.
- It is necessary to use sealant to seal connections with pipes and adapters.
- In places where the duct bends, the diameter should exceed the cross-section of the corrugation itself. If this requirement is violated, the pressure will decrease, and hence the quality of operation of the entire exhaust system.
- A pipeline 3 meters long will effectively perform its functions - no more, without turns or bends. If a turn is necessary, its angle must be obtuse.
- When laying through a wall, adapters must be used to protect the pipeline from damage.
- Long corrugated pipes should be fixed every 1-1.5 m. This prevents them from bending and swaying when the hood is on.
- At the junction of the pipe being laid and the ventilation shaft, it is advisable to install a special lattice frame equipped with a check valve and a flange for fastening the edge of the air duct. The principle of operation is as follows - when the hood is turned off, air circulates freely through the grille, while the valve is open. When the device is turned on, the valve closes, preventing contaminated air from entering the room.
We recommend that you read: Do-it-yourself natural ventilation system in a private house
You need to know that the throughput of the exhaust equipment drops by 10% with each turn of the pipeline at an acute or right angle. With several bends, the system is ineffective and operates with large overloads. If turns cannot be avoided, you should buy a device with more power, and also increase the nominal cross-section of the pipeline.
Assembly instructions - all numbers and performance
How does this all come together in practice? For capacities up to 300 m3/h (low speeds of most hoods), a d-125mm pipe is sufficient. On the device itself, the outlet hole may be larger.
For example, for 650 m3/h you will need a d-150mm pipe. However, you are unlikely to find such plastic pipes, and if you use the next standard size d-160mm, it will turn out to be a huge and awkward structure that spoils the entire interior and design of the kitchen.
Moreover, you will have to drill a factory hole for the ventilation duct in the wall, expanding it.
Therefore, in most cases, the optimal diameter of 125 mm is chosen. And you don’t need more.
The forced throughput capacity of standard channels and shafts with dimensions of 100*150mm is 400 m3/h.
An air flow of more than 450 m3/h simply will not fit there (it was tested in practice), even if it says 1200 m3/h on your hood!
Remember also that you cannot underestimate the diameter of the air duct too much compared to the outlet pipe on the hood. Otherwise, the vibration and noise will be so strong that the structure will have to be re-glued every month.
The connection of different diameters is made using special adapters.
Let's start assembling. First, install the adapter on the hood and connect the vertical section to it.
To improve its sound insulation, it makes sense to go crazy and stick a 5mm thick heat-sound-insulating material on top.
It wouldn’t hurt for them to cover the inside of the decorative casing and the noisiest part - the adapter. This is where the greatest turbulence occurs.
Next, add 90-degree elbows and other straight sections of duct as necessary to ultimately exit toward the hole in the wall.
All this is glued together with silicone, no superglues. There should be no gaps anywhere.
We reach the tee. A valve is installed in it from the side of the room.
Keep in mind that this is a gravity valve! It opens not due to air flow, but due to its weight.
One half of it is heavier than the other and at the same time it is installed at a slight angle of 2 degrees.
How to choose the right hood for the kitchen?
Let's figure out which hood to choose for the kitchen.
It all starts with the fact that you need to decide which cleaning method is more convenient to use (circulation or ventilation).
This determines how labor-intensive it will be to install the device and its effectiveness.
Ventilation option:
- You will need to build a separate ventilation duct and make a hole in the wall - the process is complex and costs a lot. Connecting a hood to a common house shaft is a bad idea for many reasons.
- Along with air removal, it will be necessary to organize its supply. If this is not done, you may not feel the effect of the device. Or you will have to open the window every time, which is very inconvenient in winter.
- Despite the complexity of installation, the ventilation system is guaranteed to supply the room with fresh air!
- The efficiency of the device is higher.
- The operation sound is quieter.
- No need to constantly buy filters.
- Only the exhaust option will help maintain comfortable humidity and air temperature, removing superheated steam and replacing it with a clean stream from the street.
Circulation option:
- Twice less effective than exhaust.
- Noise at work.
- It only cleans the air of odors and fumes, but the heat and moisture remain in the room.
- But the device is much easier to install.
- It can be placed anywhere in the kitchen, while the ventilation hood is “tied” to the hole in the wall and the duct.
- A device that is designed only for circulation work is cheaper.
Ventilation hoods remain the best. If you want to do it, but there is no opportunity yet, you can purchase a universal unit and use the circulation mode for now, and eventually organize channels.
About fans and their power
How to choose a kitchen hood based on power? Performance is the most important parameter for any hood. It depends on it whether the device will cope with the volume of air that is “entrusted” to it. Performance is directly related to the power of the fan (by the way, there can be 2 of them).
Productivity is measured in cubic meters, which the unit drives through itself, per unit of time - an hour. You will need to find out the volume of the kitchen (multiply the length by the width and height). According to sanitary standards, the hood should update this volume from 6 to 12 times per hour (multiply the volume by at least 6, or 12).
Inclined hood in the kitchen interior
It is also important to know that:
- The performance indicated in the device passport is designed for a height of 65 - 85 cm to the stove. Lower is simply inconvenient, and if you have to hang the hood higher, you need to take it with a reserve of power.
- More powerful fans produce noise that can be annoying.
- Using the device at less than full capacity will extend its service life.
It is best to purchase an exhaust device with maximum power, but with operating speeds. At a reduced speed, you can use the device every day, and if something burns, turn it on to maximum.
Filter system
Two-stage filtration in ductless units includes:
- Grease-absorbing filter.
- Carbonic.
The first one absorbs fatty, oily particles and soot.
It is a fairly large cassette with filter material attached to the frame.
It could be:
- Aluminum mesh.
- Non-woven fabric.
- Sintepon.
- Paper.
The metal filter is reusable and can be removed and washed in the dishwasher separately from the dishes. Preference is given to filters with 5 or more layers.
The remaining options are one-time options.
You can understand that it is time to replace the paper filter by looking at its surface - the text that is always printed on it becomes invisible.
Do not allow the mesh to become heavily soiled. Not only will the filter become useless, it may crumble and drip, but it can also ignite from high temperatures.
The carbon filter removes 96% of impurities from the air, including odors. It also needs to be replaced (usually lasts 3-6 months, depending on operating conditions).
The second stage, a carbon filter, is not considered mandatory. In emergency situations, you can run the exhaust device without it. But you cannot use the device without a grease-absorbing filter! Dirt will clog internal parts and settle on the fan blades.
When purchasing, you need to find out exactly what filters are installed, how much they cost and where you can buy them. Since filters differ for different models, low price and easy access to purchasing consumables will be very important.
Appearance and design of the hood
Exhaust devices can be mounted in different ways:
- On the wall.
- On the ceiling.
- Built into furniture.
Wall mounted
The first option is quite common.
Usually it is located between two kitchen cabinets.
Wall models can be shaped like:
- Dome;
- Sloping;
- Flat (or mounted).
Dome - a classic look, similar to a fireplace chimney. They can be stylized in a rustic style, with a natural wooden frame, or glass can be used. They look cumbersome.
Inclined hoods are modified dome hoods. They are good because they take up little space, allow the cook to lean over the stove, and do not interfere with his work. Stylish design using glossy surfaces will not spoil, but will decorate the interior.
Flat ones are inexpensive units that hang over the stove. They protrude forward the same distance as the others, but vertically they are very compact.
Ceiling models
Used in large kitchens with a non-standard layout, where the stove can be located far from the wall. Types of forms of such hoods:
- Island;
- Dome;
- T-shaped.
Ceiling hood option
Island - do not have a back wall, all of its edges can be considered front. They are often cylindrical in shape. Designers practice their skills on these models, which is why their prices are the highest.
T-shaped and dome are simply variations of similar units, differing only in the mounting under the ceiling.
Built-in
A separate category of hoods that can be almost completely hidden in furniture. Only the bottom plane of the device remains outside.
Materials
The requirement for the material is that it should not react. It is recommended to prefer hoods made of food grade stainless steel (which does not oxidize).
You just need to take into account that it cannot be cleaned using abrasive particles and acids.
Satin aluminum is another excellent material (magnesium alloy). The surface of the unit will slightly change shade, will not retain fingerprints and can be washed with any cleaning product.
Control panel - which is better?
The choice comes down to three options and depends only on preferences and finances that you are willing to overpay for the device:
- The touch panel is a stylish surface with LEDs.
- Buttons.
- Slider type - rotating handles or a slider moving in different directions.
Hood dimensions
The width of the exhaust device should not only fit into the gap between the kitchen furniture, but also correspond to the size of the hob (more is possible, less is not advisable). A narrow hood may not capture the entire volume of rising steam, and its efficiency will be low.
- Mounting height to gas stove: 75 – 85 cm.
- To the electric stove: 65 – 85 cm.
Narrow compact hood
The lack of space for a wide hood can be compensated by purchasing a model with a retractable panel, which increases the absorption area when needed.
Connection to communications
It is worth refusing to buy a hood with an air duct made of corrugated pipe. Otherwise, the requirements for the air duct are that it has a smooth inner surface and is as straight as possible (the more bends, the worse the draft).
Try to place the unit next to the outlet, or stretch it specially. Usually all hoods are equipped with a short wire with a plug.
Additional bells and whistles
Features that not all models have, but may be useful:
- Programming to turn on at a specified interval.
- “Residual speed” - after operating at maximum, the fan will spin for another 5-10 minutes in quiet mode.
- Timer.
- Remote control.
- CD and DVD players.
- Built-in TV screen.
- “Meteo” – connects to an outdoor weather station and displays weather information.
Which lighting is preferable?
It is very important to clearly see the stove and dishes (for example, experienced chefs judge their readiness by the shade of caramel or onion).
Lamps that can be in exhaust units:
- Incandescent.
- Luminescent.
- Halogen.
- Neon.
Incandescent lamps are inexpensive, have high brightness and can be of different wattages. But their service life and efficiency are the lowest, and their energy consumption is high.
Fluorescent (or daylight) is a sealed tube coated with a phosphor. Light output and efficiency are higher than incandescent lamps and last a long time. But the light is uneven, flickering, distorting colors; the phosphor wears off over time and the properties are lost. There is a small amount of mercury inside.
Hood with lighting
Halogen - the same incandescent lamp, but with a buffer gas in the bulb. This circumstance increases the service life of the lighting element and light efficiency (although it is still far from luminescent). The device gets very hot and burns out if you touch the surface with your hands. Electricity consumption is also quite high.
Neon - their body contains an inert gas and two electrodes (disc or cylindrical). They have a long service life even compared to fluorescent ones, do not heat up, have excellent brightness and the ability to select the shades of the glow. However, light bulbs contain harmful substances, are fragile, require sufficient stable voltage and are expensive.
Neon lighting, if used correctly and recyclable, is the best choice.
Preparing the ventilation shaft hole
Before all installation work, it is advisable to plaster the entry into the ventilation shaft itself and remove all sharp corners. This will give the entrance maximum aerodynamic qualities.
You should end up with approximately the same surface as a standard 90 degree round elbow.
It is recommended to add ceresit liquid (ceresit CT99) to the plaster solution.
This hole will be exposed to fat and moisture. And ceresite contains components that prevent the formation of mold.
However, do not use gypsum plaster under any circumstances. Its use in ventilation shafts is a direct path to the appearance of mold and fungi.
Attach sections of a standard air duct to the tee on both sides. From the side of the wall, 5-7 cm, wall it up in the ventilation duct. The exit itself is decorated with a square frame.
Installation Rules
The installation requirements for the hood are the same for all types of models. Since the device is an electrical device that collects grease and moisture, a breakdown of current may occur through the housing of the equipment. To protect yourself during installation, you must properly ground the hood.
Typically, modern houses are equipped with a grounding loop and there should be no problems in this regard: you can insert the plug into the socket and the device is ready for use. If such a circuit does not exist, it is necessary to make it. Under no circumstances should you connect the grounding wire to pipes or radiators, as not only family members, but also neighbors may be injured if they receive an electric discharge through the risers.
In order to ground the device, a three-core wire with a cross-section of 2.5 square meters should be connected. mm to the electrical panel. Then find the pipe (solid neutral) from which the bundle of wires comes out, and connect your wire to it. Its end must be stripped.
Before purchasing a hood, you need to measure the cooking surface of the kitchen stove - length and width. For the device, these dimensions should be larger or, in extreme cases, the same. A hood with a smaller area will not cope with high-quality removal of polluted air.
Another rule that you need to remember when installing a hood is maintaining the distance from the surface of the stove to the appliance. The height above electric and induction stoves should be 65-75 cm, above gas stoves - at least 80 cm. If these parameters are not taken into account, inconvenience in working at the stove or fire hazards may arise due to overheating of the device.
We recommend that you read: Balcony ventilation
The device must be fastened to the wall firmly and reliably, otherwise the device may break and injure one of the family members. Therefore, when covering the walls with plasterboard during repairs, you need to strengthen the place and place wooden blocks in the intended area for attaching the hood.