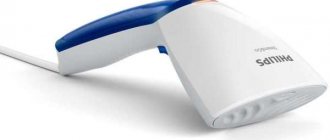
Clothing is an attribute of every person's life. It reflects an individual’s lifestyle, his social status and serves as a means of self-expression. In modern society, clothing is produced using special equipment that greatly simplifies human labor - sewing machines. A sewing machine cannot operate without failure all the time. Like any mechanism, it needs care, adjustment, lubrication, and sometimes repair. Repairing a sewing machine in case of minor malfunctions can be done independently. However, there are problems in which only a repair shop can bring the sewing machine back to life. Let’s try to figure out in which cases it is possible to repair sewing equipment at home, and in which cases it is necessary to seek help from professionals.
Industrial sewing machine: repair
An industrial sewing machine is mainly purchased by companies or people professionally engaged in tailoring. A special feature of industrial sewing machines is the presence of a table, an electric drive and a lamp. It is better to trust the repair of modern industrial sewing machines to qualified specialists in order to avoid additional problems when repairing them yourself. If the problems are minor or there is no opportunity or means to contact a professional, the instructions for repairing an industrial sewing machine will come to the rescue.
When starting to repair industrial sewing equipment, it is necessary to adjust the moment when the needle meets the nose of the shuttle. The implementation of this setting comes down to the following: you need to lift the needle plate and presser foot, and then clean everything with a special brush from the debris and dried oil that has accumulated over time. If necessary, use magnifying tools, the simplest of which is a magnifying glass. Next, reduce the tightening force of the shuttle fastening screws to such a state that the shuttle rotates around the axis with difficulty. The next step, using your right hand, quietly turn the sewing machine flywheel towards you, and using your left hand, hold the shuttle so that its nose is stably positioned on the axis of the needle, and the needle enters the bobbin holder hole to the very bottom. Next, rotating the handwheel, lift the needle up 1.8-2.0 mm. The first value of this interval is calculated for sewing products of fine fabrics, the upper one, respectively, for coarser ones. To make it easier to find this value, you can use a marker to mark the distance on the needle bar with a dash. After the distance has been found, raise the needle 1.8-2.0 mm from its lowest position and maintain this position. At the same time, slowly move the tip of the hook towards the needle so that the distance from the upper edge of the needle eye to the lower edge of the hook tip is 1.1 mm. This interval may be slightly increased, but in no case reduced.
Based on the adjustments described above, you need to proceed to the next step in setting up your sewing equipment, which is to set the gap between the nose of the shuttle and the point of the needle when they meet in the amount of 0.05-0.1 mm. It should be noted that the needle should pass at a minimum distance from the nose of the shuttle, but not come into contact with it.
Another important point of the equipment is adjusting the tension of the compensation spring. It happens that this spring is not in the machine at all, or it is there, but does not work. At the same time, the machine itself can function quite normally, without giving the seamstress a reason to worry. However, it is the proper functioning of this spring that allows you to make beautiful stitches, especially on delicate fabrics. To adjust this spring, you need to loosen the tensioner mounting screw and completely remove the tensioner. To avoid problems with reinstalling the tensioner, sketch, photograph or remember how it was assembled. Next, you need to move the spring driver.
LiveInternetLiveInternet
These machines are 40-50 years old, and they still sew, which cannot be said about modern imported consumer goods. I bought it and threw it away, but my grandmother’s rarity is kept carefully, in many families, as a memory and as a masterpiece of Soviet industry. Podolsk Order of the Red Banner of Labor Mechanical Plant named after M.I. Kalinina produced these sewing machines of class 2-M.
Unpretentious, reliable, easy to use, it always helped out in difficult times, and allowed many to earn a living. It’s a pity to see how young people are now getting rid of old things that can serve their owners for a long time. Most of these cars now rest in a junkyard. And before, the sewing machine was affectionately called the nurse; it fed and sewed the family. It's time to get down to business. First of all, we cut off the fabric that women love to sew on the “waist” of the machine. Believe me, there is no benefit from it, they stick used needles, bent, blunt, into it, and then they try to reuse the same needles. And they can’t understand why the machine doesn’t sew. In addition, after such stickings, the coating deteriorates and scars like this remain. Used needles should be thrown into a trash bin, that’s where they belong.
We disassemble the machine, remove all the covers, the needle plate, and disassemble the shuttle, as shown in the photo.
It can be seen that lint from fabric and threads has accumulated on the shuttle body, there are even pieces of thread and all this is mixed with thickened oil.
And here there is also dust and thickened oil.
And this is a place where not a single seamstress ever looks in during the entire operation of the machine. Lint and dust and sand accumulate here, in general, everything that gets into the holes of the needle plate.
We remove all this mess with a needle and tweezers.
What time is it here?
The toothed rack also needs to be cleaned, it is best to do this with a large needle.
And of course we clean the shuttle device; it’s good to use kerosene for these purposes; if you don’t have it, you can remove the thickened oil with a knife or screwdriver.
All dirt and old oil have been removed, now we begin to lubricate the machine. For these purposes, it is best to use a regular disposable syringe with the thickest possible needle. I don’t recommend using an oil can, it overfills the oil and you’ll get the machine dirty and you’ll get dirty yourself. Oil can be bought at any hardware store. Household Lubricating Oil will do.
Here the arrows indicate the technological holes for lubrication, put 3-4 drops into each hole, no more is needed.
And here it is necessary to drip into both holes, one hole of the needle bar and the second of the presser foot.
In these places, the needle bar is rarely lubricated, the friction here is crazy and the metal is used up, a backlash is formed, as a result of which the needle hits the needle plate or the shuttle.
And accordingly, our foot should also move freely up and down. Without braking, otherwise the fabric will be pressed unevenly, it will simply move under the foot and the stitches will be of different lengths.
And one more place that we definitely lubricate.
Winding the bobbin, add three drops of oil.
Now let's put the machine on its side. The arrows indicate all the places that need to be lubricated.
After complete lubrication, turn the handle for a couple of minutes so that the oil flows into all the joints and crevices of the machine mechanism. Feel the difference, it began to work completely differently, softly and quietly. Pay special attention to the installation of the friction device. Here you can see how not to do it, this is usually how amateur craftsmen install the friction washer, as a result they do not have the power stroke activated. After which they begin to use their imagination, cut out washers from cardboard, wind wire, in general, whoever is good at what.
This is how the washer should stand, the protrusions should be outward.
After this, tighten the friction screw and the stop screw.
The result of our work.
Do not store the sewing machine near heating devices or in cold, damp areas.
https://nakolene.narod.ru/
Series of messages “Sewing”:
Part 1 - We sew a backing for a sewing machine with pockets Part 2 - Sewing machine in painting... ... Part 26 - Foot sewing machine - device and repair of the drive Part 27 - Sewing machine Podolsk. Instructions and repairs Part 28 - How to repair grandma's sewing machine. Part 29 - AN UNUSUAL BAG FROM OLD JEANS + PATTERN Part 30 - A little thing for needlework Part 31 - How to insert a needle into the machine correctly?
Vintage sewing machines: repair
Sewing machines “Zinger” (“Singer”), “Podolsk” were once in almost every home. The development of sewing machine design technologies has led to the creation of new equipment that is more powerful and productive. As a result, tailoring has become widespread - it has become possible to buy clothes in stores, for every taste and color. Therefore, they began to forget about the old machines and they were replaced by more modern sewing machines. However, many people still have the founders of modern sewing technology somewhere in the village, in the country house or in the attic. Those in excellent condition are valuable antiques for collectors. However, it is not always possible to find a working antique sewing machine; most often they survive to this day pretty shabby. The repair of an antique sewing machine is determined by the degree of deplorable condition in which it found itself after long-term operation or storage. If the machine was stored in good conditions and cleaned periodically, then there is a chance that a simple lubricant can bring it back to life. If the machine is very tattered and spare parts are lost that are difficult to find, then it is worth weighing the pros and cons of repairing such a machine. But at the same time, antique sewing machines were made, as they say, conscientiously and with good care they can last for many more decades.
Poor fabric advancement
Frequent breaks and difficulty moving the fabric may be due to mismatch between the movement of the needle and the movable rack assembly. Since each model of sewing machine may have different settings for the rack assembly, for example, if we take the repair of Brother sewing machines, it is not possible to give universal instructions. But if you understand how this unit works, you can configure it on any model of the unit.
- The needle moves simultaneously with the staff to the final lower position.
The most important point in tuning is when the tip of the needle meets the notches of the staff. The latter should be in a slightly lowered state relative to the needle plate, but not completely (peeking out a little). At this time, the position of the needle should be such that its tip does not reach the teeth 1.5-2 mm. This position of the two parts relative to each other is the main parameter when setting up straight-stitch machines. In this case, your unit will no longer tear the thread, and will no longer move or collect the fabric poorly. This is possible as long as the other settings are correct. - The moment when the needle rises. Once the bottom position is reached, the needle begins to rise and the staff begins to move forward in preparation for the next cycle that advances the fabric.
At this time, a stitch is formed (the top thread is removed from the needle using a shuttle), and there should be no obstacles to the advancement of the thread. Often this occurs simultaneously with the advancement of the fabric, as a result of which excessive tension is created and the thread breaks. Often, moving the fabric causes the needle to break. - The thread is pulled into the stitch. If the staff moves upward towards the plate, the thread taker pulls out the top thread with a sharp movement. This movement of the thread guide must occur when the stitch formation has already finished, so the excess thread is pulled out.
The quality of the stitch is affected not only by the tension of the thread, but also by the correct operation of the compensation spring, the ideal condition of the shuttle (without roughness and burrs), the tension force of the thread from below and other parameters. If the rack is incorrectly adjusted, the thread will get tangled at the bottom, break, and be difficult to pull out. - Promotion of fabric. At the last stage, the rack begins to move the fabric along the plate. The length of the stitch, set by a special regulator, depends on the distance the staff moves. You should pay attention to the height of the teeth above the plate. Their reach should be no larger than their size.
For thin fabrics, it is recommended to lower them halfway, while simultaneously reducing the pressing force of the presser foot. The ideal option is to replace the rack with another one, with smaller teeth (not all sewing machines have this option). Straight stitch units can sometimes have 3 types of slats, and, accordingly, needle plates. The rack is changed simultaneously with the plate with the corresponding number.
Sewing machines: service and repair
By purchasing sewing equipment in stores or from official dealers, you get the opportunity to service your machine in the future, and, if necessary, apply for warranty and post-warranty repairs. Additional maintenance of sewing equipment includes:
— training buyers in the correct use of the machine and all its functionality, can take place in the form of presentations, master classes, videos;
— training clients in the basics of care, cleaning and lubrication;
— an explanation of typical problems that customers can fix on their own (replace the needle, belt drive, adjust the thread tension, adjust the stitches, clean and lubricate the machine, tighten the screws);
— supplying customers with the necessary set of spare parts and consumables (screwdrivers, oilers, needles, etc.);
— installation of software for electronic sewing equipment;
— provision of related products and sewing accessories.
In case of serious breakdowns, for example, a malfunction of the shuttle socket, problems in electrical and electronics, the client will be forced to resort to the services of a service center; if the equipment is still under warranty, then the problems will be eliminated under the terms of the warranty repair. In general, sewing equipment repair service centers perform a wide variety of repairs: from cleaning and lubricating to replacing electronic boards.
Needle problems
The main part of the unit, surprisingly, is the needle. During operation, it produces thousands of punctures in fabrics of varying densities. Over time, the needle becomes dull, pressure increases on it, and as a result it breaks or bends.
If the needle accidentally hits a hard surface, for example, the body of a machine or a zipper, its tip will bend. In this case, the needle seems to look normal, but while sewing it is difficult to achieve an even stitch. This is due to the fact that the thread, passing through the eye of the needle, begins to catch on the damaged tip. If this happens, then it begins to slow down with the appearance of an excessive part of the upper thread running in the line. Therefore, breaks occur regularly and loops appear in the screed.
Quite often, the equipment breaks down if the seamstress tries to use fabrics that are not intended for household machines, for example, a zipper on a sheepskin coat, a triple turn on trousers.
That is, all repairs to sewing machines with your own hands can consist of simply replacing the needle. This element must be taken seriously and the needle must be replaced as often as possible, even if no obvious defects are found. Replaced needles do not need to be thrown away; they can help if the new needle breaks, but the work must be continued urgently.
An improperly secured needle can also cause the “whims” of the sewing machine. This problem often occurs when sewing devices such as Chaika and Singer are repaired. The blade must be turned towards the nose of the shuttle. If the machine starts to tangle the thread, you need to take out the needle and make sure it is fixed correctly.
There have been cases when a home craftswoman bought consumables for industrial sewing machines instead of a needle for household needs, although it is difficult to confuse an industrial and household needle. There is a slight cut on the last one. When attaching industrial parts, the shuttle can be deformed, since certain types of needles are slightly larger than usual. Even if the size is correct, there is still an incorrect gap between the needle blade and the nose of the shuttle, resulting in gaps in the screed.
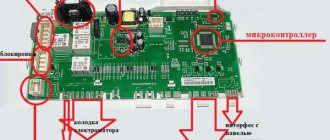
Sewing machine motor repair
The engine of sewing equipment is its most important part. In the event of a breakdown, you will have to pay significant amounts of money to repair or replace the engine, taking into account the cost of the technician’s services, which in total can amount to almost half the cost of a new machine. The motor of modern sewing equipment is represented by an electric motor, which also sometimes breaks down. However, if the engine does not start, do not immediately blame it for the problem. The problem may be a malfunction of the pedal, oxidation of the connection contacts, wiring failure, etc. It is almost impossible to make significant repairs to an electric motor at home with your own hands. Since the sewing electric motor operates from a 220-volt electrical network, you should not disassemble the motor yourself and try to repair it; it is better to entrust this task to electricians. It is better to immediately take electronic sewing machines to a specialized workshop.
You can actually change the brushes and electric drive on your own. The need to replace old brushes with new ones can be determined by turning off the lights in the room and working for a while without light. If the engine sparks or makes a crackling sound, it is time to change the brushes, which can be purchased at service centers or sewing equipment stores. Usually the brushes are easy to get: you need to unscrew the fixing washers with a screwdriver. However, in almost all Soviet cars the brushes are located inside the electric motor housing.
Repairing a sewing equipment motor most often means replacing it. However, buying a new electric motor can be a serious problem, since modern cars do not have a uniform standard for mounting for an electric drive, which cannot be said about old Soviet ones. Therefore, it would be more correct to contact the service center of the manufacturer of your particular sewing machine. Firstly, they will select the ideal engine and pulley, and secondly, set up the settings for turning on the machine and lighting the workplace.
In order for the electric motor to work for a long time and properly, it is necessary to follow the work and rest modes that are prescribed in the operating rules for household sewing machines. Otherwise, the electric motor will overheat, the wires will melt, and eventually become exposed, which will ultimately lead to a short circuit and complete failure of the motor. Industrial sewing equipment has a different engine structure and more powerful fans, so it can work for a long time without rest. Another useful tip - do not leave the sewing equipment plugged in for a long time; always unplug it from the outlet, because although the machine will not work, voltage will still be supplied to the electric drive.
Unstable stitch
As noted above, repairing sewing machines with your own hands can be done in case of minor breakdowns that do not require replacement of parts in the units of the unit.
You should know that preventive cleaning of the device and timely lubrication of moving parts can prevent most problems in the device.
If there are gaps in the line, the following factors can cause this problem.
- The fastening holding the needle has become loose. To fix the problem, clamp the part using a screwdriver, wrench or pliers (depending on the model of the unit).
- The nose of the shuttle became dull or bent during operation. To check this, use a magnifying glass. If a defect is detected, replace the part with a new one.
- The needle selected for the fabric is too thick. Use the manual for the device, which describes in detail the criteria for selecting fabric and needles.
- The thread chosen for the small eye of the needle is too thick. Select its thickness according to the size of the eye of the needle.
- Incorrectly installed needle. Install the part as indicated in the instructions. Typically, the cut on the flask should be directed away from the seamstress.
- Factory defective needle. Replace it with a new one.
Sewing machine repair tools
Mechanics who repair sewing equipment have a decent arsenal of tools and equipment for carrying out repairs. Among them: keys, awls, wire cutters, staples, duckbills, metal rods, needle files, calipers, triangular files, pliers, hammer, cleaning brush, as well as an oiler and spare parts for repairing a sewing machine. As you can see, there are many tools, some of them are in every home. The most important and necessary tools that every seamstress or tailor should have are a screwdriver, pliers, some kind of sanding material, a cleaning bead and an oil can. Everything else can be purchased or borrowed if necessary.
If a breakdown does occur and you need spare parts for your sewing machine, there are repair shops and special sewing equipment stores that offer a wide range of parts: presser feet, bobbin case, thread take-up, motor, thread tension regulator, rack, presser foot lifting mechanism, foot holder, presser foot screw, stitch length adjuster, pedal, needle plate, needles and needle bar. In addition, parts can be ordered in online stores.
Partner starforge.info
Fabric moves unevenly
1. The stitch length regulator is set to the minimum value
2. Wrong combination of needle, thread and fabric
3. The wrong needle is used
4. The thread got tangled
5. The conveyor combs are lowered. On many machines, the lifting of the rack teeth is controlled by a switch, do not forget about it.
See also: Setting up a sewing machine. Reika - fabric advancement
Adjusting sewing machines when knocking occurs
It is quite possible to repair a sewing machine yourself, but it is worth remembering that you can not only repair it yourself, but also cause a new breakdown. There are problems that will only take a couple of minutes to fix, and there are those that may require service.
If the device does not work, and you cannot disassemble it, or you are afraid that you will not be able to put it back together, it is advisable to contact a specialist.
If you need to quickly and correctly repair your sewing machine, then it is better to seek help from specialists
A very difficult problem with such equipment is the occurrence of knocking noise during operation. To solve the problem, you need to pull the flywheel, corresponding to the axial direction of the machine. Setting up the machines to fix the problem begins with disassembling the product.
To do this, you need to follow the sequence of actions:
- The manual drive is removed, and be sure to remember, or better yet, take a photo of how it is located.
- The limiter is unscrewed from the cavity of the nut, which in appearance resembles an ordinary screw located under the cavity of the manual drive. When reassembling it is screwed back in.
- The flywheel is removed, and maximum care is required to prevent damage, since if the flywheel breaks, financial investments will be required, and not small ones at that.
- The bobbin, which looks like a cone, located under the flywheel, is removed.
- The sleeve is removed from the shaft.
- You need to put a tin washer on the shaft, which is quite possible to make yourself, and an ordinary tin can is suitable for this.
In approximately 4 cases out of 10, it is a correctly made and installed washer that allows you to repair the machine and eliminate the knocking. As soon as this part is added to the device, the breakdown will be eliminated. In some cases, it may be necessary to rotate the rack 180ᵒ in order to more thoroughly examine the device from the inside and detect any problems.
Troubleshooting and troubleshooting yourself
The user of the machine can identify and fix a certain number of problems on his own if he understands the principle of operation of the machine.
Attaching the needle bar and tensioner
The most important element in the operation of a sewing machine is the needle. Before you start setting up, you need to check its functioning. During operation, a large load is placed on the needle. She makes a huge number of punctures in the fabric. This results in dulling and bending over time. It is very dangerous for the needle to hit the metal body. This will cause the tip to break immediately. Craftsmen with little experience may not immediately notice the defect. And working with such a needle creates large tears in the fabric.
A thread that is threaded through a broken eyelet will constantly snag, which can lead to deformation of the fabric. Loops may appear in the stitching. Because the needle is bent, the thread may continually break. This makes it difficult to stitch difficult areas where the top thread needs to be kept as tight as possible.
Checking the condition of the needle holder
For your information! In this case, adjustment and repair of the sewing machine is not required. You can fix the problem if you replace the needle yourself. Experts recommend changing this element as often as possible to make the machine work better.
When changing the needle, you must adhere to the following rules:
- The sewing needle should be selected only in exact accordance with the type of equipment. You cannot insert a needle for an industrial device into a household machine. In such a situation, the gap between the nose of the shuttle and the needle blade will be compromised. This will cause skipped stitches. In the worst case, the shuttle may break.
- It is important to position the element correctly in the needle holder. The blade should be on the side of the shuttle nose.
- Before replacing, even a new needle needs to be checked. There should be no distortions on it. This may not be noticed immediately. It is recommended to place the needle on the glass. The location of the curvature will immediately become noticeable.
- The needle should be selected according to the fabric being used. For jeans, stretch or faux leather, you need to choose special needles that allow easier passage through the fabric.
The needle must match not only the fabric and machine model, but also the thread number.
It is important to pay attention ! New sewing machines have a certain feature: they have a guide stop that prevents the point from moving to the side.
Setting the interaction between the hook tip and the needle
The quality of the row and stitch depends on the proper settings of the shuttle assembly and the sewing machine needle. The correct values must be set between them. If they are broken, thread breaks, looping, and omissions may occur. To perform the setup correctly, you need to understand the principle of loop formation.
As soon as the needle rises 2 mm, a loop is formed from the upper thread. At this time, the nose of the shuttle should pass close to the hollow of the needle. It is important that this distance is no more than 0.15 mm. And the distance from the eye of the needle and the nose should be 0.5 mm. These parameters apply to working with fabrics of medium thickness.
For your information! It is important to pay attention to the correct installation of the rack. It should be positioned vertically. It is the rail that moves the fabric relative to the needle. As soon as the material is pierced with a needle, the edges of the teeth of the rack should be at the level of the sewing machine work table.
Instructions: how to set up an old sewing machine
Setting up, adjusting and restoring a sewing machine are 3 different moments, since you can repair it when problems are discovered, but you should adjust a mechanical machine before you start using it, which will prevent breakdowns. Despite the availability of many modern sewing machines, many people use old models. It is possible to repair an old manual or foot-operated sewing machine, for example, a Podolsk sewing machine, it is not difficult, but it can be expensive. Models of sewing machines such as Chaika, which have a foot drive, are very popular.
You can set up an old sewing machine yourself if you strictly follow the instructions
Setting up the device to work is quite easy and does not require too much time:
- The lid opens;
- The sewing head is mounted on a hinge;
- The hinges are secured with screws;
- The visor is installed with screws;
- The valve closes;
- The sewing head is lowered;
- The drive belt is passed through the visor;
- Next, it is tucked into the drive wheel and flywheel cavity;
- The type of both idle and power strokes is switched by turning a friction-type washer;
- It is very important to place the needle and thread correctly;
- By turning the thread take-up handle, you need to set it to the highest position;
- The needle is inserted into the needle holder, and so that its flat part is turned onto the rod of the foot;
- The needle is screwed on with a screw;
- The thread take-up lifts up to pull out the spool pin;
- A spool of thread is placed on it and then the threads are threaded through the cavity of the thread guide and friction washer;
- The thread is sent to the thread take-up and fixed in the thread guide and needle holder.
If repair and adjustment of Brother machines and the like are required, then you should pay attention to the type of breakdown, the year of manufacture of the machine and the type of device, in particular manual or electric. Manual devices are much easier to repair, since the mechanical installation has a simpler operating principle and does not require checking electrical circuit boards.
How to fix a sewing machine if there are problems with the needle
Regardless of the model or brand of manufacturer, it is possible to set up and remove faults in a sewing machine yourself, and if the cause is the needle, then there should be no problems at all. The quality of the sewing and how long the equipment will work depends on the quality of the needle.
When choosing a sewing machine, experts recommend paying special attention to the quality of the needle.
The sewing machine can be of any brand.
- Singer;
- Janome;
- Brother;
- Veritas;
- Janome.
If the needle is defective, then the clothing may be torn, the thread may break, and other consequences may occur. Any instruction manual contains a recommendation on choosing a needle by number relative to the type of material, since sewing denim with a thin needle will not only not work, but can also ruin the fabric.
By following clear instructions from the manufacturer, the possibility of keeping the equipment in the best condition is much greater.
Another problem that can cause tissue damage is improper needle placement. In this case, everything depends solely on how well the connection is made; this must be done strictly according to the instructions.
The 97 class sewing machine has similar settings
The 97 class sewing machine is designed for sewing light suiting fabrics in factory sewing conditions at high speed. That is why it uses automatic lubrication of components and mechanisms and uses an oil pump instead of wicks (class 1022). A glass “window” on the body allows you to control the oil pressure, into which a stream of oil “hits” at high speeds. An important feature of this machine is the rotary type of thread take-up and the use of a belt drive in the design of the machine, connecting the movement of the upper (main) and lower shaft. That is why the 97 class sewing machine operates almost silently.
This machine is ideal for ateliers and seamstresses working at home. She sews any fabrics, including knitted ones, with high quality. Its only “disadvantage” is that it will not be able to sew too thick and rough fabrics, including leather. Sewing machines of class 22 and 1022 are more suitable for this.
Another difference is that the diameter of the inner hole of the shuttle of a class 97 sewing machine is slightly different and therefore a class 22 shuttle device will not work, but the bobbin case of all these machines is interchangeable. If you use a class 97 industrial sewing machine in your studio or even at home, then this material may help you independently adjust and make minor repairs without resorting to the services of a specialist. Moreover, not everyone has such an opportunity, since not everywhere there is already such a master. It should be noted that some settings require experience, not just knowledge. But, start repairing yourself and experience will appear.
Industrial sewing machine class 22
Despite the abundance of professional sewing equipment in stores, many still use old industrial sewing machines of class 22 and class 1022. Despite the fact that the Class 22 sewing machine is the same age as pensioners, it is still used not only by amateurs, but also by professionals in small sewing enterprises. One of the reasons is probably that it is not always possible to buy a new universal industrial sewing machine, and a class 22 sewing machine, although outdated, is not inferior to modern ones in many respects.
Its main advantage is that it is a universal and reliable machine. A well-tuned sewing machine of class 22 sews any fabric, including leather, with high quality. Of course, these machines look quite shabby, because they have worked hard for decades. But, for small sewing studios that do not have sufficient finances to buy modern sewing equipment, a used sewing machine of class 22 is sometimes simply the only way out.