Conditions for performing connection work
I would like to note the following. In the photographs in this article, the panel and oven are connected directly to the power cable, with both devices connected to the same cable. Speaking from an electrical installation point of view, this is not correct. For a hob or electric stove, a separate supply circuit with separate grounding must be laid. A modern oven, despite its size, has double protection and can be connected to a simple (without grounding) outlet. In this example, the oven comes with a socket, which we cut off and connect directly.
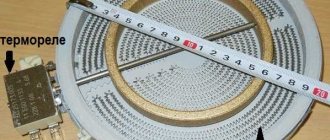
But be that as it may, in my example, both the oven and the hob are connected to a common cable using a power terminal block (block) designed for high current in the circuit, below you will see its photo. I would like to note that connecting an electric stove or hob to so-called twists, solders or low-power terminal blocks like Wago is DANGEROUS.
Related article: How does an induction cooker differ from other electric models
Work plan
We divide the planned work into the following parts:
- Preparatory work;
- Electrical preparation;
- Hob connection;
- Oven connection;
- Installation of devices in place;
- Functionality check.
Let's start with the preparatory work.
Connecting the hob and oven - preparatory work
In principle, all preparatory work, without which it is impossible to connect the hob and oven, must be done in advance. Namely:
1. Power supply for household appliances must be connected and located on the wall behind the stove. If the connection is planned to be made through a socket, then the sockets are located behind the oven installation site no higher than 100 mm from the floor. If the connection is planned to be made through a power terminal block (block), which is what we will do in this article, then the length of the cable for connection is selected locally, based on the convenience of the work. 2. Let me remind you that to power the electric stove (hob), a separate electrical group must be allocated, a cable with three cores, brands VVGng, NYM, must be laid. The cross-section of the cable cores is 4 or 6 mm2 (not less), depending on the power of the hob. 3. A hole must be cut in the installed countertop for the hob. The tabletop itself must be firmly fixed.
To start connecting the hob and oven, all you have to do is turn off or check the power supply to the stove, prepare the tools and unpack the purchased appliances.
Prepare the tool
First, the hob is connected and installed, then the oven.
Related article: Which refrigerator to choose for an apartment
Connecting the hob and oven to the mains: basic rules
It is important to immediately decide on the following points:
- Is there a separate outlet for connecting this equipment:
Sometimes in new buildings the developer installs a separate outlet for connecting an electric stove or hob. This is most common in homes without gas. And as a rule, such an outlet has a dedicated line (separate cable) and a separate electrical circuit breaker. But the outlet itself has an unusual appearance and requires a corresponding outlet, which is sold in stores. We described how to connect a grounded outlet in one of our articles.
- What is the power consumption of household appliances:
In some cases, before purchasing household appliances, you should definitely inquire about this indicator. The fact is that city apartments, especially old ones, have restrictions on power consumption. And in terms of the load-bearing capacity of the network, in particular old wires.
Sometimes this limit is 3.5 kW, and modern equipment is energy-intensive. For example, a modern Zanussi gas oven in grill mode can consume up to 1.7 kW of electricity. Therefore, you immediately need to understand that if there is a 16A circuit breaker at the entrance to the apartment (load up to 3.5 kW), then you will need to think about redistributing the load. Only a professional electrician can help you with this.
- Is there grounding in the kitchen and in the apartment or country house:
A prerequisite for connecting household appliances is to connect them to grounding and a residual current device (RCD), which will protect you from electric shock.
Therefore, modern household appliances are necessarily produced with grounding of current-carrying parts. Take a look at your equipment's wiring. There will be 3 wires, and the yellow-green one will be the ground wire.
Connecting the hob
- Unpack the hob and oven;
- Prepare a PVS 3x4 cable to connect the panel;
- Remove the top insulation from the cable by 10-12 cm;
- Strip the cable cores and crimp them with a special tool (it is not expensive);
Crimping the hob connection cable
Related article: Small kitchen appliances
PVA cable cores are multi-core. To ensure a strong connection and for safety reasons, crimping is mandatory. The power of the hob is high, the currents are high, and if there is poor contact, a fire can occur.
- Connect the PVA cable to the hob;
- Close the panel terminal block cover.
The connecting cable is connected to the hob.
Move on to the oven.
Related article: Properties of electrical insulating materials
Connection diagram for hob and oven
How to connect the surface and oven to the electrical network with your own hands? It's not that hard, the main thing is to learn the basic rules.
A dedicated line with a separate specially designed socket must be used for the oven and hob
Many new apartments already have a separate cable and a special socket for the hob. In these cases, you will need to buy a special plug. But older houses do not always have these devices.
If the apartment does not have a separate cable and socket for the hob, then this device should be connected in accordance with important recommendations:
- The first step is to check the permissible voltage for which the household device is designed. You will definitely need to check the connection diagram recommended by the device manufacturer;
- You can find out the permissible voltage indicator and the type of circuit in the instructions that come with the household appliance. Additionally, it is worth inspecting the connection area on the device;
- hobs can be connected to a network with a voltage of 220 V and 380 V, ovens - 220 V. The factory terminals for connecting the cable are installed with jumpers, which provide the ability to connect to a 220 V outlet;
- standard kitchens cannot have connections to a network with a voltage of 380 V; this does not meet the requirements of SNiP. They are usually equipped with sockets with a voltage of 220 V;
- It is imperative to install a separate circuit breaker in the electrical panel. A separate cable is laid from it. The current rating of the network protection machine and the connection option may depend on the level of possible load;
- to connect electrical devices that have a power of no more than 5 kW, a current of 25 A is required, the cable cross-section must be at least 2.5 mm2. If more powerful products are used, for example, with 36 A or 40 A, then in these cases it is worth using a cable with a cross-section of 6 mm2;
- Preference should be given to non-flammable cable brands; it is advisable that they have double insulation with a moisture-resistant structure. The most suitable would be VVGng;
- To connect a cable to one phase, it must have 3 cores. To connect a two-phase circuit, you should use a cable with 4 cores, and to connect a three-phase circuit, you will need a cable consisting of 5 cores;
- at the end of the connection process, the socket is installed and the plug and cable are connected. But it is important to choose the right plug and socket.
Before turning on the hob, you need to select a plug
In some cases, electricians, when installing household appliances, connect hobs and ovens using terminal blocks that are installed on the wall surface, without using a plug and socket. However, this connection method is inconvenient and not entirely suitable for use.
If you have to dismantle the hob, you will need to climb into the terminal box, and during the installation process you will need to connect it again. If a plug and socket are used as connecting elements, then this process will be much easier.
Oven connection
Check if the power supply cable is turned off
- Strip the cores of the power cable and make rings at the ends, almost like in the photo (the ring should close). The rings will ensure a tight and reliable connection;
- Connect the terminal block to the power cable. Tighten the mounting screws securely;
Connecting the terminal block to the power cable of the hob.
- Place the hob next to the cut. Pass the connecting cable through the panel cut. Connect the cable from the hob to the connecting terminal block. Tighten the mounting screws securely;
In the photo we see that the connecting wires of both the hob and oven are connected to the terminal block.
Ovens are usually ready for connection and have their own plug, which you just need to plug into your socket. If an outlet is not provided, then bite off the plug from the oven cable and connect it to the hob terminal block, after crimping the stripped ends.
- Close the terminal block cover (it is transparent, in the photo on the right). The connection is ready.
Hob and oven connected
Gas hose selection
Before choosing a built-in oven, you need to ensure that certain requirements are met, compliance with which will allow you to avoid dangerous situations:
- There should be no flammable or combustible materials near the oven (kitchen curtains, towels, rags, oil).
- Furniture in the near zone of the oven must withstand an increase in ambient air temperature of 50 C.
- It is not recommended to place the oven and hob next to the refrigerator or freezer.
- The oven should be located away from water sources in the kitchen.
- The electric oven must be located close to a grounded power outlet installed at a height of more than 10 cm from the floor.
When determining where in the kitchen and at what height to install the oven, you need to consider the following placement options:
Traditional placement of the oven, while the location of the hob above the oven is not mandatory. This option is most often used in small kitchens where there are few work surfaces, and there is no alternative for small ones.
Column cabinets
Typically, this placement is used in a spacious kitchen, where there is enough space to install additional tall cabinets.
Important!
When deciding at what height to install the oven, you need to consider the following. The high placement of the oven provides a number of advantages: it is easier to clean and maintain, it is safe for small children, it is easier to remove dishes and monitor the cooking process.
Read more: Seal for refrigerator Biryusa; Replacing the rubber seal on a door with your own hands
To the skeleton
In a spacious kitchen with a hob placed in the middle, it would be logical to install the oven directly into the frame. This option is most suitable for families without small children and who rarely cook.
In a high cabinet
A very convenient place to integrate the oven into the cabinet located on the edge of the unit. At the same time, it is not possible to use the surface of the cabinet as a working area, but you can install a microwave oven, various household appliances and kitchen accessories on it.
It should be noted that such placement is quite often used in everyday life for medium-sized kitchens, where there is no shortage of work surfaces, but there is also no shortage. In this case, it can be considered optimal.
Installation of cabinets on different surfaces
There are two main types of gas hoses on sale:
|
Gas hoses are sold in various lengths; before purchasing, decide what length you need.
| Rice. 1. Various types of gas hoses |
Rubber gas hoses are the simplest and cheapest, which is probably why they are the most common. But rubber hoses are poorly protected from mechanical stress; the recommended service life is 5 years.
| Rice. 2. Rubber gas hose |
https://www.youtube.com/watch?v=8pS69oVPeW8
Polymer gas hoses in steel braid were previously widespread, but in many cities and countries they are prohibited for use. They are visually distinguished from water hoses by yellow braided stripes.
Bellows gas hose is safer and more durable than rubber gas hoses, with references to lifespans of up to 25 years. Bellows hoses are produced from stainless steel, at the ends of the hose there are threaded fittings with paronite gaskets. The hose bends easily, withstands pressure up to 6 atmospheres and temperatures from -50 to 200 degrees C. I chose this option.
Bellows gas hose with protective coating is a bellows hose model that is protected by a layer of polymer coating.
Read more: How to calculate the power of a gas boiler
The choice of location for installing a do-it-yourself electric oven should be approached with the utmost responsibility. At the same time, in addition to observing the basic rules of electrical and fire safety, it is necessary to ensure normal conditions for the operation of the oven and make sure that it does not interfere with the functioning of other household appliances located in the kitchen.
A far from complete list of recommendations is as follows:
- there should be no curtains, towels, paper products or other flammable items in the immediate vicinity of the oven;
- furniture elements in contact with the cabinet must withstand a temperature of 50 ° C without damage;
- placing the oven close to a refrigerator or freezer is unacceptable;
- It is advisable to install the oven as far as possible from water sources;
- to ensure natural air circulation, it is necessary to provide gaps of at least 90 mm from the bottom, 40-50 mm for the side and rear walls of the oven;
- On the side of the installation site, at a height of at least 10 cm from the floor, there must be an electrical outlet with grounding that can be easily reached.
Size ratio when connecting an oven
Important!
The socket must be designed for a current of at least 40 A. If this is not the case, replace it. Before you build a new oven with your own hands, you should decide on its installation location. The most convenient locations for ovens:
- In the cabinet under the table top. In this case, the hob does not have to be nearby at all. This placement is optimal for small kitchens with limited work surface area;
- Column cabinets. This option is good for spacious rooms. The niche intended for the oven can be located at eye level, which makes it easier to monitor the cooking process and removes hot surfaces from children;
- To the skeleton Many housewives find it convenient and natural to install an oven in the supporting structure of a hob, located in the center of the kitchen area;
- In a high cabinet. In a medium-sized kitchen, it is quite possible to mount the oven in the outermost cabinet of the kitchen unit.
Examples of oven locations
As preparatory work after choosing the location for future installation of the stove, the following should be provided:
- availability of reliable ventilation;
- grounding inspection;
- checking the electrical network for the possibility of connecting a new large energy consumer.
Advice! The socket for a powerful oven should be connected through a separate machine. If you lack your own qualifications, contact a professional electrician.
Installing devices in place
- Place the hob on the installed countertop. Don't forget about the seal between the panel and the countertop. If necessary, use additional sealing with acrylic or silicone sealant. Apply the sealant in a thin layer so that it does not squeeze out from under the edges of the panel after installation (it will turn yellow over time).
After securing the hob, move on to the oven. We insert the connected oven into place.
Functionality check
- Turn on the previously turned off power supply;
- Check the functionality of the installed devices.
That's all! The hob and oven connections are complete.
©Remont-kuxni.ru
Other articles in the section: Plumbing and kitchen appliances
- No entries found
With or without oven?
The choice of an independent or dependent hob is another criterion that requires careful consideration.
- The dependent hob looks like a large stationary gas stove. The panel and oven are connected by drives. This option is suitable for lovers of traditional gas stoves.
- Independent or as it is also called an autonomous hob. Consists of a panel on which the burners are located. The oven is not included. Its acquisition is your personal desire.
Advice. Those who decide not to purchase an oven or place it separately from the hob can install a dishwasher or cupboard.