The main components of the iron and the tasks they perform
Main components
- An electrical wire that connects to a terminal block.
- Thermostat, which is responsible for regulating the temperature.
- A heating element.
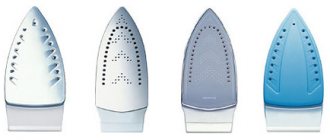
- The sole is perforated with holes for steam to escape.
- Water supply system, which includes a boiler, supply keys, tubes, nozzle, etc.
Operating principle of the device
- A hidden heating element heats up the metal sole of the iron when the device is plugged in.
- The degree of heating is regulated using a bimetallic plate. As the temperature rises, it deforms and opens the contacts. The heating intensity is determined by the thermostat.
- When you press the supply button, the water poured into the boiler is transferred in drops to the sole, there it comes into contact with the heated surface and forms steam.
Some models from well-known manufacturers are equipped with an automatic shutdown board, an intelligent control system, an anti-scale cartridge built into the boiler and other components.
Determining the cause of the breakdown
Despite the differences in the designs of budget and expensive multifunctional models, all the main malfunctions of irons can be combined into three groups:
- The iron does not turn on (no indication).
- It turned on, but stopped heating.
- No steam is supplied and water does not splash.
In some models, the automatic shutdown system may break down (the control board has burned out). It is hidden in the handle of the device and can only be replaced at a service center.
Let's take a closer look at the main causes of iron failure and methods for eliminating them.
How to repair an iron yourself 6 main causes of breakdown
An iron is a guarantee of neat things and a neat appearance. Responsible and respectable housewives experience not very pleasant emotions when the device breaks down - not everyone can afford its expensive repairs. And why spend extra money if you can fix the device yourself. Let's look at what the main malfunctions of an ironing device are and how you can repair the iron at home yourself.
Before disassembling the ironing machine, check all external structural elements, perhaps the problem lies with them. The main parts of the iron are located in its bottom, and they are the main causes of breakdown. These include:
1) Temperature regulator. 2) Electrical cord 3) Water regulator 4) Steam system 5) Iron soleplate 6) Heating element
Origin of the iron
The first ironing facility was invented back in Ancient Greece - ground heated stones were used to pleat clothes. When the first iron similar to its modern form appeared, it was used exclusively for ironing silk.
Interesting fact: the body of the first irons was filled with hot coals.
It is not known who and when invented the semblance of a modern iron, but the invention of the first electrical device is attributed to Henry Seely. An American registered a mechanism called “Electric flat iron” in 1882.
The weight of the electrical device was six kilograms. Therefore, it is not difficult to imagine what the ironing process was like. After the heating method using a carbon arc was introduced into the mechanism, caring for fabric items became much easier.
In 1892, the General Electric Company began production of irons using an electric spiral. Next, a current regulator and steam supply, anti-scale protection and other important options were introduced into the devices. The design of irons changed in accordance with fashion.
The iron does not turn on
If the iron does not turn on and does not heat up, the likely cause of the malfunction is wear on the cord and failure of the fuse.
Cord wear
Sometimes the defect can be seen visually - the cable winding is worn out, twisted, the wires are visible through the weaving, and their insulation is damaged.
To eliminate or eliminate this malfunction, you should:
- Get to the contacts by unscrewing the mounting bolts and removing the back panel.
- Trim the damaged area (if the defect is visible visually and the length of the cord allows). After cleaning the contacts, you need to reconnect the rest of the cable and check whether the sole starts to heat up.
- If there is no external damage, you should test the cord with a multimeter, and if there is no resistance, replace it with a new one.
If the cable is in good condition, you need to remove the housing to get to the base and key components of the device.
Thermal fuse has blown
If the cord is in order, the cause of the malfunction may be a failed thermal fuse. This element is built into the circuit and serves to protect the device. If the surface temperature of the heating element exceeds the permissible value, the fuse burns out. The element is located next to the thermostat, often hidden by a layer of insulation.
To check the functionality of the thermal fuse, you need to measure its resistance. If the value shown by the ohmmeter is zero, the element is faulty.
Repair of heating elements and thermostat
If the device stops heating, the heating element may have burned out, the replacement of which is expensive. If this happens, then it is better to buy a new iron. The two heating element outlets are located at the back of the iron soleplate. To check, the multimeter must be configured to measure resistance and connected to the terminals of the heating element. If a number close to 250 Ohms appears on the device display, the heating element is OK. If the number is much higher, then the heating element has burnt out.
The thermostat externally consists of a plate with contacts located on it and a plastic rod intended for putting on the disk. Connect a multimeter to the contacts and check the operation of the thermostat. When you turn it off, the sound should disappear, and when you turn it on, it should appear again.
If the thermostat breaks down, the iron may not turn on, even if it is set to “on”. It may be the other way around - the device does not turn off when the thermostat is turned off. In both cases, the problem is faulty contacts.
If the iron does not turn on, there may be carbon deposits on the contacts. It can be cleaned using fine grit sandpaper. If the device does not turn off, the contacts may have melted or become stuck when dropped. You can try to carefully unhook them, being careful not to bend or damage them. If it doesn't work, you'll have to replace the iron.
No steam is produced, no water splashes
If the iron has been in use for a long time, the owner may encounter a situation where the iron stops steaming. At the same time, it turns on regularly and maintains the temperature in accordance with the selected mode.
There can be two possible causes of malfunctions:
- blockage;
- failure of the anti-drip system.
If hard water is poured into the iron, after several months of operation, deposits in the tubes, nozzles, and holes in the soleplate can accumulate in such quantities that they block the steam output.
To remove the blockage, you need to descale the iron according to the instructions. A clogged nozzle can be cleaned mechanically using a sharp needle. If necessary, you can use the following descaling products:
- Citric acid, soda or vinegar poured into the tank in certain proportions.
- Chemicals: MAGIC POWER, Topperr, Top House, etc.
Perforated holes in the sole can be treated with ammonia or a special pencil.
If cleaning does not help, the problem may lie in the anti-drip system. Some models have a special thermal disk installed, which bends when the heating element starts to heat up. He lifts a plate that presses down the valve, which shuts off the water supply. If the system malfunctions (the disk is deformed, the plate comes off when dropped, etc.), the valve can shut off the water supply when hot. To eliminate the malfunction, it is necessary to straighten the displaced parts and secure them in the desired position.
Steam spray system
If almost no steam comes out of the iron, but there is water in the container, most likely the holes are clogged with salts. You can restore functionality with a simple technique. Pour water and vinegar (regular, table vinegar without dyes) into a dish with low sides (a frying pan or baking sheet will do). One glass of vinegar per liter of water. The second recipe is to add 2 teaspoons of citric acid to 250 ml of boiling water. Place the switched-off iron into the bowl with the prepared liquid. The liquid should cover the sole.
Cleaning the steam vents on your iron
Place the container with the iron on the fire, bring to a boil, and turn off. Wait until it cools down. Reheat. You can repeat this 3-4 times. Until the salts dissolve.
Sometimes water stops coming out of the sprinkler. This is most likely due to the tube being disconnected. In this case, repairing the iron consists of disassembling the panel on which the injection buttons are attached and installing all the tubes and wires in place.
The second way to descale your iron is to disassemble it completely so that only the soleplate remains. Seal the sole with tape to prevent water from seeping through, but you can also put it in a dish. Pour hot water with vinegar or citric acid into the sole, leave until it cools, drain, and refill. Continue this way until you are satisfied with the result. Then rinse with water and collect.
Repair Tips
An equipment owner who decides to repair an iron at home may find the following tips useful:
- The case elements of modern models (Philips, Bork, Tefal, etc.) are held together not only by screws, but also by plastic latches. Therefore, you should disassemble the device very carefully so as not to damage the mount.
- When checking the temperature regulator, you need to make sure that it is turned on by turning the pin left and right. When turned off, it will erroneously show no resistance.
- If there is no replacement fuse, the burnt element can be removed from the circuit. The iron will still work, however, the next time it overheats, the heating element or thermostat will fail.
- To assemble the device in the required sequence (attaching the cover, body, handle, etc.), the key stages of the work should be photographed.
Where to begin?
First, you must visually inspect the case for cracks, defects and traces of melting of the case. Perhaps the appearance will immediately show what exactly is causing the iron to break down. If the inspection does not yield anything, you need to completely disassemble the case to independently diagnose all the components.
Please note that disassembling the iron is sometimes quite difficult. This is due to the fact that every year manufacturers spend more time on the design of electrical appliances, creating invisible fasteners and holes for screws. Initially, prepare a set of screwdrivers and a knife that will be useful to you for further actions.
Power cord
One of the main malfunctions of the iron is the power cord, which you actually plug into the outlet.
Get to the junction of the contacts with the heating element and if there are no visible faults, use a tester to ring the cord to determine its functionality.
For dialing, you can use a homemade tester, consisting of a piece of wire, a battery and a light bulb. If the light comes on when the contacts are connected to both ends of the cord, move on.
If the power cord is the cause of the breakdown, you can try to shorten it by 10-15 cm (perhaps the problem area will be removed). Is your iron still not working? Replace the cord with a new one!
Causes of iron failure
An iron is a fairly simple household device, consisting of a heating element, a light bulb indicating the operation of the modes, a water container used for steaming, a control button and a handle. It is an essential item and cannot be replaced with anything else. That's why its breakdown is so unpleasant. If your iron stops working
, you should not repair it yourself, because it is not entirely safe.
In addition, it is important to correctly determine the causes of iron failure
. If the definition is incorrect, there is a high probability of damage to other components of the device.
Let's look at the most common causes of iron failure.
:
- Damage to the power cord. This breakdown is the most popular. Make sure that the iron is connected to the mains and check the wire for damage or breakage. The integrity of the cord and plug is diagnosed with a special device - a multimeter.
- If there is voltage in the outlet and the iron turns on, but there is no heating, the reason may be that the wire breaks and the contacts with the heating element become loose.
- Thermostat failure. The temperature regulator is a lever that sets the desired temperature of the soleplate of the iron. When the temperature of the iron changes, the contacts in it either close or open, and a high voltage current flows. If the contacts become dirty, dust, dirt, or clothing debris gets in, the performance of the device deteriorates.
- Thermal fuse is faulty. He is responsible for the safety of the iron during operation. If the temperature inside it rises above normal, the fuse disconnects the electrical circuit and is destroyed to prevent a fire. Of course, after this the iron stops working.
So, the iron broke. What to do?
Is it worth fixing it yourself? Self-repairing an iron often involves scratches and cracks on the body, which can lead to the thermostat or handle falling out. The device may be damaged so badly that it is no longer possible to repair it. Not everyone, even a technically advanced person, has all the necessary tools to diagnose and repair a device, much less the necessary spare parts. Often, self-repair of the iron ends with its complete disassembly. In this form they bring it to the service center, which greatly increases the cost of repairs. If the iron stops working
, we advise you to contact the service center. The quality and duration of further operation of the device depends on the level of professionalism and knowledge of the technician who repairs the equipment. We do not recommend turning to friends who supposedly know how repairs are done, or to private craftsmen in order to save money. Large companies that legally offer repair services for household appliances provide high quality repairs. Here you are protected by law and therefore do not have to worry about anything.
Our specialists repair irons of varying complexity, regardless of the reasons for the breakdown of the iron.
, and offer services to repair any damage.
Temperature regulator
Second in line is the thermostat. We also check it using a continuity tester, which we attach to the contact group.
When the temperature control is turned toward the circuit closing direction, the electrical circuit should function. Is the light not on? We clean the contacts with sandpaper and check again. We immediately recommend watching the video repair instructions:
The thermostat is working, but the iron does not heat up? Let's start checking the thermal fuse!
Heating element (heating element)
Well, the last reason why the iron does not work is the failure of the heating element. If the equipment turns on, the light is on, but the sole does not heat up to the required temperature, most likely this is the problem. As in previous cases, we use a homemade tester to determine the performance of the product. The heating element is attached to the sole and if the attachment point is permanent, then most likely you will have to say goodbye to the purchase (if that is the reason).
If the heating element is connected to the soleplate using tips, you can try to repair the iron yourself by cleaning the contacts with sandpaper. Still not heating up? We send the equipment for recycling, because... a new part costs almost the full cost of the device!
Please note that if you throw the equipment in the trash, it would be better to disconnect the power cord and keep it for yourself. Perhaps this element will be useful to you in subsequent repairs, especially since it will not take up much space in the closet!
Steaming system
If the malfunction is that the iron’s steamer does not work, then most likely it is necessary to clean the internal steam cavities. To do this, we recommend that you use a solution of water and vinegar in a ratio of 1 liter to 1 glass. Place the sole in a container (as shown in the picture), bring the water to a boil on the stove, turn it off and wait until it cools down. After this, we repeat the action 3 more times, which is enough to properly clean the spray bottle.
In stores you can see special products for cleaning scale, but we strongly do not recommend using them. This is due to the high cost of the funds and at the same time low efficiency compared to the traditional method! It should also be noted that on thematic forums there are many negative reviews about the fact that the iron does not work after cleaning with salt. This is due to the fact that salt crystals clog the steam supply holes, as a result of which you have to thoroughly clean the sole.
Another reason why the sprinkler does not work is that the steam button is broken. It can also be tested with a tester and replaced if necessary.
That's all the instructions for repairing an iron with your own hands. As you can see, the event is quite simple and even a novice electrician can do it! Finally, I would like to note that if the red indicator on the case is blinking, do not panic, because this may indicate a certain operating mode or automatic shutdown after heating. Read the instructions that come with the kit to understand the reason for the blinking. We hope that now you understand what to do if the soleplate of the iron does not heat up and how to repair the breakdown at home!
Related materials:
How to disassemble a Philips iron
Interesting!
Washing machines equipped with the “No Iron” or “Easy Iron” functions can wash clothes with little to no wrinkling. This effect is achieved through a special approach to spinning - it is performed at low speeds, with long pauses, and a small amount of water is retained in the tank.
The first officially patented washing machine was made of wood and was a box with a frame, half filled with wooden balls. Laundry for washing and detergent were loaded inside and the frame was moved using a lever, which, in turn, made the balls move and grind the laundry.
Astronauts, while in Earth orbit, solve the problem of dirty things using an original method. Clothes are dropped from the spacecraft and burn up in the upper atmosphere.
There is a washing machine “for bachelors”. Linen washed in such a unit does not need to be ironed at all! The thing is that the device does not have a drum: some things can be placed inside the container directly on hangers (for example, jackets and shirts), and smaller things (for example, underwear and socks) can be placed on special shelves.
In the 19th century, washing ladies' toilets took a lot of time. The dresses were first ripped open, and then each part was washed and dried separately so that the fabric did not become deformed. After washing, the clothes were sewn again.
History knows the fact that a kitten fell into the drum of a washing machine and, after going through a full wash cycle on the “Wool” program, got out of the unit unharmed. The only trouble for the pet was an allergy to washing powder.
The expression “soap opera” (“soap”) did not arise by chance. The very first series and shows that had a female audience were broadcast on television at a time when housewives did cleaning, ironing and laundry. In addition, to attract female viewers to the screens, commercials for detergents: soaps and powders were often played on air.
There are a variety of balls that are used in the washing machine. Antistatic ones will prevent the fabric from sticking to the body after washing, balls with special loops will “comb” the lint and prevent the appearance of pills, and silicone ones with pimples will prevent fluff from matting when washing outerwear.
Washing machines have something to do with the origin of the expression “money laundering.” In the 1930s, American gangsters used a network of laundries as a cover for their illegal activities. By passing off the proceeds of crime as proceeds from cleaning clothes, they turned “dirty” money into “clean” money.


