The Stinol brand is popular among connoisseurs of high quality and reasonable cost. The reliability, high-quality assembly, functionality and durability of these devices are beyond doubt among consumers. But technology remains technology and, despite careful use, sometimes it breaks down.
Repairing Stinol refrigerators is not a problem, since service centers are available almost everywhere. You can also repair the equipment yourself. The article we presented describes in detail the causes of typical breakdowns and methods for restoring the performance of refrigeration machines.
Operating principle of a typical Stinol unit
The range of Stinol refrigeration units is represented by a wide range of models with different performance characteristics. All of them belong to evaporative or compression type devices. This means that their design necessarily includes a compressor and an evaporator. Let's look at how they work.
To cool the working chambers of the equipment, a so-called refrigerant is used. The composition is a liquid that can evaporate at a certain pressure at room temperature.
Most often, R22 refrigerant is used as a refrigerant, but there may be other compositions. All types of refrigerants are called freons.
The refrigerator, like any other refrigeration machine, operates due to the continuous circulation of a refrigerant through a closed circuit, passing through the stages of boiling and condensation during movement
The work cycle occurs as follows. Liquid freon is fed into the die. This is a narrow nozzle in the form of a fragment of a capillary tube through which the refrigerant is injected into the evaporator.
The latter is made in the form of a coil, which allows heat exchange to occur with maximum efficiency. Inside the evaporator, freon quickly expands and transforms into gas, absorbing a large amount of heat.
As a result, the temperature inside the refrigerator or freezer compartment drops. If you constantly pump refrigerant into the evaporator, the pressure in it will increase sharply and the evaporation process will stop.
Evaporative type refrigerators are designed in the same way. Their design necessarily includes a compressor and an evaporator (+)
Therefore, freon vapor is continuously pumped out by the compressor and supplied to the radiator. This is another coil located on the back of the refrigeration unit. Here, the refrigerant vapor condenses and releases heat.
Next, liquid freon is fed into the die and the cycle is repeated. The main feature of such a system is the presence of moving parts and mechanisms that can sooner or later fail.
Refrigeration units with one or two compressors are produced under the Stinol brand. In the latter case, it becomes possible to separately control the freezing and refrigerating compartments, each of which is serviced by its “own” compressor.
This is convenient, but significantly complicates the system, as well as its maintenance and repair. In addition, the brand produces No Frost equipment and models with a drip defrosting system.
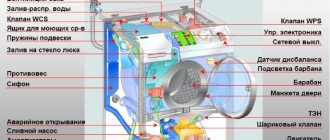
The electrical circuits of Stinol refrigerators vary somewhat depending on the model. In general, they can be represented as shown in the diagram (+)
What temperature should it be
The new Stinol refrigerator must be left unplugged for up to 2 hours. Before turning on the equipment, you must set the regulator to level 3, if the room is +25°C. At a higher temperature, it is necessary to set positions 1-2; in a cool room, mark 5 is set to maintain balance.
What temperature should be in the refrigerator depends on the location of the compartment:
- In the main compartment it is 0°C at the top and +10°C at the bottom, in the center it should be maintained at +5°C. Vegetables are stored in a warm compartment on the lower level.
- Equipment belonging to the subtropical climate class (ST) has a standard general mode of +7°C.
- The freezer compartment, marked with the “****” icon, is used for freezing products in a short time and storing them at -18°C.
Technical characteristics vary depending on the type of storage product:
- in departments for meat, hard cheeses, fish, eggs, a regime of about +1...+3°C should be maintained;
- in compartments for placing sausages and culinary products, you need to set the mode to +2...+4°C;
- for storing milk, boiled vegetables, fresh herbs, it is optimal to maintain a temperature of +3...+5°C;
- in seafood sections +4…+6°С is maintained;
- in the fruit department the proper mode is +6…+8°С;
- The temperature on the refrigerator doors is maintained within +5...+10°C; sauces, medicines, and drinks are placed in the niches.
View » How to turn on the refrigerator correctly and after how long after defrosting
When placing products, it is important to take into account the temperature distribution in the freezer and the size of the equipment (one- or two-chamber unit). The minimum mode is marked along the rear compartment, into which the refrigerant pipes are mounted.
Electrical system design
Normal operation of any compressor refrigerator is ensured by an electrical circuit.
In its simplest form, it includes several elements:
- A thermostat responsible for maintaining a certain temperature.
- Thermal protection relay that prevents the compressor from overheating.
- Electric motor.
- Starting relay responsible for starting the motor.
The work cycle occurs as follows. When voltage is applied to the device, current flows through the thermostat with closed contacts, the forced defrosting button, then through the thermal protection relay to the start relay and to the working winding of the motor.
To work with the electrical part of the refrigeration unit, you will definitely need a tester, a soldering iron and basic knowledge in the field of electricity
Since the motor shaft is stationary, the current flowing through its working winding is much higher than the rated value. This is necessary since the design of the starting relay provides for the closure of the contacts on the starting winding only when the rated current is exceeded. Thus, the relay transfers the current to the starting winding, the engine begins to rotate, and the voltage in the working winding disappears.
The motor continues to operate normally, but the refrigeration unit begins to freeze. When the previously set temperature is reached, the thermostat is activated.
It opens its contacts and current stops flowing to the motor. The refrigerator compressor stops. When the temperature changes, the thermostat contacts close again and the cycle repeats.
If the refrigerator thermostat has failed, there is no point in repairing it. Usually this device is simply replaced completely with a new device
To protect against overheating that is dangerous for the motor, a thermal protection relay is provided. Its main element is a flexible bimetallic plate. When it reaches a dangerous temperature, it bends and opens the contacts; the cooled element “falls” into place and closes them.
Overview of typical breakdowns
It is clear that if equipment stops working, it requires repair and sometimes replacement. However, there are signs that indicate that the owner needs to pay attention to his unit and, perhaps, invite a technician.
Normally, the compressor should operate without excessive noise and turn on/off periodically. Continuous operation of the compressor is a direct signal of a malfunction.
A thrifty owner always carefully monitors the condition of his refrigerator and notes all signs that are atypical for the normal operation of the unit. This is the only way to prevent serious malfunctions.
The temperature inside the refrigerator and freezer compartments must correspond to the set temperature. There should be no excess frost inside the freezer, and water should not accumulate in the refrigerator compartment. A variety of factors cause breakdowns.
Most often this is due to improper operation or installation of the device, mechanical damage, or environmental influences, for example, too high a temperature in the room. Power surges in the network are also very dangerous.
If the capillary pipeline is clogged, which is not at all uncommon for older refrigerators, water will appear in the storage compartment and the temperature will rise
If the engine runs continuously and the temperature drops extremely low, the thermostat is most likely to blame. If it breaks, a different picture is possible. The unit refuses to start and defrosts, the compressor does not work.
In this case, the compressor will work without shutting down, and ice may appear in the evaporator. There may be a refrigerant leak in the cooling circuit. This problem is more typical for equipment with a bottom freezer.
There is a metal tube running along its perimeter, which can corrode in about 6-7 years. In this case, it becomes a source of freon evaporation.
Over time, some metal parts of the structure can corrode, leading to refrigerant leaks, compressor failure, and other problems.
If there is a leak, the freezer will continue to work, but the refrigerator compartment will not. Corrosion can occur in both the evaporator and condenser. Repair in such cases is impossible, only replacement of damaged elements.
Quite often, Stinolov owners turn to repairmen with compressor problems. This could be a jammed motor mechanism. The engine will turn on, but not rotate, but only hum. After a short time the thermal protection relay will operate.
Short circuits in the working or starting winding of the motor are also common. Less often the capillary pipeline fails. This can be noticed by an increase in temperature inside the refrigerator and freezer compartments and the appearance of ice on the evaporator.
The engine will run almost without stopping. All of these are typical breakdowns that most likely will have to be dealt with by a technician.
Instructions for regulating the temperature in the refrigerator Stinol 110
The adjusting knob with a risk for both chambers has the same number of working positions - there are 5 of them. But the thermostats for the refrigerator and freezer chambers are used differently. The freezer is equipped with a No Frost system; the thermostat has a circuit with cyclic activation of the dry ice sublimation system.
The instruction manual for the Stinol refrigerator includes a section that contains instructions on how to adjust the temperature. Both cameras have a control knob and a risk for rotation. Number 1 corresponds to the highest temperature in the control range, number 5 to the lowest. The position is indicated on the overlay.
Initially, the indicators are set in the middle part of the scale, even before turning on the device. According to the instructions, the cold must accumulate in the chambers within 4 hours, and only then can food be placed there.
What temperature is in the Stinol refrigerator can be determined with a special thermometer. For the refrigerator compartment, use the glass of water method. A glass of water placed in the center of the refrigerator will cool down in 4 hours. By measuring the water temperature, you can find out the average temperature in the cold compartment. If the indicator is 4-5 degrees, the parameter corresponds to the basic one. It may be -16 in the freezer
-20 0 C. This is normal.
If the temperature is different, you need to make an adjustment or evaluate the external conditions, the tightness of the connection, and the installation of the door. The refrigerator does not dissipate heat well in a hot, humid, unventilated room.
You need to adjust the handle gradually, turning it by 1 notch after 5-6 hours, measuring the temperature inside the chamber. If the device does not respond to commands, it is necessary to determine whether the thermostat is working.
DIY Repair Guide
A user, even a little familiar with technology, understands that it is impossible to give detailed instructions for repairing equipment of a certain brand. The models are too different in their technical characteristics. We can only give general recommendations for the repair of individual components.
#1. Compressor of the device and its suspension
The design of the compressor of a refrigeration unit is quite simple. But at the same time, its independent repair is practically impossible. Frequently occurring inter-turn short circuits of the windings require replacement of the compressor.
Amateur craftsmen who try to rewind them usually waste time and effort. The reason for this is moisture and dust mixed with air that get inside the compressor during operation.
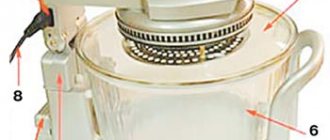
The Stinol refrigerator compressor is quite complex. It is hardly worth repairing it yourself; it is often useless. More often, a complete replacement of the node with a new one is used (+)
As a result, the unit still has to be changed. Masters do not advise doing this. Another thing is the compressor suspension. Due to its deformation, malfunctions of the entire unit are possible.
First of all, it is worth checking the elasticity of all its mounting legs. It should be about 8-10 mm or even more. If this is not the case, you will have to replace the shock absorbers, which is not expensive or difficult.
The main difficulty will be that the compressor is massive and can break the cooling circuit tube with its weight. Therefore, when replacing shock absorbers, you should securely fasten the unit in the working position and handle it as carefully as possible.
One more nuance: experienced craftsmen know that atypical noise in the compressor area can come not only from a faulty device, but also from some kind of tube beating against its body
In the latter case, you should wrap it in cloth or felt and secure this bandage with wool or cotton thread. It is strictly not recommended to use synthetics or foam rubber.
They will become brittle or stick together as the temperature changes. In any case, there will be no benefit from them. Such a “bandage” will not only solve the noise problem, but also protect the tube from premature wear.
It is not recommended to repair the compressor yourself, but it is quite possible to “work” with its suspension. The arrows in the picture show the screws holding the posts in place.
Another common problem is reducing the amount of freon. After watching enough videos on the Internet, some craftsmen are trying to do the refueling themselves. Masters strongly do not recommend doing this.
It will be possible to fill in freon, but whether the unit will be able to work after that is a big question. Water vapor and dust will inevitably enter the cooling circuit during the refueling process, which will subsequently lead to failure.
In addition, pumping refrigerant with a standard compressor presupposes its forced operation in wet conditions. And this is extremely dangerous. The best thing you can do for your compressor in this case is to invite a qualified, licensed specialist who will perform the necessary work.
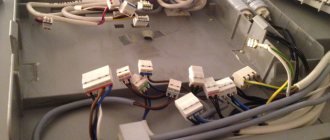
#2. Protection and starting system
The starting and thermal protective relays are usually combined by designers into a common unit. In order to get to it you will have to drill out the rivets holding the cover in place.
After repair work, it is best to place it on plastic glue and “grab” it with screws. The contacts can be considered the weakest points of the node. They often become dirty or melted. Basic cleaning will help here.
Self-filling of refrigerant into the cooling circuit is prohibited. An incorrect operation will lead to damage to the refrigerator and an overly frugal owner will have to buy a new one.
Another “dangerous” area is the starter core. It may be filled with dust, which causes the starter contacts to stick. The problem may also be in the bimetallic strip. It can lose some elasticity over time. If the part is slightly curved when cold, it is enough to give it the desired shape.
Loose adjustment screws can converge, and then the compressor begins to operate as if there are interturn short circuits on both of its windings. To solve the problem, simply unscrew the screws to the required clearance. It is about 0.15-0.25 cm. And clean the current protection contacts.
#3. Refrigeration unit thermostat
The design of thermostats used in refrigerators may vary. In general, there are two types of such elements: electronic and thermomechanical.
The former are used in electronically controlled devices and are a group of detectors and thermistors connected into a single unit with a control board. Only a certified electronics engineer can attempt to repair anything in such a system.
Electronically controlled refrigerators do not have thermostats as a separate unit. They are available in simpler models, but even here it is not easy to repair the thermostat yourself
The thermomechanical thermostat is made as a single unit, but it is considered completely non-repairable. This is explained by the fact that the heat tube is glued to the evaporator, the seam is filled with sealant and the entire system is covered with a casing.
It is extremely difficult to separate the assembly from the evaporator without special tools and skills. In addition, the correct position of the heat tube must not be disturbed, which could result in serious damage.
The only thing you can try to do with the thermostat is to work with it without removing it from the unit. So to speak, “in weight.” In this position, you can inspect the transfer spring and replace it if necessary.
You can check the functionality of the chipper screw, as well as inspect and thoroughly clean the contacts. Reassembly should be done very carefully.
External inspection of the thermal protective relay can be carried out without dismantling. In case of serious damage, dismantling will be required; to do this, remove the cover and disconnect the device from the assembly terminal box
#4. Drainage system of “crying” devices
In units with a drip system, water may appear and accumulate inside the refrigerator compartment. The main reason for this unpleasant phenomenon is a clogged drainage system. The design is designed to drain water from the chamber and runs inside the refrigerator body.
Another sign of a blockage is the appearance of a snow coat in the freezer. Since drainage begins in the food storage compartment, in order to protect against organics getting inside the tube, it must be equipped with a water seal.
In “crying” refrigeration units, a drainage system with a water seal must be installed. When it becomes clogged, the owner of the refrigerator begins to have problems associated with the appearance of water in the storage compartment
In practice, it looks like a small bend in which all unnecessary contaminants can be retained. To clean the hydraulic seal, the manufacturer offers special tools that need to be used to clear the hole from accumulated contaminants from time to time.
At the same time, the outflow of water is improved. If the drainage is clogged, such cleaning will not help. The blockage will need to be broken through.
This must be done extremely carefully, since the drainage system itself is a tube made of thin-walled plastic. It is best to take a fishing line with a diameter of 1 mm and melt its end smoothly.
The resulting improvised cable is lowered into the drainage hole and the system is cleaned. Then pour one and a half to two liters of warm washing solution into it and finally rinse with clean water.
To clean the drainage hole, the “weeping” refrigerator models include a device with a tip of the appropriate diameter.
#5. Fuser, timer and fan in No Frost devices
“No frost” refrigerators are structurally more complex than “weeping” ones. Accordingly, there are more problems with them. Their main difference is the presence of a blower that drains excess moisture, which prevents the appearance of frost.
Experts consider the fan, fuser and timer to be the “weakest” points of such devices. You need to examine the fan from the freezer. Depending on the model of the refrigerator, the element can be open or closed.
To get to the closed fan in a refrigerator with an “Anti-frost” system, you must first remove the cover. Very often the cause of the problem is elementary dirt accumulated on the impeller.
In the latter case, the assembly is covered with a lid with holes. For electronically controlled devices, open assemblies are usually used. The timer in this case is also electronic.
Such a tandem cannot be repaired independently; a master is needed. For simpler models with a removable cover and an electromechanical timer, repair is quite possible. First you need to carefully remove the cover.
Having reached the fan, you should carefully inspect it and try to turn the impeller with your finger. If it does not give in or is tight, you need to disassemble the assembly. To do this, find a fastening plug.
It should be located on the axis of the device and may be covered with a branded sticker. Under the plug there is a washer, which can be made of plastic or metal. The first is diluted and removed using ordinary needles.
Steel is removed with pliers or special tools. Under this washer there are several more Teflon ones, which are carefully removed and stored. Next, the impeller along with the rotor is removed, cleaned and lubricated.
Experts warn that the lubricant must be chosen correctly. Only low-temperature formulations are used, otherwise they will thicken. After this, reassembly and performance testing are carried out. Perhaps the refrigerator repair was quite successful and the problem is solved.
Often problems with a refrigerator begin with deformation of the seal. If the user notices that the rubber gasket does not fit tightly, you should immediately purchase a repair kit and install it to replace the worn one.
If not, all that remains is to check the operation of the fan. To do this, the unit is opened from the back, then you need to gain access to the device through which the fan is turned on. This can be either a mains filter or a low voltage filter.
To check, the fan is connected to the narrow standard terminals of the filter, and mains voltage is applied to the wide terminals. If the impeller does not start rotating, there may be a problem with the filter.
To verify this, remove a similar filter from the compressor cooling fan and repeat the experiment. If a breakdown is confirmed, the filter is replaced with a similar one. If everything is in order, you should check the fuser and the thermal trigger of the timer. They are located in the evaporator area.
First you need to remove the fuser from the connectors and ring it with a tester. The resistance should be zero. If not, we change the part, it is disposable. We first check the evaporator heating element for breakdown.
After this, you need to put all the disassembled parts in place and close the thermal control sockets with a jumper. This should only be done with the unit disconnected from the network. Then it is turned on. It should run on short cycle, not normal. If this is the case, the problem is in the thermal unit and needs to be replaced.
You need to check the thermal contacts very quickly, otherwise you can reset the timer settings. It's very difficult to put them out again. It is impossible to do this on your own
An important nuance. Such a check should be very short in time, literally 3-4 seconds, otherwise the timer will go off. If the timer does not work, most likely it is the cause of the problem. You should not try to repair it; experienced craftsmen can do it. It will be easier to replace the entire defective unit.