Let's remember physics
From a school physics course we know about the structure of an internal combustion engine. The compressor functions in a similar way. The scheme of its work for Indesit or Atlant is the same. A piston and valve system compresses the freon, sending the heated refrigerant to the condenser. There it turns into a liquid state and enters the capillary expander. The compressor compresses the freon, then cools the gas in the condenser, allowing it to circulate throughout the refrigeration system. The process has a continuous cyclical nature. The compressor is turned off, turning on from time to time to perform the function of compressing the refrigerant.
Internal combustion engine structure
Which refrigerator do you have - the Belarusian Atlant or the Indesit assembled under the Italian patent? They all have the same motor and similar internal circuit design. In Atlanta and Indesit, piston-type compressors are used. The piston compressor is equipped with an electric motor with a vertical shaft. The structure is insulated with a sealed casing. When the engine is turned on, it starts the crankshaft, which rotates and moves the piston. The piston pumps the refrigerant out of the evaporator and pumps it into the condenser.
Piston compressor
Signs of a broken refrigerator compressor
Refrigerator malfunctions cause a lot of inconvenience, as food begins to spoil during downtime. Signs of a compressor failure include the appearance of characteristic sounds during operation of the refrigerator. If the motor-compressor is faulty, then when you connect the refrigerator to the outlet, you can hear its hum, noise and grinding. The compressor hums for a few seconds and a slight click is heard. When the motor clicks, the hum stops. However, the refrigerator does not cool food.
The following symptoms indicate a compressor malfunction:
- high temperature in the refrigerator compartment;
- the motor does not turn off and runs constantly;
- the compressor does not turn on;
- ice on the walls of the refrigerator;
- strong vibration, rattling;
- extraneous noise.
A breakdown of the motor-compressor can become a real problem for refrigerator owners, since the cost of this unit can be a third of the cost of the equipment itself. To minimize the cost of engine repairs, you need to call a specialist when the first signs of a breakdown appear.
To eliminate the main compressor malfunctions, you first need to determine what happened to the unit. And only comprehensive diagnostics can help with this. If your refrigerator with the No Frost system begins to work incorrectly, then do not waste time and call a qualified technician who will help fix the problem professionally and quickly.
Where to start replacing a refrigerator compressor with your own hands
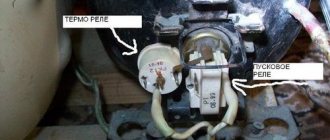
You can repair refrigerators and replace the compressor yourself by identifying the cause of the malfunction. If the compressor heats up after being plugged in, the thermostat relay has most likely failed. Replacing the refrigerator compressor relay can be done even by an amateur. When starting the refrigerator does the motor suddenly turn off for no reason? Replacing a refrigerator compressor motor is best left to the professionals.
Refrigerator compressor repair
But you can try to replace the entire compressor.
Step-by-step compressor replacement
If the owner of the equipment was able to get a set of tools, then he can repair the equipment himself. Before replacing the compressor, it is necessary to disconnect the unit from the electrical network and clean the chambers of products. The equipment is moved away from the wall, and a layer of dust is removed from the surface of the pipelines. After removing ice and water, it is necessary to drain the condensate from the bath mounted on the cover of the pumping station.
View » Why the refrigerator compressor does not start
To change the compressor, you must:
- Cut the main pipe at a distance of 30 mm from the dryer body; it is possible to cut the metal and then break off the pipeline.
- Using a cutting tool, separate the metal pipes through which the refrigerant is pumped and drained. The incision is made at a distance of 10-15 mm from the point of entry of the tube into the compressor housing.
- Separate the dryer housing from the line.
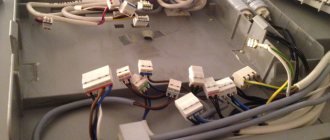
- Open the control relay casing and disconnect the cables going to the refrigerator compressor motor windings. On some equipment models, the switching unit is installed on metal contacts; to remove it, you need to pull the relay towards you.
Removing old
The pump housing is installed in the niche of the refrigerator on a special traverse. The supports are equipped with spring and rubber shock absorbers, the structure is tightened with a bolt and nut. To remove the compressor, you need to unscrew the mounting points. If the threads are covered with rust, then WD40 must be applied to the surface. After removing the worn-out unit, it is necessary to clean the ends of the metal pipeline.
Installing a new
Since the design of the compressor does not provide for repair of the electric motor or piston pump, if parts break down, it is necessary to install a new unit. The unit body is mounted on a traverse, and factory safety plugs are installed on the tubes. It is allowed to remove elements immediately before soldering the pipelines; during dismantling, the excess air pressure in the housing is checked (by the whistle of the escaping gas).
If there was no air under pressure in the compressor, then installing such a unit is not recommended.
Then the lines are sealed; the burner flame should not enter the cavity of the pump unit. After removing the shipping caps from the dryer body, the capillary tube is installed. After checking the quality of the seams, the refrigerant recommended by the refrigeration equipment manufacturer is pumped into the circuit. When refilling, the system is pre-evacuated; if cracks are detected in the freezer or connecting pipes, additional repairs of the refrigerator are performed.
What you will need
Check out the video and photos of the step-by-step process of replacing a refrigerator compressor with your own hands.
Then prepare the necessary tools:
- oxygen-propane burner;
- two valves: for piercing and removing refrigerant;
- leak detector;
- electronic thermometer;
- small pipe cutter;
- filter drier:
- copper tube 6 mm;
- solder;
- flux;
- pinch pliers;
- Hansen coupling;
- charging cylinder;
- storage container for freon;
- new compressor.
Follow safety precautions. Do not start work while the device is turned on. Repair equipment must be grounded. The work is carried out with gas - the room must be well ventilated. Clear the refrigerator so you can lift and turn it easily.
Disassembling the refrigerator
How to replace it yourself
The compressor installed in the refrigerator acts as a regulator of internal pressure differences. This device draws in evaporated refrigerant, which cools the internal chambers, and pushes this liquid into the heat exchanger. The compressor comes with an electric motor. Replacing this device is carried out in four stages. The algorithm of work carried out at each stage may vary depending on the design features of the refrigerator.
Therefore, when carrying out this procedure, it is recommended to find a diagram of the device.
Dismantling
At the bottom of the refrigerator on the back wall there is a compartment in which the compressor is mounted. Dismantling of this device is carried out according to the following algorithm:
- Using pliers, the compressor is disconnected from the two pipes.
- The refrigerator is connected to the mains and turns off after five minutes.
- A special cylinder, through which freon is pumped out, is connected to the filling line through a separate pipe.
- The relay unit is dismantled, which looks like a black box from which the wires come.
In the future, you need to unscrew all the fasteners and cut the wires. Finally, after dismantling the supercharger, it is recommended to clean all the tubes to which the new compressor will be soldered in the future. At the next stage, special cylinders with a pressure of less than six atmospheres with nitrogen are used, which are necessary to purge the system of condensate residues.
The procedure will also require a Schrader valve. Purge is carried out for 15 minutes. After this, you should replace the old filter, which is located next to the capillary tube, with a new one.
Preparing equipment for refilling freon
To refill freon, a special station is used, consisting of two pressure gauges with shut-off valves. This device also has three hoses. When replacing a compressor on a home refrigerator, take into account the readings of the pressure gauge marked in blue. Thanks to this, you can control the pressure with which new freon is supplied.
Before you start pumping, you need to make sure that the valves are tightened. After this, you need to connect the central (yellow) hose to the freon cylinder. The blue one is connected to the pipe through which the refrigerant will be supplied using a special fitting. The red hose, along with the Schrader valve, is connected to the other end of the system.
Installation of a new compressor
Installation of the supercharger is carried out according to the following algorithm:
- The compressor is mounted on the crossbeam of the refrigerator.
- The plugs on the supercharger are removed and the internal pressure is checked. These procedures must be performed no later than five minutes before soldering.
- Using new copper tubes with a diameter of 6 millimeters and a length of 60 millimeters, the compressor pipes are connected by soldering to the lines that pump, suck and charge freon.
Soldering must be done according to the given line order. Next, you need to remove the plugs from the filter drier and place the latter together with the throttle pipe in the heat exchanger. After this, you should solder the seams of these system elements and put a Hansen coupling on the filling hose.
At each stage described, a torch is used. An alloy of copper with phosphorus (4-9%) is used as solder.
Refrigerant charging
Freon refilling is carried out according to the following algorithm:
- A vacuum cylinder is connected to the filling station.
- A protective relay is installed on the compressor and the first start is carried out. The pressure in this case should be 65 Pascals.
- The refrigerator is connected to the mains and charged with freon at 40%. The last parameter can be calculated based on the table, which is located on the back wall of the device.
- The refrigerator is left on for 5 minutes. At this stage, pipes and other elements of the system are checked for leaks.
After the specified period has expired, the refrigerator must be disconnected from the network and the pressure reduced to 10 Pascals. This procedure takes at least 20 minutes. The refrigerator should then be reconnected to the electrical outlet and filled with freon. At the end of the procedure, you need to clamp the tube, remove the coupling and solder it.
Work process
When replacing the compressor of an Atlant refrigerator or any other refrigeration device, it is necessary to slightly extend the compressor. Lifting it, break off the freon filling tube, after cutting it with a file.
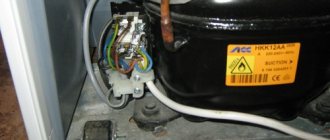
Compressor
Then you need to release the gas. Turn on the refrigerator for no more than 5 minutes. The refrigerant will move to the condenser. Attach the piercing valve with the hose from the cylinder connected to it, unscrew it for 30 seconds. The gas will collect in the container.
Solder a copper one in place of the broken tube. A gas burner is used here; in the absence of a burner, a soldering iron will do. A cut of several centimeters is made on the capillary expander to break off the tube and unsolder the filter from the condenser. The compressor is connected to the refrigeration unit by two tubes (one to build up pressure, the other to remove excess gas).
It needs to be unsoldered from these tubes or cut off with a pipe cutter. The filter drier is cut off at a distance of 15 mm from the condenser. Remove the start-up relay. Dismantle the compressor and remove it from the refrigerator. Before starting soldering on a new compressor, clean the pipeline.
When installing a new compressor, all steps are repeated in reverse order:
- place the compressor in the refrigeration cabinet, securing it to the traverse;
- the plugs on the pipes must be removed;
- it is important to depressurize the unit 5 minutes before starting soldering;
- when removing the plugs, check whether there is excess air pressure in the compressor (this will be indicated by the noise of the escaping air;
- gradually connect the discharge, suction and filling tubes to the compressor pipes, the filling tube should have a diameter of 6 mm and a length of 60 mm;
- start soldering the seams on the tubes, adhering to the following sequence: filling, suction, discharge, make sure that the burner flame is not directed into the compressor nozzle;
- Having removed the plugs from the filter drier, attach it to the condenser, connect the capillary tube to it;
- solder the filter along the seams;
- and put the filling tube on the valve coupling half;
- check the quality of soldering of all seams, they should be smooth, without unsoldered spaces;
- Refill with freon by connecting a vacuum filling station to the coupling and removing moisture from the system;
- attach the start-protection relay to the compressor by connecting the electrical wires;
- turn on the refrigerator, fill the system with freon, leave for 5 minutes;
- Use a leak detector to check whether the tightness of the seams is broken;
- perform a secondary evacuation of the refrigerator, leave it to work for 20 minutes;
- pinch the filling tube, remove the coupling, and solder the tube.
Replacing a refrigerator compressor at home
Refrigerator compressor: review of common breakdowns + step-by-step instructions for replacement
Home refrigerators are reliable durable devices and some units last up to 40 years, and that’s a fact. The compressor service life declared by the manufacturer is 10 years. However, instability of the network voltage and its breakdown are inevitable. In this article, we will consider the possibility of replacing the refrigerator compressor at home yourself, having become familiar with the sequence of work and safety rules.
General operation algorithm of the refrigerator
The operation of all refrigerators and air conditioners is the work of a heat pump, in which a refrigerant with appropriate physical properties is used to transfer heat. Circulating in a closed circuit, freon (refrigerant) changes its temperature depending on the pressure in each section of the circuit. The compressor pumps freon gas (refrigerant) into the condenser, where the refrigerant cools and becomes liquid. Liquid freon passing through a capillary tube (choke) enters the evaporator and begins to boil with a boiling point of up to -30 °C. As it evaporates, it takes (pumps out) the temperature through the walls of the evaporator tubes from the volume of the refrigerator or freezer. Next, the freon gas is compressed by the compressor, becomes hot and enters the condenser, which dissipates the heat into the atmosphere. As a result, the temperature in the refrigeration chambers drops to a predetermined level and is maintained by automation devices, and the heat that was taken from the products in the chambers is radiated into the atmosphere by the condenser. This is how a heat pump works.
In this case, the compressor unit is the main unit of the physical process, on which the temperature level inside the refrigerator and freezer depends.
In addition to the main circulating action of the refrigerant, which creates pressure differences in the closed hydraulic circuit of the refrigerator, there are auxiliary elements that participate in regulating the temperature regime of the circuit by removing temperature from the chamber and dissipating it into the atmosphere:
- evaporator, removes heat inside the refrigeration chamber from the products;
- condenser, dissipates the heat of hot freon (refrigerant) into the atmosphere;
- throttle, calibrates the flow of refrigerant through a capillary tube or expansion valve.
All these processes are dynamic.
We should also consider the algorithm of operation of the refrigerator system.
The compressor is driven by an electric motor and provides pressure differences in the system.
It sucks freon gas from the evaporator and pumps it into the condenser. In the condenser, due to cooling, the freon turns into a liquid state and enters the capillary tube, and through it into the evaporator. Thus the cycle repeats. In the refrigerator compartment the temperature can be adjusted from 0 to 5-6°C, in the freezer – up to -30°C. Having understood the operating cycle of the refrigerator, you can move on to the main causes of the main breakdowns of the compressor unit.
The main causes of compressor failure
All malfunctions in the operation of the compressor unit are divided into two groups:
- with the compressor unit running, a sound is heard from the compressor, the indicator light is on;
- the compressor does not turn on.
The compressor runs constantly, without shutting down. As a result of valve failure, the compressor unit operates constantly, without shutting down, and does not create the required level of pressure difference, which consequently affects the cooling process - the evaporator does not reach the desired temperature. When the compressor operates, a characteristic metallic ringing sound may be heard. You can find out by reading the article Checking the refrigerator compressor.
The compressor does not turn on when there is voltage. If there is voltage at the compressor terminals, the compressor does not operate. If the compressor unit does not turn on, then a possible reason may be a complete break in the electric motor windings. You can find out by reading the article Checking the refrigerator compressor.
The compressor turns on and then turns off. The compressor starts and switches off after a short time, while the housing of the compressor unit becomes very hot. When the compressor is turned off, a characteristic click is heard when the thermal relay is activated. The suspected malfunction is an interturn short circuit of the working winding of the electric motor. You can find out by reading the article Checking the refrigerator compressor.
Compressor jamming. When turned on, you can hear the hum of the electric motor windings, but the compressor does not work.
Description of the process of replacing the compressor yourself.
Dismantling the compressor. For dismantling you need: pipe cutter; side cutters, screwdrivers. Under no circumstances should copper compressor tubes be sawed off with a hacksaw, as metal shavings will get into the pipeline. You need to cut the tubes with a pipe cutter or, in extreme cases, bite them off with side cutters or pliers. We bleed off the freon. Remove the start relay. Unscrew the compressor fasteners. We clean the tubes for soldering the new compressor.
We measure the resistance of the compressor motor windings. To find out the reasons for the failure of the electric motor windings, we carry out a check. You can find out by reading the article Checking the refrigerator compressor.
We check the current consumed by the windings of the electric motor. After checking the resistance, it is necessary to measure the operating current. You can find out by reading the article Checking the refrigerator compressor.
We prepare equipment and tools for charging the refrigerator with freon
To fill the refrigerator system with freon (refrigerant), special equipment, tools and materials must be prepared. Before soldering the compressor pipes, you need to ventilate the room where the refrigerator is located for at least 15 minutes. It is not allowed to turn on heating devices during repairs.
We are installing a new compressor. We install a new compressor, check the prepared system pipes, remove the plugs from the pipes, connect them to the discharge and suction pipelines, and the filling hose. Solder the tubes in turns: filling, outlet, discharge. We prepare the filter drier and solder it to the condenser and capillary tube. We put a Hansen coupling on the filling hose.
We charge the refrigerator system with freon. We install a start relay on the compressor and proceed to refueling the refrigerator after reading the article Filling the refrigerator with freon at home.
At the final stage, we clamp the tube, remove the Hansen coupling and solder the pipe.
Compressor repair or replacement?
As a rule, the refrigerator compressor fails due to the fault of the users. Most refrigerators of popular brands LG, Liebherr, Bosch are equipped with a quick freezing or super freezing function. Many people actively use it, as it allows them to freeze food in the shortest possible time. Most often, users forget to disable this function, which is why the motor starts to work at full power, which can lead to its premature complete wear.
If the refrigerator compressor hums but does not start , then when inspecting the equipment, the technician may offer two options - repair or replacement of the compressor. In most cases, it offers to replace it, but the decision is made by the owner of the equipment. The price of a compressor is high, but at the same time, buying a new refrigerator is an expensive pleasure that not every person can afford. Therefore, if you are faced with a similar problem, then you need to solve it based on your financial situation. If you can afford to buy a new refrigerator, then you can refuse to repair the motor-compressor.
If you are bothered by extraneous noise, rumble and other unpleasant sounds that appear while the engine is running, then in this case the unit is repaired, namely adjusting the casing suspension. To do this, the technician adjusts the suspension bolts and tightens them well. It is worth remembering that only a qualified, competent specialist can determine the cause of a compressor failure.
Only after diagnosing and identifying the malfunction can you find out how much it will cost you to repair a refrigerator at home. The cost of replacement also depends on the brand of the refrigerator and the type of compressor (linear or inverter). Many people are interested in how to find out which compressor is installed. You can read detailed information in the operating instructions supplied with the equipment. At the same time, it is very important what brand of refrigerator you use: Sharp, Siemens, Haier, Shivaki, Atlant, Minsk or Biryusa, since the cost of the motor depends on this.