How the Redmond multicooker works
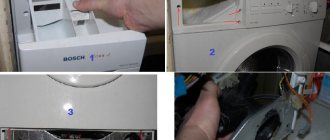
To repair a multicooker yourself, you should familiarize yourself with its design features and analyze the principle of operation of the device. It resembles an ordinary pan on which a monitor and a power button are located.
The container is closed with a special lid with a latch. The device contains a bowl in which food is prepared. Under this part of the device there are power and control units. There are also diagrams there. A multicooker is considered a multifunctional device. Its operation is ensured by a microprocessor. It consists of several elements.
Electrical diagram
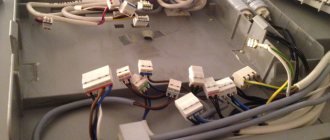
The voltage goes to the connector, which has several contacts. One grounds the unit, the second connects to the housing, the third connects to the cover.
Wiring diagram
Power gets to the wires. They carry the current to the switch and fuse, which are fixed in series. A switch is used to start or stop a job. The fuse protects the unit from overheating.
Power supply and switching
This element solves 2 problems at once. It supplies alternating voltage of 220 Volts and converts it to direct voltage. 5 Volts are required for the control unit. The switching circuit requires 12 volts. The circuit includes a battery. It is required to record the actions of the hostess, who launches the device’s operating programs.
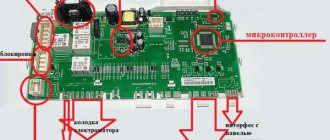
Control block
This circuit is responsible for generating all the functions and programs of the device.
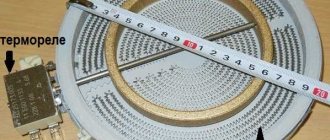
Thermal resistances
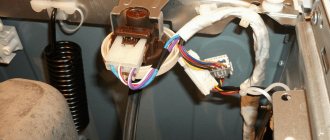
The device contains 2 thermistors. One of them is attached to the lid, the second - to the bottom of the device. The key task of the elements is considered to be thermoregulation in the use of the device. Thanks to this, it is possible to maintain the temperature set by the owner.
Thermal fuse
This element protects the kitchen appliance from overheating. It helps prevent damage to the control system.
Product design
To independently repair a multicooker from Polaris, Redmond or any other company, you need to know the internal structure and operating principle of the product. In appearance, all such units resemble an ordinary saucepan with a display on the side and buttons for setting the cooking mode. It is closed on top with an airtight lid with a latch, and the bowl where food is cooked is installed inside. The heating elements are located under the bowl, and the power supply and product control unit are also located there. From below, everything is covered with a plastic lid, which is the bottom of the multicooker.
The diagrams of different multicooker models are identical, with the exception of minor nuances. The heating system is no different from a coffee maker or other electrical household appliance, so it is enough to study the diagram of one, as well as familiarize yourself with the principle of its operation, in order to successfully repair any multicookers with your own hands if necessary.
The power supply is standard: from the home network it is supplied to a three-pin connector at the bottom of the product. One of them is grounding - inside it is connected by a yellow-green wire to the body and lid of the multicooker. Temperature sensors are located in different places: one in the lid, and the second in the bottom of the multicooker.
Deciphering error codes
To determine the causes of the malfunction, you need to understand the error codes. If a system message appears on your monitor, you should understand what it means. The instructions for a specific model or a visit to a professional technician will help with this.
The most common codes include the following:
- E0 - indicates a break or short circuit in the upper temperature sensor circuit. Also, the reason may be hidden in its wire. Sometimes this error indicates that the lid is not completely closed. This is usually due to damage or lack of silicone sealant.
- E1 - this error indicates liquid penetration into the device. It also indicates a breakdown of the heating element or lower temperature sensor. The multicooker displays the same code when the thermostat contacts are clogged.
- E2 - in this case, you can suspect a break or short circuit in the upper temperature sensor circuit. The same may apply to its wire.
- E3 - this code indicates the penetration of moisture into the structure of the device. He also talks about an open or shorted circuit of the upper temperature sensor or its wire. The cause of the error may be the absence of a bowl or the use of an inappropriate element.
- E4 - the problem may lie in a clogged pressure sensor. The cause is also considered to be a failure of the control board.
- E5 - this code indicates automatic shutdown, which is required to protect against overheating.
See also
Instructions for leveling the ceiling with putty yourself
DIY diagnostics and repairs
To repair such a device, it is worth conducting detailed diagnostics. This will help identify the causes of the breakdown.
Checking the switch, thermal fuse and heating element
If inspection does not help to detect a breakdown, it is worth checking the operation of the switch. Evaluating the functioning of the thermal fuse is of no small importance. These elements are fixed with a thick wire. It has a red color. To identify the problem, you should take a multimeter and measure the resistance. Use the probes to touch points 1 and 2. The parameter should be zero. You can also carry out the procedure using a pointer tester.
The heating element is also checked at the same time. To do this, it is worth measuring the indicator between points 1 and 3. It must coincide with the resistance of the heating element coil. Taking into account the power, this parameter can be 30-80 Ohms. If, after measuring the resistance at points 1 and 2, it was revealed that it tends to infinity, the breakdown lies in the switch or fuse. To check the switch, you should put the key in the on state and touch the exposed terminals with the probes of the device. Normally the resistance is 0.
If the switch is working properly, you can proceed to checking the fuse.
To do this, it is recommended to release the rack that secures it on the device body and move the insulating tube. Then touch the terminals with a multimeter. Normally, the resistance should be 0. Otherwise, the fuse is broken. It needs to be replaced. The element does not have polarity, so it can be placed in any way.
Doesn't work and the display is lit
If the monitor shows error code E, this indicates normal operation of the cord, fuse and switch. The breakdown may be in the thermal resistance or heating element. The power supply may also be the cause of device failure.
How to check the power supply and switching unit
If at the preliminary stages it was not possible to identify a device failure, it is worth checking this unit. It is exposed to elevated temperatures and therefore often fails. Often this breakdown is accompanied by the appearance of error code E1. If you carefully examine the elements of the block, you can see the fuse resistor. When measuring resistance with a multimeter, it tends to infinity. However, according to the color coding, it should be 100 ohms.
To repair the unit board, it is recommended to dismantle it. This element is fixed to the base of the multicooker with 2 screws and nuts. When unscrewing the screws, they should be held.
To gain access to the nuts, it is recommended to hold the element from the bowl side. In this case, you need to remove the heating element, fixed with three screws. The wires do not need to be detached from the terminals. If you remove the resistor from the printed circuit board, you can see that it has burned out. In the circuit, this element is not only used to limit the current, but also as a fuse. Its damage is caused by the large current that flows.
To more easily identify a breakdown of the multicooker, you can draw a fragment of the circuit diagram of the power supply. A detailed examination of the microcircuit body helps to identify minor local darkening of the marked fragment.
How to replace the standard power supply
To replace the power source, it is worth choosing a suitable device. It can be ordered upon request. It is also permissible to use an adapter from computer equipment. To do this, you should use a device with a voltage of +12 Volts and replace the failed part of the circuit on it.
You can use an adapter for the Redmond multicooker. On its body there should be information about a constant voltage of +12 Volts and the ability to withstand a load current of up to 200 milliamps. This is absolutely identical to the parameters of the device microcircuit.
Before connecting the adapter to the power supply, it is recommended to turn off the stabilizer. First of all, it is recommended to unsolder the resistor and diode. To avoid the need to open the adapter case and cut its cord when checking, you can connect the element via a regular connector. The plus is located on the output, in the center. The leads should be soldered following the polarity rules. This is done parallel to the capacitor terminals of the power supply board. The lid should be put in place and the multicooker should be plugged in. Then the adapter is plugged into the outlet.
At this stage, the multicooker should work. To assess the reliability of its functioning, it is worth pouring water into the food bowl. Fill the device to the brim with liquid and set the cooking mode. It is recommended to bring the water to a boil and cook for 45 minutes until the timer signal. Such tests will help confirm that repair procedures have been carried out correctly.
See also
How to hang a chandelier on a suspended ceiling with your own hands, mounting rules
Finally, you should insert the adapter into the device. After which it should be connected to the power supply. To do this, the contact fragments of the adapter board are connected to the terminals of the block board. The power supply voltage is supplied by a pair of wires. They are distinguished by black and red colors.
To ensure good thermal performance of the adapter, the housing fragment with the power plug should not be installed. Before fastening the element in the lid, it is worth choosing an area that prevents it from resting on the device part after closing. You can make a hole in the lid so that the screw thread fits normally. Holes are made in the adapter body for screwing.
Lid hinge repair
If the hinge that holds the lid breaks, you should take action. Such a malfunction does not interfere with cooking, but does compromise the seal of the device. If you use the device carelessly, there is a risk of damage to the wires that connect the thermal resistance in the cover to the control board.
The device cover includes 2 fragments. To repair the loop, it is recommended to disconnect them. The cover elements are secured to each other with latches. They are small in size, so you can easily separate the cover with a flat screwdriver. This tool needs to be squeezed between the halves of the product.
To access the other part of the loop, you need to remove the steam condensate collection device and unscrew the screw. In this case, it will be possible to identify the malfunction of the hinge axis holders. This defect occurs quite often, since the holding axis is made of plastic and has a thickness of no more than 2 millimeters.
To restore the eye of the loop, a steel paper clip can be used. One end of the device should be straightened, then bent at an angle and cut with side cutters. Then it is recommended to fuse the corners of the paper clip into the base of the lid. This is a rather labor-intensive process that requires patience.
When carrying out the procedure, you need to hold the prepared element from a paper clip with tweezers and warm it up by applying a soldering iron tip. As a result, the fragment should literally sink into the plastic of the lid to the required depth. It is worth considering that the final result may not be very attractive. However, the loop can be covered with the second part of the lid. Thanks to this, it will be invisible from the outside. In this case, the restored loop will be much stronger than the previous one.
Cleaning valves
This element is located at the top of the device. It requires careful care. To clean the steam valve, do the following:
- Gently pull the element cover and open it. This can be done using a small protrusion. There is a lock on the back of the device. It is also recommended to remove it by turning it counterclockwise.
- Carefully remove the valve rubber from the retainer and rinse thoroughly. The elastic band must not be stretched or twisted. Such actions will lead to its deformation.
- It is recommended to assemble all parts in reverse order. Then close the cap on the valve.
- Place the cover in place and press it gently.
It is worth considering that manufacturers advise all owners of multicookers to regularly clean the steam valve and the inner lid of the device. This should be done after each use.
Solving problems with the timer
Redmond multicookers have an electronic control system equipped with timers. Their task is to take into account the time it takes to prepare a dish. In some situations, the mode starts, but the timer does not record the time. It may also freeze after the countdown starts. Experts say that this is an error in the automatic control device. Also, the reason may lie in the settings of this part. Before starting the device for the first time, you must carefully study the instructions.
Often the timer does not start counting due to the device lid not being tightly closed. The operation of the device element begins after reaching a specific temperature set by the user. When the lid is not tightly closed, heat is lost through the gap. As a result, the timer is not activated.
If the lid is closed tightly enough, but the timer remains inactive, this indicates a problem with the electronic system. A defective temperature sensor may also be the cause. After eliminating the problems, the multicooker will work normally again. The timer will start on time and beep when the cooking time is complete. If the timer does not work immediately after purchase or after using the device for a short time, it is recommended to call a technician. This product is under warranty. Therefore, you should not disassemble it yourself.
See also
DIY ways to repair bathtub enamel at home, how to remove scratches
Cleaning contacts
To clean the device yourself, you should follow these steps:
- Remove the metal or plastic cover. It is also recommended to remove other elements located in plain sight and secured with screws.
- Clean the microcircuits. To do this, it is recommended to turn the device over and shake it gently.
- Secure the lid and other upper parts.
If clogged contacts are located at the bottom of the device, it is recommended to do the following:
- unscrew the screws that secure the bottom cover;
- unfasten the cables that hold the heating and software boards together;
- remove the heating element and screws;
- carefully remove the internal thermometer so as not to damage the device;
- clean boards and microcircuits from bulk products.
Thanks to strict adherence to the disassembly rules, cleaning the devices will not cause any particular difficulties.
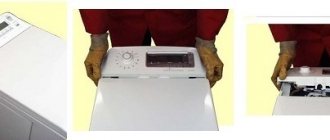
How to disassemble and remove the cover
Models with a removable handle (using the example of SkyCooker M40S):
- Turn and remove the steam valve.
- Insert a plastic card by widening the gap between the top and aluminum covers.
- Slide the card into the slot until you hear a click. The sound means the card has pushed out the latch.
- Insert the second card and remove the second stop.
- Remove the first card and press out the remaining two latches.
- Remove the plastic cover.
- Place the appliance with its back facing up and remove the condensate container. It comes out easily, without clicks or screws. Underneath there is a plug that hides the loop and wires.
- Loosen the screws in the plug and remove it.
- Lift the lid and pull the metal bar out of the holders.
In such models, a thermistor is located under the aluminum panel of the inner cover. It is attached with double-sided tape or glue and covered with foil. The wires from it (blue in a white additional braid and yellow - ground) pass under the plug, go down into the case and stretch to the board located at the bottom of the structure.
We recommend: Why you shouldn’t open windows after wallpapering: the secrets of perfect walls
The wires are constantly bent and often break, which leads to error “E2”. The multicooker turns on, understands commands, but stops heating, displaying a failure message immediately after pressing the “Start” key.
Models with a key using the Redmond RMC-M4500 as an example:
- To clean the steam valve, you need to remove the plastic box on top of the lid.
- Then remove the valve from it and wash both components.
- The aluminum cover of models in this series is secured with screws - they need to be unscrewed to remove the part.
The lid snaps into place thanks to a key-valve, which is secured in a recess on the body with two spikes. The latter quite often break or wear out. As experts on the forums note, this is “planned wear”, forcing buyers to change the device to a more modern one.
Redmond RMC-M70:
- The valve is dismantled in the same way as the previous model.
- The aluminum liner is attached to two clamp clamps. They need to be squeezed simultaneously or one by one, and the lid can be easily removed.
Model Redmond RMC-250:
- Remove the aluminum cover by pressing the three clips around the circumference.
- Remove the steam valve. The difference between the model is that this part is located inside and not outside. When sliding into place, the valve should snap into place on the stopper.
How to fix a key lock
Since the key is mounted on two pins, the most logical thing to do if they malfunction is to increase the protrusions. To do this, wire is fused into the key or nails/screws of suitable length and diameter are driven.
An easier way is to put screws on the lid or glue metal plates, and small flat magnets with sufficient adhesive force to the body.
Modern models of Redmond multicookers can be disassembled as simply as possible. The manufacturer recommends regularly removing and cleaning the steam valve and the aluminum inner lid. Older models are more difficult to disassemble, but in quite accessible ways. Take proper care of your multicooker so that it does not spoil the aroma of your dishes and lasts longer.
We recommend: How to repair a thermos lid with a button or valve
Master class on board repair
To troubleshoot problems, the microcircuits should be carefully inspected. To identify malfunctions, you should pay attention to the following signs:
- the appearance of soot;
- swelling of capacitors;
- peeling and tearing of tracks;
- damage to soldered seams;
- darkening of resistors.
If certain elements malfunction, they should be replaced immediately. It is easier to restore soldering. The board tracks can be repaired by sanding with scratch paper. You can also tinning damaged areas.
In some cases, jumpers are used, which are easily made from resistor legs. After completing the work, the surface should be filled with varnish. Otherwise, a leak can lead to negative consequences. Varnish helps protect the metal from moisture and oxygen. It is these factors that pose the greatest danger to conductors.