Operating principle of the refrigerator start relay
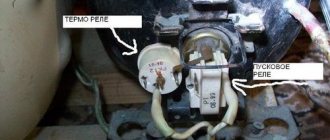
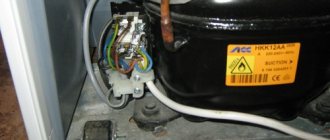
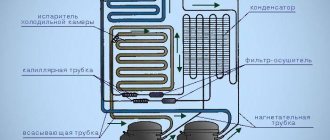
The control type mechanism, which controls the operation of the cooling equipment, is small in size and located in close proximity to the compressor. There are two types of relays:
- launchers;
- Start-protective.
The latter variety comes in two types:
- Current . It turns on when the electric current reaches a certain value. The motor consumes this electricity, and if it overheats, the relay cuts off the power. When the motor cools down to a certain temperature, the trigger turns it on again.
- Current-thermal . The starting relay is triggered by thermal indicators and electric current values. A running motor consumes electricity passing through the coil, which heats up slightly without affecting the biometric plate.
Starting relays come in several types, but there are two main functions:
- starting the starting winding;
- stopping the supply of electric current at increased engine speed.
Based on the principle of operation, devices are distinguished:
- tablet (posistor);
- induction
A posistor, a type of thermal resistor, together with a capacitor located between the buses of the working and starting windings, are the main parts of the tablet. The last part of the design provides a phase shift that turns on the refrigerator compressor motor.
The maximum electric current flows through the winding, heating the posistor and increasing its resistance. Electricity keeps a type of thermal resistor warm while the compressor is running.
The tablets include:
- RT;
- RCT;
- P3R;
- RP3P2;
- 6SP;
- A.E.G.
The main working part of the induction relay is a solenoid, the coil of which is connected to the working winding of the compressor motor. Electric current at its maximum value passes through the coil, creating a strong magnetic field. The attractive force of the latter attracts the current-conducting contact, completing the circuit.
A set of required rotor speeds becomes a signal to reduce the current strength, which reduces the impact of the magnetic field. This allows the core to restore its original position by opening the contacts. A prerequisite for the operation of the induction relay is a strictly horizontal location of the part inside the refrigerator.
Start relay connection diagram
This device is necessary to start a single-phase asynchronous compressor motor. The motor stator includes two windings - starting and working. The first serves only to create starting torque and start the compressor. The second winding is needed to maintain the rotor in working condition by continuously supplying alternating current to it.
Important! To regulate the process of supplying and turning off power to the starting and operating windings of the electric motor, as well as for the overload protection function, a starting protection relay is provided.
Inductive closing mechanism
The relay connection diagram is not complicated. Conditionally “zero” and “phase” power is supplied to the input of the device, and at the output “phase” is divided into two lines. The first line is connected to the working winding of the electric motor, and the second line is connected to the starting winding through the starting contact.
In relays of old and modern refrigerators, current is supplied to the working winding through a spring with high resistance, and then through a connection with a bimetallic jumper. With a strong increase in current in the circuit (motor jamming, short circuit between turns, and other breakdowns), the spring in contact with the jumper heats up, which changes its shape under the influence of temperature, thereby opening the contact and turning off the compressor.
Inductive circuit circuit
In this circuit, a coil (K1) is used to start the electric motor, which is connected in series with the working winding. Applying voltage while the motor rotor is stationary provokes an increase in current in the coil with the formation of a magnetic field that attracts a movable core that closes the starting contact. After the rotor picks up speed, the current in the circuit decreases, the magnetic field in the solenoid decreases, and the starting contact opens by gravity or a compensating spring.
PTC switching mechanism
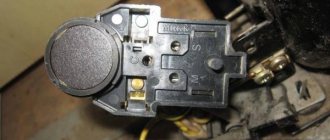
Modern household refrigerators use a start-up relay with a built-in posistor (a resistor that increases resistance as the temperature rises). The circuit of this device (Fig. 2) is similar to an induction relay, only instead of a coil, a posistor connected to the starting circuit is used to close and open the starting contact.
When power is supplied to the compressor, the temperature of the resistor is low and it passes current to the starting winding. Since the resistor initially has resistance, it heats up and opens the circuit of the starting winding of the engine. The cycle is repeated after the thermostat is triggered and the refrigerator is then turned on again.
PTC switching mechanism
How to check the functionality of the start relay?
You can suspect a malfunction of an important part of the refrigeration equipment if the following non-standard reactions occur:
- the temperature inside the chambers is higher than normal;
- the equipment does not turn on;
- quick shutdown of the electric motor in working condition.
Before you start checking the start relay, you should make sure that it is the problem. To do this, disconnect the contacts from it and connect the compressor directly. The stable operation of this part of the refrigerator confirms the suspicions. If the compressor does not turn on when the electricity is turned on, then the problem is there.
Check the functionality of the relay according to the following scheme:
- Visual inspection of the location . The part is in the correct, strictly vertical position, there is no inclination or displacement.
- Using the tester . All contacts are probed with a measuring device. The absence of indicators is the result of oxidation and contamination of contacting units. Sandpaper all wires.
- Internal inspection . This procedure involves removing the device and opening it.
- The absence of the above violations requires checking the voltage supply. This is done with an ohmmeter or multimeter.
How to check the operating parameters of a refrigerator compressor
If there is a malfunction or lack of switching on, you need to check the resistance with a multimeter, since if there is a breakdown, it can cause an electric shock. In other words, a tester test is carried out to examine the winding to identify its damage. Masters call this calling. You can initially check the serviceability of the refrigerator compressor using 3 main parameters.
Namely, by:
- Resistance;
- Pressure;
- Toku.
If the winding is truly damaged, the voltage level may jump and be transferred to the surface of the housing. Typically, this can happen with older devices. The serviceability of refrigeration equipment is checked by measuring the resistance in each of the 3 contacts present, together with the equipment body, and it is important that there is no paint present in the place where the ringing is carried out. If the resistance of the windings does not change and there is no damage, then the infinity icon will light up on the display of the diagnostic device. Otherwise, the compressor can be called faulty.
If the test does not give the desired result, and there are signs that the household appliance needs to be repaired, then a pressure diagnosis or measurement with a pressure gauge is required.
It is necessary to correctly connect the terminals of the simulator in the posistor to the cavity of the discharge fitting, connect everything securely, and then the indicators are taken precisely when the compressor is turned on. If the display displays a pressure of 6 atmospheres and the number begins to increase, then the diagnostics confirm the functionality of the device. If the pressure is lower or begins to drop, the pressure housing must be replaced.
It is equally important to call and find out whether the thermal starting relay is working, which will allow you to determine whether current is supplied to the motor. It is advisable to take the relay in working condition as a basis, which is confirmed by testing, and then use a device such as a multimeter with a clamp. After connecting the operating relay to the compressor cavity, a multimeter is required. This is done by clamping one of the wires using pliers. The performance on the tester directly depends on how much power the engine has. For example, if the power is 140 W, then the display will allow readings of 1.3 V. If the power is 120 W, then the readings can vary between 1.1-1.2 V. In this case, the start-up relay is operational and suitable for operation , however, most often it happens that the compressor is broken, and experts recommend starting the check with it.
Troubleshooting and Troubleshooting
There are two ways to determine that the relay is broken:
- Remove the terminals from the trigger mechanism and connect them directly to the electric motor. If the engine runs stably, it turns off stably after 10-20 minutes.
- Connecting the operating relay. If with it the refrigerator starts and stops the engine reliably, then the problem is in the starter mechanism.
Mechanisms with moving parts, contact groups, heating elements are characterized by a standard set of breakdowns:
Contact group jamming
Typical fault signals of this type:
- the electric motor does not turn on at all when the current is connected;
- the engine runs for 10 minutes and turns off;
- non-stop operation of the motor.
A few seconds after the electricity is supplied, the thermal protection is triggered, and the starting relay turns off the current supply. The damage is corrected by restoring the mobility of the rod. The causes of failure are also wear of the part, mechanical damage to the mechanism as a whole or its parts.
Burning, oxidation of contacts
This type of malfunction is detected by disconnecting the relay contacts and connecting the electric motor directly. The stable operation of the latter indicates its serviceability.
You can check the condition of the starting relay with a tester - between the contacts the indicator is zero, indicating the absence of breakdowns. Exceeding the value indicates the need to replace the device. First, you can try to clean the contacts with sandpaper and smooth out the spots.
Heating element burnout
If the compressor does not turn on, the cause may be an open circuit. Attempts to independently correct the breakdown will lead to failure; a complete replacement of the trigger mechanism is required.
Failure of the biometric plate, loss of its main properties
The malfunction is accompanied by the opening of the contact group when the spiral reaches a certain temperature. Short-term switching on and off of the compressor indicates a breakdown of the biometric plate. The only way to fix this is by replacing the relay.
Calling contacts
Malfunctions of the trigger mechanism are detected with a multimeter by ringing three sections:
- Using a measuring device, check the input and output to the working winding for the presence of a break, oxidation of the open contacts, return of the protective mechanism to its original position;
- break of the zero section due to mechanical impact on the circuit;
- Use a multimeter to check the input and output to the starting winding for a break in the current-carrying wire, lack of contact, or open circuit.
Checking the posistor on and off
The part should be checked in a hot and cold state. 2-3 minutes is enough for the posistor to completely cool down. In this state, it must be probed with a millimeter. Absence of indicators or a high value indicates a malfunction of the element. When hot, the posistor displays certain data, which depends on the type of part.
Refrigerator relay replacement
Replacing the relay in the refrigerator is carried out at a service center or independently at home. To carry out the work, a tester and a screwdriver are required to dismantle the element.
Removing the relay
You can remove the device yourself, taking into account the following points:
- Before carrying out any work, the device must be disconnected from the network, after which you need to wait some time to de-energize the entire system.
- The RTP type can be removed by simply disconnecting the contacts. A relay on a refrigerator for starting an engine is often installed without insulating the contacts, which causes the appearance of oxide on the contacts. Therefore, problems with dismantling may arise.
- You can replace the device depending on how it is attached. Rivets, screws and latches are used. You can unscrew the screws with a screwdriver; the latches are pressed out.
DIY relay replacement
Symbolic identifiers of the feed-through contacts will help you correctly connect the new starting device. If there are none, then when unscrewing the wires, it is recommended to mark them, otherwise it is easy to mix up the contacts, which will lead to breakdown of a working mechanism.
Refrigerators Nord, Stinol, Ariston, Indesit have similar designs, so replacement is carried out according to the same scheme:
- disconnect the device from the power supply, after which it is recommended to wait until the device is completely de-energized;
- unscrew the fasteners securing the water supply hose and move it to the side to avoid damage;
- Unscrew the fasteners of the rear panel, remove the protective plate of the rear panel of the refrigerator;
- press out the latches, rivets or unscrew the screws holding the trigger mechanism to the compressor;
- carefully pull out the part, maintaining spatial orientation;
- disconnect the wiring from the start relay, mark each contact to avoid confusion when installing a new device;
- loosen the clamp by lightly pressing, disconnect the connector;
- clean the contacts of the wires and connector with a soft cloth moistened with alcohol;
- move the starting capacitor from the old to the new relay;
- connect the cleaned connector to the space provided for it;
- fix the relay on the capacitor in a strictly vertical position;
- Tighten the wiring using pliers and check the reliability of the connection;
- secure the relay with screws, latches, rivets;
- put the back panel in place, screw it on;
- put the water supply hose in place and secure it;
- Connect the refrigerator to the electrical network and check operation.
Replacing the starting relay of Atlant, Minsk refrigerators is carried out according to a different scheme, since they have similar designs:
- disconnect the refrigeration device from the electrical network, wait a while for complete de-energization;
- remove the back panel of the refrigerator;
- remove the wire clamp that secures the trigger mechanism;
- disconnect the contacts, inspect them and, if necessary, sand them with sandpaper;
- mark the wires to avoid mixing them up when connecting a new device;
- Unscrew the fasteners, if they are rusty, pry them off with a screwdriver or lubricate them with oil;
- slightly press the wire clamp to remove the device;
- move the starting capacitor from the old to the new relay by simple rearrangement;
- install the mechanism in place, monitor strict horizontality and verticality;
- connect the wires according to the markings, securely screwing each patch;
- Throw on a wire clamp and secure;
- put the back panel in place, tighten the screws;
- Connect the refrigerator to the electrical network and check operation.
Modern types of cooling equipment have similar designs, but there are still differences that must be taken into account before starting independent repairs. Experts recommend reading the manufacturer's instructions before opening the equipment in an attempt to fix the problem.
Replacing the start relay of a Liebherr refrigerator:
- disconnect the refrigeration device from the electrical network, wait until the power is completely off;
- Unscrew the fasteners, move the rear protective panel;
- remove the plastic cover and inspect the mechanism;
- Clean the contacts with sandpaper;
- check the serviceability of the return spring;
- unscrew the fasteners securing the start relay;
- replace the device with a working one, having first checked it;
- put the device in place of the old one;
- secure with fasteners;
- return the back wall to its place, tighten the screws.
Video of replacing a relay in a refrigerator
In case of malfunction and suspected malfunction of the start-up relay, immediate replacement of the start-up relay of the refrigerator
, otherwise the consequences may be irreversible, and the compressor will have to be completely replaced.
However, some sources claim that the start-up relay can be repaired. This is absolutely not true. To restore the refrigerator to normal operation, only replacing the start-up relay
.
The main signs of a problem with the start relay
Uncharacteristic sounds occur when the compressor is turned on: rattling, clicking, creaking, strong hum.
The motor-compressor suddenly turns off immediately after starting or does not turn on at all.
The start relay switches on very frequently, either starting or stopping the compressor at varying intervals.
If you begin to notice that such signs are occurring, you need to call a technician to your home as soon as possible and carry out diagnostics to determine the exact cause, and then repair the refrigerator inexpensively.
Cost of replacing the start protection relay
Replacing the start-protection relay
- the work is not particularly expensive. Other repairs associated with eliminating malfunctions caused by the breakdown of this component are much more expensive. A faulty relay can cause a more serious malfunction, in particular, damage the compressor. Replacing a compressor will cost several times more, so at the first sign of a relay failure, you must contact service for help. Thus, you can save a lot and protect your equipment from irreversible consequences.
Speaking about the cost of the master’s services, everything is individual and it depends on several points:
Makes and models of your faulty refrigerator.
How to remove the start relay
An important part of the refrigerator does not break often, but replacing or repairing it requires certain knowledge, a set of tools, and protective equipment. The design of the starting relay is simple, so a couple of assemblies and disassemblies of the mechanism will allow you to acquire sufficient skill, understanding of what is happening, and experience.
To remove the start relay, you must follow the diagram:
- disconnect the refrigerator from the electrical network, wait until the power is turned off;
- unscrew the fasteners securing the protective cover and move it to the side;
- disconnect the contacts by unscrewing, when soldering with metal parts, pry them up with a flat screwdriver;
- remove the latch screws holding the relay;
- remove the trigger mechanism.
How to connect the start relay
Self-installation of a new mechanism must be combined with a certain level of knowledge, otherwise you should call a specialist. If the refrigerator arrived without a start relay and there was no visual inspection of its correct location, it is recommended that you read the manufacturer’s instructions.
The starting relay connection diagram is standard:
- disconnect the electrical appliance from the network;
- wait a few minutes for the equipment to completely de-energize;
- unfasten the water supply hose from the back wall and move it away so as not to accidentally damage it;
- Unscrew the fasteners securing the protective panel and put them aside;
- remove the old start relay; if it is not there, find the location on the compressor;
- connect the connector to the new device;
- insert into place;
- connect the wires according to the markings;
- secure the trigger mechanism with screws and latches;
- put the back panel in place, screw it on;
- attach the water supply hose, secure;
- plug into the electrical network for testing.
Professionals recommend using protective gloves to prevent hand injuries. Independently connecting modern types of starting relays can cause a number of difficulties that are not always possible to correct on your own.
The start relay is an important part of the refrigerator that starts the electric motor and protects the equipment from breakdowns. Failure of an element leads to the appearance of uncharacteristic noise and equipment not turning on. You can identify the malfunction, carry out repairs, and replace it yourself, but in the absence of certain knowledge, it is better to turn to specialists.
