Is it possible to dismantle the air conditioner with your own hands?
It is enough to have a pre-purchased specialized tool on hand, know some technical subtleties and take your time. The question arises: why waste time and effort if you can call the appropriate specialists who will perform the necessary operations in a short time? You can, but there are two reasons why you shouldn't:
- Price is the most important aspect. The average pricing policy for dismantling a modern split system is 4,000 rubles. We are talking about small apartment models. If the device has substantial dimensions and is installed mainly in offices, then the price will rise to 10,000 rubles. Quite significant for the budget.
- The likelihood of ending up with low-quality “specialists”. The modern desire of the population to do their own business leads to the massive appearance of people who do not understand the work they do. Also with some air conditioning “masters”. Therefore, the chance increases that the procedure will be performed poorly at a high cost.
But it should be said right away that manually removing a split system cannot always be successful. A common problem is the complete leakage of freon, which is quite expensive, and the price of a new one is at least 1,500 rubles. Therefore, when removing the air conditioner with your own hands, all actions should be performed accurately.
The necessary tool and its possible replacement
If you have the means, you can hire a specialist to remove and install modern split systems, without even paying attention to the manufacturers of this tool, which changes the pricing policy. But then the point of independent dismantling, which is carried out in order to save money, disappears. Therefore, some types of tools are best replaced with cheaper ones, and some will have to be abandoned altogether.
List of tools required for disassembly:
- Gauge manifold. This is a necessary thing, as it will show the pressure when pumping freon into the outdoor unit. And this particular measuring device falls into the category of tools that you should discard (at your own peril and risk), since its minimum cost is 1,500 rubles. A more reliable one will cost 3000-3500 rubles.
Example of a pressure gauge for split systems
- Set of hexagons. This position is mandatory, since the fitting cannot be unscrewed any other way. Fortunately, the price of such keys is not exorbitant - 3000-350 rubles.
- Pipe cutter It is inexpensive (about 300 rubles), but you can reduce costs even further and purchase an ordinary hacksaw, which will later be useful for housework.
- Flat and figured screwdrivers. Now they are sold in any hardware store or hardware store.
- Safety equipment if the air conditioner is located on upper floors. It’s not worth saving here, and not paying for a product whose cost is less than 1000-1500 rubles.
And one more prerequisite is the presence of an assistant, or preferably two. Both the external and internal units have a significant weight, so it will be problematic to handle it yourself; you can accidentally damage the device.
What to pay attention to when dismantling
The most fragile place in an air conditioner is the compressor pump. Despite its compact size, the design of such a pump includes complex mechanical components: rotors with cams, sealed system elements and a chamber in which the main work takes place.
If ordinary dust gets in, the walls of the chamber may be damaged, and accordingly, freon will move aimlessly around the system without performing any useful work. Therefore, the main slogan when dismantling the air conditioner is to preserve the vacuum in the system, which, in turn, requires the tightness of all external openings.
Main types of removal: with and without freon preservation
How to remove or hang the air conditioner from the wall without losing freon? As mentioned above, freon is quite expensive, and when removing the air conditioner yourself, it should be saved. But if the service life of the device is long, and the freon needs to be replaced, then when moving, you don’t have to save it, but simply drain it and dispose of it.
If you decide to keep the freon, then the sequence for removing the air conditioner is as follows:
- On the outside of the split system there are service valves with protective caps covering special slots. To access the slots, the caps should be disassembled and the hexagon should be installed only in the valve on the thin tube located at the bottom of the device.
Removing special hex splines
- Now you should set the lowest air cooling temperature and turn on the device at maximum operating mode. Some models have a turbo option.
- After switching on the enhanced operating mode, the valve (with the hexagon installed) should be tightened. From this moment, the system must operate for at least one minute, during which all the freon will flow into the external unit.
- After freon is pumped into the outdoor unit, the gas line is shut off and the device is turned off. It should be remembered that continuing to operate the air conditioner in this mode with two valves closed will lead to damage to the split system.
- Unscrew the nuts securing the copper lines covered with a heat-insulating layer, which should also be removed. Now the tubes bend neatly and can be removed through the hole in the wall.
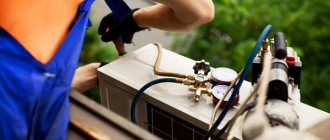
An assistant is required when removing the external unit
After completing all of the above operations, you can begin to directly dismantle the air conditioner, which is best started by removing the external unit.
It is very important to remember that the pipes should be sealed after removal. Often, simple adhesive tape, film or electrical tape is used for this. A more reliable way is to close them using simple pliers. If you approach the problem with full responsibility, then the ends of the pipes should be securely closed using a bench vice, thus preventing the penetration of moisture and dust into the evaporation chamber.
Preparation stages
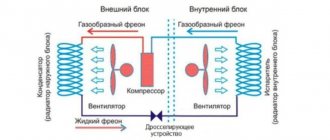
At the preliminary stage, it is necessary to retain the refrigerant in the system. It is located in a circuit that consists of a compressor, evaporator, condenser, and connecting pipes.
Freon enters the evaporator in a liquid state, so small diameter tubes lead here. As the refrigerant evaporates, it enters the compressor in the form of gas. Here the branch size is larger.
The purpose of the preliminary stage: to collect all the gas in the condenser. To do this you need to follow these steps:
We recommend that you familiarize yourself with: Internal unit in an air conditioner - operating principle and technical characteristics
- The air conditioner is switching on in cooling mode. The lowest temperature is set. The unit operates for 10 minutes.
- There is a valve with a fitting on the external block. A thin tube approaches it, through which freon moves. There is a protective cap on top. When you remove it, splines appear. A key is thrown on them and the valve is closed.
- The pressure gauge is monitored, the needle of which should drop to zero after 1 minute. Immediately after this, the same procedure is carried out with the outdoor unit. The protective cap is removed and the second valve is screwed on. The air conditioner is then turned off using the remote control. All the refrigerant accumulates in the outdoor unit.
If there is no pressure gauge on the unit, then wait 1 minute and close the second valve, turning off the device.
How to properly and quickly dismantle the external unit of a split system
This procedure should not be performed if the system is installed on the upper floors of a multi-story building. This can be life-threatening.
Removing the external unit on the upper floors
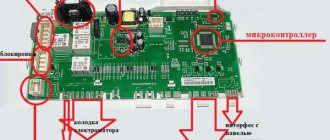
Removal of the external unit of the split system occurs only after all the above operations have been correctly completed. Dismantling should begin by disconnecting the input electrical cable, the wires of which are suitable for the air conditioner terminal box, located under a special protective cover. To simplify the connection of the device at a new location, the wires should be marked with the appropriate colors (red - phase, blue - zero, yellow-green - ground).
All that remains is to unscrew the nuts that secure the air conditioner to the brackets. This is not a problem, but an assistant is needed to support the external unit during the entire process. Once the nuts are unscrewed, you can carefully remove the unit and prepare it for transportation.
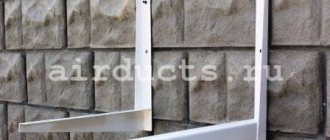
Don't forget the brackets to which the air conditioner is attached. They are usually mounted using dowels to the outside of the wall, and dismantling takes a little time.
You should know that split system manufacturers strictly prohibit the transportation of devices into which freon is pumped. Why? The answer is simple: after all the above actions, excessive pressure forms in the system, and the air conditioner housing is not designed to withstand even the slightest mechanical impact. Therefore, without the necessary conditions (covering the block with a sealant or special film), the block body can simply break through. This can be understood by the characteristic hissing.
Dismantling a working air conditioner with refrigerant recovery
Any type of working split system can be dismantled for the purpose of moving and installing it later in a new location. Most often, this operation is carried out when organizations move to a new office. In order not to waste resources on refilling the system when installing it in the future, you need to collect all the freon located in the evaporator (indoor unit) and in the pipeline. To do this, dismantling should begin with distillation and collection of freon in the condenser (external unit). As an example, consider the dismantling of the most common and popular air conditioners, wall-mounted split systems.
Refrigerant transfer
First, turn on the air conditioner in air cooling mode (at the lowest possible temperature) and wait for the compressor to start. Next, remove the plastic protective casing installed on the outdoor unit, which covers the connection point for the pipelines.
Using an adjustable wrench, unscrew the protective caps of the taps of both pipes. Inside, behind the brass caps we will see hexagon taps. First, close the tap of the thinner diameter tube (liquid line) with a hexagon of the required size.
Thus, the supply of liquefied freon to the evaporator is stopped, while the compressor continues to operate and pump gaseous freon into the condenser. After some time, up to 1 minute, depending on the length of the pipelines, we will hear the characteristic sound of an idling compressor. Then we tighten the valve of a tube with a thicker diameter (gas line) in a similar way, and immediately turn off the air conditioner. The first stage has been completed - all the freon has been distilled into the outdoor unit.
Disconnecting electrical wiring
According to the installation technology, the air conditioner's power should be supplied to a separate circuit breaker or, using a power cable with a plug, plugged into a regular outlet, like any household electrical appliance. We turn off the required circuit breaker in the distribution brush or remove the plug from the socket. Open the front panel of the indoor unit, under which there are filters. To the right of the filters is a small cover. Using a Phillips screwdriver, unscrew and remove this cover; under it there is a block with connected wires that form a connection between the indoor and outdoor units of the split system.
We check the absence of voltage with a tester to make sure that the desired machine has been turned off, then unscrew and disconnect all the wires. Then we disconnect the same wires on the external unit, the terminal block of which is located under the cover just above the protective casing of the service port, where the main line is connected.
Removing the wall block
There are two latches at the bottom of the wall-mounted air conditioner unit; their location is indicated on the plastic of the case. Most often it says “Push” (push, press), but it also happens the other way around - you have to pull the plastic down, for example, on a Mitsubishi Electric or Lessar. By simultaneously pressing these points, the indoor unit should unfasten from the mounting plate and move away from the wall.
Under the block, approximately in the center, there is a pipe connection point. Using adjustable wrenches, disconnect the block from the main line and disconnect the drainage hose. Pull the housing up, removing it from the mounting plate. The wall block has been dismantled. Using adhesive tape, we close the pipelines, protecting them from debris getting inside.
Dismantling the outdoor unit
Using adjustable wrenches, unscrew the nuts securing the pipelines and disconnect them. In order not to lose it, we screw all the nuts and caps into place and protect them from possible debris with adhesive tape. The external unit is secured to the brackets at four points using bolts and 13mm nuts. Unscrew them and remove the unit from the brackets. The external unit has been dismantled.
Removing the indoor unit
After the external unit has been dismantled, it is necessary to dismantle the internal (located in the room) air conditioner unit. There are fewer problems with it, since there is no need to work even at low heights, but there is a certain dismantling procedure and additional tricks.
Don’t relax and think that it’s enough to unscrew a few nuts, remove the indoor unit, and send it to a new place. The main trick lies in the desire of air conditioner manufacturers to make the process of removing the device as inaccessible as possible for craftsmen. That is why each indoor unit has a latch system with which it is attached to the wall. You can only work with such fasteners using a special tool, but there are no hopeless situations, and it is quite possible to choose something simpler.
Two screwdrivers will help you quickly remove the latches
Another tip: when removing a block, it is best to have not one assistant, but two. This is due to the fact that the indoor unit is quite bulky and heavy, and one person may simply not be able to handle it.
The two most common options for removing the indoor unit are:
- The simplest design is sometimes the most complex, which is why manufacturers of split systems try to hide the latches under the evaporator cover. The cover bolts are located inward, so to unscrew them you will need a special short bit in the form of a shaped screwdriver and a head with a ratchet.
- In addition to securing the evaporator cover, they try to make the latches themselves internal. If you don't have a special tool, you can use two flat-head screwdrivers and push them between the bracket and the wall. Now it’s enough to press a little (you shouldn’t be too zealous, they can be removed without effort), and an assistant can easily remove the internal block.
Removing the indoor unit with an assistant
There is one circumstance that can significantly interfere with work - the presence of a large number of evaporation tubes, and they are usually located near the mounting brackets. Therefore, when working with brackets, you should be as careful as possible so as not to damage them.
Recommended operating procedure
The first thing to do is to make sure that the grounding is not broken. Elementary precaution, nothing more.
Next is the general algorithm of actions. When dismantling yourself (as when installing a split system), it is necessary to take into account all the features of installing the system, the specifics of connecting to electricity and other nuances.
Removing refrigerant from the indoor unit
- Gas circulates in a closed loop. Therefore, the path of its entry to the indoor unit should be blocked. To do this, close the tap on the one outside the window (external). It is located on a copper tube (thin) suitable for it. To tighten it, you need a hex wrench.
- The air conditioner turns on. Mode – cooling.
A number of questions and problems may arise here:
Firstly, the system will immediately give a “failure”. Very rarely, but it happens. The solution is simple - connect the external unit directly to the outlet. Naturally, this requires at least basic knowledge of electronic technology. If such reconnection is difficult for the owner, then it is not a sin to turn to a knowledgeable neighbor. There is always a way out.
Secondly, how long does it take to “drive” the system? Nobody will give an exact answer. The operating time depends on the model. By the way, service employees do not like to share this secret so as not to lose potential customers. But an analysis of all the reviews and advice on this issue allows us to conclude that within 60 seconds (± 2).
During operation of the air conditioner, gas will be removed from the indoor unit and partially from the connecting tube. Naturally, some losses of freon cannot be avoided during further disassembly of the system, but this is already the cost of independent dismantling.
The device is turned off and the tap on the second thicker tube suitable for the outdoor unit is closed, and the first one is additionally tightened (if necessary). That's it - the refrigerant is “driven” and sealed in the condenser.
System de-energized
If the plug is plugged into the socket, it is pulled out. If connected directly to the panel using an extension cable, the circuit breaker is turned off and all ends are disconnected.
Dismantling of communications
Where to start? Whatever is more convenient. The task is to remove all tubes and wires. The main difficulty is disconnecting from the indoor unit. If you need to “squeeze” it away from the wall, there is no need to be afraid - the body is fixed only in the upper part, on a horizontal bar.
On a note! If it is necessary to roll the tubes into a coil, then its permissible minimum diameter is 0.6 m. If twisted more tightly, there is a risk of damage (flattening, breaking) of the walls.
Removing the indoor unit
There are no difficulties in this. Just open the casing cover and it will immediately become clear. As a rule, the block simply lifts up a little and towards itself. By the way, this is a good time to clean the air conditioner and filters.
Outdoor unit
If all the connections are made, then it is simply removed from the landing “socket”. The difficulty is that it has significant weight. Each model has its own parameter. You may also need help. But how can two people work in a window opening without disturbing each other? All this needs to be thought through.
On a note! The weight of the outdoor unit can be checked from its passport. If it is lost, then there is enough information on the Internet on various systems.
How to properly re-hang an air conditioner
Situations often arise in which relocating an air conditioner is more important than completely dismantling it. In this case, one of the blocks is left in its place, and for the second the tubes are simply extended. The process of removing both the internal and external units is no different from those described above, the only difference is the need to build up copper or ordinary pipes.
When dismantling one of the units, you should also monitor the safety of freon and pump it into the outdoor unit before carrying out all operations. After undocking the split system, it is necessary to rehang it as carefully as possible, without damaging the air conditioner housing. To save more money, you don’t have to do the soldering of pipes yourself, but entrust this task to specialists. Split system service technicians have a corresponding column in their price list, which is called extension of the interblock route.
DIY dismantling technology
To begin with, the air conditioner should be plugged in in cooling mode and let it run for 5-10 minutes. Next, we move on to the external block and find on its body two nearby fittings, each of which has pipes connected to it. Most likely, the pipe itself will be dressed in a protective casing, which must be removed to get directly to its body.
These two channels have different cross-sectional diameters, since freon moves through one of them in the coolest liquid state, and through the other in an already heated gaseous form. Freon enters the external unit in the form of gas through a steam pipe with a large diameter, and leaves it as a cold liquid through a thin channel.
When the air conditioner has been cooling for a certain period of time, you can proceed to locking the channel through which freon leaves the unit. To do this, first remove the fitting cap from the narrower pipe; it, as a rule, has a smaller size. This task is accomplished using a hexagon, which must be installed inside the hole that appears after removing the cover.
By turning the key clockwise until it stops, the exit channel is locked and the freon begins to gradually leave the indoor unit. After which you need to wait 50-60 seconds, depending on the length of the channels connecting the internal and external units of the system. During this time, all the freon will go into the external unit and you can begin to close the second pipe.
The second pipe is closed in the same way using a hex wrench and the air conditioner is turned off from the network as soon as possible. Then the fitting caps are installed in their places, since valve adjustment is no longer required.
After the air conditioner is completely turned off from the network, it is time to turn off the communications leading to the external unit. Using cutters, a cut is made in each of the pipes at a distance of 7-8 cm from the connection with the fitting.
Next, using pliers, the ends of the pipes on each side need to be rolled, that is, bent in such a way that they become airtight and moisture does not get into them.
In the photo above you can see that the top pipe is rolled too close to the fitting. It’s better not to do this, because in the future, when installing the air conditioner in another room, removing the nut from such a short, deformed pipe is very problematic. The lower thin channel is sealed correctly.
The second type of communications connecting the external unit to the internal one is electrical wiring. It usually fits into a special box from which you need to remove the casing. Under the cover there are several control wire contacts on small screws and an external unit sensor. The screws are unscrewed with a screwdriver, and the sensor wiring fastening is made in the form of a plastic lock and can be removed by hand.
The last step is to remove the fixing screws on the legs of the block. They can also be removed simply with a screwdriver, after which the unit can be moved indoors and you can begin disassembling the internal part of the system.
Some useful tips
Having prepared the necessary tool, read the instructions and watched the corresponding videos on the Internet, you should also learn several important subtleties:
- Both when completely dismantling the split system, and when partially moving the device, you should not worry too much about the safety of the copper pipes. Replacing them will not cost too much money and installing new ones is always better than repairing old ones.
- If it is difficult to understand which pipeline is liquid and which is gas, then you need to pay attention to the diameter of the pipes. The liquid pipeline, which is also the outlet pipeline, is always thinner than the gas supply pipeline.
Examples of pipes on an air conditioner
- During transportation, the system should be covered with any seal, since any blow to the housing can lead to loss of freon or failure of the device.
And the most important advice is never to rush, since these systems require precise and careful movements; strength will not always help here.
Reasons for dismantling the air conditioner
The need to remove the split system arises in the following situations:
- The air conditioner has expired and needs to be replaced with a new and improved one;
- The façade of the house, to which the external unit of the system is attached, is planned to be plastered and painted;
- A housewarming party is planned, the working staff will move to another office with the preservation of the old climate control equipment;
- Carrying out renovations in the apartment - painting the walls, wallpapering or installing a stretch ceiling.
Features of removal of various types
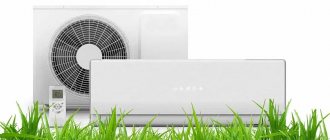
Climate control equipment can be divided into three groups:
- split system;
- cassette air conditioners;
- duct type air conditioners.
During dismantling, it is impossible to drain the working fluid from the split system by running the process empty, as is done with cassette and duct air conditioners. In this case, the refrigerant is collected in a special container. Moreover, even the order in which the pipes are emptied matters. First, the refrigerant is drained from the thin pipe, and then from the thick one. In general, dismantling a split system is difficult: most often the pipes of such climate control equipment are made of copper, which is why they have to be cut off rather than removed.
A cassette air conditioner is heavy equipment, so it cannot be dismantled alone. The cassette air conditioner unit is necessarily protected by fittings. Therefore, after disconnecting the pipes through which the refrigerant passes and disconnecting the equipment from the network, you will need to use a power tool to cut metal.
Such equipment is dismantled from a suspended ceiling
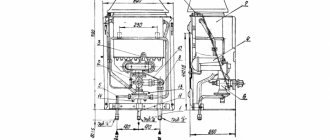
Dismantling a duct-type air conditioner is more difficult. Still, a ducted air cooling unit weighs a lot, has large dimensions and a special design with air ducts. This means that in this matter you cannot do without an assistant.
This air conditioner is similar to a split system, but also combines ventilation functions.
Possible consequences of incorrect dismantling
The main requirement for dismantling is caution. Neglecting this rule can lead to loss of freon from the tubes that cool the air. To refill the equipment with a special liquid, you will have to pay the technician a lot of money.
Also, poor-quality dismantling of climate control equipment risks the penetration of air into the structure, which can oxidize its metal parts. Later, rust may appear on the internal elements of the air conditioner, which will cause it to fail.
It is important to remove the necessary parts from the climate control equipment with the utmost care, otherwise they may break. In the best case, you will need to purchase some new elements for the air conditioner; in the worst case, you will have to buy a new split system.
Therefore, you should think seven times before removing the air conditioner yourself. You should refuse to dismantle yourself and invite a professional to your home in the following cases:
- It is necessary to dismantle a heavy duct or cassette air conditioner;
- There is no knowledge and confidence to carry out dismantling;
- There were no tools to remove the air conditioner.