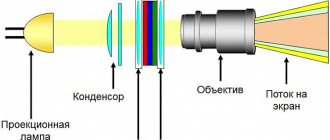
A multimedia projector is one of the most popular devices in the field of projection equipment. The essence of his work is that he projects an image onto the screen. It can come from a computer, DVD player, VCR or other signal sources. Using a projector together with an interactive whiteboard, an interactive attachment, or using an interactive projector allows you to replace a regular school board with a more functional one.
How are projectors used in schools and what connectors should the projector have?
- Demonstration of educational films from a DVD player . Functionality is limited in that the projector can only display images, slideshows and videos from the disc. Can be used, for example, in foreign language classrooms, MCC, and music classrooms. To work only with a DVD player, the simplest and most inexpensive projector with a screen resolution of 800*600 pixels is suitable. To connect devices to the projector, a composite connector (yellow “tulip”) and an HDMI input are sufficient. Of course, just in case, it is better that the projector has other connectors. And, if the DVD player does not have speakers, the projector must have them.
- Screen sharing from a computer (laptop) . This is the most popular use of a projector today. Everything that is on the monitor screen is fed to the projector. That is, when connected to a computer, the teacher can show not only the same DVDs with films, but also control playback in the player, quickly switch between different files, their fragments, etc. A projector connected to a computer can be used in any lesson, be it physics or Russian. To use a projector with a computer, you need inputs (depending on what the computer supports) HDMI or VGA, and there must be both a VGA input and a VGA output so that the image is on both the monitor screen and the projector screen - so it is more convenient to work during a demonstration and there is no need to reconnect anything if the teacher, for example, wants to work on a computer without a projector. Speakers must be connected to the computer.
“Projectors do not produce high-quality images in a well-lit room.”
Surely you have heard something like this more than once. This statement, despite its apparent simplicity, raises many questions:
- How bright is the room?
- What brightness are we talking about a projector?
- What size is the screen?
Saying something without having answers to these questions is like saying that a SUV is completely unsuitable for off-road driving: without specifics, these are empty words, nothing more.
300 cm wide was projected onto a light gray wall.
(i.e. about
140 inches
). To study the issue, I took the Epson EH-TW6600 home projector (brightness 2500 lm) and the new installation projector Epson EB-L1100U (laser installation projector with a brightness of 6000 lm, which we talked about in the blog earlier).
At first, the maximum lighting in the room was used, and the projectors operated in maximum brightness
, and maximum
accuracy
. The camera shoots in automatic mode due to the fact that when the light flux of the projector changes, the dynamic range of the entire frame changes (more about it below), and the exposure assessment is set to the “weighted average” mode, which roughly allows you to estimate how the human eye would adapt in those conditions. or other lighting conditions. The result is the following sequence of photographs:
The two photos on the left are an installation projector, the two on the right are a home one. What are we observing?
The first thing you'll notice is that in "fine modes" (like "sRGB") the image quality doesn't look higher at all. Secondly, we don’t care about the contrast of these projectors, since the “black” color is affected in this case only by room lighting. This is clearly visible in the photographs - the “black” color actually has the illumination of the wall, and in all photographs its brightness is the same, since the illumination in the room is the same.
However, the camera is also adjustable for bright
areas of the image, and in shots where the projector is at its brightest, blacks appear darker. And for our vision, the effect will be similar: under the same lighting, a brighter image will be able to create deeper blacks. Visually, of course.
In general, image contrast is the amount of light from the projector divided by the amount of light produced by the room's lighting fixtures. Doesn't remind you of anything? The difference between the minimum and maximum value... Exactly!
This is a textbook definition of dynamic range!
In our case, however, we are not talking about a photo, but about a projection, so we will use another definition that most of us have long been familiar with - contrast
.
We take lux (lx) as units of measurement. After measurements, it turns out that in the center of the screen we have an illumination of 145 lux. Meet – this is our “black color”, i.e. the minimum possible value of the darkest area of the image in a given room. Alas, modern technologies do not allow projectors to “project” a stream of “light-absorbing antiphotons” onto the surface, so we have to work with what we have.
At the same time, we have 145 lux of illumination on the wall at the maximum distance from the light sources. The illumination on the nearest horizontal surface is as much as 440 lux, and at the other end of the conference room – all 540 lux! Such conditions correspond to workplaces in drawing offices and laboratories, while in ordinary offices and conference rooms there should be ~200 lux. In general, the conditions for the tested projectors are a little extreme, but we are not used to it. By the way, in an ordinary apartment, the illumination of working surfaces rarely exceeds 100 lux.
Other Projector Features
- Matrix resolution . The higher the projector resolution, the clearer (detailed) the image will be. To demonstrate presentations, photographs and videos, you do not need ultra-high resolution; resolutions from 800 to 1280 (on the larger side) are quite acceptable.
- Image format . Options: 4x3, 16:9, 16:10, 15:9. For education, standard 4x3 resolution is more suitable, while widescreen is more suitable for showing films. However, now more and more wide-format monitors are appearing, so it is more convenient to use a set of a wide-format monitor and a wide-format projector, so that when the projector is connected, the picture will be the same in both.
- Brightness (luminous flux) . The better the room is darkened, the lower the requirements for the brightness of the projector (from 600 to 1500 lm), however, in the lesson, as a rule, there is no darkening (children simultaneously write something in a notebook, read, and look at the screen). If the screen is exposed to direct sunlight, then at any brightness level the image will be poorly visible, so you need to provide for darkening at least the area between the projector and the screen: turning off the electric lights, darkening the windows with curtains or blinds.
- Contrast . A characteristic that is not always given in a standardized form in the projector passport, so it is difficult to compare the contrast of projectors from different manufacturers.
- Lens . Projector lenses have a number of characteristics. For example, the ability to scale the image (ZOOM) without moving the projector.
- Network connection . Is it possible to connect the projector to a local network via an Ethernet port or Wi-Fi.
- Weight . For a stationary projector, weight is irrelevant; for a portable one, it is better to choose a lighter projector.
- Interfaces . VGA (analog), DVI (digital), etc. Support for different ports is better, but for stationary use of the projector in one office, you can choose the projector that is supported by the computer’s video card. If necessary, you can connect adapters and splitters to your computer.
"Brightness" which is Luminous Flux
Because the projector does not have a fixed screen size, the same model produces a brighter image on a small screen and a less bright image on a large screen. In this regard, brightness is usually called the luminous flux of a projector.
To measure it, the average white screen illumination in lux is multiplied by the screen area in square meters. Lux is the same unit that is used to measure, for example, the illumination of a working surface to check compliance with occupational safety standards. ANSI luminous flux (ANSI lumens) means that the measurement is carried out in accordance with the ANSI methodology, that is, the sensor is installed perpendicular to the surface towards the projector, measurements are taken at certain points, and the “contrast” and “brightness” parameters are pre-set in the projector menu. Pre-adjusting the contrast setting is necessary to ensure that the projector's original (factory) settings display a smooth transition from black to white. If the contrast is not set correctly, the projector may benefit from maximum white brightness, but white shades will be lost.
You can see the correct and incorrect contrast settings in the two pictures above.
I’ll tell you a little secret: it also happens that with a normally adjusted gray scale (from black to white), the projector tends to cut off the color scale (from black to red, green or blue). As you can see, this applies to both brightness and image quality. In my tests, I have recently been publishing the brightness obtained when the gray scale is correctly adjusted, and in the future I will also report on the brightness to which the projector goes down when the color scale is displayed correctly.
In the figure above - the effect of a cut off green scale - you need to lower the “contrast” of green to a state where the green scale is no longer cut off in bright areas.
I may be getting a bit lost here, but as I said, grayscale adjustment is a requirement even for ANSI luminance measurements. Initially, the projector’s “contrast” parameter may be adjusted accurately or inaccurately, but when we lower this parameter, we not only have to restore the shades of white, but also reduce the brightness.
It is also necessary to remember the rule that color rendering adjustments should not affect the black level, that is, the brightness of black color, which depends on the lamp mode, matrix parameters and projector device, etc. In other words, during color rendering correction we most likely reduce maximum white brightness without affecting black brightness. As a result, the image contrast can only decrease.
Projector Brightness and Modes
So, for the first time we come to the problem: adjusting color rendering is accompanied by a loss of brightness. In this regard, we immediately move on to the next issue: each projector has several standard color modes. The projector produces maximum white brightness in the “brightest” color mode, which can be called “Vivid” or “Dynamic”. This mode is the brightest and least accurate. As color reproduction is adjusted, brightness decreases. For example, the projector has 3 modes:
- Bright - 3000 lumens
- Presentation - 2500 lumens
- Accurate - 1500 lumens
If you are satisfied with the image quality in the Vivid mode, then you get a 3000 lumens projector. If you are satisfied with the image quality in fine mode, then you get 1500 lumens. This depends not only on your tasks, but also on the extent to which the projector's image is acceptable in its brightest mode. But this is purely a question of color rendering.
Brightness and lighting
If you take a regular school or office projector, or even a home projector, the principle is the same everywhere: you need high brightness in a lit room and for a large screen. Under these conditions, small color imperfections tend to get lost and brute force in the form of maximum projector brightness is greatly appreciated.
As the lighting weakens and even turns off, the concept of excessive brightness appears, but color rendering problems become much more acute.
Additional brightness in a lit room is required to create a contrast image, because the brighter the light, the brighter your “black” will be, and how many times white is brighter than black is the contrast of the projector. Contrast in this case is synonymous with image legibility. I even have an article that suggests an approach to calculating the brightness of a projector in a lit room.
Please note that in a brightly lit room, the contrast of the projector does not provide any benefits, including better text readability, etc. When the lights are off, it’s a different matter!
The figure below shows how background light affects image quality (contrast).
"Brightness" which is Brightness
In a prepared home theater room with darkened walls, etc., there are clear recommendations for maximum brightness, which for standard tasks is 14 or 16 foot-lamberts. 1 ft-lambert = 3.426 candela/m2 (nits).
Although it is common to simplify the expression “luminous flux” and say “brightness”, there is also a normal brightness, which is recorded, for example, in the characteristics of monitors and televisions. This is brightness, which is measured for a specific installation with a fixed screen size and, very importantly, takes into account the characteristics of the screen surface. Screens even have a parameter that determines its effect on brightness - Gain, or “Gain”. An ideal matte screen has gain = 1, a gray screen can have gain = 0.8. Very often, expensive home theater screens use a gain of 1.1, 1.3, or even more. This article talks about this in a little more detail. As you probably guessed, unlike the situation with measuring the luminous flux of a projector, when measuring brightness, the sensor looks at the screen, and not at the projector.
Well, it’s worth noting that an ordinary living room or meeting room with the lights off is not considered a home theater at all. The reason is the strong influence of light reflected from bright walls on the image. In such conditions, the brightness should be slightly higher than in a real home cinema.
Brightness and 3D
Insufficient brightness is the main enemy of 3D systems. This is due to their low efficiency. Most low- and mid-priced projectors use the projector's brightest mode (with its color rendition) in 3D mode. As you can see, suddenly the quality of the projector's performance in the brightest mode begins to affect itself in the most curious way. Only a few projectors allow you to select a color mode (vivid or accurate) in 3D mode. If such a choice is offered, then we can assume that the manufacturer is quite confident in the high brightness of the 3D mode.
Some 3D image problems are directly related to brightness. For example, the flickering of a picture or the ghosting effect is less noticeable, the lower the brightness. And finally, since brightness drops significantly in 3D mode, in some cases a 3D projector will not provide as large a screen size as in 2D. This can happen even with flagship models.
Brightness and screen size
Ok, it is believed that for school and office you need a projector with a brightness of 3000 lumens (give or take). But what should you put (hang) in a large conference room or assembly hall? Simple arithmetic tells us that doubling the width of the screen corresponds to increasing the screen area, and therefore the required brightness of the projector, by 4 times!
There was a screen and a 3000 lumen projector. Doubled the width of the screen - you need a projector with 12 thousand lumens. And this, let me note, is a completely different class of devices.
Color Brightness (CLO)
This point applies primarily to projectors in the budget price category and primarily to the brightest image modes. This option is actively promoted by Epson with their 3LCD technology. The essence of color brightness is this: if a projector creates white from red, green and blue, as conventional TVs and monitors do, then by adding the brightness when displaying red, the brightness when displaying green and the brightness when displaying blue, we get the brightness of white, that is, “ color brightness = maximum brightness.”
If the color brightness is significantly less than white brightness, the projector will display dull colors (eg dark red, almost brown instead of bright red). It is important to understand that these colors are dull compared to white. If you take dark red and reduce the screen size, it becomes bright red. But in projectors with an imbalance of color and maximum (white) brightness, a different picture appears, for example, a bright sky, but dark greenery, a bright white background, but a dark color logo.
If the image consists only of colored objects, then we can say that the maximum brightness of the projector is not used - its color brightness is used, and the lower brightness in this case visually turns from dark colors into a dimmer and less contrasting image.
Typically, the largest discrepancy between color brightness and maximum occurs in bright picture modes, and it decreases closer to fine modes. By reducing color brightness, the manufacturer is able to significantly increase the maximum (white) brightness of the projector. The color brightness parameter relates to the quality of color reproduction in the brightest mode of the projector.
Showing low color brightness (left) from projectors with equal white brightness.
In my reviews, I prefer to indicate color brightness as a percentage of maximum.
Content:
Projector TypePriceResolution and Aspect RatioBrightnessContrastColor AccuracyInstallation Flexibility
Some projector models have other capabilities
- interactivity (see below)
- ability to quickly change lenses (for example, from long-focus to short-focus, see below)
- “magnifying glass” - the ability to enlarge a fragment of an image
- freeze
- ability to display two independent image sources (picture in picture)
- USB and other inputs for presentations and slideshows without connecting a computer
- ability to move the lens up and down
- and much more, not always relevant for school projectors.
