Save and read later -
Flickering films from film projectors are a thing of the past, and the best modern models can turn a room almost into a real cinema hall. If you decide that it's time to get such a device, we will help you make a choice in a situation where it is wider than ever, and prices for the best models are temporarily reduced.
The urgency further complicates the issue, as if there wasn't enough confusion due to different types and technologies. In such conditions, choosing the best option is not easy.
Therefore, it is worth taking a few minutes to review the basic concepts. Sit back, grab some popcorn and immerse yourself in the magical world of projectors.
Selecting a Projector Type
First of all, let's understand the different types of projectors. In most cases, it will be one of two models: DLP (digital light processing) or LCD (liquid crystal display).
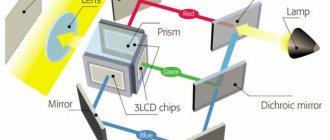
In an LCD projector, three liquid crystal matrices, each of which is responsible for creating an image of a primary color, create three pictures - red, green and blue. Using a glass prism, they are combined, giving a full visible spectrum, and in this form they are transmitted to the screen.
A DLP projector uses a single chip made up of millions of microscopic mirrors. Each can be rotated to direct its light toward or past the projection screen, so that each mirror essentially acts as a TV pixel. A rotating color wheel is located in front of the light source and determines what color image is currently being projected. Three-chip DLP models are also available, in which the light is split into three components and recombined, just like in LCD projectors, which eliminates the need for a color wheel.
In addition, there is a projection system LCoS, which stands for “liquid crystal on a semiconductor” and it works almost like DLP - only instead of mirrors, liquid crystals are used to control the light. This method is used by Sony and JVC under the names SXRD and D-ILA, respectively.
All of these technologies have their advantages and disadvantages. DLP generally has better brightness and clarity, but it tends to have a "rainbow effect" (red, green and blue colors do not mix but appear separately) when monochrome images are not perfectly combined. LCD projectors are cheaper and don't suffer from this effect, but they do have problems conveying motion and the blacks are less deep than other types of projectors.
In turn, LCoS does not have the rainbow effect, like DLP, and the tendency to burn out matrices, like LCD. However, it is more difficult for them to create deep blacks than DLP models. In addition, they are usually more bulky and expensive.
With all the differences between technologies, when choosing a new projector, you should not rely only on their characteristics. It is best to read the reviews of the model you like and make a decision taking them into account.
If something went wrong...
If you are faced with a situation where the image constantly lags, the picture is blurry and cannot be focused correctly, or the projector completely turns off after only working for a while, do not rush to panic. First, ensure ideal conditions for testing and setting up the projector, otherwise they say there should be minimal or no lighting in the room. Use a quality projection screen or a flat white wall. Make sure that the projector is connected correctly, the HDMI cable and power cable are fully inserted into the appropriate connector, and the wires are not twisted or broken. Be sure to check the optics; there should be no foreign marks on them, such as fingerprints or stains. Quite often, when buying projectors from China, sellers skimp on including a good HDMI cable in the kit, so we recommend immediately purchasing it separately, for example, this one or this one.
If your projector supports WI-FI connection, try transferring the image via wireless connection, this will eliminate the possibility of a problem with the HDMI cable. If re-checking the connection and restarting the projector did not help, in this case it is worth writing to the seller, describing in detail what exactly you have already done to correct the problem and the very essence of the problem. As a rule, conscientious sellers from AliExpress, who value their reputation and rating, accommodate the buyer and, in case of defects, replace the product or return the money.
4K or Full HD: which resolution to prefer?
While buying an HDTV seems like a weird fad these days, a 1080p projector makes perfect sense, especially if you're on a budget. There are many decent options on the market; our favorite is the Epson EH-TW650.
Projectors in the price category 100,000 - 300,000 rubles. allow you to count on 4K resolution - four times more than HD. It's not true 4K, but it still uses 4.15 million pixels (or slightly less) - half of Ultra HD's eight million. With pixel shifting, which quickly and alternately displays two lower-resolution images to create a final high-resolution image, projector manufacturers can claim 4K support and receive certification from the Consumer Technology Association (CTA) in the US.
The upper end of the price spectrum is occupied by devices with true 4K resolution. Their prices start from 450,000 rubles, but they guarantee that the image will be as clear as possible, as intended, without any tricks. The best picture we've ever seen was produced by the excellent JVC DLA-Z1, which costs an impressive amount of money.
Ultimately, the price and size of the projector will determine the resolution you can expect; All that remains is to choose the best option from the available ones.
Is it possible to get HDR at the same time?
Today, only a crazy person would buy a 4K TV without HDR (high dynamic range) support. With projectors everything is much more complicated.
Most often, HD projectors do not support HDR. Many inexpensive 4K projectors can handle HDR10 (the standard version of HDR) from Blu-ray discs or streaming services, but can't reproduce the full range of colors.
For example, the BenQ W1700 model, according to the words, however, reproduces only 96% of the Rec.709 palette. The five-star Optoma UHD40 projector does much the same thing.
Of course, having the ability to receive a signal in HDR is better than not having it; However, you can also find a projector with full HDR support - you'll just have to pay a lot more for it. The Award-winning Sony VPL-VW260ES is a decent starting point for decent HDR10 pictures, and the more you're willing to spend, the better the picture you'll get.
Setting up the projector
Both large and small projectors require adjustments equally. The first thing you should think about is the projection ratio, which determines how far away from the screen the device must be to produce a picture of the required size.
You can find it in the user manual of the selected model (or, which is much faster, on the manufacturer’s website). Look for a combination of a number, a colon and another number. For example, if this indicator is “1.15:1”, then an image with a width of 1 meter can be obtained from a distance of 1.15 meters, for a two-meter image the projector must be located 2.3 meters from it, and so on.
Most projectors are long throw and should be mounted far enough from the screen; short throw models can be placed quite close to the wall and result in a large image. The choice between a short-throw and long-throw projector must be made first - it is much easier to buy another model than a home theater room!
It is worth considering purchasing a special screen. Without it, your new projector won't be able to show off all that it can do. Of course, in a pinch you can do without it, but the higher reflectivity of the screen makes the image clearer and more colorful compared to a picture on a regular wall.
And the black frame around the image also significantly visually increases its contrast.
Accommodation
The location of the projector is equally important. If possible, it should be mounted at the height of the center of the screen to minimize geometric distortion. Ideally, the device should stand on a horizontal surface; Most models come with adjustable feet for leveling.
If you need to adjust the position of the projector, place it in the desired location and then unscrew the legs until the image is level.
By this point it should already be close to what you want. Many projectors are equipped with rotary controls (and more expensive ones with electronically adjustable remote controls) to zoom in and out of the image to fit the size of the screen.
If you have to install the projector too high or low so that the picture appears skewed, you can use the keystone correction feature.
It stretches the picture horizontally or vertically, turning the trapezoid into an even rectangle. This feature can be useful, but any scaling affects image quality, so leave it as a last resort. The less distortion, including when setting up the projector, the better the result.
Adjust keystone correction
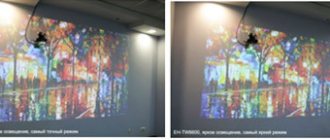
This is an image of the projector before adjusting the trapezoid settings.
This is an image of the projector after adjusting the trapezoid settings.
After focusing the image using any of the above methods, there is another category of changes you may need to make to improve the projector's image quality: changes to how the projected light is processed in the image.
The most common of these is keystone correction, which is a feature of all projectors to correct problems associated with projector height or centerline alignment with the screen.
There are two options for correcting keystone distortion: vertical and horizontal. So, start by determining which one you're most likely to play with. As mentioned above, it's difficult to mess up installing a projector on the center line of the screen, but perhaps you have a smoke detector or some other ceiling feature blocking the right spot of the center line.
If the projector is not centered on the screen, the image will be skewed so that one half is larger than the other. Horizontal keystone correction corrects this by manipulating the image before it is projected.
Vertical keystone correction does the same thing, but to correct problems caused by the height of the projector. Whether the projector is installed above or below the screen, you can use vertical keystone correction to fit the image to the screen, even if the projector is projected at an unexpected angle.
You can set keystone correction by finding the keystone correction or keystone setting in the projector menu and then simply dialing it in, increasing and decreasing the correction factor until the image looks right.
And if you haven't even purchased a projector yet, be sure to buy one like the Epson Home Cinema 3700 (on Amazon) or the Optoma EH504WiFi Full HD Wireless DLP Projector (also on Amazon), both have plenty of options for both horizontal and vertical keystone correction .
Focus
Now you can start focusing. The best way to do this is to take frames of letters - for example, the end credits of any movie - and adjust the focus on the projector, placing one of your friends near the screen so that they can see the individual pixels.
Slowly turn the focus dial back and forth until the letters are as clear as possible and your friend confirms that the pixels are not blurred.
Some projectors may require you to crank up the sharpness a couple of notches via the menu, but don't overdo it or the image will become too sharp.
Changing the projector's position relative to the screen
Assuming you've already tried using the built-in focus knob to capture the image and have checked the projector lens for dust, fingerprints, etc., now it's time to think about the placement of the projector.
The focus knob is designed to correct problems where the projector's image is just a few inches out of sync with the distance to the screen, but if the projector is off much further than when placed, then it's time to think about moving it.
I'm assuming you have the correct left to right position for your projector - there's only one center line from the screen to mount, so it's hard to get it wrong, but distance from the screen is a different story. However, if you haven't set up your projector yet, here are a few reasons why finding that centerline is important.
Your projector will have a distance requirement from the screen. Or rather, the range of distances for which it is designed. If you can't correct the blurry or unclear image using the methods described above, then it's time to physically move the projector back and forth until you find the right distance from the screen. To help here, we have a calculator you can use for this.
Perfect picture
Most of the time, the projector's factory settings will be fine, but we recommend turning on the Standard or Cinema mode and then adjusting the brightness and contrast to your liking. Don't forget to stock up on a couple of good and proven films.
To adjust contrast, stop playback on a frame with cumulus clouds; Set the contrast to maximum and reduce it until you can see details instead of all white spots. To adjust the brightness, there must be something dark on the screen - for example, a coat or shirt. Lower the brightness until the folds and fasteners begin to disappear into shadow.
The color palette usually does not require adjustment; otherwise, choose a scene with bright colors and raise the level if you lack energy, or lower it if the colors seem overheated. A scene depicting human faces will allow you to appreciate the realism of flesh tones.
Please note that the projector's fan may be quieter in Eco mode, but will result in a less energetic image. Most projectors have this mode; find it in settings and disable it.
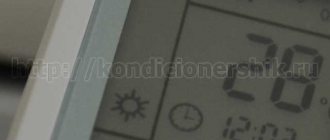
Adjusting the Projector Brightness
The brightness of the projector is adjusted based on the display of black color. Manipulations are performed using the control panel. Before making any adjustments, the projector must be installed in the position relative to the screen in which it will be used.
A special image can be displayed on the screen, consisting of a number of stripes of varying “blackness”, from deep black to light gray. Also, any frame in which there is a black area can be selected as a setting image. The setup occurs in the following sequence:
- The brightness is increased to maximum, so that all stripes (or all objects from the frame) become almost white.
- The brightness value is gradually reduced until all stripes are distinguishable from each other.
- The brightness is reduced again and again until the blackest bar becomes really deep black.
- If the blackest stripe has merged with the next, slightly lighter stripe, then the brightness needs to be increased a little, since it was reduced too much.
Increasing brightness
If the brightness is set to maximum, but the desired quality cannot be achieved (the picture on the screen does not stand out enough against the background lighting), you can take the following actions:
- Reduce the size of the projected image. Making the screen smaller will allow the same light flux to be distributed over a smaller area, which will lead to greater brightness of the visible picture.
- Reduce the distance between the projector and screen.
These actions, of course, have limitations. For any of the possible distances (indicated in the technical documentation for the projector), there is also a minimum and maximum screen size, exceeding which makes the picture not very suitable for viewing.
When increasing the luminous flux, it is worth remembering the deterioration of color rendering. The adjustment should not degrade the overall image quality.
Decrease
Reducing the brightness may be necessary for dark rooms, when an overly bright screen creates discomfort for the eyes. In this case, it will be possible to cope with hardware without changing the frame size. The only condition is not to reduce the brightness so much that the different shades of dark colors merge into one solid black color.