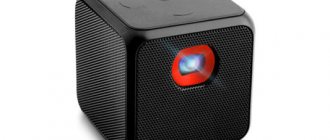
The bracket is the holder to which the projector is attached. Ceiling models are most often used. They are more convenient because, even when placed in the center of the room, they do not interfere with movement. Another advantage is the high quality of the projected image, since the broadcast is carried out directly on the screen. The image is not blurred along a horizontal line, as when placed on a wall. But brackets for ceiling-type projectors are different. And beginners who purchased video equipment for the first time cannot always select and install this accessory correctly. Let's take a closer look at the existing types of brackets and figure out how to mount the projector to the ceiling.
Types of Ceiling Mounts for Projectors
Holders are made mainly of metal; products made of plastic and wood are much less common. The bracket consists of several parts: a holding part (mount for a video projector), a rod and a support that is installed on the ceiling. The design can be different, which allows you to choose the right model for any projector. Let's look at the existing options.
Crabs (spiders)
This is one of the most popular types of ceiling brackets. The design consists of the following parts:
- mounting foot - the upper part attached to the ceiling using anchors or dowels;
- housing grip unit (the so-called “crab” or “spider”) - consists of several strips that are screwed to the projector cover;
- swivel joint - a part that connects the heel to the “crab”, which makes it possible to rotate and tilt the video projector.
If the upper part of different manufacturers is almost the same, then the design of the “spiders” is different and comes in several types:
- X-shaped with fixed slats;
- with movable adjustable legs;
- with sliding parallel clamps.
“Spiders” are universal fasteners that provide many possible positions for connection to the device. The mobility of the legs or fasteners ensures correct balancing of the equipment and center of gravity.
Three bolts
Some projectors only have three mounting slots on the lid. For such models, special types of “spiders” are produced - with three bolts. But if such a bracket is not found, then take an ordinary “crab” with movable legs and remove one bar. In most cases, it is possible to set the desired position.
Retractable (telescopic)
These brackets are equipped with a retractable rod. The ceiling stand is a round or square pipe that connects the mounting foot to the “crab”. There is an adjustment mechanism on top that allows you to align the bar vertically.
Telescopic bracket models are usually chosen for rooms with a height of 3 m or more.
Elevators
These are motorized elevators that are installed in a suspended ceiling or in a special niche. When the equipment is not in use, it is raised, reducing the likelihood of damage to the equipment.
Elevator brackets are designed somewhat differently. They represent a platform on which the projector is placed and secured. Instead of the usual barbell, a scissor mechanism is used here.
An elevator bracket is one of the most convenient options for high office spaces and conference rooms. Such models are quite bulky, although compact products for apartments are also produced (30-40 cm in the folded position).
Elevators are the most expensive and difficult to install devices. The most difficult thing is to set up the mechanism for extending and lifting the platform, so specialists are involved in the work.
Instructions for mounting the projector to the ceiling
Most bracket models are equipped with one ceiling plate. This option is quite convenient if the projector is mounted on a concrete floor slab.
In order to secure the bracket, it is enough to punch four holes in the ceiling slab with a hammer drill and fix the projector using dowels.
For ceilings finished with plasterboard or tension fabric, it is recommended to use structures with an additional fastening frame, as in the photo.
But you can also use the rack version. To install the ceiling holder on a suspended or plasterboard ceiling, you must perform the following operations:
- Mark a place on the rough ceiling plane, determine the point of passage of the vertical axis of the bracket;
- Using a 150x200 cm plywood board and two galvanized ceiling hangers, an embedded element is assembled, which will be hidden behind a suspended or plasterboard ceiling;
- Holes are drilled in the plywood according to the markings in the ceiling plate, after which the bracket stand can be securely fastened with screws or self-tapping screws.
If the design uses a frame instead of one telescopic stand, then the fastening is done through two half-clamps, cut into the plywood at a distance of 150 mm from each other. This makes the system self-leveling.
For the rack-mount version, adjustment along the vertical axis is carried out using a plumb bob and washers.
All that remains is to secure the bracket rails to the projector body and hang the device from the rotating unit.
Where to install the projector on the ceiling
In presentation rooms and lecture halls, it is advisable to install the projection installation at a short distance from the screen, in the first third of the ceiling space. The reduced distance makes it possible to reduce the thermal load on the device, and in addition, in case of problems, there is always the opportunity to approach and correct the direction of the image.
At home, the projector is placed on a ceiling bracket on the wall opposite the screen. On the one hand, this allows residents to avoid collisions with the mount, and on the other hand, it significantly reduces the amount of dust settling on sensitive optics.
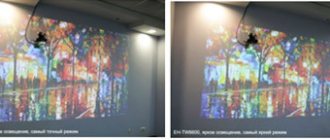
Almost all models of modern projection installations have a built-in function for correcting the horizontal direction angle to the screen. This allows you to mount the equipment on the bracket, not necessarily along the axial screen. The projector can be moved left and right by 1.5-2 m. Although, as users note, the color rendition of the image deteriorates somewhat.
Ceiling projector distance from ceiling
The main advantage of the universal mounting system is the smooth adjustment of the height of the suspension. The adjustment range is from 30 cm to 1.2 m. The distance cannot be reduced less than the recommended one, as the cooling conditions of the device worsen.
Most users prefer not to use too long gimbal stands. On the one hand, this impairs the view for spectators, on the other, it sharply reduces the rigidity of the ceiling mount.
If the projector is installed in an apartment of a panel multi-storey building, then it is best to choose a ceiling bracket model without a stand, otherwise the neighbors walking above will lead to “shaking” of the image.
Advice! If you cannot do without a rod, then it is better to choose box-shaped or frame ceiling holders.
Distance of ceiling hanger for projector from wall
It is possible to obtain high image quality only if the requirements of the manufacturer are met. The optimal distance from the lens to the screen depends on the characteristics of the optical system:
- For long-focus technology, the optimal distance is 3.7-4 m;
- Standard models are installed at a distance of 2.0-2.5 m;
- Short throw projectors are placed at a distance of 1.5-1.8 m.
The screen sizes change accordingly; the recommended diagonals are shown in the diagram below.
For your information! The further away from the screen, the easier it is to install the projector, but as the distance increases, the brightness of the image decreases sharply, and stronger shading of the room is required.
How to choose the right bracket
The holder must meet the following requirements:
- The permissible load must correspond to the weight of the projector (indicated in the technical specifications and accompanying documents). Compliance with this requirement will not only ensure the safety of the equipment, but will also protect residents from injury.
- The layout of holes and sockets for connection to the device must match. If the model is universal, it is chosen so that the platform is configured as accurately as possible. This is also a safety factor.
- The size of the boom must match the projection distance. Even sliding parts have a limited length. Therefore, you first need to carry out all the calculations and find out at what height the screen will be suspended. We'll look at how to do this below.
In addition, they take into account whether additional functions are needed: the ability to rotate or tilt the optical axis, and if so, in what increments. They allow you not only to clearly adjust the picture, but also to change the location of the screen. It is also necessary to take into account the design of the ceiling. For example, in attics the roof is located at an angle, so you will need a bracket with the ability to adjust the slope. In this case, the degree of inclination is selected depending on the degree of bevel of the ceiling.
Installing the projector on the ceiling
Attaching projection equipment to the ceiling has its own characteristics. This is harder to do than with a TV or speakers. The image on the screen should be transmitted as clearly as possible. Only with proper installation will watching a movie bring pleasure and delight you with a bright picture.
Determining the height and installation location
Where to hang the projector is determined by the shape of the room, the size of the screen and the characteristics of the equipment itself. Also take into account obstacles in the path of the rays - chandeliers, air conditioners and other devices. They check whether pets or people can damage the equipment (this is likely if there is a high podium in the house).
Before installation, calculate the projection distance between the screen and the lens. To do this, you need to find the projection ratio in the instructions for the device. The value is represented by a numeric range or a single digit. To obtain the desired value, multiply the screen width by the projection ratio, expressed in inches or centimeters. So, for a screen with a diagonal of 100 cm with a projection ratio of 2:1 to 3:1, the distance should be 200-300 cm.
Using the same formula, they will find out what size screen is needed if the equipment must stand at a certain point. Then the distance to the planned location is divided by the projection ratio and the required width is obtained. For example, 10 m/2:1=5 m.
When choosing a location for the projector, you need to consider:
- seating arrangement - they are not placed at the bottom if the equipment is heavy, especially when the home theater is used to show cartoons to children;
- places of sockets - the cable length should be enough to connect to the power supply;
- image quality - the picture will be different depending on the distance even if the calculations are correct, so you need to try several positions.
Next, find the amount of vertical displacement of the projector (in percent) at which the image is displayed correctly. This parameter is also indicated in the instructions. With a positive value, the image is located above, with a minus value, below the lens. Positive numbers are more important because the equipment is mounted upside down.
At the next stage, the optimal height is calculated using the formula: the screen height is multiplied by the vertical displacement indicator. For example, if the screen height is 124 cm, and the vertical offset is +/-96.3%, or 0.963, the result is: 124 * 0.963 = 119.4 cm. This means that the equipment must be installed accordingly up to 119 cm above or 119 cm below the middle demo panel.
Another important value to figure out before mounting your projector to the ceiling is the horizontal lens offset. The lenses should be aimed at the center of the screen. The position is calculated using the previous formula, but takes the horizontal offset (%) multiplied by the screen width.
Complex calculations are more often used when installing demonstration equipment in large rooms. At home, it is often enough to calculate the height of the bar (X), which is determined as follows:
X=A-B-C , where:
- A is the height of the walls;
- B is the distance from the floor to the bottom edge of the demonstration screen;
- C is the vertical length of the canvas.
For example: 2.5-1-1= 0.5 m.
Most brackets make it possible to move equipment vertically. This allows you to find the most suitable point. If the rod has a fixed length, then the bracket is mounted at the height recommended by the manufacturer.
Mounting the bracket and securing the projector
When all the calculations have been made, select a mount that matches the brand of the projector and connect the cables. Then proceed to installation:
- Screw the projector to the legs or lower platform of the bracket in accordance with the manufacturer's recommendations. Check the reliability of the fastening.
- Open the screen on which the broadcast will be carried out.
- Adjust the height of the suspension.
- Check the picture quality by first attaching the projector to the ceiling. The boundaries of the frame when zooming in the middle position should coincide with the edges of the screen, as well as the center of the image and the demonstration canvas.
- From the middle of the screen, draw a perpendicular line along the ceiling, marking the place under which the center of the lens should be placed.
- Holes are drilled in the concrete ceiling and plastic dowels are inserted. In wooden houses, beam ceilings are used for this.
- Center the device so that the corners do not outweigh.
- Screws are tightened securely.
- Adjust the position of the projector along the X, Y, Z axes.
Wires can be hidden in the ceiling. To do this, a groove is cut into the ceiling. After laying the cables, the surface is leveled with putty. An easier way to hide wiring is to use a plastic cable duct.
Final projector settings
After installation is complete, turn on the projector and adjust focus, lens shift and other parameters: brightness, contrast, color. If you cannot install the equipment perpendicular to the screen or if it is above or below the acceptable zone, you will not get a rectangular frame. Then use digital keystone correction - this function is provided by the projector software. But if the deviations are significant, the picture quality will deteriorate.
Sometimes it turns out that the distance to the screen is not enough or it is too large. This may be dictated by the configuration of the room. Then a long-focus or short-focus lens will correct the situation. The accessory is sold separately from the multimedia system.
Incorrect installation of the projector will affect the image quality. If it is located too close, the picture will be small; if it is too far, it will go beyond the boundaries of the screen canvas.
Resolution height
Modern equipment is available in the most suitable sizes to fit digital equipment of various models and manufacturers. Here we are talking about a video format that is transferred from the projector to the corresponding display, designed to redirect the image. Let's consider the main values of such a parameter as the height of the image on the canvas:
- 480 pixels or 12.65 centimeters;
- 600 pixels or 15.82 centimeters;
- 768 pixels or 20.24 centimeters;
- 1080 pixels or 28.46 centimeters.
There are several types of screen resolution.
These are the most common formats for transmitting images to a screen with an electric drive or with manual adjustment. All subsequent sizes provide high quality broadcasting, which is provided by modern HD and Full HD Blue Ray technologies. Other values are provided here, where the number of pixels indicating the height of the projection significantly exceeds the mark of one thousand pixels or over 50 centimeters.
Important! Wall-mounted displays for film projectors have become extremely popular and are gradually replacing traditional televisions, as they are able to reproduce and transmit higher quality illustrations.
Features of fastening to suspended and suspended ceilings
The method of mounting the holder depends on the finish of the floors. For suspended and frame structures, the process is slightly different.
Plasterboard ceiling
The total weight of the projector and bracket is taken into account when working with this type of finish. So, with a weight of up to 5 kg, equipment is hung on gypsum boards. For this purpose, you can use butterfly dowels, which open after screwing in the screw and hold the device.
For greater weight (up to 10 kg), the holder is attached to a metal frame, to which drywall is hemmed. The location of the profile is determined with a magnet.
If heavy equipment is used, a hole is drilled in the drywall and the holder is secured to the base ceiling. Then the slot can be hidden with decorative polyurethane overlays.
Armstrong cassette ceiling
This finish is the most convenient because it allows you to easily dismantle one slab. Install the bracket like this:
- Remove the cassette.
- Wiring is laid between the base and finished ceilings.
- A hole is drilled in the panel for the stand and cable.
- A holder with a rod is attached to the rough ceiling.
- A drilled cassette ceiling tile is placed on the stand and the wires are passed through the hole.
- Return the removed elements to their place. Then the “crab” is screwed on and the projector is attached.
Stretch ceiling
This is one of the most problematic options, so it is better to contact the company that installed the ceiling. A beginner will most likely ruin the film coating and the canvas will have to be changed.
There are two ways to install the projector on a suspended ceiling:
- On the embedded part . At the point where the bracket is attached to the floor slab, a wooden beam or plastic platform is mounted flush with the suspended ceiling. After stretching the canvas, the holder for the projector is screwed to the embedded part located in the interceiling space.
- On a concrete floor with outlet to the outside . If the length of the bracket rod allows, the rack is attached to the sub-ceiling. Then a hole is cut out in the tension fabric, after gluing a tread ring so that the hole does not come apart. This method is more complicated, since you need to accurately calculate the location of the cutout, otherwise folds will form after stretching. In addition, the integrity of the canvas is compromised.
Due to the high risks and large amount of work required, it is best to install the projector in the ceiling. If such a need arose after the repair, then the tension fabric is partially dismantled.
Read more: How to remove a suspended ceiling
It is also important to consider that most popular projection equipment models become very hot during operation. From high temperatures, the PVC film, which is used as a canvas for a stretch ceiling, can be deformed, therefore, the further away the projector is located, the better.
Installing Fasteners
The work of attaching brackets for a projector to the ceiling, regardless of its model, is carried out in the standard way:
- holes are made using a hammer drill;
- dowels are inserted into them;
- Screws are screwed in through the holes in the mounting panel.
There is nothing complicated about how to mount a projector on the ceiling, but this is provided that the ceiling in the house or apartment is concrete or wooden, and the owners are comfortable with the presence of visible wires. Contemplating them under the ceiling surface is not entirely aesthetically pleasing.
To prevent wires and sockets from spoiling the appearance of the ceiling and the style of the interior of the room, it is advisable to plan the installation of the projector on the eve of the renovation, when it is possible to place communications behind a suspended or suspended ceiling structure or lay a channel for cables in the concrete ceiling.
If the decision to purchase a projector was made after the renovation was completed, you need to think carefully about how to install it.
Mounting to concrete ceiling
If the decision to install the emitter was made after the renovation was completed, then for installation of the equipment it is recommended to purchase a cable duct that will help disguise the electrical wires and not spoil the appearance of the room. Otherwise, the features of mounting the bracket are no different from the procedure described above.
Mounting to plasterboard ceiling
A plasterboard ceiling allows you to disguise electrical wiring, including the wires that power the projector. However, before carrying out such manipulations, it is recommended to make sure that the electrics hidden by the suspended ceiling will be reliably protected from moisture.
You can install fasteners for a compact projector using butterfly dowels, which open when screws are screwed into them. This design will be able to hold equipment whose weight does not exceed 5 kg. If the equipment weighs more than 5 kg, then the installation of the ceiling mount for it must be done in a metal profile holding the drywall. To detect it, just use a magnet.
In addition, to install a bracket on such a ceiling, you can make a hole in the drywall and secure the structure to a concrete base. This installation option will require subsequent masking of the projector mount outlet. A polyurethane socket is suitable for this purpose.
Armstrong ceiling mount
The Armstrong ceiling is a cellular frame, in sections of which decorative slabs are placed. To install ceiling fasteners, it is enough to remove one or more ceiling elements and install them to the main ceiling according to the classical scheme. It is recommended to place the communications necessary for the operation of the projector in a special corrugated hose.
You will need to make a hole in one of the plates to bring the bracket rod out. After completing all the manipulations, you need to return the ceiling elements to their place and connect the projection installation. If you need to remove wires from under the ceiling, you can also use a cable duct to disguise them.
Attaching to a suspended ceiling
If you plan to install a stretch ceiling in a room, then it is recommended to combine the installation of a video projector on the ceiling with cosmetic repairs. In this case, before installing the tension fabric, you will need to secure the bracket. If the mounting rod is not long enough, then between the main ceiling and the mounting plate you need to install a mortgage that adds height to the bracket.
Often the decision to install a ceiling mount for a projector is made after tensioning the canvas. In this case, you need to figure out how to attach the projector to a suspended ceiling. To solve this problem, you will need to contact specialists who will partially or completely dismantle the top and, after installing the bracket, return it to its place. As a last resort, you can use thermal rings to make a hole in the canvas and install the mount on a concrete base. But due to the fact that for ease of installation the hole will have to be made significantly larger than the diameter of the bracket pipe, you will then have to think through various options for masking the hole in the ceiling.
Wall mount
To place the projection unit on a wall, you must purchase the appropriate type of mount. After purchasing and determining its location, you need to screw the bracket to the wall at the designated location. For fixation, you need to use dowels or anchor bolts (depending on the dimensions of the equipment). To complete the installation of the projector, you need to secure the equipment to the bracket.
How to make a ceiling mount for a projector with your own hands
Manufacturers recommend hanging the projector on standard or factory universal brackets. But if the device is broken or there is no replacement, you can make the accessory yourself using this master class.
To make the bracket you will need:
- square aluminum tube;
- 4 galvanized corners;
- mounting plate to fit the projector;
- 4 bolts for mounting to the ceiling;
- bolts 4x32 and 4x16, nuts and self-tapping screws.
The structure is assembled in this order:
- We make a bar: we cut the pipe in half and glue the parts with superglue.
- We screw the corners in pairs to get an H-shaped structure. We screw two nuts onto each bolt. For reliability, you can “seal” the fasteners with superglue.
- We cut the mounting plate to the size of the projector. Then we drill holes corresponding to the mounting points on the device body.
- We screw the rod.
- Drill 4 holes in the ceiling.
- Attach the bracket.
- We screw the projector.
Selecting ceiling fasteners
Before hanging the projector from the ceiling, a reliable mounting system is selected for it. First of all, they focus on the parameters of the device and the surface on which it is to be installed.
These include:
- Equipment weight
. The structure must be designed for a certain load. - Location of mounting sockets
on the equipment and bracket. Even in cases where the ceiling structure is universal, it is necessary to make sure that they match. - Rod length
. Adjustable products still have restrictions regarding the minimum and maximum length, for this reason you should determine in advance at what height to place the screen and measure the height of the room. Based on this data, they find out the required length of the rod in a particular case. The projector is placed at the same height as the top edge of the interactive whiteboard or screen. To determine the length of the rod, subtract the height of the screen and the distance to it from the floor covering from the height of the room. The tolerance size is 5-10 centimeters. - Design features
. Ceiling mounts are usually designed to be mounted to normal horizontal surfaces. If you plan to place the equipment in an attic or other room with sloping ceilings, you must have a special adapter. They are sold in two versions - for fixing on beams or rails.
When choosing fasteners for installing a projector on the ceiling, it is most practical to buy all the parts separately in order to select the rod of the required length and color, the mounting panel that is most suitable for a particular case, and other elements. Manufacturers often offer consumers so-called “construction kits” that allow them to assemble the fastening required in a particular case.