More and more adherents of a healthy diet prefer to prepare their own natural yogurt, which does not contain preservatives, thickeners, modified starch and other harmful additives. In addition, having natural ingredients on hand, you can give room for creativity and, by changing the composition, satisfy any refined taste.
But should you limit yourself to just this healthy drink? For inventive housewives, purchasing a yogurt maker makes it possible to create a lot of tasty and healthy products, being confident in their quality and without spending much effort on it.
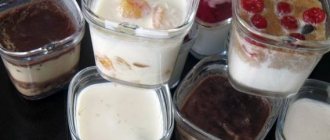
Supplements
To make a curd dessert, you can add to the finished mixture:
- fresh berries;
- pieces of fruit;
- berry, fruit or chocolate syrup;
- dried fruits, nuts;
- jam.
All ingredients are added to the finished curd after it has cooled. You can also prepare other delicious dishes from homemade cottage cheese: cottage cheese cream, cheesecakes, casserole, stuffed pancakes.
It’s easy to make cottage cheese using a yogurt maker at home. During cooking, you can slightly change the standard recipe to obtain products of different thickness and richness.
500 gr. excellent cottage cheese from 1 liter. milk - reality!
Today I want to tell you about one promised experience: how to get very tasty and tender cottage cheese at home using an ordinary yogurt maker. But these will be more thoughts and descriptions of my actions and process than a specific recipe. It still needs to be refined and optimized, at least in terms of time.
Inspired by the success in making yoghurt and the thirst for experimentation, I decided to go further and prepare cottage cheese comparable to what my grandmother made in the oven. Its taste and consistency are unforgettable.
Cottage cheese in a yogurt maker: the final stage of preparation
After fermenting the milk, you must separate the curd flakes from the whey. To do this, pour the curdled milk into a saucepan and heat in a water bath to about 60-70°C (do not boil!). You can place the containers themselves in hot water if this is convenient. While heating the fermented milk product, stir it at least two or three times.
Place the pan (or containers) of heated fermented milk in very cold water to cool quickly. If you did everything correctly, the whey should quickly separate from the curd flakes. Place a sieve or colander on a large saucepan, place two layers of clean gauze and strain the curdled milk. When the main liquid has drained, you will have a tender curd.
If you wish, you can add berries, slices of fruit, jam, puree or other flavorings to your homemade cottage cheese. However, this must be done immediately before consuming the product.
To obtain a grainy product, form a gauze bag and hang it over the dish to completely drain the whey. You can freeze the finished treat for future use, but nutritionists only allow it to be stored in the refrigerator compartment for two days.
Try making homemade cottage cheese for your loved ones! It’s not difficult to make cottage cheese in a yogurt maker at home. To do this, you only need milk itself and a special starter for fermented milk products. You can purchase it in a specialized store or order it online. Homemade cottage cheese turns out very tasty, tender and incredibly healthy!
- home
- Recipe categories
- Cottage cheese in a yogurt maker
How to make sour cream and cottage cheese in a yogurt maker
Preparing fermented milk dishes in this way is considered a healthy eating technique, because the end result preserves the largest amount of vitamins. Users note that over time, the condition of nails and hair improves significantly, and the very first “thank you” will be the normalization of the gastrointestinal tract.
Models with the specified functionality can be called small dairy plants.
True, there are some secrets here:
- Sour cream can only be made using temperature-controlled machines. For this product, the temperature should be set lower than for yogurt.
- To prepare cottage cheese, the machine must be able to curd. Plus, the kit includes special trays-bowls.
Yogurt maker with thermostat
How to make cottage cheese in a yogurt maker
It can be made in individual cups or bowls, but a larger mold makes it easier to strain out the whey. To get homemade cottage cheese, you can use:
- fresh cow or goat milk;
- pasteurized dairy products;
- dry starter for cottage cheese (available in pharmacies and stores);
Attention! Raw milk must be boiled to prevent the growth of dangerous pathogenic bacteria in it, and then cooled. The pasteurized product is not boiled.
In accordance with the instructions, the starter is completely dissolved in milk, heated to 40 degrees, and poured into the molds of the apparatus. Then you need to select the desired mode or set the time according to the instructions (about 15 hours). After turning off the device, remove the bowl and place the mass on a sieve to separate the liquid.
How tender or grainy the product is depends on the temperature, heating time and drainage. The longer the whey drains, the drier the curd will turn out. When it is ready, it is cooled in the refrigerator for about 3-4 hours and used for consumption.
If the device is equipped with a function for making curd products, the process is simplified. Using a blender, mix 1 liter of milk, 100 g of cottage cheese, 1 tbsp. a spoonful of freshly squeezed lemon juice. The mixture is transferred to a bowl with holes for draining, and the desired mode is set. After preparation, the whey is squeezed out using a drain. Using this machine, it is quite easy to get aromatic thick sour cream. To do this you will need:
- 1 liter of milk;
- 0.5 l cream (30%);
- dry lactic acid starter.
The dry powder is dissolved in a small amount of cream heated to 40 degrees. All ingredients are mixed and poured into a yogurt maker for 7-8 hours. Some people use kefir, fermented baked milk or ready-made sour cream as a starter. The thickness of the product depends on the fat content of the original components. The shelf life of such a product is no more than a week in the refrigerator.
READ MORE: Rating: TOP 15 best drugs with coenzyme Q10 in capsules according to reviews from our clients
To prepare fermented baked milk, warm baked milk is fermented, for which a dry preparation or sour cream is added to it. If sour cream is used, it is added in a ratio of 1:5. The fermentation time will be about 9 hours.
What can you cook in a yogurt maker besides yogurt?
The functionality of this device is much wider than the name suggests. It is suitable for preparing traditional fermented milk products: kefir, fermented baked milk, sour cream, cottage cheese, even homemade cheese.
The main ingredients are milk or cream and certain types of starter culture. At the same time, you don’t need to stand in the kitchen for hours, all that is required is to mix the ingredients and pour into jars, and the “smart machine” will do the rest.
Important! Before filling containers, they must be sterilized using boiling water or in the microwave.
How to make cottage cheese in a yogurt maker
It can be made in individual cups or bowls, but a larger mold makes it easier to strain out the whey. To get homemade cottage cheese, you can use:
- fresh cow or goat milk;
- pasteurized dairy products;
- dry starter for cottage cheese (available in pharmacies and stores);
Attention! Raw milk must be boiled to prevent the growth of dangerous pathogenic bacteria in it, and then cooled. The pasteurized product is not boiled.
In accordance with the instructions, the starter is completely dissolved in milk, heated to 40 degrees, and poured into the molds of the apparatus. Then you need to select the desired mode or set the time according to the instructions (about 15 hours). After turning off the device, remove the bowl and place the mass on a sieve to separate the liquid.
How tender or grainy the product is depends on the temperature, heating time and drainage. The longer the whey drains, the drier the curd will turn out. When it is ready, it is cooled in the refrigerator for about 3-4 hours and used for consumption.
If the device is equipped with a function for making curd products, the process is simplified. Using a blender, mix 1 liter of milk, 100 g of cottage cheese, 1 tbsp. a spoonful of freshly squeezed lemon juice. The mixture is transferred to a bowl with holes for draining, and the desired mode is set. After cooking, the whey is squeezed out using a drain. Using this machine, it’s not at all difficult to get aromatic thick sour cream. To do this you will need:
- 1 liter of milk;
- 0.5 l cream (30%);
- dry lactic acid starter.
The dry powder is dissolved in a small amount of cream heated to 40 degrees. All ingredients are mixed and poured into a yogurt maker for 7-8 hours. Some people use kefir, fermented baked milk or ready-made sour cream as a starter. The thickness of the product depends on the fat content of the original components. The shelf life of such a product is no more than a week in the refrigerator.
To prepare fermented baked milk, warm baked milk is fermented, for which a dry preparation or sour cream is added to it. If sour cream is used, it is added in a ratio of 1:5. The fermentation time will be about 9 hours.
Is it possible to make cheese in a yogurt maker?
The cheese itself is not made in this device, but natural homemade yogurt is prepared for it, from which you can make curd cheese by hand. Ready-made natural yogurt, made from milk and starter culture, is cooled in the refrigerator, then placed in a colander, which is previously covered with 3-4 layers of gauze.
You can add herbs, garlic, spices, and salt to your yogurt to taste. After tying the gauze into a knot, allow the liquid to drain and hang it for several hours. Then the knot is made tighter, pressed down with a weight, and sent to ripen in the cold for 2-3 days, ensuring further drainage of moisture. The result is a delicate and soft cheese product.
Sequencing:
Naively believing that with cottage cheese everything is exactly the same as with yogurt, I decided to buy a pack of children's cottage cheese. Stir it in milk and leave it to ferment in a yogurt maker for 8 hours.
Yeah, it's not like that. After 8 hours I was disappointed; of course, I didn’t receive any cottage cheese. And I received warm, slightly sweet milk.
It was late at night, and I, completely upset, decided to make yogurt, because there was no point in good things going to waste. I poured a little milk out of the jars so that the yogurt would fit. I took out a jar of yogurt I had prepared the day before from the refrigerator. Since I really wanted to sleep, I simply added a couple of tablespoons of yogurt to each jar and stirred a little, already counting on yogurt. I put it in the yogurt maker for another 8 hours, and in the morning something incredible awaited me.
In each jar, the contents were divided into 2 equal parts: at the bottom there was whey, and at the top there was a decently thick curd. I poured the curds through a small sieve, discarding the whey. And put it in a jar. I didn’t weigh it out, because I like cottage cheese just like this, slightly moist. Oh, these memories, how tightly they hold us. Apparently, the milk soured slightly during the first run (all basic cottage cheese recipes are based on this), and yogurt served as a catalyst.
My daughter categorically refuses to eat store-bought cottage cheese, yogurt and kefir. He makes a face and turns his face away))) And I decided to try to cook all this at home, because the benefits of sour milk are undeniable. Cottage cheese and yogurt for children help improve the functioning of the digestive tract, intestinal motor activity, eliminate cholesterol and saturate the baby’s body with calcium.
It is very useful to give to a baby for constipation and dysbacteriosis. To prevent this condition, it is worth making yogurt at home, or homemade kefir for children using sourdough. They have a probiotic effect, that is, in addition to the usual lactic acid bacteria, they contain probiotics - live microorganisms (mainly bifidobacteria and lactobacilli).
And recently, to implement my idea, I purchased a yogurt maker. I took an inexpensive one, for only 1100, for 4 cups, because the shelf life of ready-made yogurt is 7 days for adults, and 1-2 days for children under one year old. Therefore, I don’t need a big one, I will only cook for children.
I was satisfied with the purchase! The yogurt turns out very tasty. And the most important thing is that my daughter devours it on both cheeks.
Making homemade yogurt.
The first thing to consider is what kind of milk to use. I use baby UHT. The second point is how we will ferment our milk. I tried children's yoghurts as a starter (by the way, it is very difficult to find them without additives and with a minimally fresh date), and children's kefir, and biolact from Tema, and Vivo bifivit starter.
READ MORE: Micrometer, purpose of the meter and learning how to use
Homemade yogurt recipe:
I take milk out of the refrigerator in advance and use 500 ml of Tema’s baby milk so that it comes to room temperature. And if I use children’s yogurt or biolact as a starter, then I take them out too. You cannot pour cold product into the yoghurt maker, only at room temperature!
I sterilize the jars from the yogurt maker in advance and a tablespoon in a double boiler for 10 minutes. You can also sterilize them in the microwave by first pouring water into the jars, also for 5-10 minutes.
Pour 500 ml milk. into the bowl in which you will mix our ingredients, having first poured boiling water over it. And introduce the starter. If it’s yogurt or biolact, then pour half a pack, that’s about 100 ml. If this is a pharmacy starter, then take a bottle, pour a little milk into it, somewhere up to 2/3, close the lid, and shake thoroughly until completely dissolved. Add the dissolved starter into the milk and mix everything thoroughly. Now all that remains is to pour everything into jars.
Well, the final stage. We put our jars in the yogurt maker, cover it with a lid, and turn it on. We record the time from 8 to 12 hours. It depends on the starter. I turn it on to 8.
After the specified time has passed, we take our jars out of the yogurt maker, close them with lids, which we also previously doused with boiling water. And put it in the refrigerator for two hours, you can put the date of manufacture on the lids. We put it in the refrigerator to stop the growth of bacteria. Well, our homemade yogurt is ready.
So, as you can see with 500 ml. milk makes 4 jars of homemade yogurt. Now, about the shelf life of yogurt. For children under one year old, it can be given for two days. Children from one year old can be given up to three days. I give Yulia 2 days from 80-100 ml., I use the remaining 2 jars for making homemade cottage cheese.
Making healthy homemade cottage cheese.
Let me make a reservation right away that very tasty cottage cheese is obtained from only prepared yogurt.
1. The cooking process will be in a water bath. We take two pans of such a size that one fits into the other without touching the bottom. Pour water into a large saucepan and bring to a boil. Pour our yogurt into the smaller one (from those remaining 2 jars).
2. Make a water bath. Place the yogurt in a large saucepan of boiling water over medium heat.
3. In just a few minutes you will see the serum begin to come off. Using gentle movements from the walls of the pan, as if stirring, move it a little towards the middle so that heating occurs evenly, but do not make circular movements, do not interfere. We are waiting for our milk mixture to heat up to 60 degrees.
In time, this is about 10 minutes. You can first check the temperature with a thermometer, I don’t do this, I can already see when it’s possible to take it. You can, of course, reheat it further, but at a higher temperature we will kill our beneficial bacteria, and we have another goal - to preserve them. Once it has reached this temperature, remove both pans from the heat. We do not disassemble the water bath, but leave it in this state for 30-40 minutes.
4. Now remove the top pan. Pour water from the bottom and pour in cold water. Place the pan containing the liquid cottage cheese again, only now in a cold bath. We wait 20 minutes.
5. Pour all the contents from the top pan into a strainer and leave the whey to drain. You can also pour it into gauze, but there is no need for this; for convenience, I always use a strainer and the whey is very pure without any cottage cheese (pre-pour boiling water over the strainer).
READ MORE: How to fix a washing machine yourself: remove and replace the heating element
I described everything for a very long time, but again, your participation in preparing cottage cheese for the baby only takes almost 10 minutes while the water bath is heating up.
From two jars of homemade yogurt, 150 ml each. I get 90 gr. cottage cheese.
We eat it for an afternoon snack, I give it 40 grams, from 9 months. I’ll start giving 50. Our pediatrician said that it is not recommended to give a baby more than 50 grams until he is one year old. I add fruit puree to it.
Well, and actually a photo of a happy Yulia, devouring homemade yogurt.
Purchasing a yogurt maker with the function of making cottage cheese and sour cream will be an ideal option for a family with children. After all, who, if not a growing organism, needs to eat sour cream and cottage cheese?! The advantages of homemade products are difficult to overestimate: naturalness and safety are precisely why we value homemade dairy products, either our own production or purchased from a supplier proven by time and quality.
Advantages and disadvantages of this technique
There are many advantages to using the device - each of them is a serious reason for purchasing.
- The end result is much healthier than what's on store shelves. There is no doubt about the environmental friendliness of the dish - it is a full-fledged analogue of the village sample.
- It is not necessary to constantly control what is happening inside. The settings are set and you can return to other things. The only thing you need to do is after cooking, place the resulting result in the refrigerator (to stop the growth of bacteria). You can use all this after two hours.
- The owner of such a yogurt maker receives savings of no less than 20%, because the manufacturer includes in the price not only raw materials, but also other costs. The advanced functionality of the device allows you to get not only yoghurts, sour cream or cottage cheese - with the selected settings you can even prepare tiramisu. And others will allow you to enjoy ice cream. There are many recipes, and with them the chance to show yourself as a first-class cook increases.
However, it was not without its drawbacks.
- This device should be selected based on power - if this indicator is insufficient, fermented milk products will take much longer to prepare.
- The unit cannot be called compact - it will take up quite a lot of space on the table. And it does not deserve the title of universal for the reason that it is aimed at preparing a certain type of dish.
- It is better not to interrupt the preparation, because pre-made sourdough is a living substance that must be used every day.
Cottage cheese in a yogurt maker - recipe
Warm the milk. Mix 100 g of homemade cottage cheese in a separate container with a small amount of milk and stir well. At the end, add half a spoonful of lemon juice and mix everything well in a common bowl. Pour the liquid mass into clean yogurt cups, set the required mode in the yogurt maker’s functionality and set the desired time.
Depending on the model, preparing cottage cheese according to this recipe will take from 12 to 15 hours. After completing the process, hang the mass to drain (for example, tying it tightly with gauze). This is necessary to separate the milk whey, which, by the way, can be drunk or added to okroshka instead of kvass. Afterwards, put the cottage cheese in the refrigerator for another 4 hours.
You might be interested in:
- 25 best TV series of 2021 – New series
- Manicure Autumn-Winter 2020-2021: 100 photos of fashion trends and trends
- Wedding hairstyles for long hair: 100 photos of beautiful ideas
- Try them now! 30 fashionable manicure ideas for fall 2020 and winter 2021
How to ferment milk in a yogurt maker
To make homemade cottage cheese, you first need to ferment the milk.
The best, thick yogurt is obtained from a whole village product. Buy it from a farmer or at the market from a trusted supplier. As a last resort, you can use pasteurized milk in packages. Pour it into a food-grade metal pan and heat it to 35-40°C, but under no circumstances let it boil. After this, you need to put the starter into warm milk. You can use pharmacy calcium chloride (at the rate of 5 ml per glass) or a special bacterial starter, for example VIVO (1 bottle per 1-3 liters). When using a store-bought product, read the instructions for use carefully. Warmed fermented baked milk, sour cream or warm natural yogurt without fruit additives (0.5 cups per 1 liter) will also work as a homemade starter.
If you are not sure about the quality of village milk, first boil it, then cool it to 35-40°C. After this, it can be used to make cottage cheese.
Mix the milk well and pour it into the yogurt maker containers. Close all filled containers, place them in the appliance and close the lid. Turn on the yogurt maker for 4 hours, then let it stand with the containers inside already turned off for 4-5 hours. After this time, open the lid and tilt the device slightly - this will help you make sure that the contents of the cups have thickened.