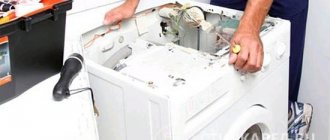
A washing machine breakdown is an unpleasant problem that requires an immediate solution. If the equipment is under warranty at the service center, there is no point in troubleshooting it yourself. When the warranty period has expired, you can try to set up the unit yourself.
To do this, you will need a basic set of tools and a manual that tells you how to disassemble the washing machine. We suggest that you familiarize yourself with the detailed instructions. With such an arsenal, even an ordinary home mechanic can restore the device.
Potential problems and breakdowns
In order not to make unnecessary efforts, it is advisable to observe the equipment and understand what exactly is the deterioration in performance. If the overall quality of the wash has dropped, an uncharacteristic noise appears during the spin cycle, and the laundry remains wet after the spin procedure, the problem most likely should be looked for in the pump.
The same unpleasant phenomena are caused by clogged communication hoses. It is better to approach all these components from the front of the unit or from below. If foam comes out of the machine during operation, you need to stop washing, set the “Drain without spin” program and wait until the device completes all the necessary actions and opens the door.
Then you should remove the laundry, manually clear the foam from the inside and start the wash again without spinning. If this is not done, foam will penetrate into the engine or onto the control board, and repairing these components will cost the owners a substantial amount.
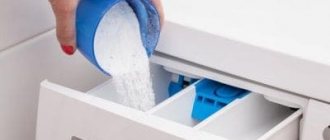
The reason for the appearance of abundant foam in the washing machine may not be a breakdown or malfunction of the unit itself, but the use of hand washing powder (it does not contain defoamers) or a significant excess of the standard dose of detergent
If the device does not gain temperature and does not warm up the water, it is most likely that the working heating element has failed. Its location is indicated in the accompanying technical documentation. It is usually located at the rear, but in some models, depending on the manufacturer and internal design features, it may be located in the front.
It may have built up scale as a result of using hard water and will need to be cleaned. Or, if the element burns out, you will need to replace it with a new heating element. The replacement process is described in detail in our recommended article.
If the machine takes a long time to wash, you should look for a fault in the electronics. It would be a good idea to check the functionality of the water temperature sensor and other controls. The same problem can occur due to an incorrectly placed drain hose.
A pressure switch or pump is responsible for uniform and rapid drainage of liquid from the washing container. Slowly pouring water clearly indicates that these elements have lost their functionality due to breakdown or operational wear.
To repair them or replace them with new ones, you will have to dismantle the side wall and penetrate into the upper part located behind the rear panel.
When failures occur in the drum or bearings, you will have to completely disassemble the device, identify the problem, carry out repairs, and then assemble the machine and start it up. If washing proceeds as usual, then operation can be continued.
This is just a short list of the main breakdowns identified in the machines. It is relevant for all household washing equipment, regardless of the brand and design features of each individual device.
Problems with electronics and software control are more complex problems and require professional intervention. To eliminate breakdowns of this level, regardless of whether the equipment is still under warranty or not, it is better to contact a specialized service center.
The certified technicians working there will carry out diagnostics, quickly identify the source of the malfunction and repair the damaged electronic unit or replace it with a new one.
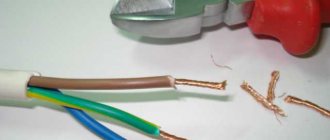
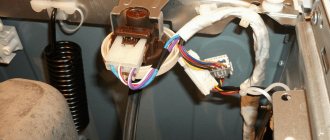
Disconnect the wires from the tubular electric heater (TEH)
The time has come to meet the electronics and start turning off the heating element, an item that is almost the most important part of the entire washing machine as a whole. There will be no electric heater - the water will be icy... well, or rather, the temperature set by the management organization.
In order not to confuse anything, take as clear a picture as possible of how the heating element was connected before dismantling. At the beginning of the article, we already recommended making a photo report of the entire process, but special attention should be paid to disconnecting the wires from the heating element.
Any mistake can cost a fatal breakdown of the tubular electric heater, and replacing it will cost a pretty penny... although, of course, if the LG washing machine is being disassembled precisely because of a faulty heating element, you don’t have to think too much, but still take precautions.
Nuances of the preparatory process
Before you begin disassembling the washing machine, you must carefully study the accompanying documents included with the equipment, study the electrical diagram and become familiar with the structural design of the unit.
The next step is to do the following:
- carefully disconnect the device from the electrical network and water supply system;
- disconnect the drain hose from the sewer outlet;
- select a set of tools required for the work ahead.
Only after such thorough preparation can you proceed directly to disassembling the washing unit.
Dismantling of the housing and internal parts must be carried out in a strictly established order, otherwise there is a risk of damaging individual serviceable elements. As a result, you will have to replace not only broken parts, but also those that were damaged during improper assembly.
It is advisable that the craftsman have a sufficient amount of time at his disposal, since the disassembly/assembly process does not tolerate haste and fuss. In addition, all repairs must be carried out carefully and delicately, without causing harm to other internal and external parts of the unit.
List of required tools
To correctly disassemble the washing machine, a home craftsman will need the following tools:
- wrenches (size 8, 9, 19);
- service hook;
- screwdrivers (classic flat and Phillips);
- pliers and wire cutters used for self-clamping clamps;
- ordinary wire cutters;
- pliers with an insulated rubberized handle;
- bent long pliers.
Almost all of these items will definitely be found in your home arsenal, and the missing items will simply need to be purchased at a hardware store or borrowed from friends or neighbors.
If the machine runs for a long time, some screws may “stick” to the cells. Unscrewing them will be problematic, so it makes sense to use WD-40. A few drops will soften the joints and facilitate correct unscrewing of the connecting parts.
In addition to all the items listed above, it is worth stocking up on a medium-sized basin, where it is convenient to drain the remaining water in the hoses, and several microfiber cloths. They can be used to wet your hands, wipe the internal parts and collect the remaining working fluid that has spilled from the tubes from the floor.
Instructions for disassembling washing machines
Structurally, washing machines, even those produced by different manufacturers, are very similar to each other. They have the same basic “filling” and work on the same principle. The main difference that matters during disassembly is the loading method - frontal or vertical.
All other criteria relate to external decorative fragments, small internal parts, fasteners and are not of significant importance.
Detailed description of disassembling the front washing machine
Front-type machines differ from their analogues in that they load laundry through a round door located on the front part. On the one hand, this is convenient and practical, on the other hand, it requires special attention and caution when removing the glass loading hatch during disassembly and repair.
When disassembling the machine and making repairs, you need to act carefully and carefully. Most of the body fragments are made of plastic and are vulnerable to mechanical stress. If impacted or overloaded, they may crack and the appearance of the unit will lose its aesthetics.
Equipment does not always need to be completely disassembled, as they say, down to the screw. Knowing how the device works and understanding the nature of the problems that appear, you can at least roughly determine the area where the problem is located.
This will help to start disassembly exactly where it is easiest to get to the failed element without touching normally functioning parts.
When the power button does not work, you need to check the electrical connection. If the connection is OK, then activation is blocked by an internal fault. It is unlikely that you will be able to diagnose it yourself. It is better to invite a specialist and instruct him to find the problem
We invite you to familiarize yourself with the step-by-step instructions that will help you cope with the volume of work yourself.
To disassemble a front-type machine, you must proceed in the following order:
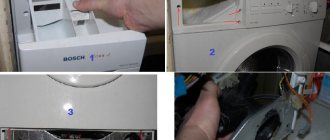
- Remove the top panel . Using a Phillips-head screwdriver, carefully unscrew all fasteners holding the top panel of the device. Gently pull the cover towards you and remove it, being careful not to damage the fragile internal elements.
- Remove the detergent container . Empty the container responsible for distributing detergents. To do this, gently press the special zone located in the central compartment of the tray with your fingers. After all these manipulations, the container can be removed without any problems.
- Remove the control unit . To do this, you need to unscrew the screws in the upper area of the front panel, carefully unscrew the block 90 degrees and carefully remove it from the fasteners. Using the service hook, securely secure the panel to the side of the unit.
- Disconnect the connectors with wires by simply pulling them out of the corresponding grooves located in the control unit. This point is relevant if the design of the washing machine requires it.
- Remove the service panel by carefully prying it off with a flat-head screwdriver. To get to it, you have to unscrew the screws facing the sides at the bottom, on the front side of the device.
- Separate the rubber sealing collar from the center panel. To do this, use a screwdriver to release the clamp from the grooves holding it.
- Unscrew the screws holding the central panel to the body and remove the entire element.
- Disconnect the front hatch locking connector.
- Carefully remove the rear outer panel and set it aside. If necessary, unscrew the mounting screws and the tightening bolt of the drum assembly.
- Remove the fixing clamp with pliers and carefully remove the inlet hose that goes to the tank. Using the same principle, disconnect the hose going to the pressure switch.
- Remove the counterweight blocks located at the front or rear (depending on the model) to ensure a stable position of the unit on the floor during operation and spinning, after first unscrewing the long mounting bolts.
- Remove the heating element . In most models it is located on the back side in the lower compartment of the case. Some manufacturers also place it low, but in the front area of the tank. To disconnect correctly, you need to unscrew the fixing nut located in the center. Then press on the protruding pin and push it inside. Pry off the heating element with a flat screwdriver and carefully remove it.
- Remove the tank . To remove the tank, you will need to twist the lower shock absorbers, remove the springs, and only then will you be able to remove it.
- Disassemble the tank itself . If there is a need for this, then first twist the bolt securing the pulley, press the shaft inside the tank, remove the clamp and divide the tank shell into two halves.
After the machine is disassembled, you can begin repairing and replacing failed working elements.
Some washing machines are equipped with a one-piece disposable tank that does not require disassembly. Home craftsmen, if necessary, cut this part with a hand saw, and then assemble it together, fastening it with elongated bolts and waterproof, durable sealant
When all the necessary activities are completed, you will need to reassemble the unit, install it in its original location, correctly connect it to the central communications and test it for functionality. If everything is done correctly, the machine will function as usual and will not cause any more trouble to the owners.
Disassembling a top-loading washing machine
For vertical washing machines, the most common negative phenomena are spontaneous opening of the working drum, corrosion of the metal block, imbalance of the central moving unit during washing and bearing failure.
In vertical units, the upper door seal loses elasticity over time and becomes deformed. As a result, puddles appear under the machine, and rust forms on the body. To fix it, you need to remove the control panel, remove the seal and install a new one.
To troubleshoot such problems, the equipment will definitely have to be disassembled. This process is labor-intensive and requires a lot of attention and concentration.
But this does not mean that it is impossible to repair a vertical unit at home. You just need to strictly follow the instructions and be careful. Then everything will go smoothly and getting to the problem node will not be difficult.
We offer a step-by-step description of the process for independent craftsmen. Before you begin disassembling a washing machine with a vertical type of loading laundry, you need to disconnect it from the central communications.
Then place the machine in a convenient place so that it does not disturb anyone living in the room. Next, you need to prepare specialized tools and stock up on a basin and a rag to immediately wipe away any remaining water that has spilled onto the floor from the communication hoses.
Now you can start disassembling the equipment and take the following steps:
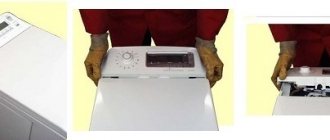
- unscrew the fixing screws located on the sides of the device;
- carefully move the base working unit towards you and disconnect the electrical wires;
- remove the control panel;
- remove the dispenser for powder and other detergents;
- remove the side and top panels;
- remove the fastening clamp;
- carefully remove the plastic casing, being very careful not to damage it in any way;
- start repairing equipment.
When disassembling a washing machine, you need to remember exactly the order of the wires and internal elements.
To guarantee, it is appropriate to photograph all the components so that you can then assemble the unit correctly and strictly in the same sequence as it was originally.
A washing machine that is not assembled correctly after repairs will not work properly. The use of such a unit may result in a short circuit, spontaneous combustion and other negative phenomena.
Upon completion of the repair of the washing machine, all that remains is to return the equipment to its original place, connect it to the main communication nodes and activate the washing mode. If the work goes as usual, and the device does not malfunction, it means that the home technician did an excellent job and did everything absolutely correctly.
We continue to disassemble the machine
After this, you can remove the inlet hose that goes to the tank. In order to do this, you need to remove the fixing clamp using pliers. Then the hose no longer holds anything and can be removed. Next, remove the hose going to the pressure switch. To do this, we again need to first remove the clamp.
Next, remove the internal clamp that secures the rubber cuff to the tank of the machine. And let's remove this very cuff. Next, remove the back wall of the car. It is secured with screws. We can easily twist them with a screwdriver and remove them.
Next we will remove the counterweights. They can be located both in front of the machine and in the back. In appearance, they look like concrete blocks. They are needed to ensure that the washing machine does not vibrate too much during spinning and other washing modes. They are usually fastened with long bolts. We twist the bolts. We remove the counterweights.
Then we will remove the heating element (heating element). In most machines it is located on the back side at the bottom of the tank. In some models it is located in the front, also at the bottom of the tank. In order to remove it, you need to tighten the fixing nut. It is located in the middle. Then press on the protruding pin. The one you tightened the nut with. It needs to be pushed inside. If this cannot be done by hand, you can gently tap it with a hammer. Next, we pry up the heating element with something flat and carefully remove it.
Then remove the drive belt. It goes from the machine engine to a pulley that is mounted on the tank. We will also remove the wires that may be on the tank and motor. We remove the fixing elements of the engine and remove it.
Now our tank is suspended on springs from below and fixed with shock absorbers from below. We twist the shock absorbers and slowly remove the springs. And remove the tank. If you need to disassemble the tank, it is not difficult to do. First, unscrew the bolt that secures the pulley. We remove the pulley. We press the shaft inside the tank. Then we divide the tank into two halves; to do this, you need to remove the clamp.
By the way, some models include non-removable – disposable tanks. Some craftsmen saw them using a hand saw. And then assembled using bolts and waterproof sealant.
Subtleties of disassembling cars of different brands
Washing machines made by different manufacturers are generally similar and perform the same set of basic functions. However, there are significant differences in the design of the units and the arrangement of internal working parts.
For many popular washing machine models, the heating element is located in front. To get to it, you just need to remove the front cover and carefully remove the part for subsequent repair, replacement or cleaning.
For correct disassembly, it is very important to know the specific unique features of the model to be repaired. Then the work will be easy and you will be able to penetrate the fault zone without any problems.
Steps to disassemble Samsung machines
Samsung household washing machines are quite easy to disassemble. The container for loading powder is located conveniently and is held on by only two screws. The working heating element is located at the bottom of the tank directly under the front cover and getting to it is not difficult.
If the door of a Samsung washing machine does not open, the problem should be looked for in the control module. It is quite difficult to cope with such a plan on your own. It is better to transfer this work to specialists from the service center
You can learn more about repairing Samsung washing machines in a step-by-step guide, which is given in our recommended article.
The nuances of repairing models from Ariston
In Ariston products, bearings and tank seals most often fail. The design of the model is thought out in such a way that this unit cannot be repaired. But for skilled and experienced home craftsmen there are no barriers.
To replace the seal, the solid tank is flared or sawed with a handsaw. There is no other way to restore parts, except, of course, by purchasing a new tank and installing it at the company’s service center.
A bad engine in Ariston equipment is a common occurrence. To repair, you need to unscrew the bolts, remove the back of the housing, and then remove the assembly. If after diagnostics it turns out that the element cannot be repaired, you will have to buy a new one and install it in place of the old one
The latest generation Ariston washing machine models are equipped with self-diagnosis devices, which significantly speeds up the process of troubleshooting. Codes of malfunctions and operational errors are displayed on the display, notifying about an emerging or impending problem. Decoding them will help you understand what should be repaired and how.
Procedure for disassembling Atlant washing machines
Atlant brand devices are practically designed and can be repaired. At the very beginning of disassembly, it is necessary to remove the counterweight, and then remove the external control panel. The drum in these models consists of two halves, secured with bolts, so any working parts can be replaced in no time.
Models from the Atlant company have a built-in self-diagnosis system. In the event of a malfunction, the electronics displays relevant information on the display. Owners can read the message, consult documentation and determine how to fix the problem
Specifics of Electrolux brand machines
Electrolux machines are very reliable and rarely break down. Our rating will introduce you to the top ten Electrolux washing machines in sales. The front panel can be easily removed and immediately provides access to all the main components and parts.
Working bearings and oil seals are placed on separate removable supports. To replace them, you do not need to completely disassemble the drum.
If the working drum in the Electrolux washing machine does not spin, most likely the brushes, drive belt, motor or control board are damaged. You can look for the problem yourself, but the technicians from the service center will do it faster and at the highest professional level
Features of LG washing equipment
LG household washing appliances have a complex design. To remove the front panel, you will first have to use a screwdriver to unscrew the nuts that securely fix the hatch cover. Then you have to carefully remove the screw that tightly tightens the clamp to hold the cuff.
To make it easier to deal with disassembling washing equipment, you can visually study the design features of the unit by looking at this diagram
Then you will need to remove the weighting material located on top and only then carefully remove the tank to be repaired or replaced.
The South Korean manufacturer equips its new models with a self-diagnosis system. Deciphering error codes will help you quickly and accurately determine what needs to be changed and where to repair. It will allow you to immediately decide whether it is worth doing the repairs yourself or whether it is better to go to a workshop.
Remove the drum from the tank body
The washing machine tank weighs up to 10 kilograms. But removing it with your own hands alone is a dubious undertaking, so we recommend calling a friend/neighbor for help. Together we remove the tank from the springs and pull it out. We unscrew the front counterweight (this part most often looks like a massive half ring) and remove it. We turn the tank with the open side down, providing ourselves with access to the pulley.
To prevent the pulley with the drum shaft from spinning, block it with a block. Unscrew the bolt in the middle of the pulley with a hex screwdriver. If the bolt does not budge, lubricate it with WD-40. After waiting a little, try again. During manipulation, be careful not to tear off the hexagon.
The bolt is unscrewed counterclockwise. The process is difficult, since the fastening element is filled with a special compound, which gives the connection special strength so that it does not fall apart from vibration. Some craftsmen recommend heating the bolt with a gas torch to make work easier. We still recommend using WD-40 lubricant, since using a torch can cause damage to other parts of the machine. Grab the pulley with both hands. Pull the piece up, rocking it from side to side. After removing the spare part, disassemble the tank body into two halves.
Now take an 8mm socket wrench and unscrew all the screws that hold the tank together. After this, the latter splits into two halves. But we still have the back part, connected to the drum using bearings mounted on the shaft.
They will have to be removed with the tank itself. We select any old bolt suitable for the shaft thread (where we unscrewed the screw holding the pulley) and screw it in. Then we substitute a small wooden block and lightly hit it with a hammer until the back wall of the tank comes off the bearing. So, we removed the wall, and we were left with part of the drum with the cross and shaft installed on it. The shaft is fitted with an oil seal and a bearing. Let's get to the hardest step.
- We drive the puller's grips under the bearing.
- By slowly tightening the thread of the puller, we create a certain tension.
- Lubricate the bearing thoroughly with WD-40.
- We wait about half an hour.
- After this, we continue to unscrew the thread and, as a result, remove the bearing, and then the oil seal.
Now you know all the intricacies of disassembling a Siemens washing machine with your own hands. By removing parts one by one, you can easily get to the components and elements that need repair. When reassembling, carefully follow the instructions without skipping any steps.
Share your opinion - leave a comment
Conclusions and useful video on the topic
A detailed description of how to independently disassemble a Samsung washing machine with a front-loading type of laundry. Interesting design features of the model and curious nuances that arise during disassembly:
How to properly disassemble an LG washing machine at home. Detailed execution of all processes step by step:
Disassembling a washing machine is a meticulous process that requires attention. If the breakdown concerns only a separate part of the system, there is no need to completely disassemble the unit. If malfunctions are observed in the main components, efforts will have to be made to fix the problem.
Our step-by-step instructions will help with this, clearly describing the process. Having such a cheat sheet at hand, even a person with minimal experience can handle repairing a washing machine. If you still have questions, ask them in the comments and we will try to help you.
Tell us about how you disassembled the washing machine for repairs with your own hands. Share what difficulties you encountered and how you solved the problems. Please leave comments in the block form below, ask questions and post photos on the topic of the article.
How to assemble a washing machine?
The machine is assembled in the reverse order. Photos will also help you if you took them during the disassembly process. On them we recommend capturing the location of certain parts, as well as the methods of their fastening and the wires suitable for them. Looking at these pictures, you can easily assemble the washing machine.
Also, for clarity, we suggest you watch the video. In this video, the bearings will be replaced, during which the entire machine will be disassembled. The recording is in English, but even without translation you can disassemble the machine by simply repeating the steps of the master.
How to disassemble a washing machine - video
Read our site and good luck with the disassembly!
Interesting:
- Washing machine with vertical or front…
- Review of built-in dishwashers Hans 60 cm
- Dimensions of a front loading washing machine
- How does a Hansa washing machine work?
- Who is the manufacturer of Hansa washing machines?
- Disassembling the washing machine drum
readers
- 01/24/2015 at 11:46
Dmitriy:
There’s nothing easier to figure out, and even with such tips! Russians are invincible!!!
Answer
- 02/24/2017 at 10:44
Rinat:
Respect to the author for a good presentation of the material
Answer
- 04/08/2017 at 23:38
Yuri:
Author, tell me how to unscrew the cross from the drum of a Samsung washing machine? One of the mounting lugs burst and the drum moved forward, cutting the outer tank. Now the crosspiece needs to be replaced. If I lose the page, write me a personal message: georg-smt(dog)mail.ru
Answer
- 10.26.2017 at 18:24
Dimon:
Not in Russian. But everything is clear from the video. Thank you.
Answer
- 01/18/2018 at 02:57
Arthur:
I forgot to lubricate the oil seal, broke off the latches on the tank in vain, and you can knock out the bearings with a rubber hammer for a day. Well done.
Answer