- How to diagnose that your washing machine bearings are worn out
- What problems can arise if bearings are not changed in time?
- Steps to take when replacing a front-loading washing machine bearing yourself
- Replacing a bearing when repairing a top-loading washing machine
- The nuances of performing work on machines from different manufacturers
- How much does it cost to replace bearings in a washing machine - price review
- Video: Replacing bearings in a washing machine with a cast tub
How to diagnose that your washing machine bearings are worn out
The most typical signs that a washing machine bearing has failed, or will happen in the near future, are:
- when the washing mode is turned on, the machine operates, emitting a characteristic hum, but the drum does not spin;
- the washing mode started, but during operation there was an unusual noise made when the drum rotated, and vibration uncharacteristic of normal operation;
- The laundry spin mode does not work, it remains damp (does not spin);
- the drive belt quickly fails (wears out);
- When loading laundry, you feel the drum swaying on the rotation axis.
Signs of bearing problems
Signs that bearings are no longer performing their function include the following:
- the machine makes a lot of noise, noise or knocks when working;
- excessive vibration of the device during spinning;
- shaking of the drum when loading laundry;
- After starting the program the drum does not start spinning.
Most often, this situation does not arise if the washing machine is less than 5-6 years old. However, failure can be caused by overloading the drum or damage to the oil seal and sealing gaskets.
What problems can arise if bearings are not changed in time?
Bearing failure is always an unpleasant event, because... replacing it is a rather complicated undertaking, but nevertheless necessary. This is due to the fact that failure to perform this operation can lead to negative consequences of varying severity:
- the bearing seat will break, which will require replacing the entire drum;
- the electric motor will burn out, which will require major repairs or replacement;
- if there is a belt drive, the belt installed between the engine and the drum shaft may break;
- other components that ensure the transmission of the rotational motion of the electric motor shaft to the drum of the washing machine, available in the design of the model (crosspiece, pulley, etc.), may be damaged;
- The integrity of the tank may be damaged, especially for models where this structural element is made of plastic, which, in turn, will lead to water leakage and, as a result, flooding of neighbors and damage to the electronic control system.
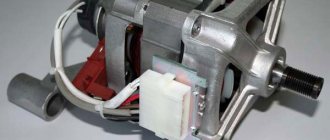
How to check bearings
Replacing bearings in a washing machine motor begins with checking them. If wear and tear is not noticed in time (noise in the operation of the automatic transmission system), then in the most severe case the result will be as follows: during rotation, the moving and immovable parts of the engine will begin to come into contact, which will lead to breakdown of the entire engine.
The check goes like this:
- Place the electric motor on a flat and hard surface.
- Hold the engine with one hand and rotate the shaft with the other.
- If everything is normal, then the rotor will spin smoothly, without snagging.
- If the bearings have served their purpose, you will hear scratching sounds or notice that there is an imbalance when the rotor rotates.
Backlash: how to check
Axial or radial play is an absolutely normal phenomenon, typical even for new parts. It is only important that the backlash is not too large.
Check radial play:
- Place the motor on a flat, hard surface.
- Grasp the shaft with your hand and swing it.
- Only slight deviation is acceptable.
- The displacement indicator is directly proportional to the size of the motor. In a household washing machine engine, these offsets can be subtle.
Check axial play:
- Grab the shaft and pull the rotor toward you or push it away from you.
- A deviation in the SM engine of more than 0.3 cm already indicates a problem.
If, while disassembling the motor, you find traces of friction between the rotor and stator, then this already indicates that the engine requires repair, or rather, bearing replacement. If the rotor is worn out, then this element must also be replaced.
Steps to take when replacing a front-loading washing machine bearing yourself
As already written above, replacing a bearing is a rather complex task, for which it is necessary to disassemble the washing machine. To do this you will need the following tools:
- hammer;
- rubber (plastic) mallet;
- pliers;
- Screwdriver Set;
- set of wrenches;
- gas key.
In addition, you must have silicone sealant, WD-40 aerosol, as well as appropriately sized bearings and seals, as well as lithol or another type of similar lubricant.
For your information!
If the user is performing such work for the first time, then in order to facilitate the assembly process and avoid mistakes, you can use a smartphone and film all types of connections of various components and electrical connections before starting the disassembly process.
The work of replacing the bearing on different models of washing machines may vary slightly, but, nevertheless, the main steps are performed in the following sequence:
| Illustration | Description of action |
| The back cover is unscrewed. | |
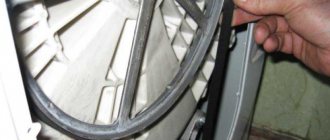
| The drum shaft drive belt is removed. | |
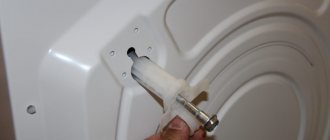
| The rotation of the drum is jammed; for this, use a screwdriver or other durable tool. | |
| The nut securing the pulley is unscrewed and it is removed. | |
| The wires from the heating elements and other elements of the electrical circuit are disconnected. | |
| The elements securing the drum to the machine body and the electric motor are unscrewed. | |
| The top cover of the washing machine is unscrewed and removed. | |
| The structural elements located in the upper part of the housing are disconnected, preventing the drum from being removed. | |
| The drum is removed from the machine body. | |
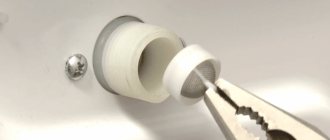
| Using a screwdriver, remove the oil seal. | |
| Using a hammer and punch, first knock out the inner bearing. | |
| Then the outer bearing is removed in the same way. | |
| The seat is cleared of dirt, and the new bearing is pressed in using a mallet or a wooden block and a hammer. |
In order to knock out the bearing, you can use a core and a hammer, as in the case discussed above, or special pullers, if available.
Important!
When knocking out a bearing, it is necessary to strike along its entire circumference, otherwise the bearing may become crooked and jam, which will lead to unnecessary problems associated with its removal.
To make it easier to install the new bearing into the seat, it can be lubricated with grease or another type of thick lubricant. When installing a bearing located inside the drum body, you can use a hammer handle or a specially made piece of wood that matches the diameter of the seat. WD-40 aerosol will be required if any fastening elements will not be unscrewed, then they should be treated with this preparation. The washing machine is assembled in the reverse order to how it was disassembled. After completion, the functionality of the repaired household appliance is checked.
How to lubricate a bearing in a washing machine
If an automatic machine begins to hum, this does not always mean that the bearings have fully served their purpose. Sometimes the problem can be solved by using their lubricant. However, in order to apply it, you will also need to completely disassemble the device and remove the assembly. Therefore, experts recommend changing them immediately.
In addition, you may need to apply the protective mixture yourself if you cannot find an original spare part. All bearings are lubricated by the manufacturer. If the part was purchased from an authorized dealer, it can be installed immediately. However, if a product of questionable quality is used, it must be pre-treated. The protective agent must be applied to the side that is in contact with the bushing.
The main requirement is to use the same composition for the bearings and the oil seal. You can't mix different ones. If you decide to leave an old spare part that hums but does not break, then it is lubricated after treatment with WD-40 or another cleaning aerosol.
Replacing a bearing when repairing a top-loading washing machine
A distinctive feature of top-loading washing machines is that the drum is attached to the body on two axle shafts, and not on one, as in the models discussed earlier. In this case, the bearings are changed on both axle shafts at the same time, regardless of which one has failed. Work on units of this type is carried out as follows:
- The outer and rear walls of the machine are removed.
- Electrical wires and hoses that could interfere with work are disconnected.
- The linings located on the sides of the drum, under which the calipers are located, with the bearings installed in them, are removed.
- The bearing on the side where there is no pulley is changed first, then on the opposite side.
- The seats are cleaned and lubricated before installing a new bearing.
- The units are assembled in the reverse order of disassembly.
Important!
On the side where there is no pulley, the thread securing the caliper is normal, right-handed, and on the side where the pulley is installed, it is left-handed.
The nuances of performing work on machines from different manufacturers
To repair some models from individual manufacturers, you need to know about the nuances determined by the design of these units. Washing machines of such brands as Indesit and LG, Samsung and Atlant have such features.
"Indesit" (Italy)
When repairing cars of this brand, it is initially necessary to clarify the design of the tank, because it may be different. New models are produced with a non-separable tank, and older ones with a collapsible one.
This determines the volume and sequence of operations performed. In addition, on some models the pulley mounting screws may have left-hand threads (W 84 TX), which must be taken into account.
If the brass bushing installed on the axis of the drum cross is damaged, it must also be replaced when performing such work. Also, models of this brand provide for double fastening of the drum axis, which is a certain nuance that should be remembered. The presence of a self-positioning sensor, which must be turned off when dismantling the drum, is another feature that you should know when doing the work yourself.
"LG" (South Korea)
For washing machines from this manufacturer, the tank is removed from the front of the device body. Modern models of this brand have improved technical characteristics that allow you to wash a significant amount of laundry in one load. In this connection, such devices are equipped with a tank that is significant in weight, which somewhat complicates the performance of the described work. In addition, when disassembling the drum, you should pay attention to the mounting unit for the electric motor, which is slightly different from the type of mounting for others (South Korea)
The design of washing machines of this brand also involves dismantling the tank through the outer wall. When working with Samsung washing machines, you should be especially careful when knocking out the bearing, because If the bushing is damaged, the entire drum will have to be replaced. In addition, a distinctive feature of this brand is the use of two bearings of different sizes on one shaft. In this case, the larger one is knocked out from the outside towards the tank, and the smaller one from the inside.
"Atlant" (Belarus)
For machines of this brand, the drum is removed from the rear side, which is provided for by their design. The tank on Atlant brand machines is of a collapsible type, so there is no need to saw it when replacing bearings.
When assembling the tank, it is necessary to use a sealant, this will provide more reliable protection against leakage.
Rules for disassembling an electric motor
The washing machine can have a commutator or asynchronous motor. They are disassembled in different ways, but still, there are general rules that should be followed when disassembling:
- Before you begin to disassemble the motor, unplug the washing machine and remove the motor, disconnecting all wires.
- If the motor control circuit contains capacitors, it is worth discharging their terminals.
- Disassembly eliminates shocks and distortions and proceeds in strict sequence - stage by stage.
- Disassembly begins after the mechanism that rotates the engine is disconnected - in our case, it is a belt that rotates a pulley (or a drum - in a direct-drive SMA).
- During operation, be careful not to damage the shaft, winding, commutator or brushes.
How much does it cost to replace bearings in a washing machine - price review
The cost of repairs associated with replacing bearings depends on a number of factors:
- region and location of the service center or repair shop;
- manufacturer's brand;
- features of a specific model, if any;
- availability of a warranty period after repairs are completed;
- urgency of work.
On average, the work of replacing bearings, performed by professional craftsmen, takes from one to three hours, which depends on the model of the washing machine and the design of the tank (collapsible/non-dismountable). The cost of replacing a bearing in a washing machine in different regions of our country is:
- in Moscow – from 1,000 rubles;
- in St. Petersburg – from 1,100 rubles;
- in Krasnodar – from 1,800 rubles;
- in Vorkuta – from 1,800 rubles;
- in Novosibirsk – from 2,000 rubles.
Although the work associated with replacing a bearing is quite complex. However, many users try to do it themselves; fortunately, you can find many stories on the Internet that tell you how to do it correctly. One such video is shown below.
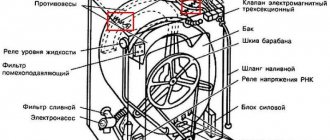
How many bearings are there in a washing machine and where are they located?
Depending on the brand, the washing machine can use:
- 2 bearings - internal and external;
- 1 mono bearing, also called double bearing.
This design ensures a reliable connection between the drum and pulley.
Depending on the manufacturer, this node is located in one of two places:
- in the cross of the rear part of the drum;
- on the drum itself.
If 2 parts are installed, they have different sizes. The larger one is fixed on the side of the drum and takes on the main load.