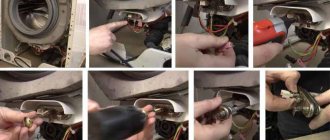
Before we begin the actual process of dismantling the top control panel, we need to gain access to the screws that secure it.
One of them is located under the tray where the powder is poured. Therefore, first of all, with a slight movement of the hand and pressing a special button (on LG machines of recent years there is always a button that allows you to easily remove the tray), the tray is removed from its usual place.
One or two more screws are located on the opposite side, but we already have access to them, since we removed the top cover in the first step, and therefore, without thinking for a second, we begin to dismantle the top control panel, unscrewing the screws. After unscrewing all the screws, try to slightly pull the panel towards you: if this is successful, then you can safely remove the panel, because nothing is holding it in place.
Depending on the model of the machine, the control panel can either be hung on a service hook specially prepared by the manufacturer for such cases, or simply carefully moved to the side without breaking the wires: do not forget that we are not breaking the washing machine, but trying to do something to “heal” her.
Removing the front wall
The time has come to remove the front wall, which has long been looking at us with its sad glass gaze and asking us not to remove it. Let's not listen to the pleas of modest components: necessity is necessity.
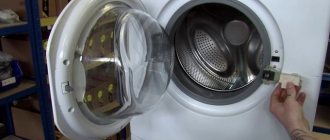
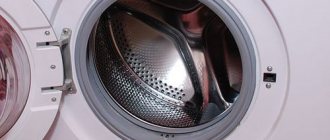
But in order to dismantle the front wall, you must first disconnect the cuff (the elastic band located immediately behind the door) so that it no longer blocks the panel. Removing the cuff is not a difficult process: just feel for the spring holding the cuff and press on it, and the cuff will immediately loosen, and you can put it in the tank so it doesn’t get lost.
Now, by the way, you can begin the process of removing the front wall. To begin with, the screws connecting the front panel to the top are unscrewed, and, accordingly, they are located at the top. The number of screws is usually 3-4 pieces, no more.
By unscrewing them, the front panel can be lifted: it is held on hooks, in other words, hanging. Most likely, you won't succeed the first time. The tank lock will interfere, preventing the door from opening at the most inopportune moment during operation. It needs to be disconnected. On many models of LG washing machines, this is done by simply removing the lock from the groove with a screwdriver even before removing the front panel.
Helpful information
Tips that will be useful when removing the front panel of an LG washing machine:
You cannot begin to disassemble household appliances if they are plugged into the network. This may result in electric shock.- If a screwdriver is used to pry up individual elements, you must act carefully so as not to scratch elements located in a visible place.
- When disassembling the machine, you need to pay attention to the bolts that are twisted from different elements. In order not to confuse the screws and the parts that they fix, they need to be placed in matchboxes, making appropriate notes on them.
- If traces of rust, dust or other contaminants are found on the removed parts, they must be removed before reassembling. Very often, corrosion can be found on the top cover of a top-loading machine.
Removing the back wall
Perhaps removing the back wall is the simplest thing we will have to do in the process of disassembling the LG washing machine. Business: unscrew two screws on the very back wall and remove it with a slight movement of your hand.
It’s even somehow uninteresting and undignified, but without this banal and, if I may say so, boring action, the entire next process will not make sense. We deliberately separated it from everything we had been doing so far, since the previous processes were rather mechanical, and ingenuity and accuracy came to our aid. Now the actions will become more difficult, and the risk of breaking the machine will increase.
Preparatory work
Please note that LG washing machines are equipped with an inverter motor. Therefore, the procedure for removing it will be different from other cars - with the help of a collector.
To remove the washing machine effectively, take the following tools:
- Screwdrivers. Don't forget to use three types: flat, cross, hexagonal.
- Pliers.
- Hammer.
- Allen keys.
- Flat-eyed keys from 8mm to 17mm.
Make sure all tools are at hand. Provide additional space to carry and place parts during disassembly.
Before you remove your LG automatic washing machine, you must prepare it for repair.
First, unplug the SM from the network. Prepare a container to collect water earlier. Remove the filling hose from the body, indicate the remaining water from it. Do the same with the other end of the snake.
Unscrew the drain filter, which is located at the bottom of the front panel, behind the valve. Place the container under and skim off the water. If necessary, empty rinsing.
Now remove the device from the wall so that you can get free on the back of the device.
It's time to learn how to disassemble LGIE (LG).
We remove what interferes and distracts
Having removed all the covers and panels, we saw all the ins and outs of the washing machine in the literal and figurative sense of the word. All unnecessary parts now need to be removed, and therefore the pressure switch hoses, the hose coming from the place where the tray (powder receptacle) was, the inlet hose and the drain pipe are removed from the car overnight.
The word “hose” is too much, isn’t it? Briefly speaking, we can assume that all the large hoses that catch your eye when looking at the washing machine in its current form are removed. To remove the hoses, you will need to unscrew the clamps securing them, and then directly remove the hoses. It is advisable not to remove the clamps from the hoses, especially if the latter are of different diameters.
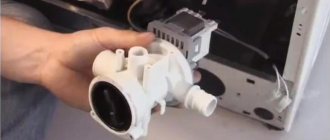
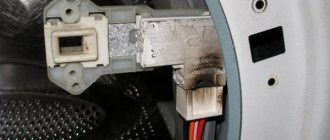
Disconnect the wires from the tubular electric heater (TEH)
The time has come to meet the electronics and start turning off the heating element, an item that is almost the most important part of the entire washing machine as a whole. There will be no electric heater - the water will be icy... well, or rather, the temperature set by the management organization.
In order not to confuse anything, take as clear a picture as possible of how the heating element was connected before dismantling. At the beginning of the article, we already recommended making a photo report of the entire process, but special attention should be paid to disconnecting the wires from the heating element.
Any mistake can cost a fatal breakdown of the tubular electric heater, and replacing it will cost a pretty penny... although, of course, if the LG washing machine is being disassembled precisely because of a faulty heating element, you don’t have to think too much, but still take precautions.
Call the master
Service center professionals can replace the drum of an LG washing machine quickly, efficiently and, importantly, with a guarantee. It is not difficult to find out contacts through search engines on the Internet or use the recommendations of friends.
Master services start from 1000 rubles. The cost of work includes: diagnostics, dismantling of the washing machine, installation of a new drum. During the repair process, hidden defects and malfunctions may be discovered, the elimination of which increases the final amount to be paid. Also, the amount of repair cost may be affected by the urgency of the order. New parts are paid separately.
The technician never announces the final amount without diagnosing the problems with the washing machine. Insistent demands for immediate payment should raise red flags and give reason to doubt the integrity and true qualifications of the person who calls himself a master.
The engine undergoes a similar process.
The wires of the electric motor of the washing machine also need to be disconnected, and we strongly recommend taking a photo of them: the photo will only take 1-3 MB, but it will give you self-confidence and the opportunity not to make mistakes when subsequently assembling the machine.
Wires for some unifying reason can be fastened with a plastic tie, and therefore all such “sets of wires” should be carefully removed from the machine so that they do not interfere and are not subject to any influence in case the situation gets out of your control .
More: LG washing machine does not drain water, what to do
Why remove the cover?
A master or an ordinary person in certain situations will have to remove the top cover. First of all, this is necessary to get to the filling valve. He is interested in when overfilling or underfilling occurs. The valve of interest is located at the top, near the back wall.
Typically, technicians ring the fill valve coil. Next, they check the wiring, pipes and the mechanism itself. If it turns out that the part is faulty, then it will have to be replaced. It is often possible to do without completely disassembling the machine. Consequently, significantly less time will be spent on repairs.
If the powder is poorly washed off, you will need to check whether water flows normally into the powder receptacle of the LG washing machine. To do this, you will need to remove the top cover. There will be full access to the external pipe through the upper area of the housing. It will be possible to remove the elements and clean them. Sometimes there is a need for a complete replacement.
If you look just under the top area of the machine, you will be able to find a pressure switch. The element will need to be checked if the machine suddenly drains water untimely. Sometimes the OE error appears, in which case the liquid remains inside the unit. You can easily replace a broken water level sensor. To do this you need to get close to it from above. You will have to unscrew the mount, remove the power wires, and then the pressure switch will be in your hands.
By removing the cover from the LG direct drive 5 kg washing machine, you will be able to gain access to the counterweight. This element very rarely becomes unusable, but it still happens. In addition, the tank and drum can be removed through the top. Additionally, you will have to remove the front wall and unscrew the service hatch in the rear area. In this case, the disassembly process will begin with the cover.
You should only undertake repairs yourself if you have confidence in your abilities. It is recommended that you carefully study the instructions and carry out the actions with caution. Do not rush, as this may cause problems. The case must not be damaged or any element lost. If everything is done correctly, then you will be able to achieve positive results.
Removing the LG washing machine tank
The machine is already ready to remove the tank, and only one thing prevents us from starting this: the shock absorbers of the tank itself.
Before removing the tank, you need to unscrew the shock absorbers using a wrench and remove the tank directly from the springs. On most models of LG washing machines, removing the tank does not imply preliminary dismantling of the electric motor, and therefore these processes have to be combined. So, having removed the tank from the springs and having full access to it, we need to remove the engine. Before doing this, you need to remove the belt from the tank and also remove the shock absorbers. After this, you can remove the engine by unscrewing several nuts securing it. Without neglecting photography, having done everything that was required, reassemble the machine
You disassembled the washing machine for a reason, didn’t you? You had a specific goal, after which you need to do the opposite - assemble the washing machine, which you recently so carefully disassembled, following our advice. Remember how at the beginning of the article we strongly recommended taking photos or videos? If you heed this advice, assembling the machine will not be difficult for you: you will only need to reproduce all the steps in reverse order. Voila!
Let us note once again: everything you do with your favorite and unique household appliances, you do at your own peril and risk. Today we found out how to disassemble LG washing machines. Let's hope that our advice has been at least somewhat useful to you.
How to remove and replace the motor of an automatic washing machine
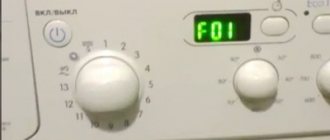
Since an asynchronous motor is practically not used, the user’s washing machine can have a commutator or inverter motor. The second type breaks down very rarely, but if a breakdown does occur, the owner of the equipment needs to remember the extended warranty and contact a service center.
How to remove a brushed motor
Thus, commutator-type engines usually have to be repaired. The process of disassembling an automatic washing machine, then removing the motor, repairing it or replacing it with a new one is very similar to equipment from various manufacturers, but there are also differences. It looks like this:
- Disconnect the device from the network and wait a few minutes until the equipment is completely de-energized.
- First, the owner of the device needs to disassemble the washing machine. To do this, you will need to remove the back cover (Ariston, Zanussi, Electrolux) or the front panel (Bosch, Samsung, LG), depending on the manufacturer. In the first case, you will need to unscrew several screws; in the second, you will need to remove the top cover and control panel.
- The commutator motor is most often located at the bottom of the washing machine, under the tank. First of all, you need to remove the belt and disconnect the ground wire and power.
- Typically the motor is installed on four seats. It is firmly screwed to two of them. It is necessary to unscrew the fasteners; for this, a 13 key is used, but other options are possible, depending on the brand of the washing machine.
- Very often the engine gets stuck in the seats, so you need to pry it out with a screwdriver.
- Once you feel that the motor is moving, you need to pull it towards you and remove it.
To install a new engine, perform these steps in reverse order. To avoid mixing up the wiring, it is necessary to photograph it before disconnecting or making notes.
When disassembling the Indesit washing machine, it is worth considering that the motor on it is easier to remove through the bottom hatch. The equipment must be placed on its side or turned upside down.
How to remove an inverter motor
The inverter motor installed on the washing machine is not intended for repair at home, but if the user nevertheless decides to remove it himself, he will have to perform the following steps:
- Unplug the washing machine.
- Unscrew the mounting bolts and remove the back cover or front panel.
- Take a photo or mark the wiring, then disconnect it after unscrewing the retaining screws.
- Remove the bolt holding the rotor. During the process, to avoid rotation, you should hold the rotor with your hand.
- Remove the rotor assembly, then the stator.
- Disconnect all wire connectors.