Owners of home appliances from a famous South Korean brand will be interested to know how to repair a Samsung washing machine with your own hands. Unfortunately, breakdowns and malfunctions occur with any household appliance, regardless of its price segment. You need to know how to eliminate them competently and in a timely manner.
In the article we have proposed, all typical types of breakdowns and ways to deal with them are analyzed in detail. The process of disassembling the unit and replacing damaged parts or assemblies is described in detail. We will introduce you to the decoding of error codes that the self-diagnosis system of Samsung machines warns about.
Frequent causes of breakdowns
Malfunctions of Samsung washing machines can number in the hundreds, but first of all, if the device malfunctions, the following “pathologies” should be excluded:
- Worn or broken drive belt.
- Burnout of the internal resistance of the heating element.
- Inlet valve faulty.
- Drain pump failure.
- Bearing jamming.
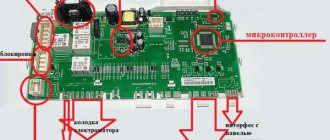
- Electronics malfunction.
Electronic components are quite resistant to power surges and excessive vibration, so technicians very rarely deal with this type of malfunction. Most often, drive belts, heating elements and water drainage devices fail in washing machines. These malfunctions will be discussed in detail below.
Error code overview
In conclusion, we present a short list of error codes most often issued by the unit.
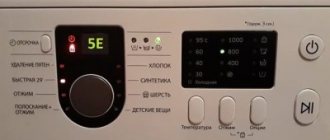
E1 – system error when filling water. This means that the required water level during filling is not reached within 20 minutes. Eliminated by turning off and then turning on the machine.
E2 – error during draining. Most often it occurs when the drain filter is clogged.
E3 – too much water. You don’t need to do anything; within 2 minutes the water is automatically drained.
E4 – too many things. Their weight does not correspond to the parameters of the machine. We need to extract the excess.
E5 – water heating does not work.
E6 – malfunction of the heating element.
E7 – malfunction of the water level sensor in the tank.
E8 – water heating does not coincide with the selected washing program. Most often due to problems with the heating element.
E9 – water leak or drain detected more than 4 times.
DE, DOOR – bad blocking. Most often, the hatch door is not properly closed.
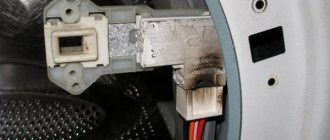
Replacing the heating element
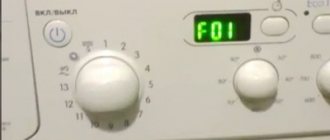
If the heating element in a washing machine breaks down, the main sign of such a malfunction is a deviation in the temperature regime of the device. Some models can forcefully stop the work process, and the error code “H1” will appear on the display. The reason why the heating element of a washing machine fails is typical for any water heating element.
If the water supplied to the device has a high degree of hardness, then when the liquid is frequently heated to a high temperature, scale will form. With a significant layer of deposits, the efficiency of the heating element decreases, and the heating element itself fails as a result of excessive heating of the internal resistance. If the heating element is burnt out, you will need to replace it with a known good element, which is intended for use only in a specific model of household appliance.
The process of replacing the heating element is carried out in the following order:
- Remove the front panel of the device.
- Remove the faulty element.
- Install a new heating element.
- Assemble the washing machine.
A feature of dismantling the heating element of Samsung washing machines is the need to remove the front wall of the household appliance. Despite the fact that to access the heating element you will need to remove a significant number of elements and mechanisms, the good news for the amateur craftsman is that there is no need to move the device or disconnect it from communications.
The front panel is removed in the following sequence:
- Unscrew the drain filter and drain the water.
- Remove the dispenser and unscrew the 2 bolts.
- Unscrew the bolt on the control panel.
- Without removing the control panel, move it to the side.
- Turn the rubber cuff of the loading hatch into the drum.
- Remove the bottom panel.
- Unscrew the 4 fasteners located behind the bottom panel.
Now you can remove the front panel, behind which the heating element of the device is located. Before you begin removing the heating element, it is recommended to check it with a multimeter. To do this you need:
- Turn on the device and switch it to resistance measurement mode up to 200 Ohms.
- Disconnect the wires from the temperature sensor.
- Connect the positive probe of the multimeter to one contact of the heating element, and the negative probe to the second.
If there is no resistance at all, the heating element must be replaced.
Removal of the faulty element is carried out in the following order:
- Using a socket wrench, unscrew the nut located between the contacts of the heating element.
- Grasping both contacts, carefully loosen the heating element.
- Push the stud onto which the nut was screwed using a hammer or socket wrench.
- Pry off the heating element with a screwdriver.
- Pull the contacts and remove the heating element from the groove.
Installation of a new heating element is carried out in the following sequence:
- Check the new element with a multimeter.
- Lubricate the seal with machine oil.
- Install a new element.
- Install a temperature sensor.
- Connect the wires to the terminals.
After installing the heating element, the front panel is assembled in the reverse order of removal.
The process of disassembling the washing machine
It is not always necessary to completely disassemble the car, but when repairing some components, this cannot be avoided. “Arrange a showdown” should be in this order:
- The top cover is removed: this element is held in place by two screws on the back side of the unit. After unscrewing them, the lid must be moved back 1.5 cm, after which it can be removed. At this stage, the network (anti-interference) filter, level relay and transformer will become available.
- Next, you need to remove the distribution hopper for washing powder and disconnect the three hoses held by metal clamps from it. The clamps should be loosened using special pliers or pliers.
- The massive counterweight found under the top cover is removed from the bottom up after unscrewing two long bolts.
- We remove the front panel: to do this, you need to unscrew the screws that secure the control panel (two in front and one on the right). The left side of the front panel can then be detached using a screwdriver. Next, pull out the lever and disconnect the base panel (this item does not apply to the R 6091 model). Now you need to remove the hatch seal by releasing the clamp holding it.
After this, the front panel can be removed by first unscrewing the 8 screws that secure it.
At this stage, the heating element, hatch lock, shock absorbers and drain pump become available.
Disassembling the washing machine
Your next steps:
- On the wire clamp that presses the rubber casing to the drum (through this part the drum is connected to the body), you need to unscrew the bolt.
- With the car on its side, you need to unscrew the 4 screws on the bottom cover, after which it can be removed. This will give you access to the electric motor and another, smaller counterweight. These elements, together with the pump, are fixed on shock absorbers, which, in turn, are attached to the body of the machine.
- We disconnect the wires connected to them from the contact connectors of the engine and pump. In order not to forget the connection order, the wires must be photographed or marked in some way before disconnecting.
- We unscrew the two bolts that secure the shock absorbers to the body.
- Unscrew the water inlet located under the top cover. There is no need to disconnect the wires from it, since they do not interfere with the disassembly process.
- To dismantle the elastic suspensions with which the drum is connected from above to the body, the hooks at their ends must be straightened with pliers - first from the drum side, then from the body side. Be prepared for the fact that they do not give in very willingly.
- All that remains is to unscrew the smaller counterweight and remove the drive belt, after which the drum can be removed.
When assembling, the belt should be placed first on the engine pulley and only then on the drum pulley.
Drain pump repair
The pump of a Samsung washing machine also often fails. This breakdown will definitely not allow you to complete the laundry program, so before you begin to solve the problem, you need to remove the water from the washing machine. Drain liquid from a faulty household appliance in the following sequence:
- Disconnect the washing machine from the 220 V network.
- Prepare a flat container for water and old rags.
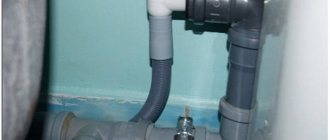
- Remove the drain hose from the sewer pipe.
- Place the end of the hose into the prepared container.
After the water has completely drained, you can begin to remove the pump from the washing machine. The pump is removed in the following order:
- Unscrew the hose clamp on the back wall of the washing machine.
- Remove the 2 screws at the bottom of the front cover of the device.
- Tilt the washing machine backwards.
- Bend down the lower protective cover.
- Disconnect the electrical wire terminals.
- Unscrew the 4 screws securing the volute to the pump.
- Remove the pump.
If the drain pump malfunctions, it is not always necessary to install a new part. Very often, the cause of pump inoperability is threads wound around its blades, pieces of wool or other objects that may be located on the pump motor shaft. This problem can be resolved very simply. To do this, simply remove the pump impeller and clean it of contamination. You should also remove any wound objects from the motor shaft.
After installing the impeller on the shaft and checking the motor with a multimeter, you can assemble the pump. To check the electric motor, it is necessary to measure the resistance between the terminals. If this parameter is completely absent, then you need to purchase a new pump. For replacement, only the original model should be used.
Checking the drain pump with a multimeter
The pump is installed in the reverse order of removal. After all work is completed, the operation of the washing machine is checked. For this purpose, a test run of the device is carried out in rinsing mode.
When starting up for the first time, you should carefully inspect the household appliance for possible leaks.
Replacing the drive belt
When operating a washing machine with a faulty drive belt, increased noise will be observed during all cycles of operation of the washing machine. Visually, this breakdown can be determined by a significant decrease in the drum rotation speed. It is also possible that the washing machine will completely stop operating as a result of a frayed belt wrapping around the electric motor pulley.
To install a new drive belt on a Samsung washing machine, you must follow these instructions:
- Disconnect the household appliance.
- Unscrew the screws holding the back cover.
- Remove the back cover.
- Carefully pry off the belt with a screwdriver.
- Bend the belt to the side and turn the pulley half a turn.
- Remove the faulty belt.
- Place a new belt on the electric motor pulley.
- Place the belt over half the diameter of the driven pulley.
- Rotate the driven pulley 1 revolution.
- Install the back cover of the washing machine.
If all the recommendations were followed correctly, then after replacing the belt the device will operate normally.
Bearings
On Samsung washing machines, such repairs occur after the service life has expired - after 10-15 years of operation. Signs of wear:
- Rattling, clanging sound - especially when spinning clothes.
- If you move the drum in different directions, play is visible.
Changing bearings is a difficult job that requires skill and the right tools. But it is possible to do it yourself. We recommend replacement instructions for Samsung SMA.
Bearing seat after heavy wear
Intake valve repair
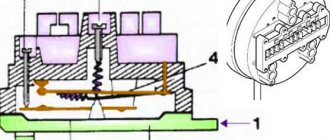
The inlet valve of the washing machine functions as a shut-off device, which allows you to collect the required amount of water for washing and rinsing clothes.
The principle of operation of the inlet valve is based on the movement of the valve as a result of the supply of current to the electromagnetic coil of the device, so most often this failure is manifested by a lack of fluid intake. If the coil is faulty or there is a break in the electrical network of the wires connected to it, the valve will not open. Repairing the filler shut-off device with your own hands is not difficult.
The solenoid valve cannot be repaired, therefore, if problems related to the performance of the part are identified, it is necessary to replace the product. The new device must not only be in working order, but also ideally suitable for use with a specific model of washing machine. To replace the solenoid valve you must:
- Unplug the washing machine.
- Remove the back cover.
- Disconnect the fill valve from the pipes and electrical wires.
- Remove the defective part.
- Install the new valve, connecting the pipes and electrical terminals.
After checking the functionality of the inlet valve, the washing machine can be operated without any restrictions.
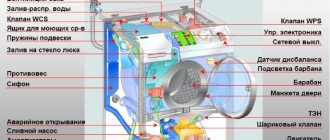
Repairing damage to a Samsung machine
We present to you a diagram of the device, which will come in handy for repairs. The technical content of machines of different brands is approximately the same. If you have already had to deal with replacing spare parts for a washing machine, then it will be easier for you to cope with the next repair.
Now you can start talking about certain types of breakdowns and how to repair them.
No. 1: unexpected stop during washing
The most common reason is insufficient water pressure. Then the machine stops, and to start it again, you need to turn it off and then turn it on again. If you have a lot of laundry loaded, in order for the machine to work, you just need to turn it off and remove the excess.
If there is a break in the power cord or an initially poor contact in the power button, then the device periodically turns itself off. The machine may also stop if it is not level and there is some misalignment.
No. 2: difficulty getting water
To fix this problem, you should first check the water pressure in the plumbing system and also make sure that the valve supplying water to the machine is well open.
You should know that the free end of the drain hose connected from below must be located at a height of more than 2/3 of the height of the device, otherwise water will immediately pour out of the machine.
No. 3: leakage from the unit
There are many reasons to explain this problem. Sometimes it is enough just to clean the powder container well - if it is clogged, water may simply leak out of it.