Natural wear and tear on washing machine parts or manufacturing defects require intervention and troubleshooting. This makes it necessary to dismantle the cover of the device. Sometimes the top panel is removed when installing appliances into kitchen furniture.
- Which SMAs have the top cover removed?
- Removing the top cover of a front-loading machine
- Top Loading Models
- Nuances for some SMA models
- Catalog of washing machines with reviews
Which SMAs have the top cover removed?
If the washing machine breaks down, you can act in two ways:
- call a specialist;
- solve the problem yourself.
The advantage of doing it yourself is saving money. Most models of modern washing machines provide the ability to disassemble the upper part of the body.
This design feature is independent of the load type. The cover can be removed for both front-facing and vertical machines.
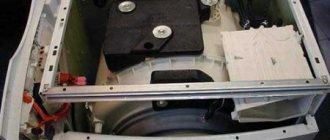
Top cover of SMA
If necessary, removing the cover of the device can be completed in half an hour. The only tool you need is a Phillips screwdriver to remove the bolts holding the panel in place.
How to remove the top cover from an LG washing machine
The range of LG washing machines is very wide: dual-load washing machines allow you to wash two types of laundry at the same time using different modes; narrow and super-narrow LG washing machines are popular among owners of small apartments. And even when talking about “standard” washing machines, you should keep in mind that they are all equipped with various convenient and life-simplifying functions, including steam washing, drying, the ability to control using a voice assistant, etc.
Also, absolutely all LG washing machines can boast of durability and reliability, since the highest technologies are used when assembling LG equipment (regardless of the country of origin), and quality control is also carried out at all stages. So when buying an LG washing machine, you can be sure that with proper use and regular care it will last for many years.
But sometimes an unforeseen situation may arise, as a result of which the equipment fails. Manufacturers recommend that in the event of a breakdown, immediately contact the Official LG Service Center, where qualified specialists can find and fix the problem. If you give the equipment to unofficial repairmen for repair, or even more so, try to fix the washing machine yourself, then you automatically lose the right to warranty service (if the warranty period has not yet expired).
If you are willing to take the risk and try to fix the breakdown in your LG washing machine yourself, then you will need to remove the top cover from it. Here's what you need to do to achieve this.
Remove the top cover from the LG washing machine: step-by-step instructions
- Before starting any manipulations with the equipment, make sure that it is de-energized. Unplug your washing machine's power cord.
- Turn off the water supply to the washing machine.
- You will need access to the washing machine from all sides, so you will need to move it to the center of the room in which it is located or, at a minimum, move it half a meter away from the walls. Before doing this, check whether the drain hose is long enough. Otherwise, disconnect the hose to avoid damaging it.
Important: The washing machine can weigh up to 80 kg, so you will need help to move it.
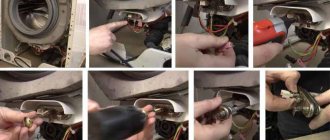
- Proceed to dismantle the top cover. To do this you will need a Phillips screwdriver.
- Walk around the washer. Locate the two screws at the top of the rear panel, close to the top cover. They hold the lid.
Important: some washing machine models may have three screws (one in the center).
- Unscrew the screws using a screwdriver, making counterclockwise movements.
- Using both hands, pull the top cover of your LG washing machine towards you. In some cases, significant force may be required. The lid should move 2-3 cm.
- Lift the cover up and remove. Dismantling is complete.
If the cover cannot be moved, it is jammed. Under no circumstances try to pry it off with a screwdriver or any other sharp object. Rock it from side to side with short movements, without applying excessive force.
Why do you need to remove the top cover of an LG washing machine?
Once you have successfully removed the top cover of your LG washing machine, you will have access to the following parts:
LG washing machine fill valve, responsible for water supply. It is located in the corner of the case near the back cover.
The powder receptacle of the LG washing machine, through which the supply of detergents passes during washing.
LG washing machine pressure switch, also known as water level sensor. If the washing machine does not drain the water on time and displays an OE error, the problem may be in this part.
Upper counterweight of LG washing machine. This is a shock absorber that dampens all vibrations of the unit. This part almost never fails.
Surge filter for LG washing machine, designed to suppress pulsed and high-frequency interference that periodically occurs in the network and protect it from power surges. It also fails relatively rarely.
To remove the drum and tub of the washing machine, you will also need to start dismantling from the top cover. So this is an important part of washing machine repair.
To replace the cover, repeat all steps in reverse order.
Online diagnostics of a washing machine
If your machine stops washing or rinsing clothes normally, then some kind of malfunction or breakdown has occurred.
You can try to find the problem yourself. Run diagnostics
Select which operation your washing machine does not perform:
1. Doesn’t drain 2. Doesn’t rotate the drum 3. Doesn’t spin clothes 4. Noises, knocks, buzzes when spinning 5. Doesn’t turn on
Checking the operation of the drain pump Is the drain pump of the washing machine working? Yes No I don’t know << Back
Clogged hoses in the washing machine If the sound corresponds to the normal sound that has always been observed when the device is working, the cause is probably a clog.
Was there a blockage in the drain hose? Yes
<< Back
The drain pump does not work! If the sound matches the normal sound of the drain pump, it is recommended that you check the drain filter first.
After cleaning, does the drain pump work and does the washing machine drain water? Not really
<< Back
Operation of the drain pump The sound of the pump is usually immediately audible and noticeable. If there is no sound, the pump is not working. We are looking for how to separately enable the water drainage program. As a rule, this is a separate option. After the program has been turned on, the pump should start working in 1-3 seconds. If everything is done correctly and the pump is operational, a buzzing sound will appear. If you hear no buzzing or other sounds when you turn on the program, the pump is probably faulty.
Is the washing machine drain pump working? Not really
<< Back
Clogged car hoses If you have identified a clog in the hoses, you need to disassemble them, clean them, and then reassemble everything.
Does the washing machine drain well? Not really
<< Back
Hurray, you did a great job, you fixed it.
<< Return to the beginning of diagnostics
The drain pump is faulty, call a professional.
<< Return to the beginning of the diagnosis.
The washing machine does not rotate the drum. During the operation of the washing machine, such a problem may occur. Each model has a different drum operation. It rotates according to a given algorithm, which is set by the program. This principle applies to spinning and washing. If you are not sure whether the drum is not spinning or whether it is working, put the laundry in the washing machine. Start the spin program. If the machine is running, it will first drain the water and then start spinning. In this case, a rotational process will be observed. If rotation is not visible, then check the belt. First, turn off the program, then unplug the wire from the outlet so that power does not flow into the device. Now you need to remove the back cover. You will need to carefully inspect the drum belt. It is quite easy to determine whether it is in the wrong position or damaged.
Is the washing machine belt torn or stretched? Not really
<< Back
Broken drum drive belt If the belt breaks, it will be immediately visible. There are also often cases when the belt simply stretches, which is why the drum, accordingly, does not rotate. Do not allow the machine to operate if the belt breaks. It is important to check whether it has wound around the engine pulley or broken the wiring to the engine. The heating element and temperature sensor may also be damaged if the belt does catch the wires. It is imperative to ensure that the belt model is original. If you choose an unsuitable or low-quality product, this will affect the performance of other devices. How do you know what kind of belt you have? There will be a marking written on the old one, compare it with the one indicated on the belt offered to you. You can also find out belt information by car model.
<< Return to the beginning of the diagnosis.
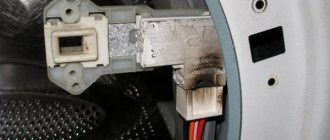
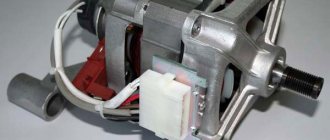
Washing machine motor malfunction If a malfunction is not found, the block with wires must be disconnected from the electric motor. Carefully remove it. We visually evaluate the engine. It may have melting, cracks, or other effects that clearly indicate damage. We call the windings of the tachogenerator and the engine. It is important to understand that you can fully study how correctly the engine operates and whether there is a malfunction only at the stand. If rotation does not occur, there may be a problem with more than just the motor. Sometimes the cause is a malfunctioning electronic module. If a short circuit occurs in the engine, the module could be damaged, while the engine remains operational. Also, the wires could be damaged.
<< Return to the beginning of the diagnosis.
Repairing a washing machine that does not spin clothes After completing the washing process, the washing machine may not spin properly or may not start spinning. Firstly, look, perhaps another mode is set, which does not involve turning on the spin cycle at all. This happens, for example, with programs related to washing woolen items and delicate fabrics. To check, run the spin cycle separately. If the washing machine does not drain water, we proceed to check the pump.
Does the washing machine now spin clothes? Not really
<< Back
Congratulations, you have solved your problem!
<< Return to the beginning of the diagnosis.
Repair of washing machines, imbalance Modern washing machines place the laundry on the drum before spinning. This is necessary for quality work. Check if this feature works. Sometimes a situation occurs when things get wrapped up in a ball that cannot be unwound automatically within a certain time. At this point the work stops. You need to unwind this laundry yourself, lay it out and continue operating the washing machine. In this case, it is important to turn off the machine, and then, when the laundry is laid out, turn on a separate spin program.
Does the washing machine now spin clothes? Not really
<< Back
Washing machine repair, drum drive repair Now you need to check the drum drive belt. We remove the cover and visually assess the condition of the belt. There should be no damage. If the tension is weak, the spin may not turn on. If you need to replace the belt, you should only replace it with the original one. After replacing, we try the program again.
Fault found, does the washing machine spin? Not really
<< Back
The engine or electronic module is faulty, call a repairman to your home.
<< Return to the beginning of the diagnosis.
The washing machine hums, makes noise during the spin cycle, rumbles, and makes a jet plane noise. If the washing machine makes noise during operation, making unusual sounds, it’s time to pay special attention to it. In this case, a visible breakdown or lack of functionality may not be observed, but the appearance of strange sounds indicates that it is time to look for a malfunction. It is important to understand that a new car that has just been delivered should be inspected for shipping bolts. If you forget to remove them, noise and vibration are inevitable. So, let's begin! We turn the washing machine drum and listen to extraneous sounds.
When rotating, do you hear extraneous noise, hum, balls rolling, does the drum move unevenly with slight jamming? Not really
<< Back
If the drum rotates and uncharacteristic sounds appear, including vibration, it’s time to check the bearings. If they malfunction, they will have to be replaced.
<< Return to the beginning of the diagnosis.
The counterweight of the washing machine has come loose. The fastening of the counterweights must also be of high quality. If they are “loose”, it’s time to eliminate this defect. In some cases, you can notice that the bolts that secure the stones are completely missing. In this case, the connectors for mounting will be visible. The bolts need to be found and put in place - they probably simply came loose. A rumble heard while the washing machine is operating may indicate that the bolts have partially loosened. To check the bolts, you can simply push the drum. If it is secure, the bolts are fine. If it moves, there is a defect.
Do you hear any noise, clanging or rattling noises when moving the washing machine tub? Not really
<< Back
The counterweight has come off
<< Return to the beginning of diagnostics
Checking the shock absorbers of the washing machine Checking the shock absorbers. If you hear vibration or excessive noise during the spin cycle, there may be a problem with the shock absorbers. Sometimes the washer moves. Now let's check the functionality. Remove the top cover. Click on the tank, move it five to seven centimeters down. A normal reaction will be observed if the tank rises sharply, jumping a little and stopping in its normal place. If this does not happen, the shock absorbers need to be replaced.
Are the shock absorbers of the washing machine working? Not really
<< Back
If a visible defect has not been identified, check whether a foreign object may have entered the machine. Replacing shock absorbers. The problem with shock absorbers wearing out occurs quite often over time.
<< Return to the beginning of the diagnosis.
Replacing washing machine shock absorbers. Malfunction and wear of shock absorbers is a fairly common phenomenon.
<< Return to the beginning of the diagnosis.
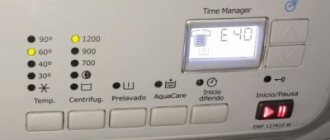
The washing machine does not turn on. It is worth trying to find the cause of the problem yourself and fix it. We start by connecting the device to the network. Next, click on the “network” button. In different car models, different indications are triggered: here either the display will start working, or, on the contrary, some other button.
Does the washing machine have an indicator? Not really
<< Back
Hatch lock lock (UBL) You can check it by turning on any of the programs. We choose what we will use. Click on the corresponding button. Don't forget to pay attention to the inclusion. As a rule, the process of activating a function is characterized by the presence of a certain sound, for example a click, with which the device makes it clear that pressing again is not necessary and the machine is already working. If there is no sound, the button may be broken. In this case, the main thing that must be done is to block the hatch and start working. If this happens, everything is fine.
The washing machine is blocking the hatch and the UBL is triggered? Not really
<< Back
Water fill valve malfunction
<< Return to the beginning of the diagnosis.
The washing machine hatch does not lock
<< Return to the beginning of the diagnosis.
No indication Checking the electrical circuit. If you notice that the washing machine does not respond to being turned on, it is first recommended to check the power supply. The outlet may be faulty. Try connecting another device. If the outlet works, you need to check whether the circuit that conducts energy through the washing machine from one element to another is intact. To do this, you will need a multimeter, which will help you fully analyze the ability to respond to an electrical signal at several stages of operation. If there is no network connection anywhere, this is probably the problem. We carry out this manipulation until we reach the electronic module. If we are talking about an old washing machine, here it will look like the device’s program. When you turn on the button, there should be no breaks in the circuit. If the circuit works, everything is fine electrically.
Is the washing machine's power supply OK? Not really
<< Back
Repair of electronic module (unit)
<< Return to the beginning of diagnostics
Contact circuit fault
<< Return to the beginning of diagnostics
What's the use of this?
We figured out exactly how to remove the top cover of the Beko washing machine. But in what situations may it be necessary to dismantle it? What parts of the machine can be replaced or repaired if this part of the body is removed?
By removing the top of the washing machine, you will have access to the fill valve. It must be checked if there are problems with the flow of water during operation of the machine, there is too much or too little of it. This part is located in the upper right corner of the case near the back cover. You can check the valve coil and other elements of the mechanism. If necessary, by removing only the top part of the washing machine, you can completely replace the fill valve with a new one.
If the washing powder is poorly removed after washing, you need to check the condition of the powder receptacle. To do this, remove the cover as described above, then remove the pipe or clean it. When required, you can completely replace the failed part.
At the top of the body there is another important element of the washing machine - the pressure switch. It is required for normal water drainage. If the washer refuses to drain the liquid or does it at the wrong time, showing an error on the screen, the problem lies in this particular part. To replace it, you need to unscrew the mount and disconnect the pressure switch from the wires, then install a new spare part.
When you remove the cover of the washing machine, you will have access to the upper counterweight. Of course, it breaks infrequently, but it can still cause an operational problem. If you need to repair this part, there is no way to do without removing the housing cover.
Removing the top will also help you get to the electrical part of the Beko washing machine, if such a need arises.
If desired, you can even remove the drum and tank. True, lifting the top cover alone in this case will not be enough. You will have to remove the front part and unscrew the service hatch at the back. However, the dismantling procedure will begin from the top.
Thus, the ability to remove the upper part of the washing machine body can be useful in many situations involving equipment breakdowns. This is the starting point for repairs of any complexity. The instructions will certainly be useful to the home handyman who does not want to overpay for the services of a technician.
Interesting:
- How to replace bearings on a Hansa washing machine
- How to replace bearings in a Beko washing machine
- How to disassemble the drum of a Beko washing machine?
- Disassembling the drum of the Indesit washing machine
- Reviews of Beko dishwashers
- How to remove the cover of an Electrolux washing machine?
Reader comments
- Share your opinion - leave a comment
Removing the top cover of a front-loading machine
Before removing the cover of a front-loading washing machine, disconnect the equipment from the power supply and communications. Then you need to do the following:
- push the machine out of the niche;
- find the mounting screws on the body;
- Unscrew the bolts using a suitable screwdriver;
- save all plastic washers and gaskets;
- push the panel away from you to remove the fasteners from the grooves;
- lift and carefully remove the cover of the device.
Expert opinion
I work in the household appliance repair industry. Extensive experience in restoring washing machines and dishwashers.
Ask a Question
Install the top panel in the reverse order: first get into the grooves, then push the cover into place and tighten the bolts, not forgetting the gaskets.
Top Loading Models
Removing the top panel from a top-loader is easier than from a front-loader. Before dismantling the part, turn off the power to the equipment and provide free access to the housing, then you must:
- open the lid;
- use a screwdriver to move the pins;
- wait for the door lock to turn off after 3-4 minutes and unscrew the screws;
- press the latch;
- disconnect the wires.
If automatic unlocking does not occur, you will have to remove the side panels to access the lock. It is also worth making sure that the pins do not fall inside the machine.
Vertical cover
Nuances for some SMA models
In some washing machines, the designers provide another way to remove the cover: after unscrewing the screws, the back of the panel is lifted up. In order for the part to move forward, it is necessary to catch a certain angle.
In a number of older machines, the bolts are located on the sides of the cover in the front. This is even more convenient, since the housing does not need to be pulled out far from the wall. Remove the plugs and unscrew the exposed bolts. Then pull the panel upward and it will come off.
As in the first case, the desired angle can be found experimentally. Make several attempts at different angles until you achieve the result.
Do you wash by hand?
Oh yes! No
Home appliances are not insured against breakdowns. Sometimes it’s easier and cheaper to do the repairs yourself. It is not difficult to disassemble a washing machine, both front-loading and top-loading, on your own without the help of a technician.
Use the recommendations offered and, having prepared the equipment, without haste, figure out the features of fastening the top panel in order to remove it.
All of the above applies to almost any brand, for example, Samsung, (LG), Bosch, Electrolux, Zanussi, Ariston, Indesit, Wirlpool, Kandy, Hansa, Gorenje , "Ardo", "Beko", "AEG", Miele, Siemens, "Kaiser" and "Atlant". The design of modern washing machines is not very different from each other, and a number of parts are suitable for different models. For example, drain pumps and heating elements.
Video
Preparing for disassembly
To disassemble the Atlant washing machine, you first need to prepare the tools. The user will need:
- Set of flat and Phillips screwdrivers.
- Pliers.
- Set of wrenches.
- Set of socket heads.
- Hammer.
After disassembly, in the process of diagnosing equipment and replacing parts, other tools, materials and devices may be required - a multimeter, a screwdriver, WD-40, rags, etc.
Before disassembling the Atlant washing machine, the equipment must be disconnected from the network, water supply and sewerage and moved to a spacious place for more comfortable work.