Almost all modern washing machines are equipped with a self-diagnosis system - if a malfunction occurs, an information code appears on the display, which can be used to decipher the nature of the problem. There are different types of failures: sometimes, in order for the machine to start working again, it is enough to restart it or clean the drain filter, but it also happens that you need to check the functionality of some parts or sensors, and even replace them. In the latter case, the unit will have to be disassembled.
To check and/or replace parts, the washing machine must be disassembled
Of course, not every breakdown can be dealt with without special training, so you shouldn’t overestimate your capabilities. But, for example, repairing an intake valve or checking the contacts and pressure switch tube is within the power of every amateur craftsman. If you are determined to save your family budget, our article will help with this, which will tell you how to disassemble a washing machine yourself.
Preparation
Disassembling a washing machine cannot be done with just a screwdriver; you will need a whole set of tools and tools:
- socket and open-end wrenches;
- set of heads and knobs;
- a set of flat and Phillips screwdrivers;
- hammer;
- multimeter;
- bit;
- hacksaw for metal;
- pliers;
- WD-40 product;
- awl.
In order to disassemble the washing machine, you need to prepare a set of tools
Please note that the presented list of tools and tools is as wide as possible and allows you to perform almost any repair. Perhaps only a small part of this list will be in demand. For example, if you do not plan to check the operation of contacts or sensors, then most likely you will not need a multimeter, and if you are not going to cut a non-separable tank, then you can do without a hacksaw.
Repairing equipment is an unpredictable process; it can last more than one day, and removed panels and parts take up a lot of space. Therefore, if possible, move the unit to a garage, shed or any other utility room where it will not interfere.
Before disassembling the automatic machine, check the warranty card. If the warranty period for the equipment has not expired, you should not repair it yourself; it is better to contact a specialized service center.
If you have to disassemble the equipment in the bathroom, prepare the surrounding space: clear a section of the floor measuring at least 2 x 2 m and cover it with film or old newspapers. Disconnect the washing machine from all communications and, if possible, carefully disconnect the hoses.
Do not forget that there is always some water left in the tank, which must be drained before starting repairs. Place a dry cloth under the machine, prepare a small container, unscrew the drain filter and wait until all the water flows out of the hole.
If you plan to remove the control panel, it is better to immediately remove the detergent tray. Usually, to do this, you need to pull out the container, press the latch located in the middle, and at the same time pull the part towards you.
How to remove main parts
It is worth noting that there are many brands of washing machines, the most popular are: Samsung, LG, Indesit, Bosch, Ariston (Hotpoint-Ariston), Zanussi, Kaiser, Whirlpool. Of course, each of them has its own design features, but the main components of the units and their location are not very different, therefore the disassembly procedure will be approximately the same.
Here is a schematic representation of the main components of the washing machine
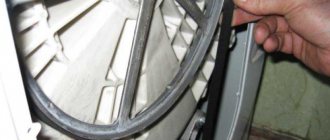
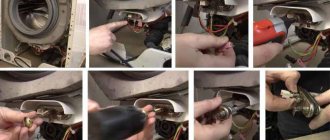
To check the contacts and pressure switch tube or inspect the inlet valve, simply remove the top panel . Other repair work also generally begins with removing this part of the body. Usually the bolts that secure the panel are located on the back of the machine, and sometimes they can be found on the sides.
To inspect the intake valve, simply remove the top panel
The back panel is removed after the screws that hold it in place are removed. Some washing machine models have a lid on the back that can also be opened. But if you are planning a large-scale renovation, it is better to remove the entire panel at once. Directly behind it is a drive belt, which is removed by carefully turning the pulley wheel clockwise.
For large-scale repairs, it is not enough to remove part of the rear panel - it is better to immediately remove it completely
The dashboard is attached with several screws located in the niche of the detergent tray, and is also often held in place with latches. Before removing the part, you need to disconnect the wiring and pipes attached to the tray niche.
During the disassembly process, the location of the parts and the connection diagram of the contacts can be photographed so that after the repair is completed, reassembly can be quickly and correctly carried out in the reverse order.
After completing the above work, you can begin to repair or replace the tubular electric heater (TEH), drive belt or drain pump. If disassembly of the washing machine drum is required, dismantling must be continued. In the upper part of the unit, remove the counterweight (concrete stone), the pipe connecting the powder compartment to the tank, the water intake valve and its contacts, as well as the pressure switch, its tube and contacts.
To free the upper part of the tank, you need to remove the counterweight, pipe, water intake valve and pressure switch
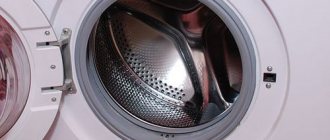
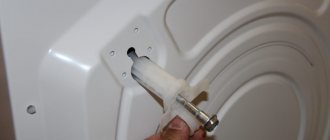
Before dismantling the front cover , remove the hatch door and disconnect the rubber cuff. You need to start working with the cuff - carefully bend it and remove it from the panel, leaving it on the tank. There should also be no difficulties with the door - just unscrew a few bolts that hold the hinge.
Before removing the front cover, you need to remove the rubber cuff
The front panel is carefully removed, after unscrewing the screws that secure it.
The front panel is removed after the screws securing it are unscrewed.
At the bottom of the unit, you need to dismantle the electric motor, heating element, lower counterweight, drain pipe and shock absorbers that hold the tank.
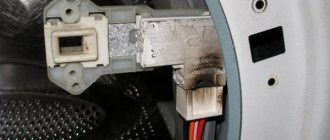
The heating element in most cars is located directly under the tank. Sometimes it can be accessed from the front of the unit, but more often the end of the part is located at the back; it is not difficult to recognize it by the contacts and the nut located between them. All these parts are removed, and the heating element itself is carefully loosened in the socket and removed.
The heating element is located under the tank, to remove it you need to disconnect the contacts and unscrew the nut located in the center
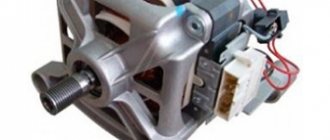
To dismantle the engine, you need to remove the power supply and ground wire from it, and then unscrew the bolts securing it (usually there are four of them).
It is convenient to remove the shock absorbers and drain pipe after laying the washing machine on its side. Using pliers, remove the clamp and disconnect the drain pipe from the pump. Then unscrew the shock absorber fastenings and remove the tank from special hooks.
To dismantle the drain pipe, you need to loosen and remove the clamps holding it
After all the manipulations, the tank can be removed from the washing machine body. But this may not be enough if you need to completely replace a part or check the condition of the bearings located in the drum.
How to disassemble the tank and drum
In some brands of washing machines, the tank can be disassembled by unscrewing the bolts connecting its two halves. But in most modern models, these parts are non-separable, and the halves are soldered at the seam. How to disassemble a washing machine drum located inside a solid tank?
In the photo you see a non-separable washing machine tank in which the drum is located
Begin disassembling the tank by removing the pulley (the wheel through which the belt passed). The bolt that secures this part can be additionally secured with glue. If you can’t unscrew it, you can treat the part with WD-40 or carefully knock it off the glue with a hammer.
Unscrewing the bolt that secures the pulley can be very difficult
The tank is divided into two halves using a hacksaw (you need to cut along the seam, where they are soldered). To make it easier to assemble later, holes are first drilled around the entire perimeter of the seam using a drill. During assembly, bolts will be threaded through them to hold the parts together.
It is easy to remove the drum from the open tank by disconnecting the fasteners. Now you can remove the oil seal and bearings from it.
The bearing assembly usually consists of two metal elements and a rubber gasket - oil seal. Disassembling the drum begins with the bearing located closer to the outer part. The drum is placed with the hole down, and the metal ring is knocked out using a chisel and hammer.
You will need a hammer and chisel to remove the bearing from the drum.
Actions when removing bearings must be careful and precise - the chisel must be installed strictly on the outer ring. If the tool slips and the inner ring is struck, it may fly out, and removing the remaining parts from the socket is a very difficult process. We remove the second bearing in the same way, and then remove the oil seal.
Disassembling the drum
How to disassemble the drum of an Indesit, Electrolux, etc. washing machine? To do this, you need to find the place where the two halves of the drum are attached (if the drum is not solid) and remove the screws that secure them.
During disassembly, we carefully inspect the condition of the seals and other parts - if necessary, they need to be wiped clean of dirt.
The seals are removed from the loading tank using a regular flat-head screwdriver (to do this, you need to pry off the seals). The bearings are knocked out with a hammer and a metal rod, the cross-sectional diameter of which coincides with the diameter of the bearings. The components of the drum must be dismantled carefully so as not to damage its integrity. Replacing bearings is quite difficult, so the tools must be used with great precision and care.
In order to understand in detail the process of dismantling the loading tank, we offer readers a video that clearly explains the main points and shows the procedure for disassembling the drum of a washing machine:
Features of disassembling units with vertical loading
Top-loading washing machines have most of the parts the same as front-loading models: tank, drum, motor, shock absorbers, etc.
In the photo you can see the structure of a top-loading washing machine
To disassemble such a unit, you will also have to remove the side panels of the case and the top cover, but you need to start with the control panel . The bolts holding the part can be found on the sides, and in some models it is secured with special latches. In this case, the panel can be pryed off with a screwdriver and carefully moved, disconnecting the wires. Under the part there is a control board, which also needs to be removed.
Then remove the top cover (its fastenings can usually be found under the control board) and side panels, and carefully disconnect the clamp from the drum.
Further actions will consist of sequential removal of all parts. The bearings in a top-loading washing machine are located on both sides of the drum.
Do not forget that the operating instructions for your unit contain a diagram of the location of all parts and their fastenings. Take your time, act carefully, and you will succeed.
Removing the Drum
Before you can begin to actually disassemble the drum, it must be removed; the operation algorithm largely depends on the type of machine, the specific model and its manufacturer.
Front loading machine
This type of machine is the most common. The process of removing a drum from such a machine is a rather complicated procedure, but with persistence, attention and accuracy, any job can be completed.
Before starting disassembly, it is important not to forget to disconnect the machine from communications, turn it off and remove the plug from the socket.
- After unscrewing several bolts holding the top panel, it is moved back and removed. Access to the insides of the device is provided.
- Unscrew the bolts securing the rear wall. They take it off.
- By turning the pulley, remove the drive belt.
- Disconnect all wiring going to the drum.
- Unscrew the bolts securing the electric motor.
- If the model has an upper counterweight, remove it.
- Remove the detergent tray. In most models from LG, Samsung, Indesit and a number of other manufacturers, it is held in place by a plastic latch.
- Disconnect the supply pipe.
- Unscrew the bolts holding the control panel.
- Carefully remove the panel.
- Loosen the clamp securing the cuff of the loading hatch and tuck it inside the drum. It is important not to forget that the cuff is made of soft material and is very easy to damage.
This will open access to the drum, hanging freely on springs and shock absorbers. You can remove it. In some models of washing machines, in particular those manufactured by Samsung, it will be easier to work if you first remove the front panel and unscrew the lower shock absorbers.
Top loading machine
These devices are distinguished by excellent functionality with very modest dimensions. A top-loading washing machine has a hatch at the top. The drum is fixed in it with bolts. Due to significant differences in design, disassembling the device looks slightly different.
- They turn the car around.
- Unscrew the back wall by unscrewing several screws.
- Move the side walls aside and dismantle them.
- Remove all interfering electrical wiring.
- Unscrew the bolts securing the plastic cover.
- Release the shaft and remove the drum.
Regardless of the type of machine, it would be useful to take step-by-step photographs during the work. Having your own instructions with a photo will make subsequent assembly much easier and will protect you from the appearance of “extra” spare parts.
Collapsible drum
Most models of modern washing machines, this is true for models from famous manufacturers: LG, Samsung, Ariston and others, have a collapsible drum, which significantly simplifies any repair work associated with it. Structurally, it consists of two halves, which are bolted together. Along the joint line there is a gasket or a layer of sealant, which ensures ease of disassembly and tightness of the drum.
Most often, disassembly is not particularly difficult, you just need to perform a number of actions in the following sequence:
- place the drum on a flat surface with the hatch down;
- jam the pulley using a small wooden block;
- Use a socket wrench or a socket with a ratchet to unscrew the bolt securing the pulley;
- after the pulley is removed, use a wrench of a suitable size to unscrew the connecting bolts;
- The halves are easy to separate; you may need to apply several light blows to the shaft with a mallet or a regular hammer through a wooden block.
When planning to unscrew a pulley, you must be prepared for the fact that the bolt will resist. If this is the case, you should not try to unscrew it “forcibly”; it is easy to tear off the edges, or even break the rod, as a result of which the repair will take a long time. Before unscrewing any bolts inside the washing machine, you should use WD-40, this will make the work easier and ensure the safety of the original fasteners.
After the drum is disassembled, you can proceed directly to replacing the bearings or removing foreign objects that have jammed the machine. If the task is to remove old bearings, it is better to use a screw-type puller. You can preheat the bearing, but you must use a torch or blowtorch with extreme caution so as not to damage the drum itself.
When changing bearings, it is important to pay attention to the condition of the sealing seals. If they have lost elasticity, there is a lot of wear or mechanical damage, the seals are replaced along with the bearings. Afterwards all that remains is to assemble the car; this is done in the reverse order. Of course, before assembling the drum, a layer of sealant must be applied to the parts being connected.