A breakdown of a household appliance always brings some inconvenience. In this article, we will look at what to do if you are about to start cleaning, but the vacuum cleaner does not turn on.
Relevant for the following brands and models of vacuum cleaners: Aura Roboclean, Bork, Bissell, Bosch, Daewoo, DeLonghi Colombina, Dexter, Dyson, Electrolux Ergorapido, Extraflex Ergorapido, Extraflex; Hotpoint Ariston / Hotpoint Ariston, Kambrook / Kambrook, Karcher / Karcher, Kirby / Kirby, LG Kompressor, Suction Power / LG Compressor, Suction Power; Miele, Philips, Polaris, Rainbow, Redmond, Rolsen, Samsung, Thomas Twin, Vitek, Zanussi, Zelmer Aquawelt, Solaris Twix , Solaris Twix; Vityaz, Typhoon and others, including automobile, washing, battery and construction models.
So, let's go!
What to check first
Some of the problems that caused the device to fail can be fixed by owners themselves, without the help of specialists.
Is the socket working?
First of all, check that the outlet is working properly:
- Plug in another household appliance and see if it works. It is best to turn on a small lamp or table lamp - if the socket is working, the lamp will immediately light up.
- Try plugging the vacuum cleaner into a different outlet and see if it works there.
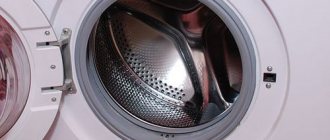
Is the bag too full?
Quite often, the vacuum cleaner does not turn on because the garbage container is full. When the dust bin is completely clogged, air passes through it more heavily and the suction power decreases. The load on the electric motor increases, and eventually it will overheat, shut down, or fail.
Modern models are equipped with an indicator that signals when the bag is full. If there is no such “red light”, listen to the sound of the engine: when it is working for wear, you can hear an increasing hum. Often the unit starts to “stink”.
If the bag is not overfilled in time, the engine will overheat. Electronics or a thermal relay can track this moment and turn off the engine itself - then just empty the bag and let the car cool down. If there are no sensors, the motor will burn out and the equipment will have to be repaired.
Have large objects gotten into the hose?
Debris stuck in the hose will lead to a drop in suction power, and as a result, overheating and engine failure. Usually the culprit is large objects (rags, children's toys) that got inside the sleeve or telescopic tube and could not move into the dust collector. But sometimes small objects also get stuck - for example, a toothpick stands across the channel, catches other debris and forms a plug.
The hose, like the dust collector, must be cleaned - however, this will be much more difficult to do.
Is the engine protection filter dirty?
The motor protection filter, located immediately behind the garbage bag, is subject to regular contamination. Small dust particles seep through the dust collector and settle on the filter: as a result, the passage of air becomes difficult and the engine heats up again.
It is enough to clean the filter once every 5-6 weeks.
Is the cable or plug broken?
The cable of the vacuum cleaner is constantly in motion during cleaning - the cable clings to corners, gets under furniture, and the unit itself often runs over it. All this negatively affects the integrity of the cable.
- Check the cable. Sometimes the damage can be determined by torn insulation, but often the metal strands are damaged internally, and the insulation does not cause suspicion. Open the case and find the place where the cord connects to the electrical board. Plug the cable into the outlet, take a multimeter and measure the voltage at the connection point. If there is no current, the problem is either the cable or the plug.
- Replace the plug or its parts. If the plug is removable, open it and look for burnt contacts or other defects. Simply cut off the permanent plug from the wire and replace it with a new one.
If the other plug does not give a positive result, then the final cause is in the cord - replace the whole thing.
How long did the equipment work?
If the vacuum cleaner stalls, check how long the equipment was running before. It is possible that after a long cleaning it simply overheated, and the electronics turned off the motor to cool it down. Wait a while (at least 20-30 minutes) and your assistant will be ready to work again.
Is there a burning smell?
If during cleaning you smell a burning smell, then most likely the armature or stator winding has burned out. In this case, you cannot do without qualified repairs - you will have to replace the burnt part, and in some cases the entire engine.
Sometimes they suggest rewinding the armature and stator windings; we recommend looking at the economic feasibility. Most often, a new assembled module will be cheaper.
https://www.youtube.com/watch?v=f1r61XNqIpk
Checking the vacuum cleaner motor
If you see that there is voltage at the output of the triac, but the vacuum cleaner does not work, then what should you do? Deal with the motor.
Check the thermoregulation relay, it protects the technical “brain” from overheating. If the device operates for a long time, the housing becomes very hot and it automatically turns off. Just wait until the motor cools down and the vacuum cleaner will start working again.
If it's not a relay, the next thing to look at is the brushes. When they have served their purpose, there is no longer a chain between the winding and the rotor. And the parts should stand close to the rotor and have a little margin along the way. The brushes become depleted over time, and then the force of contact with the commutator increases.
Also read: How to properly set up an air conditioner: basic operating rules
Sometimes, to forget that the Lg vacuum cleaner is not working, it is enough to change the brushes. This can be done without a wizard. Then check the circuit, if there are no faults, then the reason is in the rotor winding. And it needs to be changed, let’s say right away, it’s not cheap.
When a Thomas or any other vacuum cleaner does not work because the engine has burned out, you will quickly understand this. You will hear a burning smell. But if this is the reason, but there is no smell, there is a chance to repair it rather than buy a new one.
The engine cannot be disassembled. Therefore, check the wiring only through the holes in the housing. Inspect the places where the windings connect to the terminals and brushes. Since we use the vacuum cleaner often, the wire may break and the circuit will be interrupted.
Pull the wire and secure it. Does not work? Solder a piece, a few centimeters. It may not work right away, but it’s worth a try so as not to buy a new expensive motor.
What requires repair at a service center
So, the vacuum cleaner switched off and still won’t turn on. Let's check which breakdowns can be fixed by professional technicians.
Broken switch
Vacuum cleaners have two types of power buttons - mechanical and touch.
Mechanical buttons are found on early models. As a rule, they break down gradually: they are not fixed in the working position, act up from time to time, then turn on every other time, and then stop working completely. The reason is normal wear and tear. At home, the only solution is to replace the switch.
Touch switches are installed on modern vacuum cleaners. Most often, they break due to moisture entering, which oxidizes the contacts, or strong mechanical stress. You can still fix this breakdown yourself, but not always - sometimes this type of button is easier to replace.
At a service center, you can try to restore an existing switch. Video example:
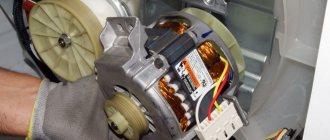
Engine burned out
Repairing a burnt-out motor at home is not easy, unless, of course, you have certain qualifications.
There are several reasons for engine failure:
- The stator or armature winding is shortened, which causes the current value to sharply increase. What to do: dismantle the fan and electric motor, then check the resistance of the stator and rotor windings.
- There is a burning smell, that is, the armature or stator winding has already burned out. What to do: disassemble the motor and replace the burnt part. In some cases, the anchor can be restored.
- Sparks in the brush-commutator assembly. A little sparking in the electric motor is acceptable, but excessive fire will cause the commutator to burn and burn out. The main reason is that the brushes are poorly ground to the commutator plates due to wear or uneven pressure. What to do: replace the brushes or brush holders and clean the commutator.
- Fast heating of the motor. The reason is a short circuit between the turns in the armature winding. What to do: disassemble the motor and check the winding. If there is a short circuit, repair the anchor.
Control board burnt out
The triac on the control board often stops functioning - the element that is responsible for the operation of the power part and regulates engine speed. As a rule, a power cable from the network runs to the triac, and wires to the motor run from the triac.
Try connecting the motor directly to 220 volts (be careful!!!). If the motor starts working, the triac must be replaced.
Why doesn't the vacuum cleaner work?
It doesn’t matter which vacuum cleaner doesn’t work, Samsung or another . Its “brain” is an electric motor. It is he who is responsible for creating a vacuum, thanks to which there is traction, and the debris ends up inside the vacuum cleaner.
Manufacturers differ in filters and bags, which you must keep clean and change if required by the model..
And therefore, the list of common reasons why a cordless or regular vacuum cleaner may not work is the same for everyone.
Important!!! Before troubleshooting, be sure to unplug the electrical appliance.
Next you need to remove the housing. It’s better to look at the instructions for how to do this, since each vacuum cleaner has its own design features.
Also read: How to fix an oven with your own hands: troubleshooting
As a rule, you can remove the filters by unscrewing the fasteners. And make sure that there are no additional screws inside the case that also need to be unscrewed. Otherwise, the case may break.
What exactly can you do yourself?
- Clean the dustbin, filter, and vacuum cleaner hose.
- Change the power button. Replace burnt parts and, if necessary, plug.
- Check the wire and control board.
- Disassemble the engine and (if you have experience) try to restore it. More details in the following articles about vacuum cleaners.
You can also buy a robot vacuum cleaner: they operate on batteries with a voltage of no higher than 15 V, so their motor is unlikely to overheat. Repairing a robot is much easier. Examples of brands are Iclebo Arte and iLife.
Repair instructions for various breakdowns
In each of the types of vacuum cleaner discussed above, various elements and components can fail. This depends on the design of the unit and the principle of its operation.
For example, most often users encounter the following problems:
- no traction;
- there is a foreign smell;
- The device does not turn on;
- a short circuit occurs, the plugs are knocked out;
- there is no cord fixation;
- suction power has decreased;
- noise and vibration;
- other.
Next, we will consider in detail what malfunctions most often occur in various types of products, and how to fix them yourself.
If your device has broken down and the warranty period has already expired, do not rush to take it to a service center. Perhaps the breakdown is simple, and you can repair the vacuum cleaner yourself without the help of specialists.
The examples of malfunctions presented below, methods for diagnosing and repairing them will help you independently solve this or that problem with the unit.
Failure #1 - the device does not suck up debris
When such a malfunction is detected, the device produces a characteristic sound in the form of a hum. This indicates that the engine is running, but is not absorbing dust.
You need to pay attention to such elements as a hose and nozzles, a dust collector, filter mechanisms, and make sure that they are intact.
To do this, you should perform a number of actions:
- Check to see if the bag or container is full of trash.
- Separate all parts from the hose - brush, tube. They may contain debris that interferes with the free passage of air flow. If found, clean the accessories under running water or using a long knitting needle.
- If the reason is not in the hose, then the blockage has formed inside the device. Check all filters (exhaust, fine). If possible, read the instructions and rinse the fine filter and dry it. After this, install the part into the vacuum cleaner body and make sure it is working.
- Inspect the garbage receptacle carefully. Fabric bags must be washed or cleaned of fine accumulated dust, which clogs the cells and interferes with the free passage of air.
Other reasons for poor dust suction may be deformed gaskets, seals, or lack of a tight connection between the hose and the product body. A worn o-ring or broken vacuum regulator bushing must be replaced with new parts.
In another case, when air passes well through the tube and brush, but debris remains on the floor, you should check the height of the brush roller.
Try moving the roller a little higher or lower - experiment. Perhaps the roller is simply not adjusted and cannot fully perform its functions
If it is not possible to achieve ideal absorption of debris, then you will need to replace the nozzle.
Failure #2 - the vacuum cleaner emits a burning smell
If during or after cleaning the smell of burnt rubber appears and the engine stops working, then the reason lies in the winding. To do this, you will need to completely disassemble the motor, repair or replace the burnt armature or stator with a new element.
Engine disassembly instructions:
- Unscrew the bolts from the product body.
- Tilt the housing cover, move the coil and wires and remove the motor.
- Unscrew the side bolts and remove the rubber seal.
- Separate the housing into two parts using a screwdriver.
- Remove the motor from the protective housing.
- Bend the flanges and separate the part, releasing the turbine.
- Unscrew the bolt using a socket head, tightly fixing the stator and the rest of the structure.
- Unscrew all connecting elements and remove the brushes.
- Knock out the anchor using a wrench and a hammer.
Check the serviceability of the bearings and, if necessary, treat them with oil.
It is not recommended to replace the winding yourself: after the procedure, dynamic balancing of the armature will be required, which is difficult to perform on your own
After disassembly, replace the failed elements and reassemble the part in the reverse order.
Failure #3 - equipment does not turn on
Have you noticed that when you repeatedly try to turn on the device, there are no signs of its operation? Then you should check the voltage in the outlet to which the device is connected, as well as the integrity of the power cord.
As a rule, the wire breaks where the cord is attached to the plug, resulting in no contact. If you find this problem, then you will need to completely replace the cord with a new one.
For repair you will need:
- Remove the back cover of the device.
- Unscrew the screws securing the diaphragm.
- Carefully remove it without touching the wires.
- Move the block with the gasket to the side.
- Remove the spring and check its serviceability.
- If necessary, replace wiring and damaged elements.
After the repair has been completed, reassemble the unit in the reverse order according to the instructions.
Faulty switches and internal wiring may also cause the breakdown. Another possible reason is the operation of auto-protection against overheating of the device. This technology prevents engine damage due to increased load during operation of the device.
The presence of a thermal switch allows you to prevent overheating of the device in time, and additional options eliminate the cause - for example, they clean the HEPA filter from dust particles.
Many models of washing units have a special relay installed that turns on when overheating of the device is detected.
If you notice that the vacuum cleaner suddenly turns off and its body is hot, then the relay has tripped. The device will turn on automatically after it has completely cooled down.
The reasons for overheating of the product are clogged filters, dust collector, air duct.
The most unpleasant reason for the unit not turning on is a breakdown of the electric motor. Therefore, the first thing to check is the brushes and commutator. Disassembly of the part should be carried out according to the instructions described above.
The collector assembly must be checked for moisture, which could cause a short circuit in the motor winding. If you find a damp environment inside, you will need to dry everything thoroughly.
A short circuit in the commutator compartment is also possible due to graphite dust from the brushes. To eliminate it, you will need to clean the collector with a brush and cloth.
Failure #4 - problems with battery charging
Battery devices also tend to malfunction sooner or later. In addition to mechanical damage, breakdowns of electric brushes and other accessories, users most often note rapid battery discharge, prolonged charging, or loss of dust suction power.
The reason lies in the battery pack. Depending on the frequency of use of the product, the battery must be replaced after 2-3 years. During this time, the element completely uses up its resource, and repeated charging no longer gives any results.
The suction power of the air flow decreases as the battery capacity decreases.
If you notice these malfunctions in the operation of the wireless unit, then it’s time to buy a new battery. The battery can be purchased at a service center or ordered from an online store
Replacement should be carried out carefully: opening the product case, disconnect the broken battery and install a new one in its place.
If you notice problems with the battery within 1-2 years of operation, this is a reason to submit the equipment for warranty repair.
Failure #5 - problem with fixing the power cord
In corded vacuum cleaners, a malfunction of the winding drum often occurs: the cord does not retract when the button is pressed or is constantly wound up while the device is operating.
The cause may be a burst, stretched or slipped spring. To check if this is so, you need to press the button several times from different sides
If a malfunction is detected, repairs should be carried out in the following order:
- Remove the product housing cover.
- Remove the drum and coil spring of the lever with bushing.
- Remove the brake roller and lever.
- Replace deformed elements - coil spring, support, etc.
- Adjust the tension of the cord in the drum.
- Assemble the drum and install it in place.
- Check the functionality of the stopper lever.
- Assemble the vacuum cleaner by attaching the housing cover.
After complete assembly, you should make sure that the auto-winding mechanism is working correctly.
Failure #6 - decreased suction capacity
Reduced traction can be caused by a clogged dust container, dirty filters, engine problems, or a faulty hose. Another reason is corrosion processes in the connecting cord retracting mechanism.
Which, due to long-term operation of the device, can cause periodic malfunctions and also reduce the suction power of dust masses.
You can restore the correct operation of the unit in this way:
- Remove the back cover of the product.
- Sand the contacts using 20-grit sandpaper.
- Treat them with a cloth moistened with alcohol.
- Using the same procedure, clean the slip rings in the drum mechanism.
- Reinstall the cover.
- Check for electrical contact in the winding mechanism.
After these manipulations, you will be able to use the device safely, and its suction capacity will be restored if the problem was hidden in the corrosion of the auto-winding unit.
Failure #7 - malfunction of the dust collector indicator
Jamming of the piston system of the mechanism and deformation of the indicator spring prevent its proper operation.
When the bag is full, the indicator may not work, which may cause the engine to overheat. This is fraught with even greater damage to the unit.
To repair a failed mechanism, you must:
- Remove the front cover.
- Remove the dust bag, filter, grille, ultra-cleaning filter and device handle.
- Unscrew the screw holding the indicator.
- Remove the indicator tube from the housing.
- Remove the rubber bushing and spring from the tube.
- Completely disassemble the entire mechanism in detail.
- Replace the deformed tube, plug, spring, and if there is a blockage, remove it using a sharp object and a brush.
- Assemble the elements one by one into the indicator housing and install it on the device cover.
Based on the results of the completed procedure, make sure that the indicator is working.
Failure #8 - broken brush in the washing unit
A malfunction of the wet cleaning attachment is a consequence of improper use of the device by the user. According to the instructions, the washing vacuum cleaner must be filled with water up to the mark on the tank.
When dry cleaning, the pump will run idle and for this reason its motor will fail. The pump is an integral part of the tank and cannot be repaired, only completely replaced.
The water and detergent spray tubes are located on the outside. When they are clogged, it is quite easy to determine visually: they are transparent.
To clean, you will need to pull the tube from the fitting and the spray mechanism, and then install it back. If a part is damaged, you can use any plastic tube of suitable length and diameter.