When purchasing a washing machine, it is important to know the rules for its installation and connection. Particular attention should be paid to the transportation bolts; we will figure out where they are on the washing machine, what they look like, how and when they need to be removed and put back.
The text is relevant for automatic washing machines of foreign and domestic production: AEG, Ardo, Beko, Bosch Maxx, Daewoo, DEXP, Candy Aqua, Aquamatic ; Gorenje / Burning, Haier / Hayer, Hansa / Hansa, HiSense / Hisense, Hotpoint Ariston / Hotpoint Ariston, Electrolux / Electrolux, Indesit / Indesit, Leran / Leran, LG Direct Drive, 6Motion / LG Direct Drive, 6Motion; Miele / Mile, Samsung / Samsung, Siemens / Siemens, Vestel / Vestel, Whirlpool / Whirlpool, Zanussi / Zanussi, Atlant, Vyatka and others.
So let's get started!
Purpose of fixing elements
Shipping bolts are temporary items used for safe transport. In a washing machine, such fasteners allow you to secure the main part - the drum - in a stationary position. The design of the machine allows for easy rotation of the drum, which during transportation can cause damage to the drum itself, as well as shock absorbers and bearings. Failures of this kind can disable the equipment.
To ensure that the drum remains stationary during transportation, manufacturers install special fasteners, which can later be reused if necessary.
Why are bolts needed for transportation?
Conventional household appliances are transported in original packaging and require additional fastenings. But with a washing machine everything is more complicated. Its design includes many moving parts, the integrity of which is compromised without fixation.
In particular, the tank is not screwed to the body, but is suspended on springs - they ensure the mobility of the tank and its shock absorption during operation. If the tank had been attached differently, the machine would have made a noise no worse than a tractor.
And transport bolts are needed only temporarily - for transporting the unit. Elements are provided in SMA of any brands: Bosch, Indesit, Siemens, Electrolux, Zanussi, Atlant and others. The purpose of the fastening is to hold the tank in which the drum is located motionless, so that this unit does not touch other parts during transportation, such as shock absorbers and others.
What do the bolts look like?
The fasteners have a primitive design of three parts: the screw itself, a rubber ring and a plastic insert. They are installed not only on standard front-facing models, but also on vertical washing machines.
Where are the fasteners located?
To determine the location of the clamps, find out the type of loading of the SMA: vertical or frontal. A regular car with a transparent hatch has only one option for their location: on the rear wall.
There can always be surprises with vertical models, so check your owner's manual to make sure you don't confuse the screws with other fasteners. Usually the manual describes in detail where the transportation bolts are located and the dismantling sequence.
According to the standard, there should be 4 screws. Did you find 2 or 3? Don’t be alarmed, this is normal, it means the manufacturer decided that this quantity is enough.
How to remove shipping bolts - step by step instructions
Before the first wash, be sure to remove the fasteners, otherwise the first wash may be the last. It will not be possible to repair the machine under warranty: the manufacturers will consider that you yourself have violated the rules of use.
Location
All washing machines are designed the same, so the location of the fastening elements in different models from different manufacturers will not differ much. In machines with side loading, the fasteners are always screwed into the rear panel, and with vertical ones they can be installed from the back and top.
The number of bolts may vary, but most often the drum is secured with 2-6 fasteners. Please refer to the instruction manual for a picture indicating the location of the fastener for your specific model.
What they look like
The transport bolt is threaded and has a hex head. The fastener is equipped with one metal and one plastic washers, as well as a plastic cylinder, which allows you to fix the drum in a stationary state. Depending on the model and brand of the machine, the appearance of the fasteners may differ, but they will perform the same functions.
Sequence of actions
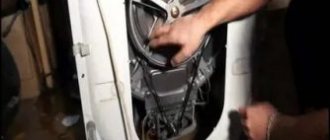
Once the location of the fasteners has been established, it is necessary to begin removing these elements. Since this requires access to the back of the device, it is better to remove the bolts before connecting to the communications.
Step-by-step instruction:
- Provide free access to the fixing bolts.
- Prepare a wrench of the appropriate size (from 10 to 14 depending on the brand and model). Some manufacturers include a special key for removal along with the instruction manual.
- Use a wrench to loosen each bolt by turning it counterclockwise.
- Remove loose fasteners from the holes by hand.
- Install the plugs that come with the washing machine into the bolt holes.
After dismantling the fasteners, they must be preserved, as they will be needed in case of transportation of equipment in the future.
What are shipping bolts?
Transportation fastenings are a type of fastening made in the form of threaded pins, at one end of which there is a head for a certain size and type of key. The configuration and size of the product head can be different and depends on the manufacturer, but in most cases it is a hexagon wrench ranging in size from 10 to 17 mm. A pressure washer and soft polymer or plastic bushings are installed on the threaded part of the bolt, which act as dampers and clamps to ensure a tight connection between the parts of the household device.
Functions of the transport fastener
The main functional purpose of the fastener is to protect the parts of the washing machine inside the housing from damage during transportation. The tank and drum of any washing equipment are attached to the body using special springs and shock absorbers. They dampen vibrations that occur during the operation of the machine and have a certain free movement.
If the washing machine is installed and connected correctly, and washing is carried out in compliance with the operating rules, the free play values are within the limits that prevent damage to the internal parts. However, when transporting the unit, sharp impacts and falls are possible, which may result in displacement of the drum, breakage of various fasteners, and disruption of the functions of bearings and seals. In order to prevent internal damage, transport fastenings are used to ensure rigid fixation of the drum in the equipment body.
Question answer
Some users make mistakes due to inexperience and forget to remove the bolts before operating the washing machine or neglect to install them during subsequent transportation.
What happens if you don't shoot?
The washing machine is designed for a long service life, but just one mistake in the form of not removing the drum fasteners can significantly shorten this life, and sometimes make the device completely beyond repair.
During washing, the drum rotates smoothly and gently, while the load is distributed evenly. If you do not unscrew the fasteners, they will interfere with the free operation of the drum when starting the wash. Vibration and beating will spread to the housing, and the bearings and engine will be under load.
Outwardly, this will be manifested by strong jumps, especially during spinning, and the presence of extraneous noise. During such operation, the internal parts of the device and the drum itself are damaged, which will require expensive repairs or a complete replacement of the washer in the future.
How to install back
It must be remembered that the transportation bolts must be put back in case of repeated transportation (moving, selling, etc.).
To do this, you need to follow three simple steps:
- Remove the plastic plugs.
- Insert each bolt into the hole and press it in a little so that it does not fall out.
- Screw them into the holes clockwise, thereby fixing the position of the drum.
Is it possible to transport without them?
Just one transportation not according to the rules is enough for the washing machine to fail. Attempting to transport equipment incorrectly will result in internal and external damage, for example:
- damage to the power cord;
- dents, cracks and chips on the plastic parts of the machine, including the internal compartment for powder and other detergents;
- damage to hoses for water intake and drainage;
- rupture of the cuff and breakage of the hatch fasteners;
- breakdown of the program switch on the control panel;
- electrical wiring fault;
- damage to the drain pump.
If for some reason there are no fasteners, which often happens when re-transporting used devices, you will have to fix the drum using improvised methods.
We clean it ourselves
Dismantling does not require special professional skills. It is quite possible to cope with it yourself, having in your hands a minimum set of ordinary tools. There is no need to disassemble the case for this. The procedure will not take much time.
First, you should wait until the device warms up to room temperature after transportation. This is especially important if the action takes place during the cold season. Next, it is necessary to ensure free access to the rear panel of the unit. To do this, it should be moved away from the wall and turned around.
To remove the bolts without assistance, the following procedure is recommended:
- Take a wrench of a suitable size or an adjustable universal wrench, the size of which is adjustable. For some models, the tool is included in the kit.
- Loosen the screws by unscrewing them counterclockwise. They should not come out completely, but only 2-3 centimeters.
- Push the screw forward into the housing, pushing until it stops.
Do you wash your shoes in the machine?Oh yes! No
- Remove the plastic and rubber inserts, leaving the metal part out.
- Remove the fastening element.
- Place plastic plugs into the resulting holes, which are included in the kit along with other spare parts. They serve not only a decorative function. If you do not use plugs, moisture may enter the housing and the noise level during operation will increase. They should be pushed all the way until you hear a characteristic click.
- Place the removed parts in a plastic bag and save. They may come in handy in the future, for example when moving. If lost, you will have to buy new ones to ensure that the tank is firmly secured during transportation.
Expert opinion
I work in the household appliance repair industry. Extensive experience in restoring washing machines and dishwashers.
Ask a Question
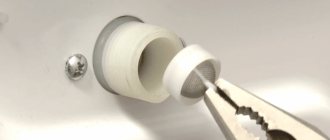
If you don't have a wrench, you can use pliers or pliers. This is not the most convenient way, but it is quite effective.
It is suitable not only for bolts, but also for other types of pins. It is necessary to firmly grasp the part and turn it a quarter turn in any direction, after which the fasteners can be easily removed.
Transportation instructions
If there is a need to transport the washing machine to a new location, it must be prepared in advance. To do this, we will perform the following steps.
Disconnect from water and electricity
First, disconnect the power wires from the electrical network and disconnect the hoses for water intake and drainage. Often during transportation, the same mistake is made - they begin to move the “washing machine” without unplugging it from the socket. This may damage the cord and hoses where they are attached.
Pour out the water
Even if the machine has not been washed for a long time, there will still be a small amount of water in the hoses that needs to be drained. After draining the residue, leave the hose holes open to dry.
We fix hoses, wires, hatch
The hoses and power cord must be folded and secured so that they are not damaged or interfere with transportation. The hatch for loading laundry and the powder compartment must be in the closed position. To prevent them from opening when moving, we recommend additionally securing them, for example, with masking tape.
Fixing the tank
An obligatory step is to fix the washing machine drum. If the bolts are not preserved, you can unscrew the top panel and fill the space between the tank with improvised materials (foam rubber, bubble wrap, etc.). This way the drum will remain stationary during transportation.
We pack correctly
The last stage of preparation is packing the washing machine. The ideal option is factory packaging, but you can do without it. Hoses and electrical wires must be wrapped in bubble wrap or any soft cloth. The body should be wrapped with stretch film and covered with foam plastic (corrugated cardboard), after which the packaging should be tightly secured using tape. You can replace the foam with a regular blanket by wrapping it around the body with tape. You also need to install the machine for transportation on something soft (any rags, blanket, etc.).
Transportation methods
During transport, it is important to properly install the washing machine in the vehicle. Three options:
- in a natural upright position;
- on the back wall;
- turn over onto the side wall.
When transporting, it is better to order a truck to place the car in a vertical position, since this option is considered the safest.
If there is not enough space (for example, in a car, in a taxi), the car can be placed in a horizontal position on its side. It is better to choose the side that is closer to the powder compartment; in this case, you must first remove the container for detergents and dry the inside of the water so that moisture does not get into the electronics.
Transportation on the rear panel is also allowed, with the exception of models in which the fill valve design does not allow loading the panel. Otherwise, the heavy weight will simply break the valve.
It is strictly forbidden to transport the device upside down and the front panel. In the first case, this can lead to complete breakdown of the equipment, and in the second, to the breakage of the hatch and rupture of the cuff.
Where are the fasteners located and how to remove them
Some models of washing machines (LG, Ariston) are front-loading. The shipping screws are always located on the rear panel. The fasteners for top-loading machines (Indesit, Zanussi, Whirlpool) are located at the top or rear. The kit includes 4-6 parts. Miniature Kandy machines use 2-3 fasteners.
To remove the screws after transportation, you must perform several steps in a certain sequence:
- Use a wrench to loosen the fastening. It is included in the set of several products: Indesit, Bosch, LG. The bolts are turned in the opposite direction to clockwise rotation, and a small force is applied.
- The screw is pushed in until it stops, approximately 20 mm.
- Then the plastic cylinder and rubber washer are pulled out, while the screws remain in place.
- The bolts are removed.
- The resulting holes are closed with plastic plugs included with the washing machine. These simple details protect the internal area of the product from various debris, dust and moisture.
Good to know! The key can be replaced with pliers. It is impossible to do such a job with a screwdriver.
How to remove bolts from a Candy washing machine
The process of removing the shipping bolts is quite simple. A certain sequence must be followed:
- two bolts are removed from the rear wall;
- the top cover is removed;
- the bolts holding the steel plate are disconnected;
- the foam insert is removed;
- The top cover returns to its place and is fixed with screws.
In some brands of cars, for example, Gorenje or Miele, the fastening function is performed by metal pins. They are removed with pliers.
In Gorenje models, fastening is carried out using metal pins. They can be easily removed with ordinary pliers. To do this, the pin head must be rotated 90 degrees. When the protrusions line up with the slots made on the body, the pins can be easily removed through the hole.
Note! Sometimes the plastic washers slip and fall down. You can get them from the bottom through the holes in the front panel. One is located near the drain pump filter. The second is on the right side, where the drain hose is attached. The machine body may tilt slightly in different directions. The machine vibrates a lot during washing. After completing the cycle, the dropped washers will be near the holes. By pulling the cap and tilting the machine slightly, they can be removed with any sharp object, such as a piece of wire.
Fasteners must be preserved after removal from the product. They will be useful for subsequent transportation.
Removing the screws: instructions
So, the car was delivered to the apartment. Of course, you want to connect the unit and start washing as soon as possible, but it’s better not to rush. First, let the washer “rest” at room temperature for several hours. Next, we remove the factory stickers and set up free access to communications, electricity, water supply and sewerage. We deal with transportation bolts only after all the manipulations described above.
The clamps are removed using a special key, which is usually included with any Indesit model. If it is not there, then we find a 12mm head or pliers. Next we proceed like this.
- Loosen the screws by unscrewing them by 3.5-4 cm.
- We push the bolt inside the housing until it rests on a hard surface (on average, a recess of 2-2.5 cm is enough).
- Without touching the screws themselves, remove the rubber gaskets and the plastic tip.
- We close the vacated holes with special plastic “plugs”, which are included with Indesit washing machines. The main thing is to press on the lids until you hear a characteristic click.
The machine is supplied with a special key for removing transport bolts and plastic plugs.
But do not rush to throw away the removed shipping fasteners. It is better to pack them and store them along with the instructions and other documentation. They will come in handy the next time you transport the car, if it is sold or moved. Do not forget that it is strongly not recommended to transport machine guns without bolts.
Where are they located?
Most models of household appliances have almost the same internal structure and differ only in material, design and minor details, so in most cases these bolts are attached to all models with horizontal loading in approximately the same places.
You can find holes with them on the back wall of the case.
In rarer top-loading models, such fasteners are located on the top cover. Since the fasteners on front-loading machines are located in the rear of the case, it is recommended that you remember to remove them before the washing machine is installed and connected to the sewer system and systems through which water is supplied, so that problems do not arise later.
Depending on the model and size of household appliances, the number of holes and transportation bolts in the kit can vary from 3 to 5 pieces. In most cases, there are 4 fasteners located approximately around the perimeter of the drum.