Required Tools
Fast and high-quality repairs depend on having a complete set of necessary tools to restore the optimal operation of the machine:
A set of screwdrivers. Pliers. Set of wrenches. Bearing puller. Inaccurate hand movement can lead to breakage or deformation of surrounding parts, so it is better to use professional tools. Pliers. New spare parts - oil seal and bearing
When purchasing a product, you need to pay attention to the manufacturer. An incorrectly selected design may not fit into the technical structure of the machine.
What problems can arise if bearings are not changed in time?
Bearing failure is always an unpleasant event, because... replacing it is a rather complicated undertaking, but nevertheless necessary. This is due to the fact that failure to perform this operation can lead to negative consequences of varying severity:
- the bearing seat will break, which will require replacing the entire drum;
- the electric motor will burn out, which will require major repairs or replacement;
- if there is a belt drive, the belt installed between the engine and the drum shaft may break;
- other components that ensure the transmission of the rotational motion of the electric motor shaft to the drum of the washing machine, available in the design of the model (crosspiece, pulley, etc.), may be damaged;
- The integrity of the tank may be damaged, especially for models where this structural element is made of plastic, which, in turn, will lead to water leakage and, as a result, flooding of neighbors and damage to the electronic control system.
Replacing Samsung washing machine bearings
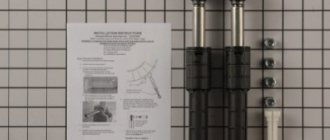
To replace bearings on a Samsung washing machine, you will need the following tools:
- Flathead and Phillips screwdrivers. It will be more convenient if these are cordless screwdrivers rather than regular ones
- Pliers
- Hammer
- Key for 10/13
- Hex key 8
Replacement process
Replacing the bearings of a Samsung washing machine is one of the most difficult types of repair of washing machines of this brand. The entire process will take several hours and requires a spacious room. You should not start repairs if you are not confident in your abilities.
1. Remove the top cover, use a Phillips screwdriver to unscrew the two mounting bolts at the back. Pull out the powder tray by disconnecting the rubber pipes from it.
2. Remove the counterweight (stone) from the washing machine tank. Counterweight bolted to tank
3. The removed counterweight should look something like this.
4. After removing the stone, the drum should look like this. Disconnect the water supply valve
5. Place the machine on its side. At the bottom of the machine you will see a plastic tray that can be torn off and thrown away. There is no need to leave it, it only collects garbage. View of the machine after removing the pan.
6. Disconnect the shock absorbers from the body. They are attached to the bottom of the washing machine with regular bolts that need to be unscrewed.
7. Go around the machine on the other side. Disconnect the springs on which the tank is suspended
8. Remove the front panel. To do this, you need to unscrew two bolts where the powder tray is inserted, three or two bolts where the control panel connects to the top cover, and one bolt (on some models) on the right side of the control panel.
After removing the control panel, remove the O-ring on the hatch cuff with a flat-head screwdriver and unscrew the front wall. Typically there are three bolts on top and four on the bottom.
10. Remove the belt and motor from the drum
11. Place the tub with the laundry opening facing down. Unscrew and remove the pulley (the gray circle that turns the drum).
12. Disconnect shock absorbers from tank
13. Separate the tank halves. They are connected to each other with special clamps. It is advisable to mark the installation locations of the clamps to make your work easier during assembly.
14. Now you need to pull the drum out of the rear wall of the tank. Sometimes it takes some effort to push the drum out.
15. Knock out the bearings from the rear wall.
16. We install new bearings in place of the old ones.
The bearing replacement process is complete. Now all that remains is to put everything back in place in reverse order.
Replacing bearings at a service center
As you can see, replacing bearings is one of the most difficult types of repairs, which is best left to professionals. All our technicians have extensive experience; in most cases, we have the ability to replace bearings at the client’s home without taking the washing machine to the workshop.
All work is done in front of you. During our work, we use only Swedish SKF bearings, which will be demonstrated to you before installation. After completing the work, all old spare parts - bearings and oil seal - will remain with you.
We provide a warranty on bearing replacements from 6 months to 1 year. You can order repairs on the website, in the Washing Machine Repair section, or by phone.
Gross mistakes when disassembling the machine and replacing the bearing
Experts have identified a number of the most common mistakes made by beginners who do not know how to remove a bearing from a washing machine drum correctly. This can cause big problems with repairs and permanently damage the unit.
Let's start listing:
- the wires of the sunroof lock sensor come off when the front part of the unit is removed;
- when you try to remove the pulley from the axle, it is damaged;
- the threads of stuck bolts break off;
- the filler pipe comes off along with the hose;
- When the bearings are knocked out of the drum, great damage is caused to them; such a bearing change may result in a drum change.
Pay attention to all of the above and try to avoid wrong actions. Replacing the drum bearings of a washing machine can be done on your own. But keep in mind that without proper experience in this type of work, you risk damaging the mechanism of the unit to an even greater extent. If you are not confident in your abilities, it is advisable to seek help from a specialist.
Removing the tank from a Samsung car
Having collected all the necessary tools, you can begin to figure out how to replace the bearing in a Samsung washing machine.
Prepare a convenient place in which you will disassemble the machine - it may not be enough in the bathroom, so if possible, move the equipment to a workshop or garage.
Next, you need to remove the “extra” parts that interfere with dismantling the tank. You need to disassemble sequentially so as not to lose spare parts and fasteners, so carefully sort and lay out everything that you remove from the car.
Disassemble the SM housing according to this scheme:
- Remove the top panel. To do this, unscrew the two fasteners located in the corners of the back wall. Then take the lid with both hands and pull it towards you and then up. After removing the panel, set it aside so that it does not interfere.
- Remove the detergent receptacle. It's as easy as shelling pears:
- pull out the tray to the maximum;
- press the valve located in the middle;
- With your second hand, slightly lift the tray and pull it towards you;
- If you did everything correctly, the receiver will jump off.
- Having removed the powder receiver, unscrew the hoses that supply water to it, as well as the pipe through which the dissolved powder is poured into the tank. Unclench the clamps using pliers.
- At the top of the washer you will see a counterweight. It looks like a large brick or stone. Select a suitable socket to unscrew the fasteners.
- Next you will need to dismantle the rubber seal.
Removing the rubber cuff on a Samsung washing machine is easy:
- Unscrew the two bolts that hold the hatch lock.
- Remove the sensor - this is necessary so as not to break the wiring when removing the cuff.
- Using a thin screwdriver, pry up the wire tie.
- Move the screwdriver under the clamp until you hit the fastener. Your job is to weaken him.
- Loosen the bolt and remove the clamp.
- Place your fingers under the cuff and pull it towards you.
You may not be able to remove the seal completely. The point is that it does not interfere with the removal of the front panel.
Next, lay the machine on its side to gain access to the bottom of the MCA. Remove the bottom by unscrewing the 4 bolts holding the cover in place. Set it aside.
Get started with electronics:
Locate the motor and drain pump. Remove all wiring connected to these parts. If possible, record the disassembly process on video so that you don’t mix up all the wires later. If this is inconvenient, then label everything using a marker.
Now you need to remove the racks - replacing the bearing of a Samsung washing machine is impossible with them. The ends of the stands are attached to the tank with four bolts, on the other side of the stand they are screwed to the body of the machine.
Don't remove anything else at the bottom except the motor. The pump will also not hurt you - you just need to remove the pipes going to it.
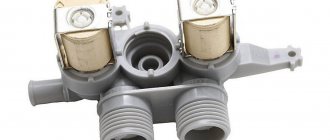
Leave the washer in a horizontal position - this will make it more convenient for you to remove the water inlet valve along with the tubes and sensors going to it.
Remove the wire connected to the valve sensor, then unscrew the fasteners that hold it in place. Remove valve, set aside. Finally, remove the 4 springs on which the tank hangs.
Removing covers
Now there is nothing left to get to the tank - you only need to remove the wall and the front cover. The control panel is held on by 5 bolts. By unscrewing them, you can easily remove it.
The front wall is held in place by about a dozen fasteners. Find them all and unscrew them. Remove the lid and set aside. By the way, under the front cover there is another counterweight smaller than the main one. Take the socket wrench and unscrew it.
Now everything that previously prevented you from getting the tank has been eliminated. You can take out the engine and tank
It is important not to damage wiring and other vulnerable components, so as not to add more work to yourself
- Turn the tank over.
- Remove the belt from the pulley.
- Use a hexagon to unscrew the pulley. If the pulley fastener is tight, add a little WD-40 to prevent stripping the bolt.
You have completed the routine work and disassembled almost the entire machine. Now, you can disassemble the tank to see in person what bearings are in your Samsung washing machine and make sure that they need to be replaced.
Causes of breakdowns
The new washing machine operates almost silently and hardly vibrates during washing. However, during operation, the “noise” of this household device increases sharply due to bearing wear, which increases significantly if the owners of the automatic machine:
- the tank is often overloaded;
- wash “heavy” items (shoes, sports equipment, etc.) without a protective net;
- do not monitor the condition of the seal (water may get in);
- do not check clothing pockets and accessories for the presence of sharp objects or edges that could damage the rubber seal.
In addition, such a malfunction quite often appears due to wear and tear of equipment or poor quality water. In the latter case, it is necessary not only to repair the device itself with replacing the tank and bearings, but also to install water purification filters.
Any of the above options can lead to serious damage in the form of failure of the electric motor, as well as other important components and parts of the device. There is only one way to avoid such problems - timely change the damaged bearing on the washing machine yourself or call a specialist to repair these household appliances.
How to diagnose that your washing machine bearings are worn out
The most typical signs that a washing machine bearing has failed, or will happen in the near future, are:
- when the washing mode is turned on, the machine operates, emitting a characteristic hum, but the drum does not spin;
- the washing mode started, but during operation there was an unusual noise made when the drum rotated, and vibration uncharacteristic of normal operation;
- The laundry spin mode does not work, it remains damp (does not spin);
- the drive belt quickly fails (wears out);
- When loading laundry, you feel the drum swaying on the rotation axis.
Parsing the machine
To disassemble the device, you must first disconnect it from the power source and turn off the hoses. It is recommended to place the unit in such a way that you can access each of its parts. All car disassembly procedures should be photographed. This will help you reassemble the device correctly after the repair is completed.
Removing the top cover
First you need to unscrew the lower fixing screws that are located on the back wall. They should be moved slightly back - 3-4 centimeters. Then remove it from the stops, fold it back and set the lid aside.
Detergent tray
To remove this part of the device, you need to press it with your finger onto the latch located in the center. After which the tray can be pulled out. After this you can see the side bolts. They should be unscrewed with a Phillips screwdriver.
Disconnecting wires
To disconnect the wires, you need to unscrew the plastic holders. Then you can pull out and disconnect the wires. To do this, you need to find and squeeze the latches. Then unplug the connectors one by one.
How to remove the clamp
The next step is to open the door. The clamp spring should be pryed off. This is done with a screwdriver. It is located under the drum rubber. You should take out the clamp and insert the cuff under the drum.
Service panel cover
To remove the service panel, press out the latches that go on top. Then lift and slightly tilt the panel towards you. It is recommended to unfasten the wiring and pull it out through a special hole. Then remove the control panel from the device.
Cuff
The hoses connected to the cuff can be disconnected using a flat-head screwdriver. The cuff is fixed on the tank with the same clamp as on the hatch. Therefore, the spring should be pryed. This is done with a flat screwdriver. As a result, you will be able to get the fixing clamp. The cuff can then be removed from the drum and set aside.
Disconnecting tank hoses
To make the tank lighter, it is worth disconnecting the heavy counterweights. Then you need to unscrew the screw fastenings of the counterweight located on top and remove it. Similar steps can be performed for the lower counterweight.
heating element
To remove the heating element, it is recommended to unfasten the batteries and cut the tie with wire cutters. Then you can unscrew the grounding contacts.
Disconnecting all elements connected to the tank
Be sure to remove all parts attached to the tank. The clamps of the pipes can be loosened using a Phillips screwdriver. You should also remove the screws securing the pressure take-off chamber.
Stator
This part should also be removed after unscrewing the screws. It is recommended to tilt the element down. This will help remove the wires from it.
Shock absorbers
These fragments are fixed on pins. To pull them out, you need to put on the key and squeeze the locking tabs. Then pull the part towards you with pliers. It is recommended to disconnect it and lower it down. Then remove the front shock absorber. This is done using a spanner wrench. Using pliers you can remove the pin.
Tank
To remove the tank, it is recommended to remove the side springs that secure this structural element. Use a flat-head screwdriver to unscrew the plug, lift and pull out the spring from the hole located on the frame. Carefully lower the drum down and remove the spring. Do similar steps on the second side.
Disassembly stages
The direct process of disassembling a washing machine consists of several stages, during which you need to take into account a number of nuances. Otherwise, you may encounter difficulties and provoke the emergence of new malfunctions.
When disassembling equipment, it is also important to follow the sequence
Disconnection from connections
For safety and convenience of disassembling the washing machine body, you need to disconnect it from utilities. First, the machine is disconnected from the network, and then the hoses connected to the water supply system are unscrewed.
Recording all stages using a camera or video camera
Without sufficient experience and skills in disassembling washing machines, you can get confused in the reassembly process. Incorrect fastening of parts leads to incorrect operation of the equipment and serious damage. To make the task easier, it is recommended to take photographs and videos of each stage of disassembly, and after replacing the bearing, perform the reassembly process in reverse order.
Remove the cover and dashboard
The process of unscrewing the cap depends on the design features followed by various manufacturers. In most models, you can remove the top cover by unscrewing the screws located at the end just below the cover. Then the upper part is moved back 3-5 cm, pressing lightly in the horizontal direction.
After removing the cover, you gain access to the dashboard, which is fixed from the inside with fasteners. The screws are located under the powder dispenser and on the back of the panel. First you need to remove the compartment, and then unscrew the screws holding the panel and pull it towards you.
Releasing the hatch, removing the rear wall
The back wall is secured with latches and is very easy to remove. It is enough to pull the wall towards you, and if it does not release from the latches, you need to bend them with a screwdriver and remove the wall.
Removing the heating element, wiring, tank
The heating element and wiring are located under the rear panel, so the next step is to remove these components. Then it remains to pull out the tank, which can be solid or consisting of two halves.
Dismantling the dismantled structure
To disassemble a non-soldered tank, you need to find the junction of the two halves and unscrew the screws that hold both parts. Then take out the seals, prying them off with a simple flat-head screwdriver. The bearings are knocked out with a hammer and a metal rod, the cross-sectional diameter of which must be identical to the diameter of the bearings. The drum components must be dismantled carefully so as not to damage its integrity.
Opening a solid tank
It is more difficult to disassemble a solid tank than a non-soldered one. The disassembly process proceeds as follows:
- The tank is removed from the washing machine and the location of the weld is located. At a distance of 4-5 cm, holes are made in the seam using a drill with a drill diameter of 3-4 mm.
- Using a hacksaw, saw the tank along the seam.
- Having separated the part, they gain access to the shaft and replace it, after which they assemble the tank in the reverse order. To connect the parts of the tank, special glue is used and additionally fixed with screws.
Where can I get new bearings and seals?
The main difficulty when repairing old washing machines is finding replacement components. Thus, the first copies of the Vyatka-automatic were released back in 1981. Despite such a long period of time, the units were well preserved. They function properly to this day.
We'll have to look for analogues from more modern washing machines. To repair a bearing assembly, you need to find and purchase:
- internal bearing. “Ring” dimensions 30x62x16 mm;
- external bearing, 25x50x15 mm;
- sealing rubber (oil seal), 38x62x10 mm.
There will be no problems purchasing bearings. “Rings” of these sizes can be found in specialized stores or ordered online. They are quite common, as they are suitable for modern automatic machines Indesit, Ariston and others.
The situation will be more complicated with the oil seal. On the Russian market it is almost impossible to find a seal exactly the same size as the one on Vyatka-automatic. You can try your luck in workshops that dismantle and repair equipment; suddenly, quite by accident, they sell an old washing machine for spare parts.
Repair
Repairing washing machine faults requires skills in working with tools and at least minimal knowledge of electronic equipment. The approximate work plan presented below will allow you to avoid annoying mistakes and eliminate problems yourself.
Washing machine pumps
Even professionals rarely attempt to repair a broken drain pump. This device is not too expensive and is easier to replace entirely. The main thing is to find a part of a suitable brand in the store.
The pump is replaced as follows.
- Remove the bottom panel.
- Using a screwdriver, disconnect the pump from the machine body.
- By pressing on the drain valve from the outside, push the pump inside the housing and pull it out.
- Disconnect all wires leading to the pump.
- Remove the drain hose and pipe.
- Installing a new device.
After this, you need to reassemble the washing machine, performing all the steps in reverse order, put it in the working position and check the operation of the new part by turning on the wash without laundry.
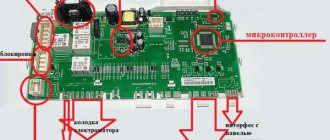
Washing machine control module
In many models, the control board is located at the top of the front of the machine; removing it is not difficult. Having freed the substrate with the microcircuit from the fixing strips, you need to carefully examine it. Signs that repairs are needed include:
- the plate has changed color in some places, the tracks have darkened;
- torn capacitor caps;
- The place where the main processor is installed has darkened.
If you discover one of these defects, it is better to immediately contact the workshop. After all, to repair a microcircuit you will need both the appropriate skills and the ability to work with a soldering iron.
Bearing replacement
If the washing machine starts spinning loudly, then one of the reasons may be damage to the bearing. To change bearings in a top-loading machine, you must:
- Disassemble the device body and remove the back wall.
- Remove the belt from the pulley, allowing access to the bearing system.
- Unscrew the central bolt securing the pulley to the drum and remove the pulley.
- Unscrew the three screws securing the structure and remove the coupling with bearings.
- Remove the O-ring and oil seal from the shaft, which will also have to be replaced.
Then all that remains is to install new parts and reassemble the washing machine, doing the work in reverse order.
Replacing the heating element
The heating element often requires replacement. It can burn out from long-term use or unstable voltage in the electrical network. From constant contact with water, the tubes of the heating device become covered with scale.
Changing the heating element is not difficult, you just need to do the following:
- Remove the back panel, since most often the heating element is located in the rear of the case.
- Disconnect the electrical appliance connection terminals.
- To remove a faulty heating element, you need to unscrew the nut using a wrench and press on the stud with a screwdriver. Use a twisting motion to remove the damaged part from the seal.
- Install the new part, trying to place the heating element evenly, without deforming the seal.
- Insert the stud into place, tighten the nut, and connect the wires.
By photographing the position of the parts and wires before disassembling, you can make your work much easier.
Shock absorbers and dampers
Shock absorbers and dampers protect the components of the washing device from vibration and premature destruction. However, these elements themselves wear out quickly and often require replacement.
It is enough to change the seals in the dampers. Replacing shock absorbers is a complex job that requires complete disassembly of the washing machine body. It is better to contact a service center with this problem.
Briefly about prices
When you understand that changing bearings is inevitable, then you should not despair, even if you are not able to do it yourself. In service companies, such repairs will not cost you that much:
- for front-loading machines - 1-2 thousand rubles;
- for vertical - 1500 rubles;
- replacement in the forecastle - from 2 thousand rubles.
Prices by region may differ, but not by much; exact prices can be found in the service centers of your city.
If bearing failure leads to water leakage, the heating element may burn out, then the cost of repairs increases. The worst case scenario is that the electronics system burns out, then buying a new machine is inevitable, the old one will only be suitable for disassembly for spare parts.
DIY repair
So, you have prepared everything you need, get to work.
Remove the top cover of the Bosch washing machine
Take a Phillips or hex screwdriver and remove two screws from the back of the machine. Now slide the cover forward and lift it up. Be careful, the edges of the panel may be sharp. Set it aside.
Disconnect the control panel
Moving to the front, pull out the powder dispenser tray. Press the latch in the center, pull it towards you and remove it from the case.
Next, unscrew the bolts located behind the tray, as well as the bolts on the other side of the panel. Carefully release the plastic latches (you can pry them off with a flat screwdriver) and disconnect the panel. To completely remove it, you will need to disconnect the wire connectors - it is better to photograph them in advance. But it’s easier to hang the panel on the side, on the service hook.
Remove the bottom cover. It is located at the bottom of the front panel. To do this, simply release the latches. Set it aside.
Remove the front panel of the Bosch machine
First of all, open the hatch door. Before disassembling the Bosch washing machine door, remove it from its hinges by unscrewing the fastening screws. This must be done so as not to damage the sunroof glass.
Bend the hatch cuff and, prying the clamp with a screwdriver, pull it out of place. Place the sealing rubber inside the drum.
Unscrew the bolts securing the door lock. Place your hand behind the body and take out the UBL. Disconnect all wires from it and set the lock aside.
After unscrewing the screws around the perimeter of the front panel, carefully remove it and put it aside.
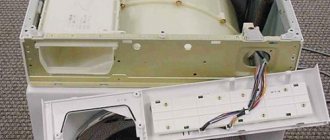
Detach the back panel and deal with the counterweights
Using a screwdriver, unscrew the bolts around the perimeter of the cover and remove it. Behind the panel you will immediately see the internal components of the Bosch washing machine.
Unscrew the screws on the top bar that connects the two parts of the body. Using a 14 mm wrench, unscrew the bolts and remove the upper counterweight. Do the same with the counterweights that are located around the hatch.
Remove the details at the top
How to further disassemble the Bosch washing machine? To remove the tank, you need to free up as much space as possible and also disconnect all the parts attached to it.
- To remove the dispenser tray cuvette, disconnect the pipe leading to it. If there is a clamp on it, loosen it with pliers. Also remove the inlet valve pipe.
- Now disconnect the pressure switch and noise filter. To do this, disconnect the wiring from the parts and unscrew the fastening bolts. Remove the tube from the pressure switch. Remove the parts from the housing.
The tank no longer holds anything on top.
Go back to the back
Now you need to disconnect all the fasteners and elements.
- Remove the drive belt by pulling slightly towards you.
- Disconnect the wires leading to the electric motor.
- Unscrew the bolts that hold the motor to the mounts.
Rock the engine slightly from side to side and remove it from the housing.
Be careful, the part is heavy!
Get to the pump
It is necessary to lay the washer on its left side, remove the bottom (if it has one) by unscrewing the screws.
We disassemble a Bosch washing machine:
- Using pliers, loosen the clamp of the drain pipe.
- Unplug it. Be careful, there may be water in it.
- Unclench the wires leading to the pump.
- Unscrew the bolts that secure the drain pump and remove it.
Remove the tank
There is little time left before dismantling the tank. Disconnect the wires from the heating element. The heating element in Bosch cars is located in the front part, under the tank.
Sometimes wiring is attached to the walls of the tank, secured with bundles. Cut the harnesses with wire cutters and move the wires to the side. Now you need to remove the shock absorbers.
- Place a socket on the back of the shock absorber rod to press in the latch.
- Pull the rod towards you with pliers and pull it out of the hole.
Do the same with the second shock absorber. All that remains is to remove the tank from the springs. Lift it up by the edges of the hatch and pull it out through the front compartment.
Steps to take when replacing a front-loading washing machine bearing yourself
As already written above, replacing a bearing is a rather complex task, for which it is necessary to disassemble the washing machine. To do this you will need the following tools:
- hammer;
- rubber (plastic) mallet;
- pliers;
- Screwdriver Set;
- set of wrenches;
- gas key.
In addition, you must have silicone sealant, WD-40 aerosol, as well as appropriately sized bearings and seals, as well as lithol or another type of similar lubricant.
For your information!
If the user is performing such work for the first time, then in order to facilitate the assembly process and avoid mistakes, you can use a smartphone and film all types of connections of various components and electrical connections before starting the disassembly process.
The work of replacing the bearing on different models of washing machines may vary slightly, but, nevertheless, the main steps are performed in the following sequence:
| Illustration | Description of action |
| The back cover is unscrewed. | |
| The drum shaft drive belt is removed. | |
| The rotation of the drum is jammed; for this, use a screwdriver or other durable tool. | |
| The nut securing the pulley is unscrewed and it is removed. | |
| The wires from the heating elements and other elements of the electrical circuit are disconnected. | |
| The elements securing the drum to the machine body and the electric motor are unscrewed. | |
| The top cover of the washing machine is unscrewed and removed. | |
| The structural elements located in the upper part of the housing are disconnected, preventing the drum from being removed. | |
| The drum is removed from the machine body. | |
| Using a screwdriver, remove the oil seal. | |
| Using a hammer and punch, first knock out the inner bearing. | |
| Then the outer bearing is removed in the same way. | |
| The seat is cleared of dirt, and the new bearing is pressed in using a mallet or a wooden block and a hammer. |
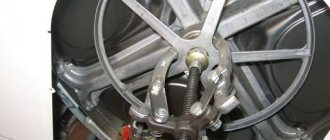
In order to knock out the bearing, you can use a core and a hammer, as in the case discussed above, or special pullers, if available.
Important!
When knocking out a bearing, it is necessary to strike along its entire circumference, otherwise the bearing may become crooked and jam, which will lead to unnecessary problems associated with its removal.
To make it easier to install the new bearing into the seat, it can be lubricated with grease or another type of thick lubricant. When installing a bearing located inside the drum body, you can use a hammer handle or a specially made piece of wood that matches the diameter of the seat. WD-40 aerosol will be required if any fastening elements will not be unscrewed, then they should be treated with this preparation. The washing machine is assembled in the reverse order to how it was disassembled. After completion, the functionality of the repaired household appliance is checked.
How to replace
Before starting repair work, it is necessary to disconnect the machine from the electrical network in order to avoid the possibility of electric shock. After this, unscrew the water supply and drain hoses, pulling them forward a little.
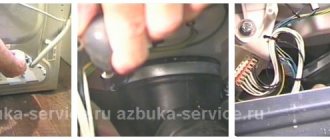
Removing the pulley and motor
To solve the problem of wear of seals and bearings, remove the motor and pulley of the washing machine. To do this, you must first remove the drive belt by screwing the pulley and pulling the belt forward.
After this, secure the pulley by inserting a strong pin into it. You can tighten the pulley if you unscrew the bolt that secures it. The pulley is removed from the shaft if you swing it a little and pull it towards you. In this case, it is not necessary to dismantle the heating element. Although, this is the time to consider the condition of the heating element. If there is a thick layer of scale on it, it is better to remove it.
The engine can be removed by unscrewing the bolts that secure it. In this case, you need to remove the pipe. It is easier and easier to do this through the bottom of the machine, turning it on its side.
Removing the top cover
On the back of the machine there are 2 self-tapping screws, through which the cover is attached to the body. By unscrewing them, the lid will move back a little. After this, it can be lifted and removed.
Some models of the Indesit washing machine are equipped with special plastic latches that secure the lid. In this case, it is enough to unfasten them, which will allow you to remove the top cover.
Removing the Drum
The next step in replacing the oil seal and bearings is to dismantle the drum. To do this, you need to remove and pull out the tank by pulling it forward. All Indesit models are equipped with a one-piece tank. In order to be able to access the drum, you will have to divide the tank into 2 parts. This can be done by sawing it using a grinder or a metal saw.
Before you start cutting the tank, you need to make a final decision on how its subsequent assembly will be carried out. To do this, you need to make several holes on its surface for bolts, with the help of which the tank can be assembled into a solid structure.
After disconnecting the drum from the tank, experts recommend inspecting it for damage. In addition, you should check the condition of the gasket located under the drum. If it is stretched and has cracks on the surface, it is better to replace it.
Removing and replacing bearings
Now it's time to change the oil seal, which performs a protective function for the bearings. To do this, you can use a screwdriver to pry off the seal. It is possible that this will be difficult to do. You will have to use a hammer and chisel, carefully knocking out the bearings by tapping them in a circle.
If it is impossible to do this yourself, you will have to contact a service center, where, using special equipment, the cuff will be pressed out of the bearings.
After successfully removing the cuffs and bearings, you need to clean and lubricate the place where the new parts will be installed. It is recommended to use a special sealant for lubrication.
Purchased new bearings and a cuff can be installed in their original place using a hammer and a wooden block. As a result, it will be possible to significantly soften the force of the hammer impact, preventing cracking of the bearings and damage to the seal. It is recommended to direct the main direction of impact towards the edges of the parts. The oil seal must rest on bearings. After this, all that remains is to reassemble the Indesit washing machine in reverse order.
To ensure that replacement does not cost too much, it is recommended to adhere to the following operating rules:
- Operations with the pulley must be performed carefully, without sudden jerks. You first need to lightly swing it to the sides and then pull it forward. Otherwise, the pulley may be broken;
- When using the machine for a long time, its bolts may become stuck, which makes it difficult to unscrew them. If you apply force when unscrewing the bolts, you can tear off their heads. To avoid this, spray them with WD-40;
- when dismantling the tank cover, the wires of the temperature sensor can be broken;
- You should assemble the washing machine carefully, not forgetting to connect all the sensors.
Following these simple rules will help you avoid additional costs for repair work.
Phased renovation
To replace the bearing in an Indesit washing machine, you will need a tool and a general understanding of the operating principles of household appliances. The complexity of disassembling the machine is determined by the design of the tank. In new Indesit models, the tank is non-dismountable, plastic; in older models, the iron tank is disassembled. A non-separable tank will have to be sawed and then glued.
Disassembling the washing machine
For those who decide to change the bearing on an Indesit washing machine on their own, it is recommended to photograph the disassembly process during work in order to later assemble and connect the machine correctly.
First, the washing machine is prepared for repair work. It is disconnected from the power supply, water and sewerage, the remaining water is drained, moved to the work site and the detergent dispenser is pulled out.
Then you need to remove the cover of the washing machine by unscrewing the screws on the back of the case, as well as the cover of the service hatch on the rear wall, which is also held on by screws.
Next, opening the machine door, remove the outer clamp of the cuff, separate the cuff from the outer part of the body and tuck it inside.
The top of the tank must be emptied. To do this, the dispenser hopper and pipes are removed, and the counterweight is disconnected (if it is located on top). The terminals are removed from the control unit.
At the bottom of the machine, remove the contacts from the heating element and temperature sensor from the tank. After this, remove the clamp from the tank, and then disconnect all the wires that are attached to the tank. Then the wire belt is removed, the motor and heating element are disconnected and removed.
The tank is pulled out and placed on a horizontal surface for further work.
Removing the Drum
If the tank is collapsible, then you need to remove the pulley from it (it is attached to one bolt) and recess the shaft inside the tank. Now you can remove the top part from the tank and take out the drum.
If the tank is not dismountable, it will have to be cut along the outer edge or along the seam. Then the tank is turned over, the pulley is removed and the shaft is pressed in likewise.
The drum is removed, and access to the oil seal and bearing appears in the tank.
Removing old bearings and seals
Before dismantling the oil seal and bearings, it is recommended to clean their visible parts from dirt mechanically (this will make them easier to remove). The bearing is carefully knocked out with a blunt chisel and hammer, distributing blows around the entire circumference so that it comes out straight
All actions should be carried out very carefully so as not to damage the tank
The bearing most often flies out at the same time as the seal. Or the oil seal is taken out separately after the bearings.
Replacement with new parts
Before installing new bearings and an oil seal, it is necessary to wash the shaft, clean it from dirt and treat the places where they are attached with lubricant (for example, Litol-24), select bearings and an oil seal of the required size, identical to those used previously.
First, the outer bearing is installed. It is hammered along the outer edge of the part. Next, the internal bearing is installed in the same way. It is recessed relative to the inner surface of the tank. An oil seal is placed on top of it, which is generously lubricated with grease.
The drum is mounted in the tank in its original place.
The quality of the repair work can be checked by unscrewing the drum in the tank with your fingers. If nothing interferes with the movement of the drum and there are no extraneous sounds, then the bearings are installed correctly.
Reassembly
First, the tank is assembled (or glued together). Then a pipe is installed (its fastening can be sealed with sealant), a cuff, a heating element and a temperature sensor. The tank is placed back into the housing. It is recommended to clean and rinse all removable rubber parts before assembly. Assembly is carried out in reverse order.
Replacing a bearing in a top-loading washing machine
As we have already said, it is better to purchase the part that you plan to replace in advance, but this is only possible if you know what it looks like. If you are faced with a similar task for the first time, you will need to first remove the part to use it as an example, and then go to the store to find a similar one.
Bearing diagram in a washing machine
The bearing replacement process itself requires adherence to an algorithm. We will consider such actions using the example of a Zanussi washing machine.
Step-by-step instruction
Step 1. We will start the analysis from the side panel (right), because this is where the pulley is located.
Using a screwdriver, you will need to unscrew the screws
Step 2. After removing all fasteners, you need to open the side panel.
The belt should be released
Step 3. Now you will need to remove the support to free the pulley. If the fasteners are rusty, they can be difficult to remove, so you will need the help of a partner.
Here it is immediately clear why the breakdown occurred, because there is play in the indicated place
Step 4. Now you need to remove the remaining traces of corrosion. This is necessary in order to see in which direction the bearing is removed.
Using a rag, you need to clean the fasteners from rust.
Step 5. Now you need to take two screwdrivers and place them on the sides of the mechanism.
Using some effort, you should dismantle the unit
Step 6. Now you need to remove the oil seal. Here it is impossible to disconnect the bearing from the support, so it is completely replaced.
The oil seal itself and the places with which it comes into contact must be treated with a special lubricant included in the package.
Step 7. Next you need to install a new node.
There should be signs on it so you know which way to screw.
Step 8. Now you need to tighten the fasteners using the same two screwdrivers. Only now you need to move in the other direction. Using the same principle, you should replace the bearing on the other side of the washing machine.
Tighten the fasteners
Note! Since most of the internal elements are made of plastic, they should be handled carefully so as not to damage their integrity. If there is too much rust, you can clean it using special products, for example, WD-40. They degrease the surface in the best way and remove any deposits.