Home air conditioners and their owners can encounter a variety of types of breakdowns. And the reasons and sources are also different. These are complex devices consisting of a large number of parts and mechanisms, and therefore require more attention. That’s why it’s so important to study the main breakdowns of air conditioners in advance. There are several problems that appear most often in practice. Methods for eliminating breakdowns have also been known for a long time.
The main causes of breakdowns
Timely maintenance of equipment will be the key to its stable functioning. You can list such problems that are typical for modern devices.
Air conditioning master preparing to install new air conditioner. drilling the wall.
Filter dirty
Such a breakdown leads to the following consequences:
- Air circulation inside is impaired.
- Refrigeration equipment is malfunctioning.
- Copper pipelines become covered in ice.
As a result, excess water is often observed to flow and drip from the housing.
The standard filter cleaning frequency is every three weeks. The devices are washed under running water, then it is possible to completely get rid of dirt. All that remains is to dry the filters and return them to their original position. Such a problem is not enough to write off equipment.
Freon leak
No one is safe from leakage, even if all recommendations are followed perfectly. 2-3% per year is a normal figure, equal to approximately 150 grams. Refueling is carried out 2-3 times a year to avoid serious breakdowns. Then the freon level inside the system rises to normal levels.
But sometimes leakage exceeds any current standards. If ice and frost form on special copper pipes inside, this means that serious problems have arisen. These leaks cause mechanical problems.
Operation of the device in winter
Most modern devices are not adapted to work in the cold season. -7 - +40 degrees - standard temperature ranges during operation. Normal work with negative temperatures is impossible without special technical training.
The operation of the compressor and drainage systems is disrupted if used incorrectly in winter. The drain freezes, preventing water from leaving the system. Liquid leaks into the room where the device is installed. Air conditioner problems continue to develop if no steps are taken.
Causes of breakdowns and their prevention
The causes of air conditioner breakdowns are varied, and in order to eliminate any malfunctions in the operation of the equipment, you need to follow all operating rules and carry out timely maintenance of the device.
Preventive measures:
- The minimum frequency for preventive inspections is once a year. It is better to do this before the start of the warm season.
- Timely refilling of the air conditioner with freon.
- Cleaning filters and internal parts of the device (performed by a specialist).
Repair of climate control equipment is best left to professionals. The intervention of an inexperienced user can provoke new breakdowns, requiring even greater costs or complete replacement of climate control equipment.
After purchasing an air conditioner, be sure to read the user manual and follow all manufacturer recommendations.
About the main faults
It is not recommended to fix any breakdowns yourself. If you do the repair yourself, and then problems arise, the manufacturer will most likely refuse the warranty.
If there is poor cooling in the room
This is usually due to the following reasons:
- Weak power.
- The appearance of internal damage.
Sometimes it happens that the power of the air conditioner is not enough to maintain the temperature in a particular room. An example is due to a sharp change in the climate in which the operation is carried out. The average temperature range is from -7 to +40 degrees. These are the main indicators that apply to all devices.
In other situations, the problem is related to internal failures of the device. It is recommended to immediately seek technical service; it is also difficult to solve something on your own.
Short cycle unit
At first the device is turned on, but it stops working literally after 15-20 minutes.
This problem has several reasons:
- Dirty radiator.
- Failed thermostat.
- Broken control board.
- Problem with settings.
External radiators are subject to various mechanical damage and stress, especially in the summer. When foreign objects get inside, the entire system begins to overheat. Because of this, all work stops. The problem is eliminated by flushing the radiator with water and strong pressure. This will help eliminate other air conditioner problems.
Sample equipment decommissioning certificate
Equipment write-off act is a document that is drawn up by several persons and confirms the fact that the equipment has been written off.
All organizations are faced with the need to write off old equipment. Computers, office equipment and other property must be disposed of according to a write-off report. Correct write-off requires an expert opinion on the condition of the equipment, which contains an assessment confirming the impossibility of further use. A specially created commission or an invited expert organization draws up a technical inspection report, on the basis of which it is possible to write off fixed assets from the balance sheet and dispose of them.
Property tax has to be paid for equipment that has not been written off but is out of order or obsolete. You can write off fixed assets gradually - through depreciation, but there is a shorter way - drawing up an equipment write-off act. It is recommended to write off material assets that:
- cannot be used because they have become unusable;
- do not exist based on inventory results;
— morally outdated;
- extremely worn out;
- damaged when repair is impossible or economically unfeasible.
Every year, the head of the organization must issue an order appointing a commission to write off fixed assets.
Automatic diagnostics
Factory defects, poor installation and improper operation are the main reasons why the internal parts of the air conditioner fail prematurely. There is practically nothing that can be done about a manufacturing defect; in the other two cases there is a chance to improve.
Inscriptions on the display and blinking lights will help you find out in time that certain problems have arisen.
Error codes in the air conditioner usually indicate breakdowns of the following nature:
- Broken thermistor, resulting in no additional temperature control.
- Problems with the directional valve.
- Problems inside the fan.
- Voltage surges at the outdoor unit.
- Exceeded parameters related to energy consumption.
- Problems with the cable or circuitry due to communication.
- Lack of overvoltage protection.
- The work goes on both heat and cold at the same time.
- Malfunction in the thermistor of the external part.
- Faulty internal thermistor.
The instructions provide a precise definition for those who are interested in deciphering the appearing codes and designations. This allows you to quickly determine what exactly happened.
The main thing is to check in advance whether there really is a breakdown inside. Typically, the device reports problems by flashing various indicators and the appearance of inscriptions.
But not every code has a decryption for users. Most of the information is handled by technicians belonging to a particular service center.
Compressor and clutch problems
If the radiator on the external unit is clogged with dirt, this part of the structure may overheat. Heat removal becomes more difficult and the load on the device increases. The pressure level in the lines requires a separate check. Excess refrigerant must be released if the reading is higher than normal.
Never rule out the possibility that the fan on the external unit has become faulty. Clogged capillary tubes are another common cause of later problems. Replacing one of the tubes often solves the problem.
There are other signs that indicate breakdowns in this part:
- The compressor refuses to start when the air conditioner is turned on.
- Presence of oil leaks on the compressor.
- Compressor drive belt creaking.
- Extraneous noise.
- Decreased performance.
Complete compressor replacement and repair are complex operations, so it is recommended to immediately contact specialists.
How does the automatic diagnostic system work?
Some air conditioner models are equipped with an autodiagnostic function to determine the causes of failure. The opportunity allows you to immediately find out about incorrect functioning and a specific type of malfunction.
Thermistor
A thermistor is a temperature sensor that converts a temperature value into resistance. Due to this effect, it is possible to set the cooling temperature.
Indoor unit
The thermistor located in the indoor unit is the most important. Its purpose is to determine the ambient temperature. Based on the indicators of the thermistor of the indoor unit, you can find out that equipment repair is required.
Outdoor unit
The function of the outdoor unit is to limit the operation of the air conditioner when the outside temperature is below the operating range. If the permissible limits are exceeded, the air conditioner does not turn on.
Overload protection
Built-in equipment overload protection provides automatic shutdown in case of overheating. When the maximum operating capability is reached, the air conditioner turns off and does not start until the internal components have cooled down.
Cooling and heating mode
An air conditioner equipped with a heating function produces 3-4 times more heat than it uses electricity. Turning on the heating mode in the cold season can lead to jamming of an unheated compressor, since the refrigerant and compressor oil change physical characteristics due to exposure to low temperatures.
Cable fault
Equipment with automatic diagnostics blocks the ability to turn on if the cable is damaged. This feature allows you to avoid short circuits and electric shock.
Exceeding the power consumption norm
When the air conditioner begins to consume electricity in excess of the permissible norm, it turns off. Due to this, it is possible to avoid a reduction in the service life of the equipment.
Increasing voltage in the external unit
Voltage surges in the outdoor unit often lead to failure of a number of components. To protect and diagnose equipment, a voltage stabilizer is used, which is designed to convert electricity and keep the output voltage within specified limits.
See also
Instructions for repairing a scrubber dryer and when to send it for service
Fan motor failure
If the engine malfunctions, the air conditioner cannot start the cooling mode. If the automatic diagnostic system detects a motor malfunction, the equipment will not start.
Directional valve malfunction
A breakdown of the directional valve can lead to incorrect activation of the air conditioner operating modes. Self-diagnosis is performed by checking the temperature of the air entering the room.
About standard fault codes
First of all, you need to look at how many times the sensors flash. If it “blinks” only once, most likely the problem lies in the thermistor, which is installed on the internal unit of the split system. Two signals indicate that problems have arisen on the external unit. With three flashes, the system begins to work simultaneously for both cold and heat.
Overload protection is disabled when the lamp flashes four times. Turning on the signal five times means that errors occur between blocks during the exchange of information. Six flashes mean that the consumption level is significantly higher than normal. It is recommended to carry out additional testing in different parts of the device.
With ten flashes, the directional valve is definitely broken. Finally, turning on 10 times indicates a thermistor that has failed. This means that the air conditioner no longer controls the temperature. Most brands and models of devices experience approximately the same problems. Each device has its own codes that indicate errors. The instructions will help you identify the malfunction and set the correct settings for stable operation.
The air conditioner works, but does not cool - this is often called the most common symptom
First of all, you need to make sure that the air conditioner is configured correctly and all operating conditions are met!!! To understand at this stage where to move next, you need to find out whether the compressor is working.
When working, it should “buzz” and vibrate a little:
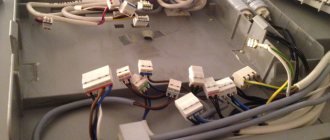
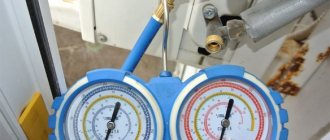
- if the compressor works, then the reason is most likely a lack of refrigerant (freon). To make sure of this, you need to check the pressure (connect pressure gauges). In most cases, leakage occurs in the connections of copper pipes at the indoor and outdoor units. There are only 4 such connections that need to be checked and, if necessary, leaks repaired (poor-quality rolling or a cracked nut as in the photo). Often, oil remains in the “sore spot” and dust sticks to it. Read the signs of freon deficiency in a separate article.
- If the compressor does not start, then without special preparation it will not be possible to eliminate the problem. Because there can be many reasons. The main ones are: the compressor starting capacitor does not work;
- compressor power contacts are burnt out;
- temperature sensors are faulty;
- the compressor itself has failed;
- damage to the control board.
Water leaking from the air conditioner is an equally common situation.
The reason for this phenomenon often lies in a clogged drainage tray or drainage hose. It is necessary to disassemble the indoor unit and thoroughly clean the drainage system. To do this, you can read the detailed instructions on “how to clean an air conditioner.”
I have come across air conditioners with defects in the condensate collection system. Water periodically flows from the block due to imperfections in the design. I will not “fire” the models. In this case, it is difficult to find the cause. You have to disassemble the indoor unit and, during its operation, study how the condensate drains. And as luck would have it, it is precisely at these moments that the drainage system functions normally!
Air conditioner won't turn on
In some cases, the solution is simple! First of all, we check the power source and the functionality of the remote control. I have already written about this, so it is better to read a separate article on why the air conditioner does not turn on. If the described actions did not help, the reason should be found in the control unit (i.e., read the next reason).
The air conditioner runs for a while and then turns off - this is another symptom expressed by the user
There can be many reasons for this: mismatch in the amount of freon in the system, overheating of the compressor, inoperability of the fans, clogged capillary tube, etc. The most difficult is an electronic malfunction. In general, it’s better to figure it out on the spot (it all depends on the signs). It’s unlikely to be possible without professional skills, experience and special tools.
If the reason is electronics, and you have some knowledge, then we begin our search with the most vulnerable parts: fuses, transformers. If a blown fuse is detected, then it is necessary to find the cause of its combustion and eliminate it (usually the problem lies in the varistor). If such actions do not produce results, then you should move on to even more complex reasons and study the board in more detail (diode bridge, voltage stabilizer, capacitors, relays).
Few people repair the board; in most cases they simply replace it with a new one . But not all air conditioner models can easily find it. There are difficulties with rare (often inexpensive) Chinese air conditioners. Then you have to repair the board and look for suitable parts. In some situations, it may be more rational to replace the entire air conditioner. In any case, you cannot do without special training.
I tried to write a short but structured article to outline the main directions for troubleshooting. It is better to analyze each of them in separate posts. If you have little experience, then you should not risk the device, but rather call a specialist!
Fan
Some errors are indicated by indicators on the device's electronic display. Most often, during such breakdowns, the system turns on for a few seconds, and then immediately turns off.
The following are the main reasons for what is happening:
- Faulty capacitor in the electric motor.
- Breakdowns in the motor.
- Broken fan blades.
In any situation, the problem can be easily solved by replacing the failed part.
The impeller changes in the following sequence:
- Removing the front protective grille.
- Unscrewing the nut that secures the fan.
- The electric motor pulley is released from the impeller.
- Using a new impeller on a pulley.
- The reverse procedure is used when assembling parts.
When replacing a fan motor, it also requires a few simple steps:
- De-energize the system, remove the front protective grille.
- Unscrewing and removing the nut securing the entire fan.
- Disconnect all electrical connections.
- Unscrewing the motor itself, completely disconnecting it.
- Putting on a new spare part.
- Assembling and securing parts using reverse order.
A certain procedure remains the same when replacing the starting capacitor:
- De-energizing the system.
- Disassembly of the outdoor unit.
- Unscrewing the fixing bracket.
- Disconnect all wires.
- Replace with a new starting capacitor.
- In reverse order, the parts are assembled and secured.
Condensate leak from air conditioner
During standard operation of climate control equipment, condensate flows down the drainage line. If water appears on the indoor unit, it means that there are some problems that need to be corrected immediately.
The main reason for condensate leakage is a clogged drain pipe. You can solve this problem yourself. To do this, you need to disconnect the air conditioner from the network, disconnect the drain pipes, carefully clean them and dry them. The cleaned tubes are installed in their place, after which you can connect the air conditioner to the network and check its operation.
If this method does not help solve the condensation problem, you will have to call a specialist. Condensate leakage can also be caused by a dirty evaporator filter or failure to maintain the required tilt angle when fixing the indoor unit on the surface.
Malfunctions of electronic control boards
The failure is associated with software settings and settings, when all the LEDs are constantly blinking, and the system itself does not turn on. To troubleshoot problems, the system is simply reprogrammed using special codes.
The likelihood of a burnt-out control board increases if the voltage constantly fluctuates. The same thing often happens with short circuits. New microcircuits are placed in place of the old ones, the latter are soldered out of their places. Separately, the buffer circuit is checked and the triacs are replaced with more powerful varieties.
Most manufacturers equip control boards with solid-state switches that rotate the fan. If you have problems with the operation of this part, you can take a closer look at the board. Separately, the resistance of the part is pre-measured. If the indicator is closer to zero, the broken microcircuit is also unsoldered.
A sign of a faulty control board is the following parts that work intermittently:
- Motion Sensor.
- Temperature sensor.
- Compressor.
There is no need to take measurements if the naked eye can see that one of the microcircuits has burned out. You must immediately replace the semistor when starting work.
Errors in interconnect connections are often made during installation. Even professionals are not completely protected from this. In such situations, parts like the voltage stabilizer, transformer, and diode bridges burn out first. If the air conditioner board burns out completely, its repair becomes impossible; the part is replaced with a new one.
The control board is changed in the following order:
- Turn off the power.
- Removing the top cover once the body is disassembled.
- The boards are removed from the slots by unscrewing all elements for fixation, including wires with connectors.
- Replace with a new part, assemble in reverse order.
In the case of a faulty board, it is better to immediately contact the service center employees. The work itself is expensive, and the slightest mistakes can negatively affect future operation.
Doesn’t cool: typical air conditioner breakdowns, and what to do about them
How it works?
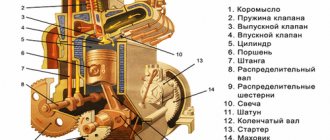
The operation of any air conditioner is very simple, look at the picture:
The circuit may vary slightly depending on whether a thermostatic expansion valve (TRV) is used or just a throttling insert, but the differences are minimal.
The compressor with an electromagnetic clutch on most cars is driven from the engine by a belt. On hybrids and electric vehicles, it may be driven by an electric motor. The design of this unit can be quite varied. The compressor's job is to compress the gas, which heats it up.
Capacitor
- This is our “air conditioning radiator”, which is located in front of the main engine radiator. It's just a big radiator, but working under high pressure. The heated and compressed gas enters the condenser, cools and exits as a liquid.
There is also a filter-drier in the diagram; it contains a certain amount of moisture-absorbing composition - for example, XN-9 zeolite. This part is a consumable item and must be changed according to regulations every 5-6 years. The filter retains moisture, which promotes corrosion, and at the same time mechanical impurities.
Evaporator
- This is a small radiator in which freon evaporates and takes heat from the air. It is located directly in the body of the car's climate control system.
In systems with a thermostatic valve (TRV), the latter is often made as a separate element, but can be structurally inseparable from the evaporator. In the TRV housing, liquid freon passes through a miniature hole. The flow area and pressure in the circuit are regulated by a needle. It is driven by a small thermostat, which usually uses R12 gas as the working fluid, although the drive can be either electrical or mechanical. The valve regulates the fluid flow and therefore the cooling capacity of the system.
You can do it simpler - install a throttling insert. It is simply a valve with a hole of constant diameter. But then, for normal operation of the system, you will have to cycle the compressor on and off and use a liquid accumulator after the evaporator. But the efficiency of such a system will be slightly higher, about 10%. And that is why it is used in household appliances and hybrids. It is also becoming more common in cars.
Refrigerant accumulator
- this is a unit that evaporates the refrigerant and prevents freon from entering the compressor in the liquid phase. And the sensor in it regulates the cooling capacity of the system. It also has a built-in dryer and filter, so a separate filter drier is not typically needed in a battery system.
The remaining components of the system are tubes. Their number usually ranges between six and a dozen. The system also includes one or two sensors for determining pressure in systems with expansion valves and at least two for systems with an accumulator and a throttling insert.
Control electronics are required in systems with a throttling insert for efficient operation, but are actually used even on systems with expansion valves for safety functions and more convenient system control.
Failure one: leak
In most cases, air conditioner failure is associated with a freon leak. In practice, loss of working fluid is indeed the most common system malfunction. There can be many reasons: mechanical damage to the tubes, condenser, filter drier housing, or simply a broken connection. Even a perfectly serviceable system is not designed to operate without gas refueling for more than 5-7 years. With so many quick-release connections, this is simply a necessary evil.
The design features of the cars prevent all the tubes from being sealed tightly. Thus, on many models, removing the radiator package is a mandatory procedure during routine maintenance to replace the timing belt or chains, access to turbines, pumps and other attachments from the front.
Mechanical damage from vibrations, stone impacts, or simply rubbing also occurs regularly. This is easily explained: most of the system is located openly in the engine compartment and is not protected in any way from dust and dirt, a vibrating motor is running nearby, the car drives through pits, experiencing alternating accelerations. Moreover, stones fly into radiators at good speed. Unsurprisingly, a “clean” leak is not that uncommon, and is indeed one of the leading causes of system failure.
Leaks are diagnosed quite well. If the problem is not identified by visual inspection, then a vacuum test will show the presence of a leak, and often the location of the leak can be determined by ear. If not, then charging the system with refrigerant with paint or a UV component will help identify the problem.
Unfortunately, sometimes there are cases of really slow leakage that occurs only at operating temperature differences and lasts for weeks. You won’t be able to drive with such a leak, you will have to fill it up too often, and it can be very difficult to find it using simple methods. In this case, options are used, as in a “random” diagnosis. The craftsmen begin to change components sequentially. Most often, the culprits of leaks are either structurally weak points in the system, which is not uncommon in a car, or simply leaking tubes in the front part or from the condenser, as the largest and most vulnerable part.
Overheating and emergency reset
There are many safety systems in the system. For example, pressure sensors will turn off the compressor when the operating temperature is exceeded, and if the pressure still rises, an emergency relief valve in the compressor or filter will release freon if it is exceeded. And this is correct: the connections of all pipelines are designed to operate up to a certain pressure and then they simply begin to let gas out.
Articles / History Oh, frost, frost: the history of car air conditioning We have already talked about how the “stove” appeared in cars. This process was long and complex, but with the advent of heat in the car, attempts to make it even more comfortable did not end. After all... 10455 9 9 08/11/2017
The reason for the increase in pressure in the circuit to emergency level is usually simple: overheating. Less often, the compressor builds up pressure to the emergency limit. The culprits for this could be radiator fan stops, increased heat transfer from the cooling system fan, incorrectly selected gas or its volume, breakdown of the expansion valve or throttling insert, or a clogged dryer or battery. And finally, the compressor itself may overheat.
Thus, the absence of gas in the system may indicate not only mechanical damage to the circuit, but also problems in its operation, which resulted in overheating and emergency pressure release. And therefore, every time you refill the air conditioner, be sure to check the cleanliness of the entire radiator package, the operation of all fans in all modes, especially at maximum performance, as well as the operation of the system pressure sensors.
Compressor fault
Even if there is gas in the system, the air conditioner may not cool the air and may not develop the required pressure. There aren't many reasons. The most common problem is the destruction of the compressor itself.
On most machines it is axial piston, but there are also in-line and rotary-piston designs. In any case, in its mechanical part there are problems such as scuffing, sticking, destruction of connecting rods and other mechanical components. It happens that valves, fittings, and even housing connections jam or leak.
If a compressor is destroyed, it introduces a lot of debris into the system, often damaging another unit.
Fortunately, the most common problem with all compressors is a banal failure of the electromagnetic clutch, in which sometimes a simple “clutch” burns out and wears out, and the electromagnet burns out. Also, the coupling often fails due to the fault of the bearing.
Articles / Practice Homemade air conditioner in a car: our experiment Summer heat is a short time of suffering for car owners whose car does not have air conditioning. However, drivers in smoking rooms say that PET bottles with ice placed on the dashboard under the line... 91437 6 5 07/25/2016
The simplest external designs can be easily changed on site, even without removing the compressor from the machine. More complex designs with a built-in sealed coupling are more reliable, but replacing faulty elements will require a serious overhaul of the compressor itself.
Replacing the clutch support bearing will also often require the use of a press, and cannot be done without removing the compressor itself from the machine. However, sometimes it is enough to adjust the gap or remove dirt from the coupling, and the unit restores functionality.
Breakdowns most often result from either prolonged overheating and overload of the system when the safety sensors are turned off, or a lack of or incorrectly selected type of lubricant and the entry of the products of destruction of the filter-drier into the piston group of the compressor.
Malfunctions of the thermostatic valve and throttling insert
These details are too often forgotten, but nevertheless they are some of the most delicate components of the entire structure. Their task is to create a pressure difference in the system and provoke evaporation of the refrigerant.
The main problem is that these are very thin devices. The holes are very small, and in the TRV its throughput is also regulated by a needle. Debris clogs these openings and disrupts the system. When vacuuming before refueling, the system may clear itself, but the likelihood of this is low. Increased resistance of the expansion valve and throttling insert leads either to complete inoperability of the system or to very low performance. Often the compressor simply cannot pump freon, and a pressure surge occurs with subsequent leakage.
Systems with expansion valves are somewhat simpler, since they operate in constant mode and with complete evaporation of the refrigerant before the evaporator, while systems with an accumulator and a throttling insert have a simpler mechanical part. But at the same time they require electronic control of the compressor, making their “flooded type” evaporator about 10% more efficient than a conventional one. But there is one more nuance. The accumulator must prevent the refrigerant in the liquid phase from entering the pump again, otherwise it will fail as a result of water hammer. And when the engine is not warmed up or when turned on in winter, there is a chance to ruin the compressor in this way.
Failures in the operation of the electronic control system can also lead to system inoperability.
Control system malfunctions
Actually, the electronics and electrics of a machine are not so rarely the cause of system failure. The list of possible malfunctions is quite large, but it all comes down to a few critical ones: a malfunction of the power supply system to the air conditioner clutch, a malfunction of the radiator fan control system, and, finally, incorrect operation of the sensor-fuse system.
How to determine on your own what is not working
If when you turn on you do not hear a characteristic sound and there is no change in engine speed, then check for the presence of freon. You can do it the “wrong” way by simply pressing the filler neck valve, although this method does not make it possible to estimate the amount of freon. But it works even when the compressor is turned off. If there is a “zilch”, then you spent a little freon, but made sure that the circuit is under pressure. The amount of freon can be estimated either by the operating pressure or when the compressor is running through the “eye”. If there is no pressure at all, then you will have to go to a mechanic to check the pipes and radiator.
Second in line is the electrician. Check the wires to the pressure sensors; they are located on the air conditioner radiator, and in the case of a system with a battery, also on it. They must be intact. Check the fuses of the air conditioning clutch and climate control system and radiator fans. Visually try to assess the performance of the coupling, if possible. Check the presence of a belt on the air conditioner pulley.
If the compressor turns on, but there is no cold, then it is useful to determine the amount of freon. Usually the tubes have a peephole to visually assess the condition of the circuit. If, when turned on, bubbles first pass through, and then almost none remain, it means that the compressor is pumping and there is enough freon. The problem lies either in the expansion valve or in the operation of the condenser and fans. If bubbles are constantly flowing, then there is a problem with the amount of freon, you just need to top up the system. If there is just a white suspension in the eye, then there is almost no freon, you urgently need to turn off the system and refuel it.
You can touch the tubes with your hand to be sure. The low pressure line to the compressor must be cold. If it is icy and the cabin is hot, then something is wrong with the air flow mixing system, or the evaporator is simply clogged with dirt from the outside. The high pressure pipe to the A/C radiator should be hot. This means that the compressor is working, at least partially.
Actually, it won’t be possible to do anything further without a pressure gauge and a special gas station. If the compressor pumps poorly, there is not much freon, but there is, or if the control system is not working correctly, then you will have to have the system diagnosed by a specialist. And remember: there are no units that cannot be repaired, even aluminum tubes are welded, radiators are repaired and replaced, compressors do not cost millions.
We’ll talk about the “correct” prices for typical repairs in the next article.
Survey
Have you ever had an air conditioner break down?
Your voice
Total votes:
Problems with the outdoor unit heat exchanger
One of the most common malfunctions in this part of the structure is freon leakage through the external unit. If R-22 was used for refilling, use a special leak detector to identify the problem. If there is an option with modern R-410-a products, the surface is simply “soaped”. And then they look to see if foaming has occurred, where it happened.
Leaks are eliminated in two main ways:
- Soldering.
Use a torch to heat the area where the leak appears. Then everything is sealed with special solder. The tubes are lightweight and thin, so processing requires care.
- Replacement.
Complete disassembly of the case begins after disconnecting the external unit from electricity. Cutting out and soldering the old heat exchanger is mandatory. The new one is placed in place of the old one, using nitrogen for connection. The module is reassembled by connecting the electrical connections. The tubes are also connected to the system, ensuring its tightness. Everything is refilled and the overall performance is checked.