Repairing hobs without involving a specialist will require basic knowledge in the field of electrical engineering. If any electrical equipment has already been repaired, then this work can be done quite efficiently.
How to repair hobs yourself will be discussed in detail in this article.
Types of hobs
Hobs can be divided into three main groups. These are hobs with simple heaters (TEN), hobs with induction heaters and gas hobs.
Hob with simple heater
These are tungsten-heated cooktops, much like the old tiles, but with a modern twist. Current flows through the spiral and heats it. The tungsten heater can be made in the form of a spiral or corrugation.
Induction hobs
The burners of such hobs represent the primary winding of the transformer. The current flowing through the primary winding induces a magnetic field of variable frequency around it. The secondary winding is a utensil made of ferromagnetic material. The currents generated in this dish heat it up. If the dishes are removed from the burner, there will be no secondary currents and there will be no heating. For this reason, special requirements are imposed on the dishes. It must be made of steel or cast iron, which can be checked using a magnet. Aluminum and stainless steel, glass and ceramic cookware will not work. And the bottom of the dish should be flat.
Hob with gas burners
This is an ordinary gas stove, but made in the form of a panel. Most often, the burners are also equipped with electric gas ignition. Natural gas approaches the burner. On approaching the ignition site, air is mixed with the gas to create the “correct” gas mixture. Well, then the mixture is ignited using an electric ignition spark, or, as in the old fashioned way, using a match.
The most common breakdowns of hob surfaces
Repair of hobs can only begin after the true cause of the malfunction of the device has been established. Let's start with the electrical panels. First you need to see if all the burners or just one are not working. If all the burners do not work, then the test should begin by checking the voltage in the outlet. Then we check the electrical plug and cord. Next, there should be a fuse in the panel itself. We check him too. These are the simplest faults, and they are also the most common. It is best to check these faults using a multimeter. If at least one burner is working, then you can skip the check in the above paragraph. This means the voltage is safely reaching the hob. Most often, failure of electrical panels occurs for the following reasons:
- Failure of the heating element.
- Failure of switching parts of the electrical circuit (switches, switches).
- Control unit malfunction.
Induction hob
Although induction panels are the most modern and high-tech devices, they are also not immune to malfunctions. Let's look at the main malfunctions of induction panels, and what repairs you can try to do yourself.
- The induction hob does not turn on or turns off immediately - most often this is a feature of this type of panel, and not a malfunction. Induction panels have a protective function; if you use the wrong diameter or cookware material, the panel will automatically turn off the power, but the burner will not heat up. The burner will also automatically turn off if you remove the dishes from the surface.
- The induction cooker heats for a long time and weakly - again, read the requirements for cookware in the instructions. 90% of induction cooker malfunctions are caused by incorrect cookware.
- The induction hob turns on independently , although there is no cookware on the burner. Remove all metal objects and clean the stove from salt; if this does not help, you have a problem with the control unit and it needs to be repaired or replaced. It's better to contact the service.
- The induction hob is not working . The principle of diagnosis and repair does not change; specialists first check the fuse. then they ring the entire circuit for a break and replace the burnt out part.
Hob repair tools
Do-it-yourself hob repair can only be done with the help of high-quality tools. For this purpose you need to prepare:
- Screwdriver Set;
- Side cutters;
- Pliers;
- Multimeter;
To restore some models, you may also need socket wrenches; if you are repairing induction hobs, you cannot do without a multimeter or tester. In addition to tools, you may need an electronic circuit diagram, especially in cases where electric hobs are being repaired.
How to disassemble the hob
In order to repair the hob with your own hands without errors, it is necessary not to damage the contact wires and other elements of the device during disassembly of the device. In addition, all electrical devices must be completely de-energized, and if induction hobs are being repaired, then it will be necessary to additionally discharge the capacitor unit, the contacts of which may contain dangerous potential, even after disconnecting the device from the 220 V network. Do-it-yourself hob repairs are carried out after how the upper decorative plane, together with the heating elements, will be removed from its seat in the countertop. As a rule, the hob is secured in the mounting hole of the countertop using clamps. Just gently pull it up and the panel will come out. But sometimes the hob is also secured with a sealant. You can watch the video on how to remove such a hob here:
Also, to properly restore the functionality of the device, it will be necessary to place the product on a flat, hard surface, with the heating elements facing up. How to disassemble a Samsung induction hob, see video below:
Why does the panel turn on and off?
Sometimes strange things happen to the cooking device. The burners can turn on or off on their own, and at the most inopportune moment. Let's consider the reason for turning off the device.
Touchpad won't turn on
There are situations when the touch hob does not turn on. The root cause of the problem may be:
- Gas jet malfunction;
- The fuse is broken;
- The electrical plug is damaged;
- The socket is faulty;
- The electrical cord is damaged.
It is very easy to fix any of these damages yourself by simply replacing the faulty element with a new one. If one of the burners turns off during operation, it means the heating element is broken. It is better to correct such a breakdown in a workshop, since incorrect replacement of heating elements can lead to complete destruction of the device.
Important! When, after cooling, the burner begins to function again, it means that the overheating protection function has worked. All glass-ceramic panels have this function. When the temperature rises to a critical level, the protection is triggered and the device turns off itself.
Removing the heating elements
In most cases, repairing an electric hob involves replacing faulty heating elements. It will not be difficult to purchase such a spare part in a store, especially if the part in the surface of a well-known brand is changed. For example, repairing an Ariston hob can be done without even visiting a service center in person. A new heating element can be ordered in the online store, and the purchase will be delivered to your door by a transport company.
The heating element can be accessed after the bottom cover of the surface is removed. This can be done using a slotted or Phillips screwdriver. The location of fasteners differs significantly depending on the model. For example, repair of an Electrolux hob is carried out after dismantling the cover, which is held on by screws located at the corners of the product.
If an electric stove is being repaired, in which heating is carried out due to installed heating elements, then the malfunction of such an element can be determined using a multimeter. To do this, just switch the device to resistance measurement mode, and then connect the probes to the leads of the heating element. A burnt-out element will have an “infinity” resistance, so further repairs of the electric hob must be carried out with the obligatory removal of the faulty part. As a rule, such elements are held on 3 or 4 clamps, which are a bracket that presses the heater as a result of tightening the threaded connection. Repairing an Electrolux hob may differ significantly, but the principle of restoring such a hob remains the same. That is, you will need to remove the old heating element to install a new element in its place. 0
Repair of a hob with an electric heater
Repairing such panels is the easiest. If the voltage approaches the heating element, but it does not heat up, then the electric heater itself (TEH) of this burner is faulty. You can also check it using an Ohmmeter (which is included in every multimeter). Just remember to turn off the voltage and check its absence using the same multimeter or an indicator screwdriver. Then disconnect the heating element from the circuit. Checking the electric heater with a multimeter:
If the electric heater is faulty, then its resistance is infinite. Then a simple replacement of the heating element is required. If the heating element is intact, but there is no voltage coming to it, then in addition to the plug and cord, you also need to check the switch (switch) of the comfoco. We check the voltage before and after the switch with a multimeter. If there is no voltage after the switch, replace it with a working one. Repairing the thermal protection of the hob, the video shows well how to do it:
Electric hob - common faults
During operation, equipment may malfunction due to voltage fluctuations, improper care or manufacturing defects.
Repair of a built-in electric kitchen hob is relevant in the following cases:
- The hob does not turn on. The phenomenon occurs due to a lack of voltage in the outlet or faulty parts. The socket is checked with a multimeter. If everything is fine with it, there are risks of fuse burning, contact breakage, cord chafing or squeezing, heating element breakdown;
- One or two burners on the hob are not working. The heater contacts that can be soldered have broken. The burnt-out heating element is replaced with a new one. If the contacts are broken, the control unit switch is repaired or replaced;
- The burner does not heat up well. The problem is due to overheating of the heating element, thermostat, or thermostat. Some parts are repaired, but the thermostat needs to be replaced;
- The fuse has blown. The failure occurs when the voltage fluctuates in apartments without ultrasonic systems on electric mains. The part is replaced, especially since its cost is inexpensive;
- the sensor does not work. The element is checked with a multimeter. If it does not respond to the device, the panel is changed completely. Sensor breakdowns occur due to improper operation of the stove or burnout of the control unit after cleaning with saline solutions;
- The hob gets very hot, works, and does not turn off. In 95% of cases the thermostat fails. The part is not repaired, but only replaced.
Read also: How to make an antenna plug for a TV
Glass on glass-ceramic surfaces sometimes cracks. The cause of the breakdown is a manufacturing defect or improper operation. Repair work is carried out exclusively by a master.
Important! Before inspection, electrical equipment must be disconnected from the network.
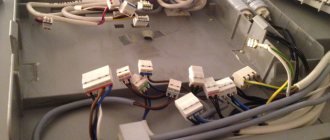
Repair of internal panel wiring
If an electric stove is being repaired, then one of the common causes of breakdown is a break or burnout of the wire leading to the heater. This happens if the wire is not tightly screwed to the heating element. In this case, it is enough to connect the burnt-out internal conductor connected to the heating element to fully restore the functionality of the hob. The charred insulation on the wire must be removed. To do this job efficiently, it is recommended to completely replace the cable of wires that go from the switch or thermostat to the heating element. Repair of a built-in hob can also be carried out by replacing only one conductor. In this case, you will need to select a conductor whose cross-section should be no smaller than the wire being replaced. Otherwise, such repairs will be temporary.
Do-it-yourself hob repair: what to do if the burner does not turn on
If the burner does not turn on, there may be several reasons:
- burning or weakening of contacts;
- thermal relay malfunction;
- problems with the wires going to this burner;
- heating element burnout.
All these problems can be fixed with your own hands. Repairing a hob begins with disassembling . It must be unplugged and disconnected from the countertop. Transfer the hob to a table covered with a clean cloth, turn it glass side down, unscrew the fastening bolts located on the sides, carefully, holding the ceramics, turn them over and remove the ceramic panel. This way we get access to the insides and can repair the hob with our own hands.
We begin repairing the hob: remove the glass-ceramic hob
The first thing to do is to inspect the wires that go to the non-working burner, check the contacts . Violation of the integrity of the wires and burning of contacts is a very common cause of breakdown. In private homes, wiring can be chewed by mice, and contacts can burn due to poor quality assembly. If everything is visually in order, we pull the wires, checking the quality of the contact. If traces of soot are visible somewhere, we disassemble the contact, clean it to bare metal, pack it back, install it and clamp it well. The last stage of checking wiring and contacts is measurement. We take a multimeter, check the wires for integrity (we call) and for insulation breakdown (on the body and between each other). Read how to use a multimeter here.
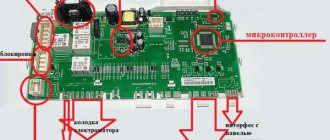
If no deviations are found in the wiring, inspect the thermal relay . It is located next to the burner (electromechanical), covered with a plastic cover. In some models, the relays are located in the control unit (electronic). Then, in order to determine which relay is responsible for heating the burner we need, we track it through the wires.
On some models, thermal relays are installed on the control board
If the relay is electromechanical, pry off its cover with a screwdriver and inspect the contacts. There may be charred, bent or fused contacts. It must be replaced. If the relay is electronic, there is no point in opening it. We measure its resistance and compare it with the serviceable ones standing nearby. There is a deviation - a replacement is needed.
Read also: VVG APG decoding and application
If everything is fine with the relay, the burner may have burned out . To check, measure the resistance. If it is large or tends to infinity (break), the problem is in the spiral, heating element, etc. To find a replacement, look for the burner number (written on its body). With this number we go to the store or search on the Internet. Next, repair the hob - replacing the burnt burner. We unsolder all the wires, remove them, install a new one, and connect.
Induction hob repair
Repair of induction hobs may be required if elements such as a transistor switch or high-frequency voltage generator fail. Repair of an Ariston hob is often accompanied by the replacement of the control unit, because to independently restore the electronic circuit you will need to have sufficiently deep knowledge in the field of operation of microprocessor technology. How to repair a Bosch panel control module, video filmed by a service specialist, see:
Glass repair
Repair of the glass of the hob is carried out only by completely replacing this element. Considering the difficulty of purchasing and the high cost of a new element, the optimal repair of a ceramic hob is to purchase a used product that has an ideal appearance, but the insides are practically beyond repair. Repairing the hob glass in this way can only be carried out if the “donor” body is ideally suited in size and brand. To repair a ceramic hob, it will be enough to carefully disassemble both surfaces and rearrange the internal parts from the old stove into the new housing. How to remove and install glass from a hob, the video shows this operation very well:
Gas hob repair
Repairing a built-in hob running on natural gas is best left to specialists. We see what malfunctioning gas appliances lead to almost every day on TV. Unqualified repair of a gas hob can lead to the same consequences. You can carry out such repairs yourself only if you have extensive experience in handling gas appliances. The simplest repair of a built-in hob of this type is made by simply replacing the entire panel. For this purpose, you will need to purchase a new surface that will be ideal in size. If you decide to repair the gas panel yourself, then you must follow the rules for working with gas equipment. According to the rules, tools for working with gas equipment must be copper-plated, i.e. covered with copper. When carrying out repair work, the gas supply to the device must be completely stopped. Also, the electrical voltage from the stove must be turned off. One of the reasons for poor performance of gas burners may be the usual clogging of the gas nozzle. To restore the functionality of the device, it is enough to clean the nozzle hole from which the gas comes out with copper wire with a diameter equal to or slightly less than the diameter of the nozzle. Also, one of the common malfunctions of a gas panel is gas leakage from the connections of gas pipes inside the panel or the faucets of this panel. Be sure to watch the video on how to repair a gas leak from the control valve:
In this case, all gas pipeline connections must be connected as tightly as possible. Checking gas leaks in connections is checked by “soaping” the connections.
Be sure to watch the video for an example of checking a gas leak. The test was done using an old-style gas stove as an example. Checking for gas leaks in a gas panel is no different.
Another very common defect in the operation of gas panels is the incorrect operation of the ignition system. Externally, such a breakdown manifests itself in the form of insufficient sparking of the fuse, as well as in the complete absence of a discharge between the electrodes. In this case, repairing the built-in hob will involve replacing the electronic unit. In order to dismantle this element, it is necessary to disconnect the oven from the mains and remove the top cover. Access to the electronic unit will open, but before you begin dismantling it, you should make sure that the button that turns on the igniter is in good condition. To do this, just connect the wires coming from it to the multimeter. After pressing the button, the device should show a resistance of about 1 ohm. If this does not happen, then most likely it will be enough to replace only this element to restore full functionality of the hob ignition system. Otherwise, you need to purchase a new electronic unit and then install it in place of the faulty element. How to repair the gas ignition system video, see here:
Find out the conditions for preferential repairs and the amount of your discount
You can get acquainted with all the details of repairing your household appliances, the cost of services, as well as ongoing promotions, current discounts, and preferential offers on our main page.
Over the years, we have accumulated extensive experience in the field of repairing household appliances. MasterByt is a high quality of service provision and responsibility to our clients! Trust your equipment to professionals!
Hobs help housewives, but they also add problems when they break down, causing serious disasters. In order to avoid situations in which our ancestors found themselves, deprived of a comfortable life, it is necessary to quickly eliminate equipment malfunctions and return pleasant predictability to our modern abode. We will tell you how to fix the panel with your own hands.
Electrical panel repair
Most often, users complain that the hob does not turn on. There are only two answers to the question “why did this misunderstanding happen to my equipment?”
1. no voltage in the outlet;
2. circuit break.
To check if the outlet is working, you can use a multimeter, which will show if there is voltage. A hairdryer or other compact electrical appliance is also suitable. The verification principle is simple: if the unit turns on, everything is fine with the socket, and the cause of the malfunction must be sought in the hob itself.
Circuit failure is a general name that combines a number of problems that cause the hob to malfunction. Among them are a burnt fuse and a broken contact, overheating of the sensor, or cable failure.
Read also: The best tool for an electrician
Let's take a closer look at each of the emerging problems.
Some models have a high-fuse fuse. It easily burns out from power surges, taking on a “blow” that would otherwise affect the operation of the hob. If the kitchen helper fails for this reason, it’s not so bad: the fuses cost a penny, and any average professional can handle replacing them.
If one of the burners does not work, this situation is caused by broken contacts leading to the heating element. You can troubleshoot the problem as follows:
- Carefully turn the panel over;
- Inspect the contacts;
- If you find a break, solder the wires with a soldering iron.
If the hob does not work, you must carefully examine the condition of the cable. If you find breaks or damage, under no circumstances should you use such a unit, as this can cause a short circuit and cause the device to completely fail. Found a broken cable? Replace it with a new one or at least isolate the damage!
If the heating element fails, you should:
1. Purchase a new heating element;
2. Replace the failed part. It would be useful to remind you that this procedure can only be done when the panel is turned off. For this:
a) disconnect the terminals of the burnt-out heating element; b) take it out; c) install a new one; d) connect the contacts to it using connecting terminals.
A damaged sensor that does not “listen” to commands can be repaired yourself. This is done as follows:
- First you need to check whether the sensor is receiving contact. You can use a multimeter for this;
- If the problem is a broken circuit, use a soldering iron to reattach the broken wire.
Advice: leave the panel sensor repair to professionals.
Why does the unit crack? Chips and cracks “decorate” a glass-ceramic hob quite rarely, but they arise not without the fault of the user, who forgets the 2 basic commandments of operating the equipment: do not hit, do not overheat.
Sometimes breakdowns are “evidence” against the manufacturer’s dishonesty in the form of a violation of production technology.
It doesn't matter whose fault they happened. When there is an empty refrigerator in the house, and the hob ignores the wishes of the owner, an urgent question arises: how to replace the glass, and whether it is worth calling a specialist. The cost of a sheet of glass ceramics is approximately equal to the price of a new hob, so it is hardly advisable to carry out such a replacement.
Among other “whys,” hob users are interested in why it turns off on its own. Most often this occurs due to a violation of the integrity of the contacts. Alternatively, in touch models the main part “flies off”.
Induction hob repair
According to the induction principle, popular in cooking surfaces, heat is directed to the contents of the pan, rather than to the surface of the stove and utensils in which the dish is being cooked.
These devices, based on technological advances, most often break down like this:
The unit turns off immediately after turning on, or does not turn on at all
Induction provides low heat
The stove lives its own life, turning on by itself, even when there is no frying pan or kettle on the burner
The panel doesn't work at all
Most often, owners of induction panels are concerned about the complete failure of the stove to perform its functions: the kitchen assistant turns off after being turned on, or does not show any signs of life at all. Most often, this situation is caused by improper use of the unit. Simply, the smart panel recognizes the wrong utensils being used for cooking and goes on strike if you decide to cook food in a saucepan made from a material that is not suitable for the unit. Yes, size matters in this case too!
Tip: Do you want your induction hob to provide trouble-free operation? Use suitable pots and pans! The instructions for each product describe in detail which utensils can be used on a specific panel. Don’t neglect the advice, and you will be happy in the form of a delicious lunch!
The traditional children's riddle “it shines, but does not heat”, with the spread of induction panels received an unexpected answer: the surface and unsuitable cookware. Poor heating of the induction panel also falls under the category of errors caused by the wrong choice of cookware. The bottom of pots and kettles should be perfectly flat. Even millimeter-sized notches or concavities provoke a decrease in the performance of the unit.
Even more offensive, and even more dangerous, is the spontaneous switching on of the panel. Try the following in this situation:
1. Remove knives, forks, spoons, scrapers, foil - anything that contains metal from the cooking surface;
2. Wash the surface, completely removing salt deposits.
Did not help? The control unit is malfunctioning. You can’t do without a specialist here.
The complete absence of any signs of device viability has a number of reasons:
- No power at the outlet. You can check it using any electrical device, say, a coffee grinder.
- Blown fuse. To eliminate the malfunction, it is enough to replace the part.
- Broken contact in the circuit. In this case, it is advisable to contact a specialist.
Read also: Why do you need copper grease?
Gas hob repair
Units that do not have sophisticated electronics are easy to repair, and in some cases problems can be fixed on their own.
The most common problems with gas-powered kitchen helpers are:
1. problems with gas ignition;
2. gas does not reach the burner.
If the gas does not ignite or ignites poorly, you must:
- Check the piezoelectric element for the presence of liquid or fatty deposits;
- Rinse and dry it;
- If this operation does not resolve the problem, check whether electricity is supplying the auto-ignition system. If the contacts are broken, the technician will solder them. You can do this yourself.
If the gas hob burners do not turn on due to lack of gas supply, do the following:
1. Check if the valve on the gas pipe is open. Found it closed? So open up;
2. Is there gas in the system, but is it not supplied to the burner? Clean the injectors. Remove any remaining food and fat from them. Wipe away any remaining moisture. Most often, this is enough to remove not too serious stains. If the nozzles are particularly dirty, a thick needle or awl will help.
Tip: Do you want your gas hob to live happily ever after, delighting you with trouble-free operation? Do not leave until later to clean up spilled liquids and pieces of food that fall out of the pan onto the panel during cooking. Removing dried and hardened evidence of culinary research will be more difficult later.
Most problems with cooktops can be avoided. All you need to do is follow the “commandments” of thrifty owners:
- follow the operating instructions;
- keep the device clean.
Minor faults can be eliminated on your own if you have previously had experience in repairing them, or the surface still requires replacement, and you “don’t mind” it. To repair an expensive unit, invite a specialist.
How to repair a hob, see here
The hob is one of the most important appliances in the kitchen, and like any other equipment, it is susceptible to breakdowns, but it’s quite easy to repair it yourself. If a malfunction is discovered during the warranty period, your stove will be repaired free of charge. But if the breakdown occurs several years later, you can try to repair the hob yourself, since contacting specialists may cost little less than buying a new stove.
In this article, our specialists have listed all the malfunctions of hobs and step-by-step disassembled the process of repairing faults with their own hands.