Requirements
It must be remembered that the electrical connection diagram for an air conditioner used in everyday life differs significantly from the similar connection of semi-industrial models that are installed in offices. Households have only a single-phase connection.
- direct connection via socket;
- separate wiring to the electrical panel.
The first option is ideal for all household devices - they are everywhere put into operation only in this way. Connecting any air conditioning system is carried out in several steps, which must be strictly followed when you decide to do everything yourself.
Connection diagram of the air conditioner to the electrical network
The figure shows a diagram of connecting the air conditioner to the electrical network, as well as various connections between the system modules; in addition, you will definitely need a circuit diagram of the air conditioner of the purchased model.
Options for connecting an air conditioner to an existing power line
This issue could not be considered, due to the presence of sockets in the room. But, some owners of low-power climate control equipment are dissatisfied with the stretching wire from the outlet to the consumer, often across the entire wall.
If the outlet is located far enough from the air conditioner, then there is an option to connect the air conditioner to the mains via a switch. We warn you right away: this option is only suitable for low-power climate control equipment and here’s why: the terminals of a conventional switch may simply not withstand the current passing through them. The result is heating, sparking, failure of the switch (at best) or fire.
It is better to cut a groove in the wall from an existing outlet and lay a power cable along it in a corrugated pipe to the split system unit, and then install a special outlet with a decorative cover into the wall. The socket must withstand a certain current: if your air conditioner has a power of 1 kW, then the socket must withstand 9-10 A; from 1 to 3 kW – 16-18 A; from 3 to 4.6 kW – 20 A; from 4.6 to 5.5 - at least 25 A. It is best to entrust the correct choice to a qualified electrician.
If you decide to connect the air conditioner yourself, then do it in compliance with all safety regulations, and in order to be completely sure that the connection process was completed correctly and safely for the climate control equipment and the inhabitants of the home, it is best to seek help from professionals.
Do I need a circuit breaker or RCD?
To understand the essence of the issue, you need to understand in detail the purpose of these protective devices:
- Regulatory regulations for design and construction, as well as PUE and GOST R 50571.8 states: connecting an RCD depends on the danger of electric shock and the type of device plugged into the outlet. It follows that not all sockets for air conditioning are connected via an RCD.
- These RCDs are installed to protect people from electric shock when the insulation is poor. But all the boxes of split system modules are made of plastic, that is, if a person directly touches the body, he cannot be harmed.
- The peculiarity of residual current devices is that they cannot protect a person from a short circuit: the RCD simply does not have time to turn off. After all, from the laws of physics it is known that the current speed in a conductor is 300 thousand km/sec, and the response time of any protective device, including an RCD, is 0.02-0.03 seconds.
- A circuit breaker is a protective device for wires that are selected according to the power of the equipment. And in the event of increased load on the network or a short circuit, the machine is triggered and saves one or another device from overheating and failure.
From all of the above, we can conclude that installing an RCD for climate control equipment is not so important, but circuit breakers for protection must be installed.
Work order
The first step is to select the set of tools and materials needed to install the connection. Next, carefully study the diagrams proposed by the manufacturer. After familiarizing yourself with the rules and requirements, you can proceed to the direct laying of cables to connect the terminals of the blocks.
Socket selection
To connect through a socket, the latter must meet certain requirements that are aimed at the efficiency and safety of the device.
- A differentiated relay or reliable grounding is a mandatory criterion when choosing.
- It is acceptable to use copper wires with a high-quality cross-section.
- The socket is connected to the panel only through a circuit breaker.
It is necessary to turn your attention to new generation European sockets. They fully comply with the manufacturer's requirements
They are well equipped and protected against power surges.
A differentiated relay is necessary if there is no grounding
Wire selection
When choosing a wire, you need to pay attention to its cross-section; it must exactly match the manufacturer’s requirements stated in the instructions. The cross-section required for household appliances is 1.5-2.5 square, the current should not exceed 19 A
If the distance between the device and the shield is within 10 m, then sections with a diameter of one and a half square meters. mm. will be sufficient. However, at a distance greater than 10 m, the diameter should also increase.
It is also important to remember that laying wires near heating or gas supply system pipes is strictly prohibited; the minimum distance between them is 1.5 m. Electrical harnesses must be placed in a protective corrugation and then secured with clamps
Evaporator connection
Installing the connection of the blocks is identical and will not cause you much difficulty
It is important to follow the rules below and observe safety precautions when working with electricity.
- First, remove the plastic front panel.
- Next, remove the protective cover and cable clamps.
- Route the wires through the wall opening that is located behind the air conditioner or on the side wall.
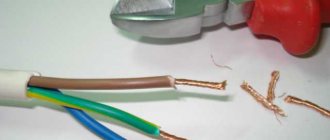
- Afterwards, it is necessary to remove the protective tape from the cores at a distance of 30-40 mm from the edge.
- Insert the bare wires into the terminals and tighten the fastening screws securely.
- The next step is to strengthen the outgoing wires.
- After completing these manipulations, reassemble the device in reverse order.
Upon completion of the installation work, check the correctness of this connection - check the result obtained with the manufacturer’s diagrams. Only after a thorough check is it permissible to turn on and use the air conditioner. https://www.youtube.com/watch?v=ogjzdCEM080
Requirements for installing air conditioners
In order for the air conditioner to bring maximum benefit, you must follow some rules:
- Choose exactly the model that matches the parameters of the room (size, availability of equipment, etc.).
- Correct installation.
- Compliance with the rules of operation and prevention.
The air conditioner has two blocks, each of which is assigned certain functions. The outer one is the condenser, and the inner one is the evaporator. They are connected using wires and tubes in which freon operates.
It is very important to choose the right location to install the system. In this case, you should take into account the weight of the block, free access to it, etc. The air conditioner should be installed closer to the window
The air conditioner should be installed closer to the window
The outdoor unit must be located on a strong wall that can support a weight of more than 60 kg. Installation should not be carried out on aerated concrete. The external unit must be protected from environmental influences. This can be done with the help of fences and canopies.
When installing the indoor unit, please consider:
- The distance from the external to the internal unit should be minimal. This will ensure higher efficiency.
- The evaporator must not be obscured by curtains, furniture, etc.
- There must be a distance of at least 3 meters between the furniture and the indoor unit.
- The system cannot be installed above batteries.
- Provide free access.
- The distance from the block to the ceiling must be at least 10 cm.
It is necessary to ensure tightness and reliability of the air conditioner mounting. If a line is used to connect the blocks, then vacuumization of the connections will be required.
Main types of air conditioners
The variety of designs of air conditioning units allows them to be used in a wide variety of places. For example, models of mobile air conditioners do not require installation work. A special block or hose is led from the room to the street to remove warm air.
Very simple installation and further maintenance for monoblock devices. There are no connectors in the freon lines, so its leakage is completely excluded. Such air conditioners are characterized by low noise, have high efficiency, however, they are quite expensive.
Window air conditioners are installed in wall openings or windows. During operation, they produce a lot of noise, but due to their low price, ease of installation and maintenance, they are widely popular among consumers.
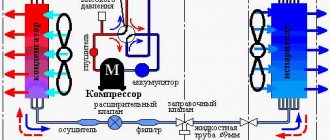
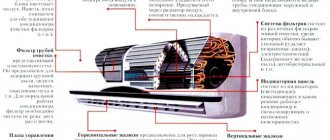
One of the types of air conditioners are split systems. Their design includes an outdoor and indoor unit. The connection of both parts is made using copper pipes. Freon circulates through these pipes. The outdoor unit consists of a compressor, condenser, fan and throttle. The indoor unit has an evaporator and a fan. There are many modifications of split systems available, which allows them to be installed in many places.
Scheme of a household split system
Split systems are traditionally used in everyday life for air conditioning. True, in addition to this version of household air conditioners, other designs are also used. However, as practice shows, the operation of other types of climate control equipment is significantly less common.
Air conditioner design features
What is a household split system from a structural point of view?
Actually, this is air conditioning equipment, consisting of two separate modules (blocks):
- Block for internal installation.
- Block for external installation.
Internal installation means the installation of one part of the air conditioner structure (a unit for internal installation) directly inside the room where ambient air treatment is required.
Accordingly, external installation means the installation of another part of the air conditioner structure (a unit for external installation), directly outside the room. As a rule, installation in this case is carried out on the street side of the wall of a house or premises for other purposes.
But first, we recommend that you familiarize yourself with where you can install an air conditioner in a private house and apartment.
A classic example of a split system (air conditioning units for domestic use), structurally consisting of two separate modules - external and internal
Connection of indoor and outdoor modules
At the next stage, the user needs to connect both modules into a single working system.
It is planned to connect the modules mechanically with pipelines for refrigerant circulation, as well as connect them electrically with an electric cable, respectively. This process is called laying the air conditioner route.
The procedure for connecting refrigerant circulation pipelines on the modules (the internal module of the split system is shown), as well as electrical conductors
Essentially, a household air conditioner contains several functional electric motors, each of which requires power supply:
- compressor motor;
- outdoor unit fan motor;
- indoor module fan motor.
In addition, the air conditioning system can be additionally equipped with electric motors, the operation of which drives the blinds, directing the outgoing air flow in the desired direction.
Blinds for regulating the outgoing air flow are usually included in the design of the indoor unit of a domestic air conditioning unit.
Demonstration of a fully assembled split system with installation of indoor and outdoor units, combined into a single structure through technological connections
Depending on the power level of the outdoor module of the air conditioning unit, two or more condenser cooling fans (installed in the outdoor module) can be used.
True, such options are rare for household climate control equipment. But for use in offices, split system designs with two fans are quite common.
Air conditioner electrical circuit
Electrical connection diagram of the external unit of the split system:
Terminal - terminal block for connecting an interconnect cable for connection to the indoor unit.
N - electrical neutral
2 — supplying power to the compressor from the control board of the indoor unit
3 — supplying power to the fan motor for operation at 1st speed
4 — supplying power to the fan motor to operate at 2nd speed
5 — supplying power to the four-way valve actuator to switch to heating mode
Compressor
C - common - common output of the compressor windings
R - running - working winding of the compressor
S - starting - phase-shifting compressor motor winding, starting
Internal overload protector - internal overload protection
Compressor Capacitior - an electric capacitor, in this case a working one (there are also starting ones, but currently not used in air conditioners)
Fan motor - engine, fan motor
Thermal protector - protection against overheating, usually placed directly on the motor windings and breaks the circuit when the temperature is exceeded.
Fan motor Capacitior - working capacitor of the fan motor
SV - solenoid valve - an electromagnetic valve that drives the four-way valve mechanism.
Diagram of the indoor unit of the air conditioner:
Terminal block
On the terminal block, in addition to inter-unit connections, there are also clamps for connecting power (power can be supplied vice versa - to the external unit)
L, N - electric line and neutral of single-phase power supply
Filter Board - filter board, reduces the level of noise in the power supply
Control Board - control board - controls all devices, receives data from all sensors, performs thermoregulation, displays information for the user, and performs self-diagnosis.
Main relay - the main relay is a power relay that supplies voltage to the compressor.
Display board is an indication module that can be a line of LEDs that indicate the presence of power, the selected mode, an error code, or a display that also displays the temperature.
Thermistor - thermistor, thermistor, temperature sensor
Room temp. - room temperature sensor
Pipe temp. — temperature sensor of the heat exchanger tube, evaporator
Temperature sensors may also be located in:
- control panel - to maintain the temperature at the point where the remote control is located (for example, “I Feel” mode).
- at the inlet, outlet and midpoint of the evaporator
Step motor - stepper motor,
Used to open louver grilles or curtains covering a fan
In one step, its shaft is deflected by a small angle, thus it is possible to very accurately control the position of the shaft.
Drain pump motor - drainage pump, built-in only for cassette air conditioners
Float switch - float sensor for condensate level, only for cassette air conditioners
Location of socket for air conditioner
There are no regulatory documents on the location of the connection point for climate control systems to the electrical network. But you need to take into account the general rules for arranging lines. If this is done at the repair stage, it is necessary to form grooves - they run vertically or horizontally. Diagonal placement is prohibited. An alternative is to install wiring in protective boxes on top of the wall. Relevant for wooden walls.
When choosing where to locate the connection point, you need to consider:
- general design of the room;
- arrangement of furniture and other interior items;
- length of the power cord from the indoor unit.
The latter can be extended. To do this, remove the plug and connect the wire contacts to another using a special sleeve. Be sure to use insulating tape and heat shrink material. This way you can correctly position the connection point with the electrical wiring, regardless of the location of the indoor unit of the air conditioner.
Air conditioner connection
Afterwards, they must be connected to each other with a four-core copper cable with a core cross-sectional area of at least 2.5 mm 2. The connection instructions are provided in the schematic diagram, which was discussed in some detail above. The connecting cable can be laid together with the freon line, or maybe in a separate plastic box.
When laying in the same groove together with copper pipes, use a corrugated plastic tube to insulate the cable.
After the inter-unit electrical connection, the indoor unit should be connected to the power supply. The connection diagram for the air conditioner to the electrical network involves receiving power both from the nearest outlet and from a separate line.
The ideal option for connecting sufficiently powerful climate control equipment is a separate power line. This option will not load the existing lines of the apartment electrical system and will allow power to be supplied directly to the internal unit of the split system. The power supply cable can be laid from the panel to the indoor unit using a groove in the wall material or in a special plastic box.
The shield from which the separate power line will be drawn must be grounded. The connection of the power cable to the terminal block of the panel must be carried out only through an automatic machine, the power of which should be calculated using the formula: the power of the device divided by the voltage. 30% of the reserve should be added to the resulting value.
It should be understood that the power cable for air conditioning equipment can be connected to the outlet only if:
- Climate control equipment has low power.
- The in-house electrical network is laid with a copper cable with a cross-section of at least 2.5 mm 2.
- There are no energy-intensive consumers on the same branch with the air conditioner.
- Supposed to be temporary.
- This power supply branch is equipped with a circuit breaker with an RCD of at least 20 A.
What you need for installation
Consistent installation of a good split system when doing it yourself should be carried out taking into account ease of access during maintenance and ergonomic criteria - cold air should not have direct access to resting and working areas.
Approximate layout of split systems
The appropriate layout for installing a new air conditioner depends on the type of unit. The indoor module can be hung:
- to the left of the outside. The track is flat, the block is located 0.5 m from the wall. When turning the line onto an adjacent wall, the distance can be reduced to 0.1 m. The output and the route are masked under the cover of the equipment;
- to the left of the external wall without cable laying on the facade. Communications are laid in the corner of the room and hidden in a box. They hide him under the curtain;
- to the right of the outer wall. A typical solution involves laying the route in a box from the wall or laying it in a groove.
Advice! Use the groove laying technology if there is a ban on laying the route on the facade.
The outdoor unit can be positioned:
- on the loggia or balcony. The module is fixed frontally or sideways for ease of maintenance;
- on the glazed balcony. The window sash should be above the air conditioner. To prevent snow, moisture or debris from getting on the block, install a visor and plastic;
- under the window. This option is suitable for rooms without a balcony;
- next to the window. The block is placed at the level of the bottom of the window.
Air conditioner installation optionsTip! Do not use hollow or metal materials for the visor - they have low noise insulation.
Equipment
When installing climate control equipment yourself, you will need:
- perforator for making through holes for the output of pipes, cables, drainage pipes;
- a pipe cutter with a sharp blade or a hacksaw for metal;
- file and rimmer for trimming nicks;
- a pipe bender or a special spring for forming copper pipes;
- a drill with drills of different diameters to make holes for the mounting plates;
- pipe calibrator and flarer;
- wall chaser, which can be replaced with a chisel, sledgehammer and hammer;
- vacuum pump to start the air conditioning system;
- screwdrivers, hex wrenches, level.
Important! Cutting pipes with a hacksaw involves smoothing the edges with sandpaper
Materials and consumables
Use only high-quality materials, selecting them in accordance with the type of equipment:
- supply wire for power supply and connection of modules - power cable for 4 cores with a cross-section of 2 mm2 × 2.5 mm2;
- seamless copper pipes with the diameter specified in the instructions. The length of the products is equal to the length of the route, and the margin is about 30 cm;
- insulating insulation (foamed rubber) - sections along the length of the route;
- synthetic insulation;
- a corrugated hose with an internal plastic spiral for drainage or a propylene pipe along the length of the route plus 80 cm;
- L-shaped brackets (2 pcs.) for fixing the outdoor unit with a permissible load limit of 5 times the weight of the device;
- fastening elements - bolts, dowels and anchors, selected according to the type of brackets for the internal module.
Important! To hide the route you will need a plastic box 60x80 cm