Device overview
Probably, many radio amateurs are already familiar with the Chinese website Aliexpress. Many people there sell radio components.
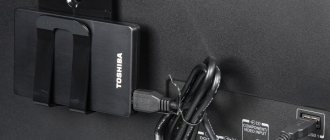
Including me. Somehow, while “walking” through this site, I came across this “miracle of Chinese technology” - a built-in MP-3 player with an FM receiver, model 747D. This device is an installation unit consisting of a front panel and a printed circuit board.
Rice. 1. Photo of the radio and MP3 module 747D.
I immediately remembered how 15-20 years ago, sets of VHF receivers based on K174XA34 or similar chips were very popular among radio amateurs.
Rice. 2. Photo of radio and MP3 module 747D, slightly different board.
Such a board could be built into some very favorite “Alpinist” or “VEF-Spidola” receiver to teach it to receive VHF.
Rice. 2. Photo of the delivery kit for the radio and MP3 module 747D.
Well, this is a similar device, but in addition to VHF reception (FM 88-108 MHz), it also contains an MP-3 player. And so, I purchased this device, called 747D.
Remaking an old model of a music center for USB
The use of analogue audio systems has become a thing of the past with the development of digital technology, but many people still have fully working tape recorders, stereo systems and cassette players at home. Such outdated equipment can be modernized using a built-in module. Converting the music center to USB allows you to make it read mp3 recordings and other types of audio files. This relatively simple process does not take much time and does not require special skills and knowledge when using special modules.
What are embedded audio modules
To quickly modernize an old music center, you should use a special built-in audio module - a sound converter. You can make such a device yourself, but making a homemade module will require a significant investment of time and special knowledge in the field of electrical engineering and electronics. It is much easier to buy finished products, presented in a wide range by Chinese manufacturers.
Purchased audio modules have a digital-to-analog conversion function. Some models are additionally equipped with mini sound amplifiers. More expensive devices are equipped with an LCD display, Bluetooth, remote control and additional connectors.
In terms of their functionality, the modules are like a compact mp3 player that does not have its own power supply and speakers. It is to fill these missing devices that the old audio system will be used.
To remodel, you will need a music center that still has the following components in working order:
- battery pack;
- speakers;
- sound amplifier.
Algorithm for embedding a module into a music center
To integrate a purchased module into an audio system, you must correctly determine the location of its installation. When choosing the location of this node, you must also take into account the possibility of remote control of the created music system using the remote control.
To convert an old music player into a flash drive, you need to follow the following algorithm of actions.
- It is necessary to partially disassemble the old tape recorder.
- Based on the diagrams of the module and audio system, you need to connect the power supply to the corresponding pin of the modular board using a wire.
- Then you should proceed to installing the module in the selected location: the compartment for cassettes or disks. To do this, you need to connect the corresponding outputs of the modular device and the sound card of the music center. The procedure can be performed using a soldering iron (soldering wires) or using the existing aux input.
- At the end of the upgrade, you need to connect the power supply and the upgrade is complete.
When choosing a different location for mounting the USB connector, you should make a hole in the case for it. In this case, you can bring the port for the flash drive to the rear panel of the tape recorder.
Module and center diagrams are usually included with purchased devices, otherwise they can be easily found on the Internet. The audio module must have a constant power supply of 5 V. From 12 volts it will need to be connected via a power supply (12-5 V). All remodeling work must be carried out in compliance with safety regulations.
Such homemade players can be used as portable ones: it is much easier to transport a small music center around the house than a desktop computer. You can make a miniature (micro) music center with USB from an old cassette player.
All the subtleties of the alteration are shown in detail in the video below.
Conclusion
The self-made device has limited functionality, however, it copes well with the task of simply playing sound files. Such a refurbishment does not cost much money and will allow you to give a second life to your favorite equipment - outdated music centers, for example, Sony, Aiwa, Panasonic. If you have the desire and free time, you can continue to improve the old equipment in the same direction as long as the original speakers and built-in amplifier work.
Article added: May 16, 2021 at 11:39
How to connect your phone to the stereo and TV speakers
No matter how banal it may sound, life is more fun with music. We turn it on not only during vacations and holidays, but also while doing various housework: the work is “in full swing” and time passes unnoticed. We often play music on our phone. But sometimes you want to turn it up louder, and the sound quality could use improvement. This problem can be solved by using external acoustics. To do this, you need to know how to connect your smartphone to the speakers of your music center. This is exactly what will be discussed below.
Connection diagram to the music center
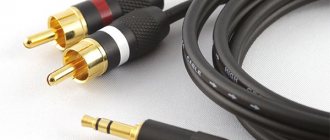
In order to connect the gadget to the system's speakers, you need to purchase a cable, the ends of which have 3.5 mm plugs (the same as for headphones to a phone). Both different phone models and different music centers may require different connectors. When you go shopping for the required cable, select an identical plug and take it with you as an example.
The process of connecting the cable is simple and does not take much time. You just need to connect one plug to the smartphone (into the headphone jack), and the other to the center. On the latter, select the AUX or AUDIO IN jack. That's it, the devices are connected. All that remains is to select the playback mode from an external connection on the center (AUX button), and turn on the music on the phone.
Connecting to TV speakers
You can increase the volume of music played from your phone through your TV speakers. If you know how to connect a smartphone to a music center, then this connection will not be difficult. The only difference is in the types of connectors: for the TV you need a special cable - “tulip”. It is named after the three multi-colored plugs it consists of. Connect one end of the “tulip” to your mobile phone (where the headphones are), the other to the TV, matching the plugs color-by-color with the existing connectors.
Select AV1 or AV2 mode on your TV and turn on music on your phone. You can adjust the sound volume on both devices.
Connecting to a speaker
For the operation of the above devices, an electrical network is required. If you want to listen to loud music in nature, away from electricity, a battery-powered speaker will help you out. It connects to the phone in two ways:
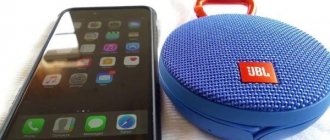
- Via Bluetooth – a wireless communication channel (for those speakers that support this function). To connect, you need to turn on the speaker. Then turn on the Bluetooth function on your phone. Afterwards, start detecting Bluetooth devices. When your smartphone detects your speaker, confirm its connection. If the device asks for a code, enter the standard one - “0000”.
- Using a cable. The connection principle is the same as connecting a smartphone to a music center. You just need to choose the right plug.
Connection using AUX output
You can also connect a tablet to the music center. Let us describe the connection of these devices step by step:
- Prepare a cable with a Jack 3.5 plug on one side and two “tulips” on the other: red and white (in rare cases, other color variations are possible).
- Look for the jacks labeled PHONO or AUX in the center. They can be located on the front panel or rear of the head unit housing.
- Insert one side of the cable into the headphone jack on the tablet, and the other, with two tulips, into the connectors on the music center. In this case, the color of the tulip must match the color of the connector. Please note that the cord cannot be pulled between devices.
- Press the AUX button on the equipment and enjoy your favorite music.
As you can see, you can enhance the sound capabilities of your phone in various ways. The main thing is to have the appropriate cables on hand.
tehnika.expert
Sequence of modernization of the music center
For the player to work you need to connect:
- power circuits (to the +5 Volt voltage source);
- output signal circuits (left and right channel).
Since there is an AUX mode in the center, and there are corresponding tulip-shaped connectors on the rear panel, I decided to connect the player’s output signal circuits to the AUX connectors from the inside.
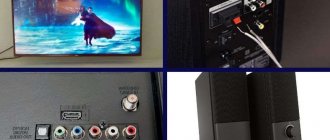
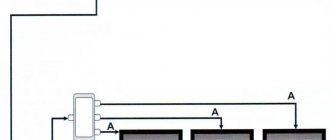
So, to find the connection points for the +5 Volt power supply circuits and access the inside of the AUX connectors, remove the side cover of the case. On the common board of the music center we find three points labeled AUX: GND – common, R – right, L – left. We will solder the terminals of our player GND, RO and OL to them, respectively common, right, left.
On the cable going from the power supply of the music center to the common board, we are looking for a voltage source of +5 Volts. Since the points on the board are not labeled, we find the required voltage by taking measurements with a multimeter. To do this, we connect one of its probes to the GND contact or to the chassis of the music center, which is connected to ground (GND), with the second probe we check all the wires of the loop
Yes, it is very important to search with the AUX mode turned on, since it is in this mode that I plan to listen to the player in the future
After finding the connection points, I solder all five wires of the player according to a temporary diagram (the sixth ANT pin - I don’t use the antenna, since there is its own FM tuner in the center). When soldering the music center, be sure to disconnect it from the network. I place the player on the top panel of the music center and plug it into the network without putting the side cover back.
I turn on the AUX mode and, by inserting a MicroSD card with music recordings into the player slot, I make sure that the player is working.
All. Now you can begin the final installation. I chose the location of the player on the outer cover of the cassette deck, which is of sufficient thickness. Having marked the future hole, I carefully cut through the plastic.
When installing the player, only its front panel should be outside. The player is secured with two self-tapping screws screwed into the prepared holes.
The temporarily soldered wires are unsoldered from the board, the entire resulting cable is carefully tied into a bundle, laid and secured inside the body of the music center, after which the wires are finally soldered.
That's it now. You can close the lid and turn on the music center. All cassette decks have retained their functionality and work great.
How to install the module
First, find a place to install the device. The cassette player deck and CD changer connector are suitable for this. You can independently make a hole in the desired place on the body of the music center. The length of the cable depends on where the device is located.
There are 5 wires connected to the device:
- 3 of them are sound output: right, left and center.
- The other 2 are power wires.
The wires are connected directly to the music center board. The audio output is connected to the AUX connectors. First find the left, right and center AUX contacts on the board.
The power wires are also connected to the power connectors on the music center board. This way the module will start immediately when turned on. To ensure that the module turns on only when switching to AUX mode, find the place on the center board that is responsible for power supply in AUX mode and connect the wire to it.
Important! When connecting the module to the power wires, it is important not to reverse the polarity. The designation written on the device is 5 V. This is the + wire. If connected incorrectly, the voltage stabilizer or the device itself will burn out.
Homemade housing for a simple MP3 USB bluetooth music center
How to make a case for an MP3 USB bluetooth mini music center with your own hands / Sekretmastera
Watch this video on YouTube
Bluetooth center housing
The body was made from materials available to the author. You can make the case from other materials and other sizes. Case dimensions 265x158x140 mm. Ask why this size. I just had a scrap of varnished OSB board measuring 2500x140x9 mm on hand. All the body parts were cut from this piece. It is convenient to cut with a circular saw.
- The body is assembled using PVA glue and thin screws, following the example of a previously made powerful Bluetooth speaker. The gluing areas were cleaned of varnish with sandpaper.
- A partition is inserted inside the case to form a volume for speakers and electronics.
- The back panel is made with the original cover. The lid was cut out with a hand jigsaw at an angle.
- The front panel is attached to the body. The contours of the partitions are transferred to it and the installation locations for the speakers and module are outlined.
- Holes are cut for the speakers, module and bass reflexes.
- Holes are drilled in the partitions through which the wires for connecting the speakers and antenna are inserted. The antenna is fixed with hot glue to the inner walls of the housing.
- The body is being assembled. The panels do not stick. All corners and joints of parts are sanded. The panels are removed and the parts are varnished.
- We install the speakers on the front panel and secure them with hot glue. We solder the conductors, observing polarity, and secure the front and rear panels to the case. We glue in the bass reflexes. Tubes are sleeves connecting a corrugated pipe.
- Insert the module. We serve food. Everything should work. Watch the video.
Details of the Bluetooth center case Connection of the case walls Internal partition of the case Assembling the center case The case is assembled Back panel with cover Marking of the front panel Holes in the front panel Bass reflexes are glued in Front panel of the music center Case of the Bluetooth center Wire routing Installation of speakers on the front panel The front panel is fixed in the case Front panel Installation module Rear panel cover Bluetooth music center
For the construction of a simple MP3 FM USB bluetooth mini music center, direct costs were no more than 300 rubles (2016). Everything else was at hand or lying idle. You could say China rules. Minimum costs and the result is a homemade mini music center. If you have any questions, ask. If you want to brag, send a photo. Yes! And if there is no FM broadcasting in your area or your ears are dry from broadcasting, then you can easily organize your broadcasting on the FM band. The main thing is to broadcast on free frequencies, not to broadcast swear words or politics, then no one will touch you. Here is a link to a decent entry-level FM transmitter https://ali.pub/4bw467.
mp3 decoder or second life of a music center
And then I came across reviews of various mp3 decoders and how they are built into speakers, old radios, etc., so I decided to order them.
Here is the music center itself.
All the photos were taken just like that, for myself, I didn’t intend to do a review, since here, on Muska, there were similar devices and everything was described there in great detail, for example mysku.ru/blog/china-stores/22295.html and here mysku.ru /blog/aliexpress/30448.html
So we have a Samsung music center
A scarf from China, a remote control for it and a pair of wires for connecting power and sound output.
The remote control is an ordinary Chinese one, infrared, the kind that goes with all Chinese radio products. FM transmitters, MP3 players, etc. No photo.
Reverse side board
We connect 9V from a Krona battery. The board starts blinking a hellish blue LED
I myself am not particularly strong in electronics, so I disassemble the music center and call a friend. He, having clarified the model of the center with me, finds a circuit diagram on the Internet and says “look for the LA3246 chip, this is a tape recorder preamplifier, legs 17 and 4 are audio channels, and leg 10 is ground, and 11 is power.” I find
and solder
I check, it’s playing, but it’s somehow loud, so much so that it’s even off scale. I transfer 5 16 to my legs and everything becomes just wonderful! But there is one BUT! Since this is a tape recorder preamplifier, it plays when the Play button is pressed on the tape recorder.
Then I took a Dremel from my wife, also bought in China, and cut a hole, attached the board from the inside and put the center back together.
The result, an hour and a half of fiddling, the music center continues to please. I switch the volume and modes of the music center with the original remote control, the Play button on the tape recorder is mechanical and always pressed, the MP3 decoder is in “Random” mode. I switch to the radio - the radio plays, I switch to the tape recorder - they play MP3. I'm more than happy with all this.
The decoder plays MP3 up to 320kbit, supports 32GB flash drives, larger size and HDD have not been tested.
+ second life for old equipment + cheap + tinkering with a soldering iron because there is nothing to do at the dacha.
I bought it with my own money, a long time ago.
How to make an MP3 USB bluetooth music center with your own hands
Bluetooth music center
The start of assembly begins with the purchase of parts on Aliexpress. There may be a small lottery here. Don't be fooled by the cheapest offers. Focus on the number of orders and store reviews. In addition, sellers are cunning. The modules may be the same, but with different firmware (will speak to you in Chinese)). So, the module installed in this center seems to be no longer for sale, here is a version of the MP3 FM USB bluetooth module to replace it https://ali.pub/4bhc8c. The ULF is digital - a small board with a power supply of +5 Volts and two channels with a power of 3 Watts each. Here is a link to purchase 10 of these scarves https://ali.pub/1d72mx. The power supply is ready-made for 5 Volts and a current of 2 Amps, preferably 3 Amps. I didn’t draw up a diagram of a mini music center. All the markings on the boards and the supplied conductors allow you to assemble the circuit with minimal soldering. The speakers for the mini center were taken from a CRT TV (honestly, I already refuse to take them for free for disassembly). The body is made from scraps of OSB boards, see details below.
About plugins
Technological progress does not stand still. So Chinese manufacturers decided to please amateur craftsmen by releasing a special audio module for sound conversion to the market.
The device is sold in several versions, differing in operating voltage. The model, suitable for most music centers, is powered by 5V. If voltage measurements on the music center's printed circuit board do not allow you to find the desired pair of conductors, you can buy a different panel design. For example, with a 12V power supply with a permissible limit of 9 to 15V.
Those who want to get everything at once will like the version with a Bluetooth module. It allows you to play audio from your phone after pairing with a modified music center.
Module with USB and Bluetooth
But these details are not enough even to create the simplest player. This is what the old audio system will be used for. It's good if it is kept in working order. If not, don't worry. The main thing is that the necessary parts work:
- The battery pack, or the unit responsible for charging.
- The speakers are from the old system, and it is through them that the music will sound.
- Well, and a sound amplifier built into the music center.
Audio conversion board
Algorithm for embedding a module into a music center
To integrate a purchased module into an audio system, you must correctly determine the location of its installation. When choosing the location of this node, you must also take into account the possibility of remote control of the created music system using the remote control.
Important! It is most appropriate to mount the module in a compartment for audio cassettes or instead of a CD drive. If the old drive is still working, then you can leave it. As a result, the device will be able to work with both a flash drive and a disk.
To convert an old music player into a flash drive, you need to follow the following algorithm of actions.
- It is necessary to partially disassemble the old tape recorder.
- Based on the diagrams of the module and audio system, you need to connect the power supply to the corresponding pin of the modular board using a wire.
- Then you should proceed to installing the module in the selected location: the compartment for cassettes or disks. To do this, you need to connect the corresponding outputs of the modular device and the sound card of the music center. The procedure can be performed using a soldering iron (soldering wires) or using the existing aux input.
- At the end of the upgrade, you need to connect the power supply and the upgrade is complete.
When choosing a different location for mounting the USB connector, you should make a hole in the case for it. In this case, you can bring the port for the flash drive to the rear panel of the tape recorder.
Module and center diagrams are usually included with purchased devices, otherwise they can be easily found on the Internet. The audio module must have a constant power supply of 5 V. From 12 volts it will need to be connected via a power supply (12-5 V). All remodeling work must be carried out in compliance with safety regulations.
Such homemade players can be used as portable ones: it is much easier to transport a small music center around the house than a desktop computer. You can make a miniature (micro) music center with USB from an old cassette player.
All the subtleties of the alteration are shown in detail in the video below.
How to connect the player to the music center?
Sometimes the music center does not have an MP3 function, but the pocket player does. But the player, unlike a music center, is not capable of sounding loudly. To correct this drawback, you need to connect the player and the center to each other.
First, check your stereo for RCA input jacks on the front panel, labeled AUX or PHONO. Don't confuse them with headphone or microphone jacks - they are not only made to a different standard, but are also designed for a different purpose.
If you do not find such sockets, then carefully, so as not to tear off any cables, turn the music center with the back wall towards you. You will probably find such nests there. Do not confuse them with sockets for other purposes, which can also be made according to the RCA standard. Now take the unnecessary headphones. Cut off the sound emitters from them. Purchase two RCA type plugs. Strip the wires that went to the sound emitter. One of the pairs consists of a clear (or yellow) and a red (or orange) wire, and the other has a blue or green wire instead of a red or orange wire. Connect all colorless or yellow wires to the ring contacts of the plugs, and the red (orange) and blue (green) wires to the pins.
Connect the cable to the player and music center. On the last one, select the mode called AUX or PHONO. If it has several inputs, they may be designated AUX1, AUX2 and the like. When searching for an input, set both the player and the center to a low volume. In the future, set the volume on the player so that the center preamplifier is not overloaded, and then make adjustments from the center side. To prevent the player's battery from draining, connect the device to a special power supply that emulates a USB port. You can also use a powered USB hub that is connected to the unit but not to the computer. Remember that if the player is powered not by a battery, but by a battery, charging the latter in any way is not allowed. Using a music center together with a player does not exclude the possibility of switching it to other modes if necessary.
How to connect your phone to a music center and tape recorder?
If the volume of your phone's speaker is not enough for you, you can connect it to more powerful speakers. In this instruction we will tell you how to connect your phone to a music center or tape recorder.
You can do this in several ways:
Via AUX cable
In order to connect your smartphone to the music center, you will need a cable, at both ends of which there will be plugs with a diameter of 3.5 mm. This diameter is the standard for almost all devices, so there should be no problems finding it and compatibility.
You need to connect one end of the cable to the connector on your smartphone, which is used for headphones, and the other to the tape recorder. It must be inserted into the socket designated as AUX or AUDIO IN. After this, you need to select a mode in the music center settings in which the audio recording is played from another device. Some models have a separate button labeled AUX. After this simple connection, all the music from your phone will sound from the speakers of the music center.
Via USB cable
This method is good because with this type of connection, you can control the music directly from the tape recorder. The connection is made by connecting the devices with a USB cable (usually included with the phone) and selecting a USB signal source in the settings of the music center. After this, a folder with music on your phone will appear on the display of the tape recorder and you can select the desired track.
(8942)
Share with friends:
www.lumias.ru