How to connect?
There are two ways:
- network;
- local.
Usually, a connection via a cable is enough to work; then the device itself recognizes the printer. All that remains is to install the software, or download the driver or program, which is usually included on the disk included with the printer itself. After installing the necessary applications, you can print.
However, this is not always the case, especially in Windows 7. The owner will have to configure the equipment himself and force his PC to recognize the connected device. Drivers are usually included with the printer.
How to connect an MFP to a computer
An MFP is a multifunctional device, popularly often called a 3-in-1 printer. Three units are located in one case - printing, scanning and copying (copier).
Connecting an MFP is no different from a stand-alone printer. The only thing that should be taken into account is the need to install a comprehensive driver on the computer. Or install separate drivers for each function (printing, scanning).
This is one of the reasons why the printer does not scan but prints, or vice versa. In addition to the failure of one of the nodes, it is likely that just one of the drivers is missing from the system.
Via network cable
Connecting a device via a network cable involves several steps.
Stage 1
- One end of the wire is connected to the printer, and the other to the system unit.
We connect one end of the wire to the printer, and the other to the system unit - Click the Printscreen button. The device will “spit out” the sheet with the IP address.
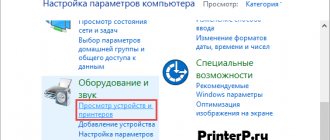
Press the “Printscreen” button on the printer - On the PC, press the start button, the printing devices section, as in the picture.
Expand the “Start” menu, open the “Devices and Printers” section - Click the “Add Printer” button located at the top.
Click the “Add a printer” button at the top - The installation wizard will ask you what type of device you are connecting to. Select the first item in the window. That is, a local device, with a note that its use is permissible only in the absence of a USB printer.
Click on “Add a local printer” and click “Next”
Stage 2
- A window will appear where the system will ask you to select the port for the connected device. In the field, click create new.
Oh, click “Next”On a note! In the English version, “Use the following” means select the proposed one, the second means “Create a new port” - set up a new one.
- From all the available options, after clicking the corresponding line, select “Standard TCP/IP Port”. Confirm with the “Next” or “Next” button if the selected language is English.
Select “Standard TCP/IP Port”, click “Next” - The system will prompt you to select an IP address. The piece of paper with IP printed out at the very beginning will come in handy here. The numbers from it are entered into the form. All that remains is to confirm the action by clicking on the “OK” button.
In the “Port name” field, enter the printer’s IP from the printed sheet, click “OK”
Stage 3
Now the lack of a driver separates the user from using the device as intended. To search, click the “Browse” button, update center. Windows itself will download what you need.
Select your printer in the list, click “Windows Update”
Attention! The Internet must be available for this!
Stage 4
All that remains is to designate who will have access to the device:
- open the device properties by right-clicking on the printer name icon;
Right-click on the printer icon, then left-click on the line “Printer properties” - and in the “Access” tab, mark the item for sharing the printer.
In the “Access” tab, check the box for sharing the printer
Connection in Mac OS X
This instruction is for those who prefer Apple products. In this case, the algorithm will be slightly different.
- The first thing a computer owner needs to do is check that all necessary updates are installed on the PC. That is, drivers and patches of the latest version.
- Find a convenient location for the printer and make sure there is no tension on the wire.
- Connect the printer to a power source and turn on the device. Turn on your PC and wait until the system boots completely.
- Connect your PC and printer using a cable. If the computer is not equipped with standard connectors, then you will have to buy an adapter, clarify this point and take care of the availability of additional elements in advance.
- As soon as the computer recognizes the device, a dialog box will appear. Click the "Install" command.
- Wait for the process to complete. In some cases, you will have to confirm several times in a pop-up window.
Now the setup is complete, you can start printing.
Recommendations for Mac OS X
Now let's figure out how to connect a printer to a computer via a wireless network in Mac OS X. The essence is almost the same as in the previous case. First you need to find out which module the printer is equipped with and whether a PC or Internet cable is required for connection.
- Install the printer where the signal from the router is best.
- Turn on the output device and computer, wait until it boots completely.
- Follow the instructions in your specific model's user manual to connect to your network. Using the printer menu, find the network you want and enter the security key. You need to select the same access point as the PC. If using Bluetooth, press the pairing button.
- Then on your PC, open the menu (apple icon in the top left corner) and go to system settings.
- Open the "Printers and Scanners" section. Click on “+” and by clicking on the name of your printer, add the device following the system prompts. Often the printer automatically appears in the list of available devices, in which case no action is required from the user.
That's all, the connection is complete, the printer is available for printing.
The nuances of connecting a printer to MacOSX by sharing it over the network
This operating system has some differences, so if you need to share the printer for public use, you need to complete all the steps up to step four from the previous section, after which we move on to the next step:
- Open the Apple system menu and go to “System Preferences”, “Printers and Scanners”, click “+” in the list that appears.
- Go to the Windows tab at the top of the new window that appears. Here, enter the name of the printer that you want to make accessible to all home PCs.
MacOS is a custom system, so connecting your printer to it will be slightly different
Setting up a printer with a computer running an Apple operating system is similar to traditional computers. The difference between connections via cable or wireless network Bluetooth or Wi-Fi for MacOS is obvious. Here it is important to follow the instructions and know the technique for connecting devices on standard WindowsXP.
Wi-Fi and Bluetooth connectivity
There are models of MFPs, inkjet printers and laser printers that support connection using wireless technologies. For example, you can take the Canon PIXMA G3400 inkjet, which has the ability to connect via Wi-Fi. A small nuance should be taken into account: this device connects to a Wi-Fi router using WPS technology. Therefore, you need to buy a router that supports WPS, and this feature must be enabled on it. The following figure shows how to enable WPS on the D-Link DIR-615 router.
Next, to connect your Canon PIXMA G3400 to a wireless network on Windows 10, you will need to follow these steps.
- Turn on the device to the network and press the button marked “Wi-Fi” located on it. Keep it pressed until the orange LED flashes once. After this, the blue Wi-Fi indicator will start blinking, indicating that the device has started searching for a wireless network.
- At this stage, you will need to connect the router to your inkjet machine (laser machine). Press the WPS button on it and hold it until the blue indicator on the inkjet stops blinking and begins to glow steadily. This will indicate that the printer has connected to the Wi-Fi network.
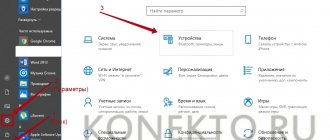
- Next, it is necessary for the OS to see the equipment. To do this, through the “Start” menu, select the “Settings” tab, after which a new window will open.
- Select the “Devices” section and click on “Add a printer or scanner”. The system will begin searching for equipment and ultimately display a link “The printer you need is not in the list,” which you will need to click.
- Next, you should place a marker near the item, as shown in the following figure.
- By clicking the “Next” button, a search for equipment (Bluetooth or Wi-Fi printer) will start. Select the required found equipment and click “Next”.
- After this, the necessary drivers will be installed and the equipment will be ready for use.
Using a print server
A print server is a small device that connects to a local network and a printer, and then allows all devices on the network to access that printer.
It is worth keeping in mind that the word “print server” has very many meanings. Some equipment (for example, routers or switches) have a print server function - that is, they have a special interface and web configurator for connecting the printer to a local network. A print server is also called software that allows the computer itself to become such a server. In general, to avoid confusion, below we will call “print server” only the individual devices themselves that perform only this function.
The cost of print servers ranges from 2 to 5 thousand rubles
The main problem with print servers is compatibility. Typically, these boxes are produced by the manufacturers of printing devices themselves - for example, print servers from Canon, Epson, and HP LaserJet are very popular. However, they are usually only able to work with their own printers. Therefore, before purchasing, be sure to find out what devices the print server you are targeting supports. This information is always available on the box manufacturer's website.
How to use a print server? It’s very simple - you need to connect a printer to a USB port, and connect the print server itself to a local network router using a patch cord. Details of connecting to the network may vary from manufacturer to manufacturer, so here we will direct you to the operating instructions - they always cover this point in detail. Most print servers also come with disks for quick installation. The print server is usually configured, like routers, through the web interface.
After this, all computers connected to the same local network will have access to the printer. There is no need to install drivers or configure access - that’s the beauty of special equipment.
Via router
The printing device can be connected to a local network and via a router if it has a USB port. In this case, you need to turn off the printer and router, connect them with a USB cable, and then turn them on again.
If the printer can connect to Wi-Fi, then you can do without wires. In the printer menu, find the desired network, enter the password for it and connect. Detailed instructions on how to connect to Wi-Fi specifically on your model will be in the user manual for the device.
This connection has a number of disadvantages. Firstly, the performance of the printer strongly depends on the router firmware - it must be updated regularly, and if after the update the printer stops working, it must be rolled back. Secondly, drivers for the printer will have to be installed on each PC that is connected to the network. Thirdly, in Russian apartments the router is often located in the hallway. Putting a much bulkier printer there is not the best idea. Therefore, for home use, it is better to abandon the router in favor of a regular cable connection to the computer.
Settings
All devices connected to the router's network will be able to access it after a short setup process:
- Click Start - Control Panel (Windows 7) or right-click Start - Control Panel (Windows 8, 8.1 and 10).
- Select "Devices and Printers".
If you have difficulty finding the item you need, enter it in the search box
- Now click on “Add a Printer”.
The required button is located at the top of the window
- The search for the printer will begin, but we are not interested in it. Immediately click “The printer you require is not in the list.”
Searching for a printer will not give us the desired result, so we can skip it
- In the window that opens, select the third item - search by TCP/IP. Further.
If you connected the printer to the router, then this is the only way we can recognize it
- Select Device Type - TCP/IP. Enter 192.168.1.1 twice. If you use a different address to access your router's web interface, enter it. Do not check the “Poll the printer” checkbox. Click Next.
Here you need to enter in the fields a combination of numbers that opens access to the router’s web configurator - usually this is 192.168.1.1
- Now check the “Special” checkbox and then click on “Options” next to it.
Here we can set some parameters manually
- Check the LPR checkbox and enter any name in Latin in the “Queue name” field. For simplicity, you can enter the brand of your PC. Click OK.
Do not change anything else in this window - this may cause the printer to not work.
- You will be returned to the previous window. Without changing the checkbox, click Next.
- Windows will now ask you to install drivers. If you have a disk with them, install the software from the disk - it will be easiest. If not, then download the drivers from the official website of the printer manufacturer.
- After installing the driver, the system will ask you to name the printer. You can call it whatever you want.
- Steps 1 - 11 must be performed on each computer that will use the network printer.
How to connect a printer to a computer via a USB cable
All actions described below must be performed with increased responsibility. After all, if you make a mistake at one step, you will have to start all over again. This is the best case scenario. At worst, incorrect actions can lead to damage to both devices.
To make typing comfortable, you need to allocate some space on your desk. This is necessary to ensure a convenient approach to the printer. If there is no space, then it is better to choose compact models. One of these is the HP Laser 107r.
The USB connection method is the most common in the modern world. At the production stage, each printing device is equipped with special connectors and cables.
So, let's go through the basic steps.
- First of all, you need to be powered by an eclectic circuit. To do this, a cord with a standard plug for an outlet was placed in the box. The second end must be inserted into the device connector.
- Our printing press came to life. But we need the PC to see it. This means that it is too early to relax. If you have a modern laptop, the operating system will automatically detect and pull up all the necessary files.
- But if this does not happen, you will have to install the drivers manually. To do this, the box must contain a disk with a driver that must be installed on the computer.
- Now all that remains is to connect the cable through which information will be transmitted from the computer to the printer.
It is worth noting that it can be used to connect to both a laptop and a computer. The cord consists of two connectors. On one side the connector has a square shape, on the other there is a regular USB connector. We plug the first side into the printer, the second into the computer.
- The last step is to restart the computer. However, this is a mandatory action and is necessary in all models. Otherwise, the complete installation will not be completed and the device will not work correctly.
Now let's consider the situation when the delivery kit turned out to be without a disk. In this case, we need to trust our personal computer. In this case, it will install the standard driver package. The process will start automatically as soon as the system detects the connected device.
That's all that needed to be done to connect the printer using a USB cable.
Take a short break and read what to do if there is no sound on your phone. After you read, come back. There is still a lot of interesting things to come.
Installing drivers
If the Windows system does not automatically install the drivers, then you need to do it manually yourself. The printer will not print without special software. An excellent scenario for you is to have an installation disk. If the device is not new or comes without a disk, then the situation is more complicated.
Using the installation disk
In the box with the equipment there should be a disk with drivers, or maybe several for different operating systems and types of systems. The installation process is very simple:
- Find the correct type of disk. Must correspond to the OS version and its bit depth.
- Insert it into the drive and wait for the installation wizard to autostart.
- Follow the program's instructions.
- Choose customizable settings to suit your needs.
If there is no disk
There is also a way out of this situation, and even several.
- You can download the driver on the website of the manufacturer of your device model. Cybersecurity experts recommend downloading any software from the original source sites. All you need to know is the exact model name. It is indicated on the product itself or its box. After downloading, run the exe or msi installation file and follow the instructions of the installation wizard.
- You can also use the built-in driver database in the Windows system itself. This database is available in any version. Through the control panel, go to the devices and printers section. Click on the button to install a new device.
In the first window, select installing a local printer.
At the next step you will be able to select drivers for your model.
Follow the prompts and click “Next” everywhere. After the installation is complete, we find this new device in the list. Using the context menu, remove the newly installed printer.
We turn on the device, wait a bit and try to print. - Enable automatic detection and installation of software for any connected device. In the “Devices and Printers” section, you need to find your PC in the list. In the context menu, select “Installation options”. In the window that opens, agree to automatic downloading.
We reboot our computer, wait for the system to try to download drivers from the Internet on its own.
Connecting the printer to a PC: methods, features
Let's look at three ways in which you can connect a printer to a PC , namely:
1) connection using a USB cable to install a local printer;
2) network connection of the printer via IP address;
3) connection to a printer installed on another PC.
Connecting the printer via USB cable
When you unpack and set up the printer next to your computer device, immediately connect the USB cable to it - the end where the plug looks like a simple USB input that is inserted into the computer. Connect the other end of the cable to the PC. Next, proceed as follows.
1) Go to the “Control Panel” and select the “Devices and Printers” section there. You will see a list of all devices that are connected to your PC.
2) On the panel at the top, click on the “Printer Installation” line. A window will open in which you need to select the type of printer you are connecting. Since in our case it is a USB device, select "Local Printer".
3) Place a dot on the “Use the following port” option and click on the field with the names of the ports available for connection. From the list that opens, select the name “USB001”.
4) The next step is to select a driver for the connected device. In the list called “Publisher”, find the name of the manufacturer (for example, Canon), and in the “Printers” list, find the model itself (for example, Canon LBP5960).
If you cannot find the name of your device, you will need to download the driver and install it manually. Download the driver on the official website, then click on the line “Install from disk...”, specify the path of the downloaded driver and confirm the action by clicking on the “OK” button. Then check the box next to “Replace existing (current) driver” and click on the “Next” button. Now do this:
1) Specify the name of your printer, after which its installation and configuration will begin.
2) Pay attention to the item “Sharing settings for your home PC”: if you are at home, cancel sharing, if you work in the office, you can open it so that in the future you can connect to the printer and print to it from several PCs.
3) Check the “Use default printer” checkbox and click the “Finish” button.
If you did everything correctly, then by looking at the “Device Panel” you will find your “freshly connected” printer there.
Connecting a network printer
To install a network printer connected to the Internet, click on the “Install Printer” button and select “Local Printer”. Only in this case you need to, then select its type - “Standard TCP/IP Port”.
You will see two fields: in the first, enter the IP address of the printer, in the second, the name of the port, so that it can be identified in the future.
Your further actions will be the same as in the first case, when the connection was made via a USB cable:
1) select the driver (or install it manually),
2) allow (or deny) public access,
3) mark the printer as primary,
4) close the window by clicking on the “Done” button.
Printing from a smartphone
Modern phones have a built-in operating system. It can be IOS or Android. Setting up printing from a smartphone or tablet involves connecting a printer in one of these mobile operating systems. As is the case with Windows, there are two connection methods:
- A direct connection via cable will require the use of a special adapter.
- Network access requires the installation of special applications. This could be AirPrint for Apple equipment, Google Cloud Print for Android systems, software from printer manufacturers - ePrint from HP.
All methods of connecting a phone or tablet to a printer and setting up printing via Wi-Hi. A detailed description of the options for all possible options to 'make friends' with Android or IOS equipment with your printing equipment.
Setting up an ink jet (laser) for printing
To configure the device, you need to go to “Devices and Printers”, right-click on the desired equipment and select “Printer Properties”. To check the functionality of the machine, click on “Test Print”.
By clicking the “Print Settings” button, you can select the paper size and determine the page orientation, as well as the print quality.
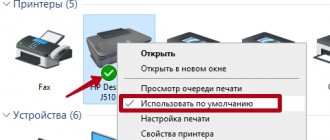
How to turn on the default printer
Sometimes it happens that several printing devices are connected to the computer. But if you use one of them most often, then constantly choosing it from the list is very inconvenient. The problem is solved in a fairly simple way: you need to add the desired inkjet (laser) to the default devices:
- open control panel:
- open the “Printers and Faxes” section;
- Double-click on the required equipment and check the box next to the “Use as default” line.
For convenience, make a shortcut to the “Printers and Faxes” folder and place it on your desktop or pin it to the Start screen in Windows 10.
Setting up a print queue
Print queue management allows the user to control all documents in its list . Thanks to this service, you can re-select and send a document for printing at any time. You can also put it in “Favorites” so that you don’t have to send it for printing next time.
There are 3 types of print queues:
- general - all PC users can perform any tasks;
- direct - you can print out a document from the designated equipment;
- secure—printing the document will not be possible without authorization.
In the event of a failure, the inkjet printer (laser printer) may refuse to print documents from the queue, or will print the same document without moving on to the next one. In this case, the queue can be cleared by double-clicking on the icon of the desired device in the control panel. Next, click on the “Printer” menu and select the “Clear print queue” line.
Setting up color printing
Setting the color profile is a very important step for high-quality color reproduction when printing. You might have seen, for example, in the device settings for printing, the choice of either glossy paper or matte paper. Each type of photo paper has its own color profile in the form of a special file containing specific commands for the inkjet printer.
Color profiles for the ink or paper used can be downloaded from the Internet and installed on your computer.
You can also set up color printing manually, by trial and error, creating your own profile for the highest quality color reproduction. To do this, use the inkjet driver. For example, setting up a Canon inkjet driver will look like this.
- First, open the printer driver window. Click in turn: “Control Panel” and “Devices and Printers”. After that, right-click on the desired equipment and select “Printer Properties”.
- Select the Main tab and select Manual color settings, then click on “Set...”.
- In the manual color settings window that opens, check the box next to “Print a pattern for color adjustment” and click on the “Pattern Print...” button to set the printing parameters.
- After opening the next window, select the options as in the image below. By the way, the paper size may be different, for example, A4. After making changes, click OK.
- Make a test print by clicking OK on the (Main) tab. A sheet will be printed with several images in which the color balance will vary.
- Having looked at the result, you should select the image with the best (natural) color rendition and remember the values that are written under it.
- In the color settings window, enter the color balance values that were indicated under the picture opposite Cyan, Magenta and Yellow.
- Uncheck the box next to “Print a pattern for color...” and print the image you need.
Now printing will be done taking into account color balance adjustments, and images will look better and more realistic. Print driver windows from different manufacturers may differ in the set of commands and button layout. But in general, the algorithm for adjusting the color balance is similar, and its implementation will not cause any particular difficulties.
Possible connection problems
Many people have encountered errors when trying to connect a printer to a computer. To properly switch devices, it is necessary to urgently solve the problem that has arisen, and therefore find the cause.
If you do not see your device in this tab or it is not working correctly, you need to look for the cause of the failure
If the computer does not see the printer: what could it be?
Have you bought a new printer, but when you try to install the device to work via a computer, it is not visible in the devices? Most likely, the problem is in the installation disk, or more precisely, that the drivers on it are outdated. In this situation, you can download a more recent version of the utilities.
If antivirus is enabled on your OS, the program can also block the connection being created. Therefore, temporarily disable the application and restart your PC. If this action does not help, check your PC for viruses, and, of course, check that all cables and settings are connected correctly (if it is wireless switching).
How to connect a printer to a computer via wifi
If both parties have the ability to connect via Wi-Fi, then this method will be the easiest. All you need to do is install the device in a Wi-Fi coverage area.
However, initially you still need to connect to the computer, as in the first case. Then you can disconnect the cable, restart the computer and activate the Wi-Fi module on the printer.
For such use, I would advise you to take a closer look at the Canon i-Sensys LBP710Cx. It has the Wi-Fi Direct function. It allows you not only to print documents wirelessly from a PC, but also to control printing via your phone and tablet.
That's all. Now we will see the device in the list of those connected via the network. And you can print over a wireless network.
