Every household appliance can malfunction, and an automatic machine is no exception. There are breakdowns that only a service center or specialist can handle, but there are those that the owner of this household appliance can try to fix.
The latter includes replacing the bearing on an Indesit washing machine. Of course, to take on this, you need to have certain skills in handling and restoring various mechanisms.
Anyone who has never picked up a screwdriver should not take it up.
If you feel confident enough in repairing home appliances yourself, then you can handle replacing the bearing.
To decide whether you will undertake to change the bearing yourself or whether it is better to invite a specialist, check out this article, which will give you a general idea of the process.
Causes of wear
Before we talk about how to change bearings in an Indesit washing machine, let’s go over the basics:
- What is a bearing used for in a washing machine?
- Why does it break?
The wisl 103 indesit washing machine, like any other, has two bearings that ensure the rotation of the drum.
When the machine begins to make excessive noise or the rotation of the drum slows down, one of the reasons may be the poor condition of the bearings, and it is time to think about replacing it before a more serious bearing failure occurs.
These bearings are different in size. One, the largest, is located in close proximity to the drum. The second, smaller one, is on the other side of the shaft. They provide a connection between the drum and the pulley, making rotation uniform.
Normally, an indesit bearing should serve without problems for at least five years, gradually wearing out. If it fails earlier, then we are no longer talking about natural wear, but about bearing failure.
Replacing the Indesit bearing
Before cutting the plastic, you should mark places for self-tapping screws or bolts, which will additionally fasten the two parts together after they are seated on the sealant. They also need to be done immediately.
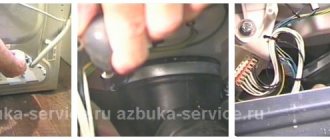
You can make cuts with a hacksaw or other high-quality hand saw. Sometimes this operation takes more than an hour, and it is quite labor-intensive. After cutting, you can remove the drum. To do this, you need to hit the pin on which it rotates. It's time to replace the Indesit bearing. Before this, the oil seal is removed. The Indesit bearing is carefully knocked out of the hole in the plastic. A chisel and a hammer are suitable for this purpose.
You need to work carefully so that cracks do not form in the material. Next, a new Indesit bearing is installed. The part must be positioned correctly and evenly in the hole.
You can pick up an Indesit bearing in a store by taking an old spare part with you. French SKF bearings have proven themselves well. A seal is purchased along with the bearing, as it also needs to be replaced. The latter is coated with a special compound to prevent water from passing through. A drum is inserted into the tank
Both plastic halves are connected with sealant and tightened with screws. All that remains is to install all the parts in place. In this case, special attention is paid to fastening the pulley. After all, during the spin process it can withstand heavy loads
This is how you can change the bearing in an Indesit washing machine. We also recommend watching a video on this topic.
Are bearings replaced on all models?
In our practice, we have never encountered an Indesit machine whose bearings could not be replaced. This includes the most common models: wisl 82, wisl 102, iwsb 5085, wisl 105, indesit 5085, wiun 81, iwsc 5105, wisl 103, w105tx, 6105, wise 10, and more rare ones: wisn 82, w84tx, iwub 408 5 , wisn 101, 4105, iwsd 6105, mise 605, wg835txc and others.
Didn't manage it yourself? Call us! We professionally replace bearings for Indesit washing machines! In addition, when replacing bearings, we give the shaft to a turner to run in on a lathe - this allows us to provide a long-term guarantee on our work!
Disassembling the washing machine
How to replace a bearing in an Indesit washing machine should first be studied using the video and instructions for your Indesit model in order to have a good idea of its structure.
Before you begin the process of replacing the indesit bearing, you need to thoroughly prepare the washing machine for this:
- Unplug it from the outlet;
- Turn off the water, disconnect the machine from the sewer;
- Separate the hoses for draining and supplying water from the machine;
- Remove any remaining liquid that is always present in the pump filter. To do this, unscrew it from the bottom of the case and drain the remaining moisture from it;
- Move the indesit away from the wall and prepare yourself a comfortable workspace where you will not be cramped and there will be space where you can lay out the removed parts of the machine.
To replace the bearing, you will have to disassemble the entire washing machine yourself, from the body to the drum. Moreover, first disassemble it, and then, after replacing the bearing, reassemble it. Therefore, you need to be very careful and careful not to damage the equipment or create new problems for yourself.
Replacing the bearing on an Indesit washing machine with your own hands. Replacing bearings for an Indesit washing machine
When choosing bearings for a washing machine in a store, take the worn parts with you first so as not to miss. If you buy online, make sure that the selected bearing actually fits your Indesit. Prices can also be found on the Internet or by phone.
It is important that you need to buy not only the bearing itself, but the entire set: two bearings and two oil seals, they need to be replaced together, otherwise the replacement will soon need to be repeated
Tools for disassembling the Indesit washing machine
Replacing the bearing of an Indesit washing machine with your own hands is not so difficult. The main thing is to get the bearings themselves, which will require disassembling the entire machine. Please be patient and have the following tools:
- Phillips and flat screwdrivers;
- socket and open-end wrenches;
- hammer;
- bit;
- hacksaw;
- pliers;
- WD-40 lubricant;
- glue and finally replacement parts.
Disassembling the washing machine
First of all, disconnect the equipment from the power supply, turn off the water, drain the water and disconnect all communications.
Free the pump filter from water (below the hatch, under the front panel) - unscrew it and pour out the water. Next, move the device being repaired away from the wall for further work.
Repair of Indesit washing machines ws84tx, wiun 81, wisl 85, wisl 83, w84tx, iwsc 5085, iwsb 5085 and other models, when replacing the bearing, is carried out in the same way.
Let's proceed directly to disassembling the device:
- We remove the top cover; to do this, we unscrew two screws from the back using a Phillips screwdriver.
- Remove the back panel, unscrew the bolts and remove the panel.
- Removing the front panel:
- We take out the tray for powder and detergents by pressing the central clip and remove the tray;
- unscrew all the screws on the control panel, two behind the tray and one on the opposite side;
- Use a flat screwdriver to release the latches on the panel;
- We do not touch the wires, we place the panel on top of the body;
- to open the hatch door, bend the rubber, use a screwdriver to pry up the clamp, remove it;
- unscrew the two screws on the hatch, disconnect the wiring, remove the cuff inside the tank;
- unscrew the bolts of the door with glass and put it aside;
- When removing the front panel, unscrew the screws.
- We remove the parts to remove the tank with the drum:
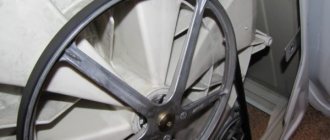
- remove the drive belt, pull it towards you while turning the pulley;
- remove the pulley, fix its wheel and unscrew the central bolt, spray with WD-40 if necessary;
- We do not remove the heating element, but disconnect the wires from it and from the electric motor;
- we take out the motor, unscrew the three bolts and swing it back and forth;
- disconnect the pipe through the bottom, place the washing machine on its side, loosen the clamp with pliers and disconnect it from the tank;
- unscrew the bolts that hold the shock absorbers at the bottom of the body;
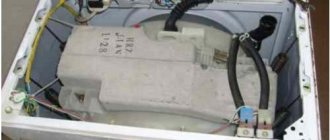
- unfasten the cuvette, first remove the pipe, loosening the clamp, then the hoses, then unscrew the bolt and remove everything together, disconnect the pressure switch hose.
- We take out the tank by pulling it up a little.
- If the tank is soldered, we make holes for future bolts and saw the tank with a hacksaw.
- We take out the drum by hitting its bushing.
- Remove the oil seal by prying it up with a screwdriver.
Let's start replacing the Indesit bearing:
- Use a puller to remove the bearing; if it is not there, then use a chisel and a hammer to knock out the bearing, tapping it lightly.
- Clean and lubricate the area for the new bearing.
- Place the part evenly in the seat by tapping on the outside of the bearing. Also install the second part.
- Place the pre-lubricated oil seal onto the bearing.
- Insert the drum into the tank, glue the two parts, tighten the bolts and begin reassembling the washing machine.
Common replacement mistakes
Before you start replacing the bearing in an Indesit washing machine, let us draw your attention to the mistakes that non-experts make.
These violations when disassembling an Indesit washing machine can either simply slow down and complicate the process, or lead to new breakdowns, which will be much more difficult and expensive to fix:
- Do not use brute force when removing the pulley from the drum axle. They do this by rocking it from side to side, while gently pulling;
- Excessive force may cause the bolt heads to break off. Fixing this breakdown is possible, but quite troublesome;
- Haste and carelessness with the tank cap can damage the temperature sensor and break its wire. Then you will have to replace it too;
- Breakage of the moving unit;
- Do not forget to replace the gasket of the moving unit so that you do not have to repair it again;
- Also, so that you don’t have to disassemble everything again, before assembling the front and rear parts, carefully check all the wiring, especially at the connection points, sensor connections, etc.;
- How to change the bearings on a washing machine of other models, you can watch the video and make sure that there will be no fundamental differences for different Indesit models.
We carry out repairs: step-by-step instructions
First, you need to correctly remove the front and back walls of the Indesit washing machine without damaging any of the sealing rubber. First, remove the top cover of the Indesit washing machine by unscrewing several bolts. After this, removing the back wall is not difficult, just unscrew a few fasteners, but with the front wall the situation is more complicated. How to remove it correctly?
- First, we remove the powder cuvette of the washing machine, which you need to pull towards you until it stops, then lift it up and pull it out.
- We find and unscrew the fasteners that hold the front panel.
- Now we have access to all the screws holding the front wall of the washing machine, unscrew them.
- We remove the rubber cuff, then remove the bolts holding the hatch blocking element and dismantle the front wall of the washing machine.
So, we have access to the “insides” of the Indesit machine. Now replacement of oil seals and bearings will be carried out freely. First of all, you need to remove the belts from the drum pulley and motor drive. Then you need to securely fix the pulley by inserting a block of wood into it and unscrew the main fastening element that holds this drum pulley.
The next step is very important; you need to carefully pull off the drum pulley. The fact is that it sits quite tightly on the axis along with the drum, and if you try to tear it off with tools, you can easily harm it. If the drum pulley was successfully torn off, you can begin dismantling the spacer bar. Next, unscrew the fastening elements of all counterweights and carefully pull them out.
We disconnect all wires from the electrical elements of the washing machine, and then unscrew the fastening elements of the moving drum assembly. Most likely, the screws will be rusty and “stick” to the metal, so before unscrewing you need to spray them with WD-40.
We proceed to the next important stage - disassembling the drum and replacing damaged parts. Here you need to adhere to a strict procedure.
- Remove the clamps that hold the tank cover.
- Carefully remove the seals and the lid covering the tank.
- We take out the drum along with the moving unit where the bearings are located.
- We check the gasket on which the moving unit rests; if the rubber has deteriorated, then you need to throw away the old gasket and replace it with a new one.
- We load the moving part with the remains of the drum into the car and take it to the nearest car service center, where we ask the mechanics to press out the bearings. It is possible to do this work on your own, but it is very risky, because this requires skills + equipment that we do not have.
- We install new bearings and seals, and then reassemble the Indesit washing machine in the reverse order.
By the way, there are a lot of good videos about assembling and disassembling a washing machine. And if you are interested in information about the features of replacing bearings in washing machines of other brands, then this article will help you.
Mistakes made during replacement
As part of this paragraph, we decided to outline the warnings of specialists regarding all stages of repairing an Indesit washing machine. Some errors can be easily corrected, but some are too expensive and lead to the need to replace entire units of the “washing machine” being repaired. What typical mistakes do our “homemade” people make and how to avoid them?
- They break the pulley trying to pull it off the drum axis. To remove the pulley, you need skill; force will not help the matter, you can only do harm. Try rocking it from side to side and pulling at the same time. But under no circumstances hammer along the axle.
- The heads of the fasteners are torn off. If one of the bolts could not withstand your pressure and broke, this is not a fatal mistake on your part, but it will require additional fuss. You will need to drill out the broken bolts and then cut new threads in the seats.
- They break the temperature sensor, including breaking its wire. There is only one recipe for this problem - be careful with the tank cap. Otherwise you will have to buy a new temperature sensor.
- Damage to the moving unit during artisanal pressing. In this case, we have already advised you to contact a car service, because doing this work with improvised means is 10 times more difficult.
- They forget to replace the gasket on which the moving unit is located. The carelessness of the technician who looked at the rubber gasket may result in repeated repairs of the moving unit.
Removing the top cover
Getting started with replacing the bearing for an Indesit washing machine always starts the same way with removing the top cover. We unscrew the 2 screws holding it from the back and carefully push the top cover of the washing machine forward.
Remove the top cover of the washing machine from the body, set it aside and move to the back. Here you have to unscrew all the fastening bolts, after which we remove the back panel and also set it aside.
We do the same with the front panel of the Indesit washing machine, but here disassembly will take more time:
- We take out the compartment for detergents by pressing the clip in the center;
- Behind the compartment there are 2 self-tapping screws that hold the control panel in place.
- We unscrew them and another one located on the other side. Then use a flat screwdriver to press out the panel latches;
- We don’t do anything with the wiring, we just put the control panel on top of the case;
- Let's start disassembling the hatch: moving away the sealing rubber, remove the clamp, unscrew the 2 screws on the hatch, and separate the wires. We will put the cuff in the tank;
- Unscrew the door along with the glass and remove it;
- Only now can we unscrew and remove the panel. Now, as you understand, we have opened access to the main internal mechanisms of the machine, which we will also have to work with before we can change the bearing.
How to change the bearing on the drum of an Indesit washing machine. Replacing bearings for an Indesit washing machine
When choosing bearings for a washing machine in a store, take the worn parts with you first so as not to miss. If you buy online, make sure that the selected bearing actually fits your Indesit. Prices can also be found on the Internet or by phone.
It is important that you need to buy not only the bearing itself, but the entire set: two bearings and two oil seals, they need to be replaced together, otherwise the replacement will soon need to be repeated
Tools for disassembling the Indesit washing machine
Replacing the bearing of an Indesit washing machine with your own hands is not so difficult. The main thing is to get the bearings themselves, which will require disassembling the entire machine. Please be patient and have the following tools:
- Phillips and flat screwdrivers;
- socket and open-end wrenches;
- hammer;
- bit;
- hacksaw;
- pliers;
- WD-40 lubricant;
- glue and finally replacement parts.
Disassembling the washing machine
First of all, disconnect the equipment from the power supply, turn off the water, drain the water and disconnect all communications.
Free the pump filter from water (below the hatch, under the front panel) - unscrew it and pour out the water. Next, move the device being repaired away from the wall for further work.
Repair of Indesit washing machines ws84tx, wiun 81, wisl 85, wisl 83, w84tx, iwsc 5085, iwsb 5085 and other models, when replacing the bearing, is carried out in the same way.
Let's proceed directly to disassembling the device:
- We remove the top cover; to do this, we unscrew two screws from the back using a Phillips screwdriver.
- Remove the back panel, unscrew the bolts and remove the panel.
- Removing the front panel:
- We take out the tray for powder and detergents by pressing the central clip and remove the tray;
- unscrew all the screws on the control panel, two behind the tray and one on the opposite side;
- Use a flat screwdriver to release the latches on the panel;
- We do not touch the wires, we place the panel on top of the body;
- to open the hatch door, bend the rubber, use a screwdriver to pry up the clamp, remove it;
- unscrew the two screws on the hatch, disconnect the wiring, remove the cuff inside the tank;
- unscrew the bolts of the door with glass and put it aside;
- When removing the front panel, unscrew the screws.
- We remove the parts to remove the tank with the drum:
- remove the drive belt, pull it towards you while turning the pulley;
- remove the pulley, fix its wheel and unscrew the central bolt, spray with WD-40 if necessary;
- We do not remove the heating element, but disconnect the wires from it and from the electric motor;
- we take out the motor, unscrew the three bolts and swing it back and forth;
- disconnect the pipe through the bottom, place the washing machine on its side, loosen the clamp with pliers and disconnect it from the tank;
- unscrew the bolts that hold the shock absorbers at the bottom of the body;
- unfasten the cuvette, first remove the pipe, loosening the clamp, then the hoses, then unscrew the bolt and remove everything together, disconnect the pressure switch hose.
- We take out the tank by pulling it up a little.
- If the tank is soldered, we make holes for future bolts and saw the tank with a hacksaw.
- We take out the drum by hitting its bushing.
- Remove the oil seal by prying it up with a screwdriver.
Let's start replacing the Indesit bearing:
- Use a puller to remove the bearing; if it is not there, then use a chisel and a hammer to knock out the bearing, tapping it lightly.
- Clean and lubricate the area for the new bearing.
- Place the part evenly in the seat by tapping on the outside of the bearing. Also install the second part.
- Place the pre-lubricated oil seal onto the bearing.
- Insert the drum into the tank, glue the two parts, tighten the bolts and begin reassembling the washing machine.
Removing the pulley and motor
Before solving the problem with the wear of the seals, we need to remove the pulley and remove the motor of the Indesit washing machine. As you can see from any diagram or photo, to do this you will first need to remove the drive belt. To do this, rotate the pulley and pull the belt towards you.
Now we fix the pulley by inserting any strong pin into the wheel. Unscrew the pulley by unscrewing the bolt holding it. Rocking it slightly, remove the pulley from the shaft. We disconnect the heating element and the washing machine motor from the wires.
It is not necessary to remove the heating element, but take a moment and look at its condition to see if there is a little scale on it.
Unscrew the mounting bolts and remove the engine, rocking it slightly. Now it is possible and necessary to separate the pipe. They do this through the bottom, for which we place the machine on its side, loosen its clamp with pliers and separate the indesite from the tank of the washing machine.
Replacing a bearing in a washing machine
Having finished with the shaft, we proceed directly to replacing the bearings in the washing machine. They are located, as you might have guessed, in the rear wall of the drum and they need to be pulled out, but before that, let’s remove the oil seal.
To remove the seal from the back wall of the washing machine, take a flat-head screwdriver and pry it off.
Now we need to knock out both bearings; to do this, we insert a metal rod as thick as a pencil and hit it with a sharp, confident movement with a hammer, moving it to different sides of the bearing, cross to cross. This way we knock out both bearings.
The small bearing is knocked out from the inside of the tank, the large one is knocked out from the outside.
The washing machine tank is quite fragile, so it is best to knock out the bearing by resting it on your knee to prevent the tank from breaking.
After you have knocked out the bearings, you need to clean the back cover itself and the bearing seats. There should not be the slightest dirt left in them, and they should simply sparkle with cleanliness. Now let's remove the new bearings from the packaging. First, we insert a small bearing and also, while inserting the rod, hammer it in, moving the rod on different sides of the bearing cross to cross. Hammer the bearing until it stops, when the bearing “sits” in place, the sound from the impact will become louder.
Continue in the same way, but drive in a large bearing on the other side of the tank.
After this, we “fill” the oil seal with a special waterproof lubricant and insert it into place. You can lightly hammer the seal with a hammer in the same way as a bearing, but be extremely careful not to damage it.
It is best to use a specialized waterproof lubricant, but if you are unable to get it, you can use Litol-24, which can be found in any car store.
Removing the Drum
The next step in replacing the bearings on the drum of an Indesit washing machine is to remove the drum. First, we have to remove the tank by carefully pulling it up.
Most models have a solid indesit tank and will have to halve it using a grinder in order to work with the drum of the washing machine.
But before dividing the tank and deciding how to remove the drum on a washing machine, you need to take care of the upcoming reassembly of the Indesit machine. Therefore, before cutting the tank, holes are made on it for the bolts, and only after that they start sawing.
To disconnect the drum from the tank, remove part of the tank and knock the drum out of the bushing. Let's see what the drum looks like and whether there is any damage on it.
It is worth checking the gasket under the moving unit in order to replace it if necessary.
Now we have to remove the seal that protects the bearing. We do this with a screwdriver, prying it off. Some people advise taking this moving part and the remains of the drum to a car service center, where they can press out the bearings, because they have the necessary equipment. But if you do not have such an opportunity, then you will have to think about various devices that can replace it.
Replacement features for top-loading models
In top-loading machines, the drum is mounted on two axle shafts. Therefore, such machines have two sets of bearings that must be replaced at the same time. After disassembling the machine, they first change the bearing on the side where there is no pulley, then on the opposite side. When disassembling, the direction of the thread should be taken into account. As a rule, it is different on opposite axes.
Armed with the necessary tools and theoretical knowledge, you can independently remove the bearing from the drum of the Indesit washing machine, select an identical one and install it back. It is useful to photograph the disassembly process. This will help with assembly.
How to choose a new part
In order to change the bearing of an Indesit washing machine, it is important to purchase exactly the same new parts. If you don’t know what bearings are in your Indesit washing machine model, then go shopping after you get the old ones.
They are usually marked, allowing you to accurately select a replacement. If after work the inscription on one of them is erased, then you can find out what the bearing is worth by looking at the second one, since their markings are consistent.
If the large bearing is numbered 203, the smaller one will be marked 202.
You need to immediately purchase both oil seals and bearings for Indesit washing machines, so that you don’t have to go through this procedure again later, disassembling the drum during the next breakdown. Find out how much parts for an Indesit washing machine cost by looking at online stores.
Required tools and parts
For this task we will need to almost completely disassemble the washing machine. And naturally, we will need tools. What exactly do we need?
- Pliers.
- Screwdrivers (slotted and Phillips).
- Special screwdriver with various attachments.
- Round nose pliers.
- Set of keys of various sizes.
- Waterproof sealant.
- Chisel (blunt).
- Rubber hammer.
- Large regular hammer.
We also need an oil seal and bearings. They can be purchased at various services and specialty stores. If you do not know any such organization, then simply type in Yandex, Google or another search engine: “Buy bearings for a washing machine”; it is better to add the name of your city to this request. For example, “buy bearings in Moscow.” In the search results you can find companies that sell parts. Tell them the brand of your machine. After which they inform you about the cost of spare parts. As a last resort, you can first remove the old parts, and only then select exactly the same new ones.
Signs of unit wear
In order to identify with a high degree of probability the wear of the washing machine drum bearings, especially in the early stages, you need skills and experience. This is a difficult task, but there are signs of bearing failure that even a non-technical person will notice.
- Extraneous noises in the washing machine during washing: metallic clanging, creaking accompanied by crunching. The volume of sounds can increase significantly at high engine speeds.
- Bad spin. The resistance in the bearing assembly does not allow the motor to operate at full power; the laundry is excessively damp after washing.
- Increased vibration level due to drum imbalance.
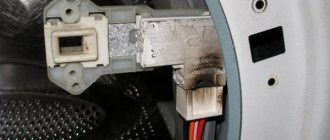
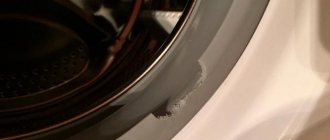
- Damage to the cuff edge. If the drum “walks” during rotation, its edges wear out the rubber seal. If such a situation occurs, it is worth checking the condition of the bearings.
Any of the signs listed above can serve as a harbinger of a problem, but do not panic; diagnostics will help confirm or refute suspicions. This is a series of simple steps that anyone can do.
The purpose of the unit and the consequences of its failure
The bearing assembly is an important part of the washing machine. On the one hand, it ensures reliable fastening of the drum to the tank, on the other hand, it does not interfere with its free rotation. The method of installing bearings and the configuration of the unit can vary significantly and depend on the type of machine and its manufacturer.
In most models of washing machines from famous manufacturers, for example, Indesit, Samsung, Bosch and others, the drum axis rotates on two bearings. They differ in size. The outer one experiences a greater maximum load, the inner one experiences less. The unit must be closed with a sealing collar that prevents water from leaking from the tank.
Bearings ensure smooth rotation of the drum, and they also protect the tank from mechanical damage. Under no circumstances should you use the washing machine if there are signs of a breakdown of this unit. A loose shaft can cause failure of a number of parts, including physical destruction of the tank, which will entail costly repairs.
Algorithm
Modern washing machines are disassembled according to one principle. The main difference is in the design of the tank. For example, LG has a collapsible one. Similar ones are installed in Electrolux, AEG, Samsung. To remove the drum, you need to release the mounting screws.
Cars like "Ariston" or "Indesit" have a solid tank. Replacing the entire structure is quite expensive, so experienced craftsmen use several tricks that allow them to replace or lubricate bearings and other parts without updating the entire tank.
First stage:
- First of all, you need to open the door slightly and unplug the machine.
- The easiest way to replace pumps in modern devices. They are located at the bottom of the machine and are accessible through the bottom. Therefore, the first thing to do is to put the car on its side or tilt it back and rest it against the wall.
- Remove the front lower panel.
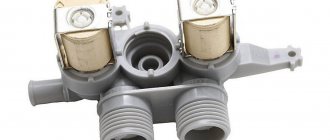
- In many models, shock absorbers and other elements are attached to the bottom. If inspection and repair of defenders is not necessary, it is better not to touch such a bottom, but to remove the face shield. To do this, remove the powder tray (it is secured with self-tapping screws and the water supply valve).
- Remove the control panel.
- Unscrew the screws of the front shield.
- Using a screwdriver, carefully pry off the clamp that holds the cuff, so as not to damage the rubber, and remove it.
- Press the cuff inside the drum and remove the panel.
- Disconnect the wires and set the shield aside.
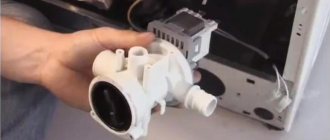
- Now you can easily disconnect the pump. The most common breakdown in this unit is a blockage or a hole in the pipe (which causes water to leak under the machine) and wear of the armature/motor (which causes vibration when spinning and draining water).
- Clean the pipe and filter from accumulated debris.
- If there is a gap or defect in the motor, replace the pump parts.
We recommend: How to determine the maximum weight of laundry to load a washing machine?
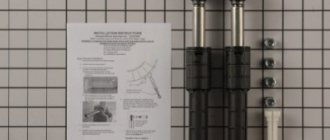
After the first stage, access to the shock absorbers/defenders opens. The simplest case is grease abrasion. To restore it, you need to unscrew the parts, extend the rod as much as possible, apply a thick, high-temperature, wear-resistant lubricant to its base and fold and unfold the mechanism several times.
After 10 years of operation, most often the depreciation fails completely. The drum begins to “beat” and make noise during the spin cycle, the machine begins to vibrate and “jump,” and leaks are possible. In such cases, experts recommend replacing the shock absorbers.
LifehackHome craftsmen have found a way to restore defenders and shock absorbers. To do this, you need to remove the rod, as well as the sealing ring-locker. Pour out the “dust” of the gasket and replace it with a piece of leather belt, 2-3 mm thick and approximately 21 mm wide. The section is inserted into the defender body as a ring, with the smooth side facing the body. Next, the gasket together with the rod is treated with a wear-resistant and necessarily viscous lubricant. Machine oil will quickly drain and wear out; such repairs will only last for a couple of months.
Second phase:
- Remove the back panel.
- Remove the weight - the layer that lies on top of the tank.
- Next, remove the clamp that transmits rotation to the tank.
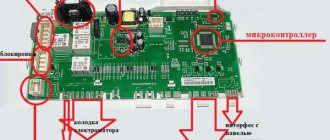
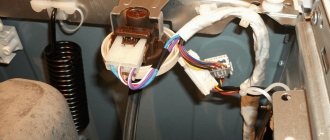
- Using a small screwdriver, press the tabs on the plugs to disconnect the wires from the heating element, tank and motor.
- Unscrew and set aside the motor.
- Disconnect the heating element and water sensors.
- Loosen the fasteners of the tank itself and carefully remove it.
- Remove remaining weight.
After the second stage, the tank is opened, which contains the drum of the washing machine. The detachable one can be easily disassembled, but most modern machines have a one-piece design. It will have to be opened by first treating the seam with sandpaper.
Third stage:
- Cut or unscrew the tank and set aside the top half.
- Remove the gasket or sealant, if there was such a layer.
- Turn the structure over and remove the flywheel on the rear wall of the tank.
We recommend: Purpose and rules for using a cover for a washing machine
Finally the bearing opened. But in order to remove it and lubricate or clean it, you need to free the drum. To do this, place the screw where the flywheel was, and use a hammer to knock the structure out of the “saddle” through the fabric. The pin will come out of the tank and the drum will be separated.
Tip: If you have little experience in disassembling washing machines, take pictures of each significant step and sort the screws so as not to confuse them later. This is especially important when connecting wires.
Fourth stage:
- Remove the oil seal.
- Use a pipe of suitable diameter to pull out the bearing.
It's easier to throw away a broken part. The collapsible one should be washed in oil or gasoline, and then filled with semi-liquid lubricant. Most often the bearing is simply replaced.
Important: If you want your work not to be in vain, buy replacement high-quality German or Polish bearings that are resistant to moisture and high temperature, vibration and wear.
Often the problem is found in the oil seal - the gasket remains without lubrication and breaks or becomes deformed. The faulty part must be replaced with a new one. When assembling, be sure to apply moisture-resistant grease (it is applied to the inner diameter along which the bearing will slide.
Having removed everything, you need to carefully inspect the bushing (the pulley on which the bearing and oil seal are actually put on). All rust and limescale must be wiped off. If scratches are exposed, it is useless to mask and polish them - the bushing will have to be replaced. The same thing happens if the original bearing has become stuck. Trying to cut it with a grinder will only risk the drum. Most likely, trying to free the bushing will damage it - it’s easier to install another one.
If the bearing is non-separable, it can be washed. To do this, the part is spilled with oil, placing a bag and rotating the disk to remove as much dirt as possible.
How to assemble a cut tank A cut tank along the cut is covered with polyurethane or silicone sealant, and then closed with screws, nuts and self-tapping screws strictly along the entire perimeter. If the fastening is not secure, the tank will separate during startup!
According to experts, there is nothing difficult about disassembling a car. It is enough to be careful and know exactly what needs to be done. In practice, inexperienced craftsmen often make mistakes that cause the machine to fail. Miss Clean magazine suggests that novice repairmen start by replacing components that are easier to dismantle, such as pumps or shock absorbers, and try more complex operations first on an old machine that needs to be recycled.