Basic operating rules
Setting up a sewing machine will go without any problems if you familiarize yourself with the basic rules for operating the device and follow them. The exact requirements are described in the instructions for each model. But there are basic recommendations that will help you understand different machines:
- the machine is rotated only in the direction towards itself;
- You cannot “sew” on a machine if there is no fabric under the presser foot;
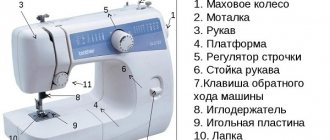
You need to know the device of the machine
- you cannot pull the fabric while the sewing process is taking place;
- it is necessary to lubricate the mechanisms in a timely manner with the means recommended for use in the instructions;
- It is important to refuel the machine in strict sequence.
Important! Not all machines require lubrication.
The sewing machine needs to be cleaned
How to set up a Chaika sewing machine?
But what if you have to set up not a new Janome, but also work on an old Chaika sewing machine? First of all, don't get upset. If you adjust the sewing machine correctly, it will sew perfectly. Secondly, place the needle and thread correctly.
Adjust the upper thread in the Chaika sewing machine:
- Turn the handle to place the mechanism at the top.
- Insert it firmly into the holder and secure with the screw.
- Place the thread on a special rod.
- And it should go through the thread guide into the washer, then into the thread tensioner, back into the thread guide, and then into the holder and into the eye of the needle.
Also read: How to use an epilator correctly: useful tips and basic nuances
The bottom thread needs to be wound onto the bobbin, and then inserted into the cap and released out. There should be a click when you insert the cap. Turn the handle to tighten the thread, and place each thread under the foot.
And some more recommendations:
- Before you start sewing, lower the foot with the needle.
- Turn the handle towards you.
- Oil the machine.
- Choose a fabric that is suitable for all stitches.
- When sewing on thick material, the disc will release its teeth, but when embroidering, it will hide them.
Causes of breakdowns
Adjustment of sewing machines should occur only after the cause of the breakdown has been determined. Experts identify several main problems:
- The threads break along the seam after sewing. This is due to a dull needle;
- stitches are skipped due to a mismatch between the needle type and thread;
- the fabric is damaged due to incorrect selection of material and needle number;
- the top line is missing due to the incorrect position of the bulb;
- the needle breaks if it is bent or installed incorrectly.
Important! Craftsmen often notice broken needles in Artista machines.
Main causes of failure
Setting up the sewing machine
I immediately remembered modern energy-saving light bulbs. I had a chance to talk to an old sewing machine, and it became clear that the technology had probably retained the principle and settings since its invention. The quality of the parts is not what it used to be. Although they discovered smooth surfaces (nanotechnology), they created strong alloys. The main shaft with a crank transmission is inserted inside. It powers the moving parts of the sewing machine. What will be indicated below affects the repair of manual sewing machines:
- The needle is directly connected to the shaft. To ensure translational movement up and down, a cranked transmission is installed inside. The needle has an eyelet where the thread is threaded. When moving downward, the fabric is pierced, the loop is captured by a shuttle moving in a circle, in one direction, in the other. In 1 revolution of the main shaft it manages to run back and forth.
- The shuttle is driven by a separate shaft connected to the main one via an elbow. The movement phase is adjusted with a screw. You can rotate the auxiliary shaft relative to the main one. Synchronous movement is achieved. Let's discuss repairing the sewing machine hook.
- The third component that ensures the movement of the fabric along the seam in the desired direction is the serrated strips. Made of steel, they move like human legs when walking. They go down, go forward, go up, go back. There is one cycle for each stitch.
It is important to set the vertical position of the gear bars correctly. When the needle is inserted into the fabric, the top edges of the teeth will be level with the sewing machine table.
Unlike other devices, gear bars are driven by two shafts. One is responsible for horizontal movement, the other for vertical movement. The adjustment method is the same. A tightened screw on the axis of the corresponding shaft, changing the position of the segment relative to the phase of the main shaft. The correct setting of the gear bars is achieved.
It is important to ensure the correct position of the needle relative to the shuttle. Remember three guidelines to follow. Please note: for modern models, old ones are designed differently, and adjustments are required once every hundred years (twice since the invention)!
- In the lower position, the eye of the needle is 4–6 mm below the nose of the vertical shuttle.
- The nose of the shuttle is compared with the edge of the needle - the distance between the upper edge of the hole and the nose is 1 mm.
- When the upper edge of the eye coincides with the lower edge of the hook nose, the latter should extend beyond the needle by 1 mm.
Approximate guidelines, you can use, decorate the horizon, the need to repair sewing machines with your own hands.
Wise mother correctly instructs her daughter
What parameters can be adjusted
Adjusting a household sewing machine does not take much time. There are few parameters that can be adjusted.
- stitch length;
- reverse;
- presser foot pressure;
- thread tension;
- height of teeth.
Important! The wobbling shuttle of Bernina machines often bends needles and tears threads.
Sewing machine controls
How to set up the device?
Old models amaze with their endurance and durability - despite their venerable age, the quality of their work is in no way inferior to modern products. Proper setup of a sewing machine depends on understanding the principle of its operation:
- A winder (wheel) is attached to the right side, which is operated manually. A nearby lever is used to adjust the stitch length.
- There is a shuttle fixed on the left, and next to it there is a presser foot with a needle.
- The movement of the material during sewing is ensured by slats fixed to the working surface.
First of all, you will need to choose the numbers of needles and threads, which will make it possible to work with all kinds of materials. In addition, you should pay attention to the stitching, but before work you need to carefully study all the settings, only then you will be able to determine which stitch is better to choose. The thread, which is tensioned from below, is regulated by a screw installed on the bobbin cap, and the upper thread is regulated by a special regulator located near the lever that lowers the presser foot.
What parameters can be adjusted?
The need for adjustment when using sewing machines at home often arises when the thread and needle numbers are incorrectly selected in relation to the material being processed.
NOTE. Working with coarse material requires a higher needle number and a lower thread number. When sewing thin material, on the contrary, you will need a higher thread number and a lower needle number.
The main parameters that are available for self-adjustment are the following:
- Stitch length. For classic material the value is 2 mm, for thinner material the stitching is done more often, and for coarse material – less often. The maximum stitch length is 4 mm, which is varied by a special regulator with a digital scale. If it is fixed in the up position, the fabric will not feed, so while working it should be lowered down, which means a longer stitch.
- Feeds fabric in the opposite direction. You can sew not only in the forward direction, but also in the opposite direction, in which the material is fed to the master. Switching is performed by a control lever, which is set to a certain position. The stitch length does not change, and switching in the opposite direction occurs without removing the fabric and stopping sewing.
- Presser foot pressure adjustment. The value changes, as a rule, when working with particularly light and silk fabrics, which require a slight reduction in presser foot pressure. With coarser materials, on the other hand, the clamping force needs to be increased. Adjustment is carried out using a screw with a scale.
The quality of sewing is also affected by thread tension - ideally, both threads are intertwined in the middle of the fabrics being fastened. The stitching on both the bottom and front sides should look the same.
What you need to set up the sewing unit
Setting up a sewing machine often does not require special tools. At home, use a syringe to inject lubricant. And also a screwdriver for tightening the bolts. Parameter adjustment occurs without tools. They may be needed if a breakdown occurs. But in this case, the machine is taken to a specialist who will repair the device.
New models of machines from such lines as Brother are sold complete with all the equipment necessary for setup.
You might be interested in Fabric craft ideas: sewing with your own hands
What you need to set up
Prevention
Prevention when setting up a sewing machine
- Once a year, lubricate the machine with special oil.
- Remove dust from the body, hook and plates.
- When you have finished working, place a piece of fabric or thick paper under the foot. And lower the foot with the needle to the end.
- Do not leave thread or fabric in the machine.
- When you don't sew for a long time, cover it with a cover.
- For models with a drive, you need to monitor the pedal and wiring. If the wires get tangled, it will cause them to break.
Instructions for winding thread on a bobbin
Setting up machines at home does not require much effort. Any owner of a sewing machine can handle winding thread onto a bobbin.
How to proceed:
- Place the coil on the vertical pin.
- Pass the thread through the thread guide.
- Pull the thread between the tension discs clockwise.
- Insert the tip into the hole on the bobbin. Place it on the spindle of the winding unit.
- Press the bobbin and move it to the right.
- While holding the thread, press the pedal.
- Make a few turns and trim the end of the thread.
- Continue winding at speed.
- Move the bobbin to the left.
Important! When full, the bobbin stops rotating.
Winding thread
Setting up and adjusting the Podolsk sewing machine
The device differs from other manual machines in that it can sew thick and dense fabrics. To do this, it needs to be configured correctly.
Setting up the Podolsk sewing machine begins with threading. The winding device for this device is located at the rear of the flywheel. A tension device is connected to the winder from the bottom of the platform. When winding the thread onto the bobbin, the sewing part of the machine is turned off; to do this, turn the friction screw towards yourself. After winding the thread, the bobbin is inserted into the cap.
The needle setting is important in setting up the machine. To do this, bring the needle holder into a vertical position and insert the needle until it stops. In this case, the flat part of the flask should be on the left, and the long groove on the right.
The upper thread is threaded from right to left. Reaches from the spool to the eye of the needle. After the upper thread is adjusted, take out the lower thread. Setting up the Podolsk 142 sewing machine is complete and you can start sewing.
When operating the device, turn the handwheel toward you and the handle away from you. This will prevent the thread from getting tangled in the shuttle. When the machine is not in use, the presser foot must be raised. When starting the machine, the fabric should be on the floor; if the machine sews idle, its teeth will become dull. The sewing machine has three tooth adjustment positions.
Eliminating knocking
The service technician always knows how to get rid of knocking. Seamstresses often encounter this problem when working on the Podolsk unit. To do this, pull the flywheel in the axial direction from the machine. In most cases, cunning helps. Sometimes you have to disassemble the device. It is necessary to unscrew the limiter in the form of a screw under the drive. Remove the flywheel. As well as the bobbin and sleeve. The master puts on a washer, which he can make himself. This trick helps get rid of knocking for a long time.
Machine repair
Position of the hook nose relative to the needle blade
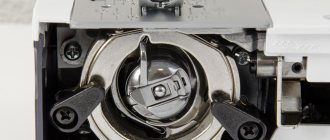
The cut flat section of the needle, just above its eye, is called the needle blade. And if you take a magnifying glass and carefully examine it, you can discover a number of interesting details. But now it is important for us to understand that the reliability of its capture of the needle loop will depend on how tightly the nose of the shuttle runs along the blade. That is, the smaller this gap, the less often the sewing machine will create skipped stitches. The main thing is to ensure that it is not only minimal, but also that the nose of the shuttle does not “hit” the needle. The photo shows with the naked eye that the gap is simply huge.
However, it is not always necessary to maintain the minimum gap, and it is advisable never to set it. Since the seamstress can pull the fabric by hand, or for some other reason, the needle will shift and then the needle will definitely break, or at best, bend.
In addition, there are unique sewing machines such as manual PMZ that do not form gaps even with a gap between the nose of the shuttle and the needle blade of up to 1 mm. But this is rather an exception, and a design incident unexplained by science. But keep in mind that for household sewing machines this is not the most important parameter (except for Chaika).
Rules for setting up modern machines
Repair and adjustment of modern sewing machines is different. At home, adjustments are a little different. Included with the new electric model, the buyer receives adjustment wheels for manual adjustment, for example, like with Janome.
A spring is used to press the thread when winding. Then the upper thread is threaded through the eyes, tension regulator, thread puller, staples, and needle. Presser foot pressure is adjusted by a spring.
To prevent adjustment from causing damage, use the instructions for the individual model. Use the tools that came with the machine. Do not use other available means. In case of problems, contact the specialist.
What does a modern sewing machine consist of?
Setting the stitch length and type
The manufacturer has provided different types of stitches for all materials. For knitwear or thick fabrics, lines are selected separately. The purpose of tailoring also influences. Therefore, the length and width are set on the machine.
Important! The thinner the fabric, the shorter the stitch should be.
Sets the width of zigzag and other types of stitches. The types of needles are selected based on these parameters. Each line has a purpose.
In the instructions for the machines, manufacturers indicate the compliance of stitches, material, threads and needles. Therefore, it is not difficult to choose them.
Adjusting the stitch length
Setting the interaction between the needle and the sewing machine hook
The shuttle must interact correctly with the sewing machine needle. The parameter is especially important if a zigzag is performed. The position of the looper nose is set a few millimeters above the eye of the needle.
The nose of the shuttle normally fits closely with the needle. In this case, no gaps are formed. The ratio is adjusted by loosening the screw with a wrench and holding the flywheel with your hand. The needle should drop to its lowest point and meet the hook at a 1.8mm lift.
The sewing unit should be taken to a specialist if interaction cannot be established.
You might be interested in this: The procedure for sewing a tulle skirt with your own hands
Setting shuttle operating parameters
Attaching the needle bar and tensioner
Often the machine stops working due to the top thread breaking and looping. Gaps occur and lines are uneven. It all depends on how the tension regulator is mounted. The tensioner wobbles or falls out. The needle bar moves upward along with the needle.
To correct the situation, you should loosen the screw and adjust the position. The blades and groove of the needle must be in proper contact. If problems arise, check the interaction of the needle and the shuttle.
Refueling the machine
Adjusting the upper thread tension
Adjusting the tension helps to cope with the problem of uneven and unsightly lines. Most often it is excessive. To reduce the tension of the upper thread, turn the adjuster in the direction of decreasing numerical marks. In this case, they do not rotate the entire division at once. Check the lines periodically. The bottom thread should not show through on the top side. If the adjustment fails, try to correct the lower thread.
Adjusting thread tension
Adjusting the bobbin thread tension
Check the tension of the lower thread using a removable hook. If you hang it by the end of the thread that comes from the bobbin, and at the same time does not unwind it, loosening is required. If there is a strong unwinding of the bobbin, the tension, on the contrary, is weak.
Use a screwdriver to turn the adjusting screw clockwise to increase it. To decrease - counterclockwise. Then a check is carried out. Scroll until the shuttle goes down a few cm. For proper adjustment, test lines are periodically laid.
Threading the bobbin thread
Adjusting the height of the gear bar
The toothed bar affects the movement of the material relative to the machine and the needle. When the needle pierces the fabric, the top of the strip should be level with the work surface. If the height is set incorrectly, sewing may occur in one place or the fabric will tear. Often the lines turn out uneven. The quality of tailoring is falling.
To adjust, you need to lift the presser foot lever and move the bar to its normal position. It is indicated in the instructions. The flywheel is turned towards itself.
Rail height adjustment
Height of teeth for tissue advancement
Often the teeth are not raised enough above the insert. The height is adjustable. To do this, tilt the car. Then loosen the screw and set the height. Normally, only the teeth rise above the plate in the middle part. In this case, the front part is higher than the back by 0.5 mm. In difficult cases, it is necessary to install gaskets between the platform and the teeth.
Adjusting the tine height
Threading the bobbin thread into the bobbin case
To thread the bobbin thread into the bobbin case, just follow a few steps. How to refuel:
- Insert the bobbin into the cap.
- Thread the thread into the slot under the spring.
- Insert the cap into the shuttle.
- Switch the machine to working speed.
- Bring the thread up.
Modern machines have a vertical or horizontal shuttle. It is easier to work with it in a vertical position. But seamstresses say that it is recommended to purchase a model with a horizontal device. It's more reliable.
Threading the bobbin thread
Mechanism lubrication
Lubrication of sewing machine parts is necessary to extend its service life. Due to friction, the mechanisms wear out quickly. Frequent sewing requires monthly lubrication. If a seamstress rarely sits down at the machine, 3 times every six months is enough.
You might be interested in this. Master classes on sewing cocoon diapers for newborns
The oldest method of lubrication is using vegetable oil. But it quickly evaporates and also oxidizes. Motor oil is chosen with a low viscosity.
Important! You cannot use solid oil or lithol.
For modern models, manufacturers recommend purchasing special store-bought formulations. For precise dosage, use a regular syringe.
Mechanism lubrication
Setting the presser foot pressure on the fabric
The uniformity of stitches and the quality of sewing of products depends on the force with which the foot presses on the fabric. To adjust this indicator on old machines, a screw located on the rod was used. Modern devices have a regulator that is located on top of the body. It is used according to the instructions.
Important! Computerized models do not require such adjustments.
Pressure adjustment. Setting up and adjusting the Podolsk sewing machine
Setting up the Podolsk machines yourself does not take much time. These units are distinguished by their ability to work with dense fabrics. To ensure high quality products, it is important to properly prepare the device.
The setup begins with threading. Then the needle is installed. Then thread the upper thread from right to left. The flywheel is rotated towards you, the handle - away from you. When the machine is idle, the foot is raised.
Machine "Podolsk"
Setting up a sewing machine for modern models
It doesn't matter what kind of machine you have. Our tips on how to set up a sewing machine are universal and suitable for Brother and other well-known manufacturers.
Stitch Options
Even the budget model has a sufficient selection of stitches, which will allow you to sew using different techniques. Much of how you set the stitching on your sewing machine depends on your choice of fabric. You can select stitch parameters manually. Then the line will come out of high quality.
Please note that for delicate materials you need to adjust the seam on the sewing machine so that the stitch is shorter.
The instructions for Brother, for example, contain a detailed description of the stitches indicating the tasks and type of fabric, so setting up the sewing machine yourself will not be difficult. For some fabrics and modes it will be necessary to change the stitch width and needle.
Also read: How to connect an infrared heater yourself: main types of connection
Installing a needle in a sewing machine
Have you seen inexperienced seamstresses whose seams are uneven or with gaps? This means that the needle in the machine is not adjusted to the hook. It is especially important to place the needle correctly if you sew with a zigzag.
The needle, rising 1.8 mm upward, should meet the shuttle. You can adjust the desired position with a key, slightly loosen the fastener, locking the wheel.
If you suddenly cannot use a double needle on a sewing machine, call a specialist.
Adjusting the needle bar and tensioner
There is often a problem with the thread. It can tear at the most inopportune moment, sag excessively or be constantly in motion, which interferes with work.
In this case, the line turns out to be uneven or with gaps. The tension regulator will help correct the situation.
If it is not looked after at all, it may even move or fall out. And then the needle bar will be at the top with the needle.
You need to loosen the screw and position the needle so that the groove is in the correct plane.
Adjusting the tension of the working and bobbin threads
How you adjust the thread tension of the sewing machine, this is the stitch you will get. Ideally, it turns out smooth, without tension and relaxed stitches. If you see that the top thread is too tight, you need to set the dial on the machine to a lower number. Do this carefully. Try moving the dial a little and then stitching to see the result. If you are still not happy with it, turn the knob some more.
The half-loop from below should not climb up. If adjusting the top thread doesn't change anything, try adjusting the bottom thread.
The shuttle will help you adjust the tension of the lower thread of your sewing machine. If the bobbin in it does not move at all when you hang the shuttle on the thread, you need to loosen the tension. And when the bobbin moves too much, tighten it up.
Also read: Refrigerator does not work: cause and troubleshooting
To increase the tension, tighten the wrench with the screw, moving clockwise. And if you want, on the contrary, reduce it - counterclockwise. And it’s better to check the result of the adjustment with new stitches after each revolution.
Adjusting the bar position
The toothed bar affects how the fabric will move during operation. When the needle passes through the fabric, the tooth should be level with the table.
Otherwise, when you use a sewing machine, the fabric will lie motionless or stretch strongly and tear.
The line, accordingly, will also turn out bad.
Adjusting the position of the bar is easy. Raise the presser foot and move the bar to the correct position, moving the handwheel closer to you. How to do this is even better described in the instructions.
Adjusting the foot on a sewing machine
The quality of the stitching and your comfortable sewing depend on how hard the foot presses.
If the machine is quite simple in its design, then the sewing foot is easy to use; you need to adjust it with the screw on the holder.
In modern models, the screw is located on the body. And it needs to be adjusted depending on the instructions.
Also read: How to choose an irrigator: useful tips for oral care
Pedal setup
If you have an electric drive, then problems with the pedal may arise due to the drive itself. For example, when you use a Janome sewing machine, there is a speed controller in the pedal. And if it fails, the pedal behaves unusually.
This can be solved as follows. When the lever is acted upon, the tablets are folded into one, the resistance goes away, and the speed increases. You need to disassemble the pedal, clean it and put it back in place. But if this does not help, then you will have to buy a new speed controller.
Seagull sewing machine: setup and adjustment
“Singer”, “Chaika”, “Veritas” or other machines are configured according to similar principles. The adjustment of modern machines is different; some operations occur automatically.
The “Seagull” begins to be set up by installing the needle and thread. Then adjust the tension. Place the coil at the top. Thread the thread throughout the mechanism.
Important! There are no special features in preparing for sewing.
Machine "Seagull"
How to set up a sewing machine after a long period of inactivity?
If the device has been left idle for a long time, then its use should be preceded by adjustment and cleaning. This is required to check the functionality of all mechanisms and elements and the absence of rust. To do this, the old manual machine must be disassembled and all its components are treated with machine oil. After this, the machine is put back together and idled at low speed, which will allow the oil to evenly cover the parts.
IMPORTANT. It is imperative that the needle is replaced and only then the thread is threaded.
For the first start, use unnecessary material, since drops of machine oil can leak out and get on it. If the line is correct, then you can confidently begin work.
Subscribe to our Social networks
Setting up mini cars
Even a small machine can be configured in the same way. These are mostly modern models. It is recommended to prepare them for work strictly according to the instructions. Experts recommend not purchasing such devices. They are often brought in for repairs. However, finding parts or fixing them is difficult. Most often, the units cannot be repaired. They use fragile parts.
Mini car
Preventative care
To make sewing enjoyable, you need to take care to prevent dirt and damage. Any machine should be looked after.
Preventive care rules:
- Store the machine only in its case. This will prevent contamination.
- Regularly clean the device with a brush to remove traces of fabric after sewing.
- Periodically lubricate the mechanisms with a product recommended by the manufacturer.
- Clean the bobbin case from dust.
- Use suitable sharp needles.
Caring for the device
In order for the machine to last a long time, you should take care of it. And also correctly adjust all parameters and prepare for work. There is a sequence that should be followed. Manufacturers provide individual configuration recommendations for modern models.
Sewing machine repair
Is your sewing machine broken? Don’t rush to throw it away, even if you inherited it from your grandmother. All you need is to call an experienced sewing machine repairman.
The SVEY-REMONT company provides repair services for household and industrial sewing equipment in Moscow, with a mechanic visiting the repair site or transporting the equipment to its official service center.
SEWING REPAIR is a team of experienced craftsmen and technicians who repair sewing machines, professional diagnostics of faults, repairs of any complexity and quality guarantee. Narrowly focused specialization, high qualifications and extensive experience allow mechanics to resuscitate and bring back to life inoperative old and hopeless equipment. We accept household and industrial sewing machines for repair, regardless of brand and year of manufacture. At the same time, the company guarantees inexpensive repairs of sewing machines. The price of services will depend on the complexity of the repair and the cost of spare parts and components needed for replacement.
Company Services
The SHVEY-REMONT company provides a wide range of services for the repair of sewing equipment:
- professional diagnostics allows you to accurately identify faults and their causes,
- carrying out repair work and restoring the functionality of sewing equipment of different brands, from domestic models to foreign-assembled samples, using modern equipment,
- replacement of failed parts and spare parts. Even if such machines are no longer in production, experienced craftsmen will select and install the necessary analog spare parts,
- preventive maintenance: replacement of spare parts, setup, adjustment, lubrication, cleaning - all this will allow you to promptly eliminate minor faults and prevent major breakdowns that require expensive repairs, consultation with mechanics on the operation and care of the sewing machine.
Qualified repair services are a guarantee of high-quality and long-term operation of your sewing machine.
Benefits of doing home renovations
Calling a specialist to repair a sewing machine at home provides many advantages for the company’s clients:
- clients do not need to rack their brains over how to organize the transportation of equipment to a repair shop,
- Having a technician come to your home saves not only money, saving you from buying new equipment, but also his precious time, because our company’s specialists arrive at a time convenient for the client,
- In our company, you can order an urgent visit of a technician and within an hour the technician will begin inspecting and repairing the sewing machine. The high qualifications of our craftsmen allow us to carry out repairs or adjustments of equipment efficiently and quickly, because We always have the necessary resources available to resolve any problems within a matter of hours.
Mechanic qualifications
A team of professional sewing machine repairers is the pride of our company. Monitoring new sewing equipment and extensive practical experience allows us to cope with any difficult situations. The use of the latest repair and diagnostic equipment facilitates fast and high-quality repairs.
SVEY-REMONT companies work honestly and conscientiously. You will not be forced to provide additional unnecessary services. The technician will perform only the necessary amount of repair work.
Give a new life to your favorite sewing machine - contact the experienced craftsmen of SVEY REPAIR for repairs!
