Initially, the sewing machine was designed in such a way that it could do work independently, thereby replacing a person. This invention made it possible to significantly facilitate the work of a seamstress and increase his productivity. The operating pattern allows even an absolute beginner, who has never held a needle in his hands, to sew straight and high-quality stitches. The newest generation of devices not only sews in a simple way, they are also capable of creating patterns and embroidery. The achievements of modern technology are amazing, but the operating principle of every sewing machine is still based on the very first algorithm developed many years ago.
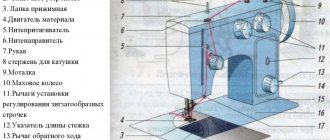
Sewing machine diagram
There are basic parts of a sewing machine, without which no unit can do:
- flywheel;
- winder;
- sleeve;
- sewing platform;
- stitch selection wheel;
- sleeve stand
- receiver (reverse)
- needle holder;
- needle plate;
- paw;
- lever for raising and lowering the presser foot.
But these are the details that are visible upon superficial inspection - they are a small part of the mechanism hidden under the body. Inside there is a complex system for driving the shuttle . We can say that the operation of a sewing machine is entirely based on the shuttle device. For an untrained person, the parts diagram of a regular sewing machine may seem complex and confusing, but everything becomes clear if you understand a little.
Electric drives of sewing machines
Topic: “Types and purpose of sewing equipment.”
Sewing machines are equipment that is designed to connect and process parts of garments and has a needle as the main tool for performing the operation. There are technological, structural and alphanumeric classifications of sewing machines.
In technological classification, sewing machines are distinguished:
· by stitch type - lockstitch machines (stitch type 301), lockstitch zigzag stitch machines (304), single-thread chain stitch machines (101), overcast stitch machines (501), etc.;
· by type of stitch - straight-line, complex configuration, etc.;
· by the number of threads in a line - single-thread chain stitch, double-thread chain stitch, etc.;
· by type of processed materials - for processing leather, fur, fabric, etc.;
· according to the thickness of the processed materials - for light fabrics, medium or thick materials, as well as other characteristics.
Based on their specialization , machines are divided into:
· universal,
· specialized,
· special.
Universal machines (for example, machines of classes 1022M, 97-A, etc.) are designed to perform a wide range of technological operations. Specialized sewing machines are usually created on the basis of general-purpose machines and have technological specialization.
Sewing machines are distinguished based on automation:
· non-automated,
· automated,
· semi-automatic machines,
· automatic machines.
Manual machines do not have automation features. Automated machines have automation features such as automatic thread trimmer, automated presser foot lift, automatic machine stop at the end of the operation, etc.
Semi-automatic machines perform part of the technological operation automatically.
Sewing machines are distinguished by speed characteristics : with a stitch formation speed below 2500 stitches per 1 minute, the machines are considered low-speed, and over 5000 stitches per 1 minute - high-speed.
The design classification divides machines according to the location of the head relative to the operator (seamstress), the location of the sleeve relative to the table surface, the length of the sleeve extension, the combination of the type of sleeve and platform, etc. When the machine pulley is located on the right hand of the seamstress, the machine is called right-handed; when the pulley is located on the left hand - left-handed .
The alphanumeric classification of machines can be represented through the factory classification and using an alphanumeric code. In our country, factory classification of sewing machines is common. Each manufactured car is assigned a serial number at the factory. When a new model is released, a letter is added to this number at the end of the number or a number in front. For example, a 22nd class machine from the Promshweimash Production Association in Orsha received the number 1022 during modernization, and during further modernization - 1022M.
Electric drives of sewing machines
An electric drive for a sewing machine is necessary to convert electrical energy into mechanical rotation of its shaft, as well as to control the speed of rotation of the drive shaft. Depending on the method of controlling the speed of the drive shaft, stopping and putting the sewing machine into operation, there are the following types of electric drives:
— electrofriction, automated with positioning of the sewing machine needle,
— electric drives with automated functions,
— electric motors with a pulley on the shaft for semi-automatic sewing machines and automatic machines with an automatic stop mechanism,
— modern mini electric drives installed on the sewing machine body.
In all types of electric drives, with the exception of servos, rotation is from a pulley 1
(Fig. 1) on the drive shaft is transmitted through belt
3
to pulley 2, mounted on the main shaft of the sewing machine.
Fig.1. Electrofriction drive of a sewing machine
Rice. 2 Scheme of installing an electric drive on an industrial table
For a semi-automatic sewing machine with mechanical starting and stopping of the rotation of its main shaft, mechanisms built into the head of the sewing machine are provided. The electric drive in this semiautomatic device consists of an electric motor
and belt drive
3
from pulley / located on the electric motor shaft to pulley 2 of the main shaft of the machine.
The electric motor 6
is installed under the cover of the industrial table of the machine and attached to it with bolts 5.
Bobbin
The bobbin is the most visible part with which the tailor constantly interacts. It is located behind a retractable panel under the needle. To remove the bobbin from the slot, pull it towards you and slightly up. This way you will bend the small grip and release the element.
The bobbin is necessary to supply threads that are wound onto it from the main spool before work. This happens automatically - the thread from the spool is threaded into a special hole in the bobbin. After this, the part is placed in the socket, and the spool of thread is secured to the body of the machine. When the flywheel is activated, the bobbin rotates, which winds the thread on its axis, and the spool of thread also rotates.
To tension the thread during operation, the bobbin structure includes a small screw. Correctly set settings eliminate the possibility of skipping top and bottom stitches. A tailor can sew without being distracted by constant quality checks. Carefully check the thread before starting work; excessive tension causes constant breaks. Watch a video about ideal thread tension.
A small part, the so-called spout, is designed to insure the reel against accidental bobbin drops. It is mounted on a moving panel, which is pressed away from the bushing body by a spring mechanism. If everything works as intended, then there are no failures in the system. As long as this part is in the correct position, the bobbin is securely fastened in the sewing machine and cannot be pulled out. To reassemble, bend the spout and, holding it in this position, insert the bobbin into place.
When examining the body of a sewing machine, you can find an oblong protrusion. Its task is to prevent the rotation of the bobbin spool or shuttle drive.
Presentation on the discipline of sewing production equipment “Design of a sewing machine”
Description of the slide: Problem Possible cause What to do Page The needle is broken Incorrect needle installation Install the needle correctly 14 The needle is bent or its tip is broken or stuck Replace the needle 14 The thickness of the thread does not match the needle size Use a needle suitable for the thread Incorrect type of needle Use the correct type of needle Needle touches the needle plate Adjust the needle plate 22 The bobbin case is not installed correctly Install the bobbin case correctly 13 When sewing, the fabric is too tight Do not pull the fabric The thread jumps out of the needle eye when you start sewing The thread take-up lever is not in the highest position at the beginning of sewing Set the lever to the highest position the highest position before sewing The end of the thread protruding from the eye of the needle is too short The length of the end of the thread should be at least 50 mm 14 The upper thread breaks while sewing The thread is not threaded correctly Thread the thread correctly 14 The needle is bent or its tip is broken or stuck Replace the needle 14 Incorrect installing the needle Install the needle correctly 14 The thread is caught somewhere Release the thread If the thread is too tight, replace it Threads catch on each other while sewing If the thread is too tight, replace it The upper thread is too tight The upper thread is too loose The bobbin thread is too tight Adjust the thread tension 16 The eye of the needle is too narrow Use the correct needle for the thread The wrong type of needle Use the correct type of needle The bobbin thread breaks The bobbin thread is too tight Reduce the tension 16 The bobbin does not rotate well Replace the bobbin or bobbin case The bobbin is too tight too much thread Do not fill the bobbin more than 80% of its capacity 13 Skipped stitches Incorrect needle position Install the needle correctly 14 The needle is bent or its tip is broken or stuck Replace the needle 14 Thread thickness does not match the needle size Use a needle that is suitable for the thread The pressure is too light Presser foot Increase pressure 16 Top thread is slack Top thread is too loose Bottom thread is too tight Adjust thread tension 16 Bottom thread is slack Top thread is too tight Bottom thread is too loose Adjust thread tension 16 Fabric gathers Top and thread tension is too tight Bottom thread Reduce thread tension 16 Presser foot pressure is too strong Release pressure 16 Needle tip is broken Replace needle 14 Needle is too thick Use a needle of the smallest appropriate thickness
Shuttle
The sewing hook is a key structural element of sewing equipment. The quality of the stitch depends on the good condition of the mechanism and the correct settings for interaction with the sewing needle . Problems in this knot cause thread breakage, looping, skipping stitches and other troubles. If everything is set up correctly, the stitching will be smooth, without any broken areas.
The quality of sewing is significantly influenced by the condition of the shuttle surface. There should be no chips, cracks, traces of rust, scratches, oil residues or dirt. All this prevents the uniform movement of the thread, as a result of which moments of thread stretching occur, the stitch turns out to be ugly - with a noticeably weak stitch tension.
A consumable that has exhausted its service life must be replaced. When finding a suitable replacement part, there may be difficulties associated with the types of shuttle mechanisms for sewing equipment. The buyer should clearly understand which shuttle is suitable for his machine model.
Sewing equipment uses three types of shuttle mechanisms.
- The vertical classic shuttle was invented by I. Singer in 1851. The design consists of a cap with a special groove into which a bobbin with thread is inserted. During operation, the shuttle moves both vertically and horizontally, hence another name - swinging. In a cyclic movement, the part removes the thread from the needle, moves it to the position needed to create a loop, and returns to its original position. This type of shuttle was used on Soviet-made machines Chaika, Podolsk and models of the German brands Veritas and Singer of previous years. Today it can be found on budget mechanisms.
- The horizontal type of shuttle is an invention of the 20th century. The mechanism has become widespread and is used in most currently produced household sewing machines. The main advantages are ease of installation of the bobbin, lack of friction and the ability to control the amount of thread through the transparent plastic cover of the part. Two full turns of the shuttle form a stitch.
- A vertical rotating (rotational) shuttle is characterized by rotational movements around its axis. A bobbin with thread is inserted inside the rotating part. The rotation speed of the nodal element reaches about 900 rpm. The consumable is distinguished by its reliable design and optimal distance relative to the needle. The rotary shuttle is installed in premium models and professional sewing equipment.
Operation of the sewing machine
How does a sewing machine work, and what forces drive its internal processes? The entire system is based on a simple principle based on a given needle movement. Taking the top thread with her, she threads it down. Next, it is picked up by a shuttle that is ready for this, and intertwines the lower thread with the upper thread.
The simplest movement provides the basis for such complex manipulations as zigzag seams and even patterned embroidery. Video on how to do embroidery on a home sewing machine.
Manufacturing companies are improving their models. Today there are already units with a special addition in the form of a side needle for processing the edges of the material, but it is not easy to find them in ordinary stores.
The inner part of the housing hides a drive, which is activated manually (in mechanical machines) or using an electric motor (in electromechanical devices). The engine, through a connecting rod, starts the rotation of three other shafts. If we go into detail, we can say that the system includes one intermediate axis, which transmits a rotational impulse to the three described shafts.
This system is designed for a long period of use and is considered quite durable. To apply lubricants to the moving parts, there are holes in the housing into which the nozzle of the oil can easily fit.
Modern sewing machines are equipped with an electric foot pedal.
In more advanced models, a pedal is provided, when pressed with your foot, all mechanisms are set in motion. It is much more convenient to use, as it gives freedom to your hands. Of course, modern designers have improved this system, turning the pedal from mechanical to electric.
The device of a lockstitch sewing machine
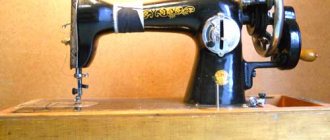
All old models of sewing machines such as Singer, Podolsk 2M PMZ perform one single straight stitch and the structure of these sewing machines is almost the same. Such sewing machines were often equipped with a bulky table with a foot drive, but most often a manual drive was installed. These types of machines have been replaced by a new generation of sewing machines that perform zigzag stitches and use an electric drive.
Sewing machines such as Podolsk 142 and Chaika have a vertical type of swinging shuttle and a limited set of operations. Modern sewing machines from Brother, Janome, Singer and other brands use a more modern horizontal shuttle design. Some models of sewing machines have a vertical “double-fitting” rotating hook, like industrial machines.
Many operations of many modern sewing machines are controlled using computer programs, which allows you to make eye loops and embroider any designs and patterns. A large selection of presser feet, accessories and additional devices expand the capabilities of the machines limitlessly, allowing you to perform any operation related to sewing clothes.
Moving fabric
When talking about how a home sewing machine works, we cannot omit the description of the device designed for drawing fabric. This invention, revolutionary for its time, made it possible to set the desired length of stitches, and also relieved tailors of the obligation to monitor the progress of the flap.
It all happens as follows:
- at the first stage, the main shaft passes through the central part, which is connected to the flywheel axis through a connecting rod;
- two rods pass through the side parts, the synchronous rotation of which sets the broaching mechanism in motion.
The first is equipped with a part that experts call among themselves “Dovetail”. To the common man, it looks more like a key. This element moves back and forth in the direction of the fabric.
The second axis has a cam that is located in the dovetail space. Its main function is to lift and lower this part.
The final result of all the movements of the listed mechanisms is the operation of the sewing machine; the dovetail-shaped part sets the lingering teeth in motion. Having received an impulse, the teeth carry out their steps, spinning in place.
All manipulations to adjust the stitch length are carried out using a rotary lever. A very small part is attached to the axis of the tailed key. When the lever is turned, the tails change their configuration from the initial position, which leads to a change in the length of the stitch in the line. The video shows how to properly adjust your stride length.
Design and principle of operation of a sewing machine
Shuttle mechanism operation
The bobbin, which is inserted into the space provided for it, cooperates with the shuttle. The main part is positioned according to the required profile. The movement occurs due to the connecting rod connection, which sets the proper trajectory. The working procedure of the connecting rod is controlled through the panel. The rotation of the flywheel sets the needle in motion, moving up and down. On the rise there is a sharp grip - this is the bow element of the shuttle.
Bobbin
The part located behind the panel under the needle. The metal component is needed to supply the threads that are wound onto it before starting the process from the main spool. The thread is threaded through the hole provided for this purpose, after which the bobbin is attached to the body. The action of the flywheel rotates the bobbin element and winds the threads onto the main axis.
Device for drawing matter
This procedure is carried out as follows:
- Initial actions. The main shaft runs through the center, connecting to the flywheel axis through a connecting rod;
- Next step. The broaching mechanism begins manipulation with the synchronous rotation of two rods placed on the sides.
The key-shaped part moves back and forth in the direction of the material flow. A cam located on the second axis performs the lifting and lowering function. During the movement of all mechanisms, the key drives the broaching teeth. Receiving impulsive signs, the teeth go through steps when scrolling in place.
Thread tension
The screw placed above the needle holder creates the proper tension on the upper thread so that the seam is of high quality. Near the needle holder there is an eyelet that moves during sewing; it resists weakening and sagging of the thread.
Thread tension
This manipulation is carried out using a special screw located above the needle holder. The tension of the upper thread is an important indicator that controls the quality of the seam. Not far from the needle holder there is a special eye that moves during operation and does not allow the tensioned thread to weaken or sag when the needle goes up. Without this small detail, the entire work of the sewing machine would be nullified.
Video on how to assemble and install the thread tension regulator.
Winding device
At the end of the description, you need to say a few words about the winding device. As a rule, not far from the winding flywheel there is a small pressure wheel with a shaft equipped with a mark.
On the panel located underneath there is an eyelet with another small wheel. The spool is placed on a vertical stand, and from it the thread is passed over the table to be wound onto a bobbin. To ensure proper operation, the pinch wheel is gently pressed in with your finger, after which rotation begins, transmitted by the sewing machine drive.
Winding thread onto a bobbin