Working on a sewing machine begins with threading the upper and lower threads. If there is the slightest inaccuracy in carrying out such a procedure, it will never be possible to achieve an even and beautiful stitch. The machine will either not sew at all, or it will tear the thread and form a seam with gaps and loops protruding above the fabric.
We will talk about the importance of choosing the right bobbin, how to wind thread on it, and what nuances you should pay attention to when threading. From our article you will also learn about what defects and malfunctions in the operation of the machine can arise due to incorrect installation of the bobbin, and how to eliminate them.
Purpose of bobbins and their types
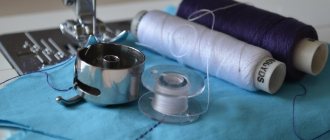
The bobbin is a small spool for winding the lower thread. The bobbin is inserted into a bobbin case, which is placed in a shuttle device located under the needle.
When sewing fabrics, a seam is formed by weaving the top and bottom threads through the material. The upper thread is threaded into the needle, which, when lowered down, plunges into the bobbin case, capturing the lower thread. The bobbin is needed to smoothly feed the lower thread and ensure its normal tension when sewing.
The state of the line is affected by:
- Thread quality and thickness;
- Correctly threading the upper and lower threads, as well as fixing the bobbin case in the hook;
- Accuracy of thread tension adjustment.
Expert opinion
Irina Vasilyeva
Designs clothes, teaches at her own school and advises beginning seamstresses
It is desirable that the thickness of the lower thread be one number less than the upper one. This will allow you to get a neater seam and reduce the likelihood of the top thread breaking while sewing fabrics. If strong standard threads are used, their thickness can be the same.
Types of children's sewing machines and their functions
Despite the variety of models, each of them is made with one purpose - to help girls learn to sew and master the basics of making their own sewing products.
IMPORTANT! All children's models are a safe device that is as similar as possible to real seamstress equipment.
Below are the most common options.
- Sew cool . It is distinguished by its originality in execution, as well as simplicity in interaction . Thus, the child will be able to cope with the work with his own hands. The main thing is that the unit is as safe as possible: all possible needles are specially enclosed in a plastic housing. The presented package provides the user with all the necessary accessories.
- PVC is intended for girls under 10 years old . Therefore, after such a model, you can safely switch to adult technology. The unit itself consists of a set of threads, a real needle and a different type of drive.
- The Singer Junior is equipped with both a thread regulator and the ability to wind it onto a spool.
IMPORTANT! Not suitable for those children under 8 years of age.
This is because they are likely to have difficulty handling them. Accordingly, adult help will be needed.
- The PlayGo has a separate compartment for storing some parts. With it you can easily master primary skills.
- Machine Couture is equipped with a wheel that is needed to control the tension. You can perform many types of stitches on it.
- With Shantou Gepai you can use pedal and manual drive. Thanks to this toy, you can learn to perform simple actions.
- Winx encourages children to develop an interest in sewing. However, it does not allow complex manipulations.
- The Toy has several speeds. In addition, it can be used to make double stitches, as well as zigzag sewing.
Numbers of threads and sewing needles for various materials
| Material type | Needle numbers | Thread numbers |
| Cotton / Silk | ||
| Batiste, silk | 70 | 80/65 |
| Satin, chintz, calico | 80 | 80/65 |
| Calico, flannel, thick silk, heavy cotton or wool fabric | 90 | 50-60/ — |
| Teak, suit wool | 100 | 40/ — |
| Cloth, drape | 110-120 | 30/ — |
Sewing machines are equipped with special devices for quickly and evenly winding thread onto the bobbin. When hand-winding, the thread tension is weaker, so the quality of the stitching is worse.
Machines of various models are equipped with shuttle mechanisms and bobbin cases of several modifications. Accordingly, bobbins of different heights and shapes are used.
For industrial sewing machines, narrow metal bobbins are used, and for household machines, wider ones are used.
The advantages of metal bobbins are strength and durability. They do not form nicks that interfere with the free movement of the thread.
The advantage of plastic bobbins is the ease of sliding along the walls of the bobbin case. It is possible to monitor the thread consumption through the transparent plastic base. When sewing on machines with a horizontal shuttle, such control plays an important role.
The disadvantages of plastic bobbins include low strength. A fast-moving needle can easily scratch the surface of the bobbin and leave nicks on it, which can cause the thread to break and become tangled in the hook.
Important! Bobbins vary in size for different machines, so these products are not universal.
Locations for measuring bobbin sizes for various machines (see table below)
What is a bobbin
A sewing machine bobbin is a miniature bobbin on which thread is wound to create the bottom stitch. Accordingly, the thread used in it is called the bottom thread. The winding process is performed automatically by the device itself. To do this, you just need to fix the bobbin on top of the sewing machine. Next, the bobbin is inserted into a special compartment - a bobbin case, which is placed on a horizontal or vertical shuttle.
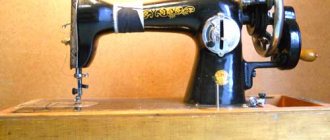
Bobbins were even used on old Podolsk machines from the Kalinin plant
The bobbin and bobbin case are one of the main parts of a sewing machine. They must always be in good condition. The surface of the cap must be smooth, because even a small flaw can distort the stitching and lead to incorrect operation: from skipping stitches to breaking the bottom thread.
Important! During sewing, the upper thread pulls the lower thread, located in the bobbin case. After they intertwine, a stitch is formed. Thread tension depends on the weight of the bobbin, as well as the material of manufacture. Plastic will move faster than metal.
It is worth saying that sewing bobbins, like bobbin cases, differ significantly from each other. For almost every machine, only those bobbins and caps that are produced by the equipment manufacturer are suitable. Bobbins differ not only in their radius and width, but also in the material they are made of. Usually they make metal and transparent plastic parts.
You might be interested in this Instructions for creating a beautiful fabric brooch
The sewing machine should be charged before use.
Metal bobbin
Such elements are designed for several types of shuttles: vertical swinging and vertical double running. Naturally, a metal bobbin is heavier than a plastic element, but at the same time it will have increased strength and wear resistance.
For your information! Metal parts of this type are considered the most reliable. They are common not only in household sewing machines, but also in production units of the “economy” or “premium” class.
The metal part is reliable
Plastic bobbin
A plastic bobbin is most often used by Japanese sewing devices with a horizontal hook. Typically, machines with a horizontally oriented shuttle have transparent needle plates through which the threads are visible. The bobbin in such devices is also made plastic and transparent. The advantage of such a part is its weight, and the disadvantage is its strength.
Through the plastic you can always see how much thread is left before you have to refill
Bobbin sizes for some sewing machines
| Bobbin dimensions, mm | ||||
| Measurement location | "Kharkiv" | "Tula" | "Gull" | "Podolsk" |
| 1 | 9.3 | 8.8 | 12 | 12 |
| 2 | 8.4 | 8.0 | 11.5 | 11.5 |
| 3 | 6.6 | 7.7 | 10 | 10 |
| 4 | 21.3 | 19.7 | 20.4 | 20.4 |
| 5 | 9.0 | 10 | 9.5 | 9.5 8.5 6.2 |
| 6 | 8.7 | 7.5 | 8.5 | 8.5 |
| 7 | 6.2 | 6.1 | 6.2 | 6.2 |
How to choose the right bobbin
When choosing a bobbin, it is important to remember that:
- It must fit the hook of the sewing machine you are using;
- There should be no nicks, scratches or chips on it. The ideal option is a bobbin with a smooth glossy surface;
- The reel must have a normal shape, otherwise it will get stuck in the shuttle.
A good bobbin fits easily into the bobbin case. If you install it in the shuttle device and then slowly pull the thread, it will come out smoothly, without jerking.
If you use a spool that has defects and clings to the walls of the cap, loops will appear in the stitching due to a violation of the tension of the lower thread. Possible permanent damage to the bobbin and jamming of the mechanism.
When choosing a new bobbin, it is advisable to have a proven sample with you. This also applies to the bobbin case.
For home sewing, you can purchase plastic bobbins. They are cheaper, and having a whole set of such spools with threads of different colors and thicknesses, you can save time on preparing the machine for work. For professional sewing, it is better to buy more durable metal bobbins.
Correct filling sequence
The process varies depending on the specific type of machine. Any device currently sold comes with detailed instructions for self-priming. Things are somewhat more complicated with rotary models. You should start with the top thread. To insert threads, perform the following sequence of actions:
- The thread wound on a spool is passed through a special mount located near the body.
- After this, the thread is directed to the tension regulator and inserted into the hook compensation spring.
- The tip is threaded through the thread guide and brought out into the mount and eye of the needle.
The procedure for the lower thread has a number of differences and is performed in the sequence presented below:
- The material is wound onto a bobbin rather than onto a spool.
- The bobbin is placed in a special bobbin case, while at the same time the thread is threaded under the spring plate.
- Check the tension in accordance with the optimal values for the specific device model.
A separate point is zigzag stitching, since in this case a double needle can be used. The refilling process is the same as described above, but it is supplemented with a second coil. As for the threads, they still go through the same tensioner. Refueling recommendations:
- Installing a double needle is based on the same principles as installing a standard needle. The cut is directed away from itself, the round part of the flask is directed towards itself.
- From each of the reels, the material is carried through the tensioner and all thread guides, and the lower ones will act as separators.
- The left and right threads are threaded into the corresponding needles.
On sale you can find devices with only one thread guide. In this case, the left thread is passed through it, while the right one passes nearby and is tucked under the eye of the needle.
Winding thread onto a bobbin
Modern sewing machines are equipped with a device for winding thread onto a bobbin. It is located at the top of the body. Only the holder for placing the bobbin and the fixing device are brought out.
Winding is done in the following order:
- A spool of thread of the required size is placed on a rod located in the upper part of the body. In this case, the thread should leave it counterclockwise;
- The thread from the spool is pulled through a tension device located next to the rod. Then it is brought to the bobbin, threaded through a hole on one of its bases and wound around the leg several times to secure it;
- The bobbin is put on the holder so that the spring located in its upper part fits into the groove on the inner surface of the bobbin. When you press it, you should hear a click. It is important to direct the thread so that it winds clockwise;
- The holder together with the bobbin moves towards the latch to the limit (a click is heard again);
- In order for the needle to remain motionless while winding the lower thread, the rotation mechanism of the working shaft is turned off. Various types of machines provide for stopping the flywheel by pulling or loosening the screw that holds it;
- The machine is connected to the network, and the winding device is operated using a foot pedal. Once the bobbin is full, the latch moves away from it and winding stops. Approximately 40 m of thread is wound onto the bobbin;
- The working position of the flywheel is restored.
Instructions on how to properly replace the bobbin
You should start working by winding the bobbin. To do this, you need to install a special pin, which is located on the top of the device. Make sure that the thread unwinds from the pin strictly counterclockwise. Repeat the following steps:
- First you need to unwind the thread a little and pass it through the disc tensioner. Most often it is located on the opposite side of the coil, approximately above the needle. It may also have a small wire piece attached to it to hold the thread.
- Next, place the tip into one of the notches on the bobbin. Next, make a couple of turns for initial fastening. Many stores offer pre-threaded bobbins to choose from.
- Then I install the bobbin on the winder, which also looks like a small pin and is located not far from the spool pin.
- Next, fix the bobbin in the winding position. To do this, either the pin is moved to the right, or the latch is moved to the left. If everything is done correctly, a small sound should be heard.
- To start the winding process, press the pedal of the machine or a special button on its body. After a few turns, it is better to stop temporarily to cut off the protruding tip with scissors.
- Fill the part completely with thread. The device usually stops on its own. Sometimes it is better to track this process.
- Return the latch to its original position. The bobbin is ready for further work.
After the device is prepared, the top thread is inserted, and the thread is wound on the bobbin, you should begin the process of replacing the bobbin. Modern devices can have a shuttle of both vertical and horizontal types. The vertical option is more common. It is used both in production and in budget sewing devices. The horizontal type is most often found in more expensive electronic machines. It is considered more convenient and may have a transparent cover, which allows you to see the bobbin and the work of the lower thread. It is also convenient to track possible problems.
Threading and adjusting thread tension
To thread the upper thread, the spool is placed on the holder rod so that it unwinds clockwise. Pass the thread through the holes of the guide and the disk tension regulator, pass it through the retaining hooks and bring it through the second thread guide to the needle. The length of the free tail is approximately 12 cm.
Threading the bobbin thread in machines with a vertical shuttle
The vertical shuttle is installed in such machine models as
Chaika 143A
Veritas 8014-35
Jaguar EL 223
When threading the lower thread, perform the following steps:
- Remove the shuttle cover. Hold the bobbin case in your hand and insert the bobbin into it. Pass the thread under the spring and insert it into the slot at its end;
- Insert the threaded bobbin case into the hook device by pulling the latch. Make sure the lever fits into the groove of the shuttle. The cap is pressed so that it is securely fixed;
- The end of a thread 10-12 cm long is left outside. The thread should unwind freely;
- Close the lid over the shuttle;
- Holding the end of the upper thread, smoothly manually turn the handwheel towards you so that the needle plunges into the shuttle device, and the upper thread hooks and pulls out the lower one;
- Both ends of the threads are pulled behind the foot with the needle.
Threading the lower thread in machines with a horizontal shuttle
Many modern machines (for example, Brother, Innov-is, Janome, Lady models) have a horizontal mechanism in which there is no bobbin case, and the bobbin is inserted directly into the shuttle. Refilling is greatly simplified. Removing the lower thread is done in the same way as in machines with a vertical shuttle. The bobbin is covered with a transparent cover through which you can monitor the thread consumption.
In order to check that the threads are threaded correctly, test pieces of fabric are sewn together. A normal stitch should look neat on both sides.
If the bobbin thread is not threaded correctly, the threads will not intertwine. Only the top thread remains on the surface of the fabric, there are no stitches at all, or a stitch with large gaps is obtained.
Setting the thread tension
You can adjust the bobbin thread tension by loosening or tightening the screw that secures the bobbin case spring. As a rule, the factory setting is correct. Craftsmen do not recommend making adjustments yourself, since it requires skill.
The quality of the stitching is most often improved by changing the tension of the upper thread using a dial adjuster. If loops are visible on the wrong side of the seam, increase the tension of the upper thread by setting a number on the regulator that is higher than the previous one.
If the stitching on the front side “loops”, the tension is slightly weakened, setting a lower value.
Diagram: how to thread a Singer sewing machine
Sewing machines of the Singer brand are distinguished by their complexity and can be used as equipment for amateur sewing or as professional machines. Mostly at home, old equipment of this brand is used, since new models are quite expensive.
Fixing the bobbin mechanism in a new Singer model
Note ! All Singer models are divided into 2 categories: with one or two thread guides. The threading algorithm depends on the type of “route” device.
Instructions for mounting sewing yarn:
- Disconnect the machine from the power supply (remove your foot from the pedal in mechanical models).
- Raise the needle to its highest position using the side wheel. Lower the foot onto the sewing platform.
- Fix the coil on a special pin.
- Thread the yarn through thread guide #1. Pull the material through the second thread guide, if available.
- Be sure to fix the material in the thread tension regulator.
- Pull through the recess of the tensioning mechanism.
- Fix the material in the hook that is located above the needle itself.
- Insert the thread into the needle.
You might be interested in this: The procedure for sewing a petticoat for dresses and skirts
Old Singer model for threading
According to the usual scheme, the bottom thread is inserted - you need to wind the sewing yarn onto the bobbin. You can use an automatic winding mechanism as an assistant.

