Possible causes of error E8 on the HP LaserJet 1132 printer
Error E8 when working with an HP LaserJet 1132 printing device is associated solely with the scanner and does not affect printing in any way. There are four different reasons why it may appear, and each of them requires its own approach to solving it, checking certain components and replacing them. The most common is the jamming of the scanner carriage, which happens due to damage to the gears or their clogging, so you should check them first. This will be discussed further, but now let’s briefly look at three other reasons:
- Firmware error. There is a small chance that the error that appears is actually false and is due to corruption in the software of the all-in-one. It is solved by flashing it, which can be done both with the help of special chips and through third-party software. It is better not to do this on your own, especially in cases where there is no experience. Contact the service center for further diagnostics and repairs.
- The scanner cable is broken. If you scan frequently with your HP LaserJet 1132, the cable on the top cover of the scanner is constantly bent and worn out. Accordingly, this can lead to its malfunction, but correcting the situation is not so difficult: you will need to take the equipment to a service center, where for a small fee they will change the cable to the one corresponding to the scanner model, after which you can again begin full interaction with the equipment.
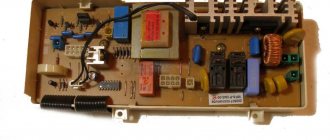
- The formatter board is faulty. We will not go into details about the operation of the formatter board, but will only clarify that its failure in the HP LaserJet 1132 causes the same error. Any service center can purchase this board separately and replace it, so again, contact a specialist.
Now let's start looking at the most common mistake that was mentioned above. You can deal with this yourself by following simple instructions, and if it turns out that the component being tested is working properly, you will have to contact the service center to diagnose and correct the problems listed above.
How to fix error e8
A service message with code e8 is often found on the laserjet 1132 MFP. It means that there is a problem with the scanner. The instructions for the device indicate that a malfunction with code e8 is fatal, that is, cannot be eliminated. But craftsmen have found several ways to eliminate this problem, which, in some cases, can return the scanner to work.
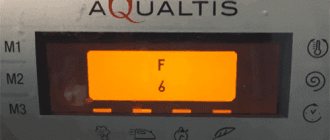
The most common case is when the scanner ruler has stopped in the extreme right position and does not move . In this case, error E8 appears on the MFP display.
In this case, the carriage was simply jammed. To fix this problem, you will have to remove the scanner glass and move the ruler to the center of the device or closer to the left edge. To remove the glass, you need to unscrew 6 bolts located around the perimeter.
To unscrew the screws you will need an asterisk hexagon.
Once the glass cover is removed, take the carriage, move it closer to the center and return the glass to its place. Turn on the device and wait until the ruler is positioned (it should move to the far left position). If everything happened exactly like this, then you are in luck, since the E8 code can appear for other reasons.
If, after turning on the MFP, the scanner carriage moves jerkily and stops, and code E8 appears on the display, then you will have to thoroughly check all the components of this unit. To check the scanner block, you need to remove the glass cover, as mentioned above, after which you need to take out the block itself and turn it over. On the bottom side of the block you will see 2 gears and an electric motor pressed against a plate. Next, do the following.
- First, it is recommended to unscrew the 2 screws on the plate and check the gears: are there any dirt or damage to the teeth, is there any play or not, is the axle on which the gear is held broken, etc.
- Remove dirt (if any) from the optocoupler.
- Check the connection quality of the cable.
- After checking and replacing failed parts, apply a little lubricant (you can use thermal film lubricant) on the gear bushings and on the guides along which the scanner unit moves.
The above steps usually fix the scanner problem in the hp m1132 MFP. But in some cases, this problem can be caused by pressing the gears or optocoupler too tightly. Sometimes the problem is resolved by loosening the pressure on the gears or removing the small gear altogether. After this, turn on the device (with the scanner unit removed and inverted) and observe the rotation of the gear. If it continues to move jerkily, then the problem may be hidden in the optocoupler.
If you look closely at the optocoupler, you will see that there is a notched disk between the two sensors. This disk should be located in the center of the optocoupler. Sometimes it moves to one side, which causes the E8 code to appear. Try installing the engine so that the disk is centrally located between the sensors.
If, after all the manipulations described above, the E8 code appears again, then the fault may lie in the engine itself or the control board. If you can replace the motor yourself, you will have to contact a service center regarding the control board.
Diagnostics of the scanning line of the scanner
We will divide the entire stage into simple steps, describing each in detail. This way you will not get confused in the sequence of actions and will accurately perform each of them correctly, without causing damage to the printing device or causing other problems associated with its operation.
Step 1: Removing the scanner cover
Remove the top panel of the scanner to gain access to its components. First, lift the top cover and locate the screw holes in the four corners. Unscrew them sequentially, but do not remove this panel yet.
At the junction of the covers there are also two screws that need to be unscrewed so that the panel can be removed without any problems. Only after this can you pry up this part of the scanner with a handy object and carefully remove it, placing it nearby at your workplace.
In the image below you can see what the scanner looks like after completing the previous step. Once you have completed the steps described, you can move on to the next step and conduct diagnostics. It is important not to touch anything unnecessary and to perform each action carefully so as not to damage the components.
Step 2: Releasing the Scanner Unit
A stuck scanner unit can also cause an E8 error, so it will need to be freed by moving it closer to the center. By the way, now you can temporarily complete the diagnostics, tighten the lid and check the operation of the device. If this doesn't help, move on to the final step, which involves cleaning the gears.
Step 3: Clean the scanner unit mechanism
The scanner unit moves thanks to a motor that controls two gears. They often fail or become clogged with small debris. The following image demonstrates their appearance - carefully turn the scanner unit over, find these gears, check their rotation and make sure there is no debris. You can also clean the surrounding parts from dust by using a small brush or cotton swab.
Once complete, reassemble the scanner, placing the block in the center to normalize its movement in the future. Try scanning absolutely any document and make sure that the error in question has disappeared. If this is not the case, contact a professional to continue the diagnosis and find out which of the three remaining reasons is preventing the HP LaserJet 1132 MFP from working correctly.
We are glad that we were able to help you solve the problem. In addition to this article, there are 12,274 more instructions on the site. Add the Lumpics.ru website to your bookmarks (CTRL+D) and we will definitely be useful to you. Thank the author and share the article on social networks.
Describe what didn't work for you. Our specialists will try to answer as quickly as possible.
Printing failure on HP printers
Often, when trying to print a document, the user discovers that the process is blocked for an unknown reason. However, all attempts to delete or cancel a job in the print queue fail.
This failure can appear for a number of reasons, for example, from a sudden power surge, but, in any case, you will have to fix the problem in the Print Manager program. This fact is explained by the fact that when a document is sent for printing, a special file is created in the Windows system. For a number of reasons, this file may become corrupted and cause a failure in which the printer does not print. Therefore, this file must be deleted in the following way.
- Turn off the printing device with the button and disconnect the electrical cable from the outlet.
- Save all your work so that it is not lost.
- Next, you should open “windows services” by pressing the windows + r keys simultaneously.
- A window will open with an empty line in which you need to enter “services.msc” (without quotes) and click OK.
- In the window that appears, find the line “print spooler”.
- Right-click on this line and select “Stop” in the menu that appears.
- After stopping the service, the window can be closed.
- Next, go to: C:WindowsSystem32SpoolPRINTERS. You can do this by pasting it into the address bar of Windows Explorer and then pressing Enter on your keyboard.
- In the folder that opens, you need to delete all the files that are in it.
- Turn off your computer.
- Before connecting the MFP (printer) to the electrical network, make sure that it has been turned off for at least 60 seconds.
- Turn on the MFP (printer) using the power key.
- Turn on your computer and wait for the operating system to load.
- Send the document for printing.
If the printing process went well, then the setup is considered complete. If you still cannot print the document, you can solve the problem using free software from HP. The program is called “HP Print and Scan Doctor” and is used to solve problems that arise during printing, as well as to diagnose equipment. You can download it from the official website using this link. After opening the program window, select automatic search for problems and fix them. After the program exits, try to print the document again.
In some cases, the following measures help solve this problem.
- Reinstalling the printer driver. But first you need to remove it: in “Control Panel” find “Devices and Printers” and open the window. Right-click on the HP printer icon and select “Delete”. These steps will remove the driver that was installed on the system. After removal, you must restart your PC. If for some reason you do not have drivers for a given MFP (printer) model, you can download them from the HP website by following this link.
- Disable the firewall temporarily and try printing the document.
- Log in to the system under a different account (relevant if the equipment was configured from a different account).