Many owners of portable equipment are often interested in how to connect a printer to a laptop via WiFi connection or USB cable. Some inexperienced users don’t even really know whether this can be done at all. If you are using one of the current versions of Windows 7, 8 or 10, then you can connect according to the instructions in this article.
First, let's connect the printer and laptop together physically, wirelessly, or over the network. Let's take a closer look at technology such as WPS (Wi-Fi Protected Setup), consider manual setup, installing drivers with and without an installation disk. We will give recommendations on how to set up printing from a laptop to any model of printer or MFP from HP, Canon, Epson, Samsung and others.
How to connect a printer to a laptop
Via USB
A laptop, like any other personal computer, can be connected to a printer using a regular USB cable. This type of connection is supported by all models of printing equipment without exception. And the input itself is definitely present on the portable “device”. The main thing is that the versions of the interfaces used match. If USB 1.0 is no longer available, then 2.0 and 3.0 are at the peak of popularity.
When the connection is established, you need to wait a little until you hear a beep. After some time, the software will be automatically installed by the Windows operating system itself and you can proceed to the section on setting up printing. If this does not happen, then the drivers will have to be installed manually. There is nothing complicated about this and is easy to do even without an installation disk.
Via Wi-Fi
WPS
WPS stands for Wi-Fi Protected Setup, which means “protected Wi-Fi installation.” To use this technology, it must be supported by the router and the printer itself. The presence of Wi-Fi on a laptop is not questioned, since models without it do not exist in nature.
We make the connection according to the following scheme:
- We are looking for the WPS button on the router body. As a rule, it is placed on the reverse side in most cases.
- Within two minutes we activate a similar button on the printing device.
- We are waiting for the connection between devices to be completed.
- If the laptop is on the same Wi-Fi network, then there should be no problems with printing.
- We connect to the printer as if it were a network one.
If the WPS buttons are not found on the modem case or it is impossible to turn it on, then we will try to do this through the web interface for managing the router. In most cases, to access its settings, you need to enter the address in the IP format 192.168.0.1 in any browser, or try 192.168.1.1. Enter the login “admin” and the same password if it has not been changed. In the settings, find the “Wireless” section, and in its subsections, disable MAC filtering and enable the WPS function.
Learn more about connecting via WiFi. More detailed instructions with screenshots and explanation of each step.
Manual setting
If the automatic connection setup described in the subsection above is not possible on your equipment models, then the Wi-Fi connection can be made manually. All that is required for setup is to know the name of the network and its access code. This information may be listed on the modem's cover or in documents from your Internet service provider.
Manual setup procedure:
- On the printer screen, go to the menu.
- We enter the network settings.
- Select the WiFi section.
- Specify the network name and SSID password.
- After some time, the printer will be online and you can connect to it as if it were a network connection.
How to connect a printer to a laptop?
Let's consider all the actions in more detail.
Connecting a printer
Installing a wired printer begins by connecting it to a power source, as well as to a laptop or computer. For these purposes, the device is equipped with two corresponding cables. Having established a connection with a computer via a USB port, turn on the printer by pressing the power button on the body.
In most cases, Windows automatically detects a new device in the system and installs the necessary software to work with it. However, if this does not happen, the owner of the laptop or PC needs to follow these steps:
On Windows 10 :
- Open the Start menu, go to Settings and select the Devices section.
- Click on the line “Printers and scanners” and click the “Add a printer or scanner” button.
- Wait until the computer completes the search and select the appropriate option from the list provided. If the laptop cannot detect the printing device, you must click “Update” or “The required printer is not in the list” and follow further instructions from the system.
On Windows 7 and 8 :
- Find the "Devices and Printers" section in the Start menu.
- Click the “Add a printer” button. Click on the “Add a local printer” option in the manager that opens.
- On the “Select a printer port” page, click “Use existing and recommended.”
Tip: Check out the list of the best all-in-one printers for home use if you haven't made your choice yet.
Installing drivers
Drivers are required for the printing device to work correctly. They are usually contained on a disk that is included with the printer upon purchase along with the cables. To install the drivers, you need to place the media in the disk drive of your laptop and wait for it to start automatically. If the disk does not open on its own, you should do it manually through “My Computer” by double-clicking on the name of the disk drive with the driver.
The installation program is launched through the file “Setup.exe”, “Install.exe” or “Autorun.exe”. Its interface differs among different printer manufacturers, but the general structure in most cases remains unchanged - the computer owner must carefully follow the system instructions to install drivers. The program will ask you to agree to the terms of use, select a printer connection method, and specify the folder to install the files.
Important: if you do not have a disk with drivers for your device, you can download them through Windows Update and on the manufacturer’s website. These methods are described in more detail below.
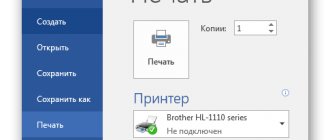
Printing settings
After successfully connecting the printer to the laptop, all that remains is to configure the printing. This procedure is carried out through the computer control panel. The user is required to:
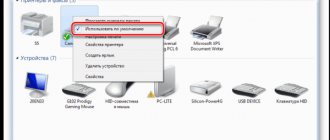
- Enter the “Control Panel” and select the “Devices and Printers” category.
- Find the name of your office equipment in the list, right-click on it and click “Printing Settings”.
- In the window that opens, set the appropriate parameters: paper size, page orientation, number of copies, image quality, paper source, etc. Click the “Apply” button for the changes to take effect. The specified settings will be used when printing documents from a laptop.
Network connection
Regardless of whether the printer was connected to the network via Wi-Fi, as described above, through another PC, or directly with a patch cord into an Ethernet socket, now you need to connect to it and install special software (drivers) for proper operation. There are several ways to establish a connection.
- Find a printing device over the network. To do this, open “My Computer” and find the “Network” shortcut at the bottom left. If the printer is connected directly to the network (via WiFi or patch cord), then click on the shortcut, and if through another network PC, then use a triangle to open the list. Using the right key and the context menu, we make a connection and agree to install the drivers.
- Use the installation wizard built into Windows. Through the “Start” button and “Control Panel” we go to the “Devices and Printers” section. In the menu under the address bar, click the “Install a printer” button, and in the next window, select the second option with adding a network printing device. We wait until all available devices are displayed in the list and select the model we need. Next, follow the instructions of the installation wizard.
Possible problems:
- Windows can't connect to the device.
- 0x00000002: During a connect operation.
- Error 0x000006d9 "Unable to save printer settings."
- 0x00000057: The specified port does not exist.
- 0x00000709: Check the name.
- Failed to open Add Wizard.
Detailed information on connecting a network printer Use our separate article if you experience problems connecting.
Connection
Connecting a printer to your laptop is as easy as connecting a mouse to it.
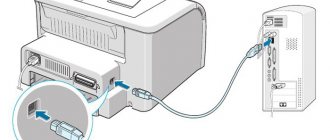
Step 1. You need to take the printer’s USB cable and insert it into a free working USB port on the laptop. The USB cable comes out from the back of the printer and is located near the cord with the socket - you definitely won’t confuse them.
Take the printer's USB cable and insert it into a free working USB port on the laptop.
Step 2: Turn on the printer by pressing its power button.
Turn on the printer by pressing its power button
When you have completed this simple procedure, you need to make sure that the connection was successful. To make sure of this, follow these steps:
- Immediately after connecting, look at your monitor screen. If everything went smoothly, a notification should appear: "New equipment found", which is accompanied by a characteristic system sound. The messages are different in different versions of the OS, but their essence is the same. If the notification does not appear, reconnect the printer.
After connecting the printer to the laptop, we will see the message “New hardware found” in the taskbar - Open menu "Start"by left-clicking on the corresponding icon on the taskbar, then click on "Devices and Printers".
Left-click on the Windows logo icon, which opens the Start menu
Click on “Devices and Printers”On a note! If you didn’t find this in Start, then open the following system menus: “Start” – “Control Panel” – “Hardware and Sound” – “Devices and Printers” .
- In the menu that opens, if you did everything correctly, your printer should be displayed. Do not confuse it with a virtual printer, like Microsoft XPS Document Writer and others. These are just computer programs for converting file formats. The printer label must be labeled with the model of that printer.
We are looking for an icon with the name of our printer model; if it is there, then everything is connected correctly
Now that you have made sure that your laptop recognizes the printer, you should proceed to a more complex step - setup.
Installing drivers
Windows operating systems independently install drivers from their built-in database without user participation in this process. If this does not happen, then you will have to install the software manually. There are several ways to do this.
- We use the installation disk. This disc is included with any printing equipment, regardless of its manufacturer. Insert such a disk into the “SD-rom” and wait for the installation program to start. Next, follow the instructions of the installation wizard. If the printer is old or you simply cannot find the disk, then use one of the following methods.
- Download the package of necessary files from the device manufacturer’s website. On the official portal of your printer brand, go to the drivers or downloads section. Find your model by name and download the necessary files for the version and “bit” of your OS.
- We search in the Windows database. Open Devices and Printers through Control Panel. In the top menu, click the “Add a printer” button.
In the second step, select local (if connected via USB) or network (if using Wi-Fi) connection option. Follow the instructions of the installation wizard. After a few steps you will see the driver installation window. In it, select the manufacturer of your device on the left, and the model on the right. - We use Windows Update. To update the driver database for devices, you need to click the “Windows Update” button under the list of models in the screenshot above. After downloading all new versions of the software and rebooting the laptop itself, you will be able to see your printer in the list of models.
Installing a printer without a disk. Use these instructions if you were unable to install the driver.
USB connection procedure
For many users, solving the question of how to connect a printer to a computer does not pose any particular difficulties. The procedure is quite simple and will be approximately identical for all printer models.
Connecting the printer via cable
Connection is carried out in this order:
- Take a USB cable and plug it into a working port on your computer or laptop.
- The other end of the cable must be inserted into the appropriate connector on the printer.
- The second wire is inserted into the socket.
- Next, you should turn on the printer using the start button, which can be located either on the front or rear panel.
You can connect a printing device not only via a cable, but also via a Wi-Fi connection. This option is the most convenient when using laptops. However, keep in mind that the device will still need to be connected to another PC via a cord.
Note! After completing the connection of the two devices, it is recommended to look at the PC or laptop monitor. If everything is done correctly, a message should appear in the lower right corner stating that new hardware has been found.
Connection via cable
Installing drivers
As already mentioned, if there is an Internet connection, drivers can be installed automatically (the Windows system is quite smart). Another option is if the device is new, then it comes with an installation disk with all the necessary applications. How to work with it:
- Check that the printer is connected to your computer and network.
- Insert the disc into the drive.
- Open the “My Computer” section on your laptop.
- In the pop-up window, double-click on the drive image.
- Either the program will start, or the disk itself will open. In the latter case, you must select the installation file from the list provided. It is usually denoted by the word "Setup".
- Wait until the installation completes.
Printing settings
After all previous procedures have been successfully completed, it is recommended to go to settings. Detailed description of how to configure the device:
- Select the Start menu.
- Next is the section with devices.
- Find the installed device in the list provided.
- Right-click on the image.
- Select “Print Settings”.
- A menu will appear in which the user can edit the settings at his discretion, for example, set the brightness of displayed images and texts.
There are quite a lot of options for how exactly you can change the settings. Here is a list of recommended ones:
- Changing page orientation. You can set it to portrait or landscape.
- Change the size of output sheets. Standard A4.
- Alternate, print text on both sides.
Device setup
Test print
You can make sure that the device is working correctly using the Test Print function. How this procedure is performed:
- Through the “Start” menu, open the “Devices and Printers” section.
- Select the installed one and right-click on it.
- "Properties" function.
- In the General section at the bottom of the screen there is a Test Print button.
- You need to click on it and the printing device will work, releasing the page.
Printing settings
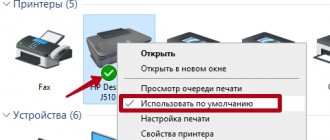
After connecting the laptop to the printer and installing the drivers, you should make some settings on the device itself. You can select it as the default main one and open network access to it. To do this, go to the control panel, and then to the “Devices and Printers” section. There, find your model and perform the actions as indicated in the pictures below.
You only need to go into properties to “share” the printing machine for other network clients.
To print from any program that supports this function, just press the key combination “CTRL+P”. You can also first make some personal settings in the interface, if it allows you to do so. For example, in a program from the office package - “Word”.
Here we can configure:
- Select the desired printer to complete the task.
- Specify which pages to print and which not.
- Select the desired part of the document to print on paper.
- Mark even or odd pages of the document.
- Working with copies.
- Select the number of document pages to output per sheet of paper.
- Setting additional properties: duplex printing, quality, layout.
- Options.
Printer printing settings in Windows 7, 8, 10. More detailed instructions with explanations of actions for inexperienced users.
Installing and setting up a scanner in a printer on a PC. Recommendations, nuances, possible problems.
Stage 1 – Selecting a connection method and setting up synchronization
Modern printers support two ways to connect to a computer:
- Wired . Using a cable, the gadget is connected to a PC via a USB port. All the necessary wires are included with the printer;
- Wireless . Connection is possible via Wi-Fi or Bluetooth. This method allows you to easily connect one printer to several computers at once and send documents for printing at a distance of up to 50 meters from the printer (depending on the range of the Wi-Fi router or Bluetooth module).
Fig. 2 - Connection methods
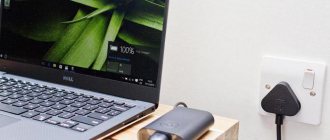
Before performing the selected connection method, connect the printer to the electrical outlet using a power outlet and start it up.
To do this, press the “Power” , which is located on top of the case or on the back near the connection ports.
Connecting the cable
If you chose a wired connection option, find a cable in the printer box to connect the device and PC.
It looks like this:
Fig.3 – Printer cable
To connect the gadget to a laptop, make sure that the PC has free USB ports. If you don't have them, you can additionally buy a special USB splitter.
As a rule, after connecting the printer wired, the new gadget automatically appears in the “Devices and Printers” on your PC.
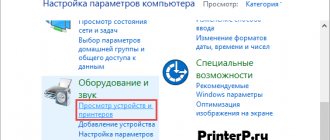
You can find this window through the “Control Panel” . Depending on the version of Windows, this window may also be called “Printers and Scanners”.
Fig. 4 – “Printers and Scanners” window in Windows 10
Note! If the name of the model or manufacturer of the new printer does not appear in the list, you need to press the “Add Printer” and wait until the Installation Wizard automatically recognizes the new gadget in the new window. Automatic addition is only available for the wired connection method.
Connecting the printer and computer via Wi-Fi
To implement a wireless method of connecting the printer and computer, you will need a working Wi-Fi access point.
With its help, documents can be sent for printing not only from a computer, but also from a smartphone or any other device.
The first option for wireless synchronization is to use WPS (Wireless Protected Setup) technology.
Both devices must support it and the router must have a corresponding button to activate the function.
Next you need to configure the router through the administrator menu:
- Using any browser, open the address 192.168.0.1 (or 192.168.0.0);
- In a new window you will need to enter the administrator login and password. As a rule, these are admin and admin, but on the bottom cover of the router you can always find out the exact information to enter the settings;
- Turn off MAC filtering and close the settings menu.
- Now press the WPS , which is located on the body of the WiFi router.
After this, the router will begin searching for all gadgets with a built-in WiFi module.
- On your computer, go to the “Devices and Printers” and using the “Add device” , add a new printer to the list of gadgets on your PC.
- In the Settings Wizard, select the “The printer you require is not in the list” .
Fig.5 – Setup Wizard window
- Next, select the adding method “Via TCP / IP address or by host name”:
Fig.6
After the new printer icon appears in the Devices and Printers , you will be able to add documents to the general print queue, despite the fact that the gadget will be directly connected to the router and not to the computer.
If your home router is a budget model and does not support WPS technology, follow these steps to wirelessly connect the printer and PC:
- In the “Devices and Printers” , open the Add a New Device Wizard and among all the methods, click on “Add a Bluetooth or wireless printer” ;
[/su_list]
Fig.7
Important! Make sure your printer and computer are connected to the same Wi-Fi access point. Otherwise, the computer will not see the new device.
Adding a network printer via Wi-Fi
In most offices, you can find an option where one printer is synchronized with several computers at once.
To set up a network connection to a printer that is already set up on another laptop, you need to follow the same steps as for a regular connection using the Add a Bluetooth or Wireless Printer .
The only difference is that another computer must be turned on, which is already synchronized with the printer.
The working network will be configured automatically and you will not have to enter the IP addresses of the devices yourself in the menu for discovering new printers.
Nuances
When connecting a printer to a laptop, things may not always go smoothly and simply. Situations are different, and sometimes quite difficult, and you should be prepared for them. Let's look at some of them in detail.
- The device does not print. Check whether the default machine is correctly selected for printing from a laptop, whether it is offline, or whether there are documents stuck in the queue.
- The device is not detected. Try replacing the power cords, USB, and Ethernet patch cord (if used). Double-check the quality of the connection, restart the laptop, turn off the printer and turn it on again after a while.
- Drivers are not installed. Clean the Windows operating system from old versions or software from other printing devices.
- The printer does not connect to the laptop. Typical for Windows 10, and less often in Windows 7. Check if you have correctly understood the USB interface versions. It is important that this is a cord of at least 2.0 and connected to the appropriate input. Remember that blue indicates USB 3. Don’t get confused, which could very well have already happened.
All possible errors and problems with the printer. Instructions for solving other equipment problems.