For full operation of the printer, you need to install additional software - drivers. Usually, they come complete with the device, on a special boot disk. Without them, the computer will not detect the connected device. Of course, we are not talking about devices that are automatically recognized by the system. I would like to note right away that you need to read the entire article, since there are complex and simpler ways to install drivers and therefore you need to read the article to the end. Almost at the very end of the article there is information on how to install a printer driver automatically, keep this in mind. When the question arises of how to install a printer without a disk, inexperienced users think that it is very difficult. But in fact, this procedure can be mastered in 15-30 minutes. Let's check if this is true.
There are two main ways to install a printer without a boot disk, namely, download the necessary drivers from the Internet
- Using basic Windows Update tools;
- Independently, knowing the device identification code or using the printer model.
The first method is perfect for simple printer models (only printing and scanning documents, without additional settings), because Windows Update installs a basic driver package.
The second method allows you to download the latest version of the software, so after installing them, the user will have access to absolutely all the functions of the printer, including more “advanced” ones.
In addition, the reason for installing drivers may be not only their complete absence, but also a malfunction of the device itself. Sometimes, using one driver or another, the printer refuses to print documents, and all because the driver you installed was not suitable for your device. This is, of course, one of the reasons why the printer may not work correctly, but as you understand, it’s not for nothing that we are talking about this right now. After all, below we will tell you how to download your driver to your computer, but if you are in a hurry, you may have difficulties. Therefore, proceed step by step.
Installing drivers manually
If you have previously studied this issue somewhere and none of the methods were successful, then you can try downloading the drivers again. This article is universal - here we will tell you how to do it in different versions of Windows.
Therefore, before installing a printer without a disk, you must:
1. Disconnect the device connected to the computer;
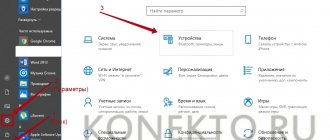
2. Go to the “Start” menu - “Control Panel” - “Devices and Printers” or “View devices and printers”;
3. Here you will need to find the line “Install a printer” or “Add a printer” in the top panel;
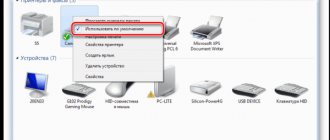
4. The Add Printer Wizard will open, select “Add a local printer” from the options provided and click “next” (for Windows 7). If you have Windows 8 or 10, then at the bottom click “The printer you need is not in the list” - and then select “Add a local or network printer with manual settings” and click “Next”.
5. The Wizard for Installing Printers and Other Equipment will prompt you to select a port, leave the default parameters (LPT1, but in some cases you need to select DOT4_001) and go to the next step;
6. Click on the “Windows Update” button and wait for the available drivers to update;
7. A list of printer manufacturers and main models will be loaded. May take from 5 to 30 minutes. Find the manufacturer on the left and the printer model on the right. Then click “Next”. In this case, we chose the HP brand and the LaserJet 1022 model.
8. The installation wizard will ask you to come up with a name for the device (leave the default name or create your own), click “Next”;
9. Wait for the installation to complete;
10. The “Use general settings” window will open, here you need to select the “No sharing of this printer” option and click “Next” (the window will appear if Windows 7 is installed). If you have Windows 10, then you will see a window where you need to click “Finish” (the same window will appear later in Windows 7).
The next thing to do is to remove the newly installed device. To do this, right-click on the printer icon that appears and select “Remove device” in the context menu (the installed drivers will remain).
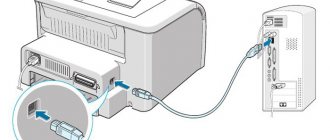
After these steps, you will be able to connect the printer to your computer. When you connect the printer, you need to wait a little for the computer to automatically recognize the printer and perform the installation. Then you can print any document to verify that the driver is installed.
How to do this on Windows 7:
How to install a printer on a computer using standard Windows tools
This option uses special system tools to load the driver we need from the resources built into the system. First of all, disconnect your printer from your computer.
1.Follow the same path: Start – Control Panel – Devices and Printers;
2.Click the button in the “Printer Setup” menu;
3.Then add "Local Printer";
4.Click next to see a list of available drivers, click “Update Center”;
5.You need to select the manufacturer of your printer in the left column, and its model in the right column and click next;
6.Then come up with a new name or leave the old one and wait until the necessary files are downloaded;
7.Now, after checking the box next to “No sharing of this printer”, click next;
8.Simply remove the device you installed;
9.Connect the printer to your computer.
Windows OS will automatically analyze the storage for the presence of drivers, then apply them to the new device - the printer.
Official sites
If you do not have a disk with printer drivers, you can download them from the manufacturer’s official website. To do this, it is enough to know the brand and model of the printer. You can find them in the documentation, on the case or back of the device. If you do not understand the instructions below, you can download the required driver on our website without any fears (all drivers are virus-free).
Open any browser and enter in the search bar: “HP LaserJet p1102 printer driver download.” In this article I will look for drivers for the above-mentioned device, but you need to indicate your model.
As a rule, the link to the official website of the developer will be on the first page of the search, at the very top. But this does not always happen and therefore you need to be careful. To avoid downloading malware instead of drivers, make sure that you actually went to the official website of the developer. To do this, pay attention to the site link in the search engine. There should not be anything “extra” (the address will be something like this: “hp.com” or “samsung.com”, etc.
If you doubt the authenticity of the site you found, you can enter only the name of the printer company without the model and other information. And from the main page, go to the “drivers and other software” section.
Advantages of downloading drivers from the official website:
- Security (drivers have a digital signature, no built-in malicious code);
- The developer posts only the latest, “fresh” versions of drivers on the site.
As soon as you get to the desired page (“Drivers and other files”, “Software”, “Software”, “Downloads”, as well as “drivers” on the English version of the site), you just need to enter the model of your printer and search.
In addition, some sites allow you to automatically determine the device model and the necessary drivers, for example, there may be a “Detect Product” button. So, if we are on the HP website, we click “Product Search” and in our case, varieties of this model appear. We need to select the desired model by left-clicking.
Once the necessary drivers are found, you will need to provide information about the version of your operating system and the system bit depth. If this window does not appear, then simply click on the link or button to download drivers.
A situation may also arise that the site will offer to download a driver version to choose from:
- Basic - to access the basic capabilities of the device;
- Advanced - to access additional functions.
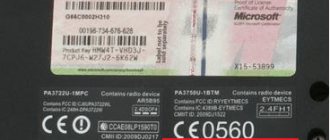
You don’t have to worry about which version you download, the main thing is to indicate the correct bit size of your system (discussed above).
The driver installation package will begin downloading:
Once the download is complete, you need to run the downloaded file and follow the instructions of the installation wizard.
Windows Update
The Windows operating system by default contains all the main drivers for the most popular peripheral devices. Including for printers and scanners. To do this, connect the device to the computer and wait a few minutes. If the automatic printer installation attempt does not succeed, you must do the following:
1. Open “Control Panel”;
2. Find “Hardware and Sound”;
3. Left-click on “Devices and Printers”;
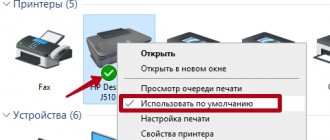
4. A new window will appear with icons of connected devices. Find the image of your computer or laptop (in my case it's a laptop) and right-click on it. In the context menu that opens, click on the line “Windows Update”.
5. After this, a window will open where you need to click “Check for updates” in the menu on the right. It should start automatically searching for available updates for all your devices. We must tell you that it is advisable to have fast Internet, as this procedure may take 10-30 minutes.
6. Now you need to wait for Windows to download the found updates automatically;
7. After the search is completed and all found updates are downloaded and installed on your computer or laptop, you need to restart the device.
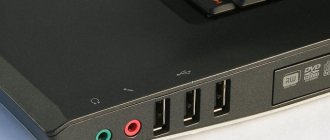
After restarting the computer, the printer should work. If after rebooting the computer still does not see the device, the root of the problem may not be in the drivers. Try connecting the printer to a different USB input.
Connecting a Printer Using the Settings Wizard
The Windows operating system, regardless of version, has a huge number of built-in drivers for printers, scanners and other equipment.
It all depends on the release date of the printer and the version of the operating system. For example, Windows XP contains drivers for printers released before 2003.
Later versions of the program have, accordingly, the ability to support more modern equipment. The same principle of hardware support is followed by developers of Unix-based operating systems.
To start installing drivers using the Hardware Settings Wizard, open:
- Control panel - printers and other equipment - printer installation.
- Following the prompts of the installation wizard, connect the printer and click the “Next” button.
- If the printer is not displayed, click the “Next” button and select the brand and model number of the printer from the list provided. We wait for it to install and click on the “Finish” button.
If the name and number of the printer is not found in the list, you can use the automatic driver downloader built into the OS from the Internet or try to download the drivers yourself.
Determining the Printer ID
Each device that connects to a computer has a unique identification code. If you know the hardware ID, then you can download the driver you need without any problems. If the instructions described above did not help you, and you have not figured out how to install a printer without a disk , you need to find out its identification code. I recommend using this option in the most extreme cases, and if you downloaded the drivers from the official website, you can skip this option.
So, to find out the ID:
1. Right-click on the computer and select “Properties”, then on the left click “Device Manager”;
2. In the window that opens, find your printer. Right-click on the desired line and in the menu that appears, click on “Properties”;
3. A dialog box will open where you need to go to the “Details” tab. Next, in the “Property” line, select “Equipment ID”.
4. A value will appear in the window below, which will be the printer identification code (if there are several values, you must select the first one);
5. Copy the ID. Go to the official website of your printer manufacturer and enter the copied identification number into the search. You can also use search engines to find the driver you need using the hardware ID. But don’t forget that our website has all the drivers for existing printers. All that remains is to download the found driver.
Remember that you need to download drivers only from official resources. It's absolutely free and as safe as possible.
Installing drivers automatically
To ensure that this problem never bothers you again and drivers for any external devices are installed automatically, just change the basic Windows settings. For this:
1. Go back to the “Devices and Printers” menu (we told you how to get here above) through the control panel. Right-click on the “Computer” icon and select “Device installation options” in the context menu that appears;
2. A dialog box will open where you need to select “Yes (recommended)” (recommended default settings) and click “Save”;
Now, after connecting a new device, Windows will automatically search for and install the necessary drivers from its own database or using the Internet connection.
Update centre
You can try installing the printer through Windows Update. There is nothing complicated here:
- Disconnect the printer from your computer.
- Open the "Devices and Printers" section.
- Click on the "Install" button.
- Select "Add Local".
- Leave the port unchanged.
- Click on the "Update Center" button.
- Wait until the available drivers are downloaded and select the software for your model (or at least series).
- Leave the printer name unchanged and wait until it installs. You do not need to allow public access.
After installation, an icon for the added equipment will appear in the “Devices and Printers” section. Right-click on it and select "Delete". Then connect the printer and wait until it “grabs” the previously installed software.
You can repair or update your printer in Simferopol at the service center on the street. Starozenitnaya, 9 (entrance from the fence). Please contact us during business hours from 9.00-18.00 at
Don't forget to rate the post and share it with your friends on social networks by clicking the special buttons below. Don't forget to leave a comment and subscribe to our youtube channel
Save
Save
Rate this article:
(
9 ratings, average: 5.00 out of 5)
Share with friends:
Related posts:
How to clean the electrical cable during printer repair.
USB Debug for restoring Samsung, Xerox, Dell printers.
Is it possible to shake the cartridge or not?
How to upgrade CISS in Epson L100, L110, L200, L210, L300, L350, L355, L550, L555,…
Waste ink drain outlet for Epson L210, L222, L350, L355, XP-406, XP-313, ...
Recommended products:
- 6 in stock
Code: 50019