Modern ovens are powerful consumers of electricity, and if their integration into a kitchen set does not present any difficulty, then connecting the ovens to the electrical network requires fulfilling a number of requirements and special attention to this process.
Before purchasing equipment, you need to understand which wind instrument is best and how it is installed. It is worth noting that this is a rather complex process that must be approached with great responsibility and attention.
Varieties
At the moment they are distinguished.
- Type:
- dependent;
- independent.
2. By heating or heating method:
- gas;
- electric.
The first option has a switch. You can turn on the equipment with just one button. Operation is only possible in conjunction with a hob, that is, paired with a stove. Regarding the independent type, it works in autonomous mode and is equipped with a separate control panel, which provides for each actively used function of the oven.
As for gas ovens, they are more suitable for those people who are accustomed to standard cooking devices. Regarding the connection, it should be noted that connecting an oven without a plug to work is quite difficult; it is best to entrust this process to specialists. This type of equipment is equipped with burner nozzles, which are located at the bottom of the oven.
If you have chosen an electric oven, you have made the right decision. As for the connection diagram for an electric oven, it is quite simple, which allows you to make the connection yourself, without outside help.
Electrical connection
If everything is fine with the wiring, it was laid recently, there is a separate line for connection with a properly functioning grounding, and the oven is not very powerful - about 2.5 kW, no questions asked - put the plug in, turn it on and that’s it. But if the wiring is more than ten years old, you don’t know what condition it is in, what cross-section the wire is, it’s unknown, it’s better to run a separate line, do everything according to the rules and only then connect the oven. In this case, you don’t have to be afraid that something will happen to the wiring.
You can connect the built-in oven to a normal line. It is better if it is dedicated - only for this unit
Conductor cross-section and circuit breaker rating
The latest models of ovens have become not very “gluttonous” - the struggle for savings is yielding results. If you look at their characteristics, the average installation power for a built-in oven is in the range of 2.6-3 kW. But we are talking about rather expensive products. Equipment in the cheaper segment can have significantly more power. Models with pyrolytic cleaning will also be more powerful.
Read also: Glue TechnoNIKOL to a gas burner can
That is why it is recommended to connect the oven to a dedicated line with a large cross-section of conductors, on which a circuit breaker is installed. Recommended cross-section is 6 mm 2 . Such a conductor can withstand a long-term load of 10 kW, which is more than enough. It is recommended to install a class C 32 circuit breaker on this line. This has a very large safety margin - lines with such parameters are often installed at the entrance to a dacha or a house in a village. Its installation will require a substantial investment - both the cable is not cheap and the machine costs quite a lot.
| Cross section of copper wires | Permissible continuous load current | Maximum load power for single-phase network 220 V | Rated current of circuit breaker | Circuit breaker current limit | Approximate load for single-phase circuit |
| 1.5 sq. mm | 19 A | 4.1 kW | 10 A | 16 A | lighting and alarm |
| 2.5 sq. mm | 27 A | 5.9 kW | 16 A | 25 A | socket groups and electric heated floor |
| 4 sq.mm | 38 A | 8.3 kW | 25 A | 32 A | air conditioners and water heaters |
| 6 sq.mm | 46 A | 10.1 kW | 32 A | 40 A | electric stoves and ovens |
| 10 sq. mm | 70 A | 15.4 kW | 50 A | 63 A | opening lines |
If your oven has a power much less than 8 kW (even when all available devices are turned on at the same time), you can lay the cable with a cross-section of 4 square meters. mm, and put the automatic machine at C 25. It will be no less reliable, but more economical. By the way, for greater safety when installing an oven, it is recommended to use two-pole circuit breakers. When triggered, they will turn off not only the phase, but also the zero, which in some cases is important (in the event of an insulation breakdown).
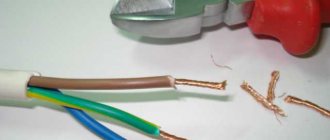
The cable can be used VVGng or NYM. The parameters are 3*4 or 3*6, respectively. Just be sure to measure the diameter of the conductor when purchasing - too often manufacturers, in an attempt to make products cheaper, skimp on copper. As a result, instead of the declared 4 sq. mm, we have, at best, 3, and this is no longer safe - the wiring can heat up, which can lead to a short circuit and fire. So, check the diameter of the conductor. For a cable with a cross-section of 4 sq. mm it should be 2.26 mm, for 6 sq. mm - 2.76 mm. Read more about how and what to measure, how to calculate here.
RCD - necessary or not?
On the line to which the oven can be connected, in addition to the circuit breaker, it is recommended to install an RCD. The machine protects the wiring from overheating and short-circuit currents, and the RCD, a protective grounding device, will protect users. If the insulation breaks down to the ground or if a phase wire is touched, it will turn off the power supply. Electrical engineering is an area in which it is better to play it safe, and an RCD is usually a safe bet, but it’s better if you have one. Safer.
This is what the oven connection diagram looks like
The selection of RCD parameters is simple - its rating is one step higher than the rating of the circuit breaker. That is, if you installed the machine at 25 A, take the RCD at 32 A, if the package is set at 32 A, the RCD will need 40 A. The second parameter is the cut-off current. Everything is simple with it - for the lines to which one device is connected, take its 10 mA.
We still need to discuss the type. It is better to install class B (B 25, for example), but class A (A 25) is also suitable. But don't take the AC class. Although they are cheaper, they do not provide the required degree of security.
Once again: if you want to connect the oven correctly and reliably, use a large-section wire, a circuit breaker and an RCD. Such an installation will guarantee long-term and safe operation of the equipment.
Socket or block
Connecting the oven to the power line is possible in two ways: using a power plug and socket with suitable parameters (selected according to the maximum current, which must be indicated in the technical specifications) or in the “Safe Operation” section. Generally speaking, with a power of 3-3.5 kW you need a plug and socket with a maximum current of 15 A; for an oven with a power of up to 5 kW you will need a socket with a 32 A plug.
Power plug and socket, rated for 32 A
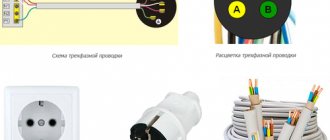
A grounding wire (usually yellow-green) is connected to the bottom connector, phase and neutral (blue or cyan) are connected to the other two. When connecting, do not mix it up - the phase and neutral on the socket and plug must match.
The second connection option is a terminal block. This method is simple and reliable. There is a plate made of heat-resistant plastic on which several pairs of contact plates and screw clamps are mounted. The wires of the two cables are connected from two opposite sides. When connecting, observe the color marking: the yellow-green wire is the “ground”. These conductors are connected strictly opposite each other. The same thing with blue wires - this is neutral or “zero”. The remaining wires are a phase and they are also connected opposite each other.
Using the terminal block to connect the oven electrically
Naturally, you need to work with the voltage turned off - turn the machine to the “off” position. The wires are connected simply - a conductor stripped to 7-9 mm is inserted under the top plate. You can first loosen it by turning the clamping screw a couple of turns. After which the screw is clamped, ensuring good contact. After the screw has been tightened, pull the conductor several times with sufficient force to make sure it is well secured.
These terminal blocks can also be used, but they must withstand the appropriate current (15 A or 25 A) depending on the power of the oven
To prevent the terminal block with wires from being exposed, it can (and is very desirable) be packed in a housing. You can use a regular mounting junction box, or you can use a small plastic mounting cabinet in which you can pack everything very neatly.
Jumpers
In most cases, the oven is delivered from the store with the power cord already attached. Naturally, in this case, jumpers are already installed in accordance with what kind of network you have - single-phase or three-phase. But if there is no cord, you need to install the jumpers yourself.
Read also: How to cut a hole in wood
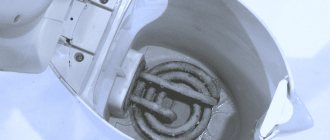
If you look closely, you will see that the jumpers are already in place. These are copper plates that look like the letter "P"
It's not difficult at all. There is a table on each device and in the operating instructions that shows which jumpers need to be installed for which network. An example of such a table is in the photo below. In this case, it is extruded on the back cover, but can be glued near the place where the leads from the oven come out and where the cord is attached.
An example table for setting jumpers on an oven when connecting an electrical cable
As follows from this diagram, the first scheme is suitable for a single-phase 220 V network. It is signed 1N. It is shown that in this case it is necessary to connect three pins, labeled 1, 2 and 3. To do this, you need to install two jumpers. Please note that the ground pin in this model is on the right. A yellow-green conductor should go to it, we connect the same one there from the cable/cord.
The one on the far left is the terminal for connecting the neutral or “zero”. Please note that there must also be a jumper there. It is usually set by default (always), but it doesn’t hurt to check. A blue wire is suitable for this terminal; we connect a wire of the same color from the cable.
The remaining reason is phase. By installing two jumpers on the remaining three free contacts, we connect this wire. It can be any color except yellow, green and blue. Most often it has a black, brown or red color, but not necessarily.
If you have a three-phase input (380 V) in your house or apartment, then you don’t need anything else except a jumper on the neutral wires. In this case, it is also better to connect the protective wires first - grounding and neutral - and then the phase ones. The order in which the phase wires are connected is not important, but it is advisable that they be connected in the same order as on the electrical plug. It's just that the less confusion the better.
Recently, the electric oven has gained popularity. Compared to a gas device, it has a wider range of capabilities. At the same time, installing an electric oven does not require calling a specialist.
You can complete this process yourself. In this article we will tell you how to connect an electric oven to the network yourself. We provided not only the essence of installation, but also step-by-step instructions for installation in a kitchen set.
How to connect a gas oven
Today, gas ovens are connected using two types of connecting parts, namely:
- flexible hoses;
- a non-flexible tube that is made of copper or steel alloy.
Remember that it is recommended to install the device directly under the countertop. Due to this, you will save free space and rationally distribute the kitchen set.
Our service center offers its services for repairing household appliances at a competitive price. We repair any breakdowns of modern household appliances. Leave a request and get a 15% discount - Leave a request
Before connecting the gas oven, you need to understand the wiring of the above hoses:
- connection using a special connector located near the equipment;
- after all the work is completed, you need to make sure that the tubes are not bent and that the fuel flows to the device without obstacles;
- When connecting a gas oven, please note that the length of the hose should not exceed two meters;
- the total number of connections is minimal.
Connecting a gas oven occurs in several stages.
- The type of oven is determined.
- Connection and test run are carried out.
- An important step is to connect the equipment to gas.
It is important to take into account that you can connect a gas oven only to sections of pipelines located close to the tap, with which you can regulate the supply of this flammable substance.
How to properly connect a built-in electric oven
Before connecting the electric oven, you should make sure that it is located in the right place and that all criteria and nuances are strictly observed. If your house or apartment was built many years ago and uses aluminum wiring, it is necessary to install three-core copper wires.
There are several methods for connecting an oven to the mains.
- Using a power cord.
- No cord required.
It is important to connect the built-in equipment correctly, as this can be fraught with serious consequences.
Connection features
First of all, it is worth noting that connecting electric ovens is not particularly difficult, since in this case there are no gas hoses. You can independently connect the oven to a 220 volt network only if you have theoretical and practical knowledge of this process. Improperly performed work can lead to short circuits and fires.
Do-it-yourself connection to the electrical network must be done in strict compliance with certain rules, including mandatory grounding.
Connection procedure
Regardless of the type of device, connecting the oven occurs in several stages:
The existing wiring needs to be assessed. You can only connect the oven if:
- Physical condition is good.
- The conductor cross-section is not less than required.
- There is a circuit breaker or at least a switch on the line. They are needed to de-energize equipment in an emergency.
If the existing wiring does not meet the requirements, it is necessary to lay a new route from the panel to the intended installation location of the oven. On this line you will need to place a machine of a suitable denomination. We will talk in more detail about the cross-section of wires and the ratings of the machines for them later.
What to do
First you need to prepare the oven for connection to the mains. The oven may have a power cord. Sometimes it ends with a three-prong plug (grounding), sometimes there is no plug. Depending on the connection method, you can install a plug on the cord, or you can do without it. You can even change the cord - this does not even affect the warranty.
It's all about what connection method you choose. You can - traditionally through a three-pin socket with a plug. You can use one that is not so convenient, but is considered more correct. Through the terminal block. Depending on the chosen connection method, connect the electrical wires (more on this below).
In some cases, a power cord with a plug is already connected to the oven
- Prepare a place for installing a built-in oven. Manufacturers usually recommend that cold air flows from behind and from below for ventilation. If the furniture has a back wall, a hole is made in it or it is completely cut out as much as possible. To ensure air flow from below, you can lay pads a few centimeters high on the sides (it is important that there is also an air gap at the top between the oven and the countertop. In addition, the side racks of the cabinet must be adjusted to the size of the oven - it must be secured to the sides with screws.
A picture like this will be in your instructions with exact installation dimensions.
That's all, actually. The oven has already been connected, but not everyone fully understands some of the nuances and, most likely, there are a lot of questions about the electrical part. Let's talk about them further.
Wire size
When wondering how to properly connect an oven, you need to pay attention to a number of nuances, including the cross-section and condition of the wiring. Remember that you must connect the stove based on the recommendations specified in the instructions. For example, a connected oven that has a built-in steam generator must have a wire with a cross-section of at least 4 square millimeters.
Connecting the cable to the oven
If you connect the oven to the mains, it is very important to comply with all the requirements specified in the device data sheet. Regarding connecting an electric oven, it should be said that it is important to take into account the state of the network, and also make sure that there are no voltage surges. Because otherwise, you risk saying goodbye to your device.
To 220 V network
Are you wondering which machine to put on your oven? Remember that it is important to maintain the power ratio and the safety of the devices. Connection to a 220 V network should only be made with a three-pin plug, as well as with grounding. It is also worth remembering that when connecting the oven to the network, there must be three jumpers.
To 380 V network
If there is no plug, but you want to connect kitchen appliances to a 380 V network, you do not need to connect it yourself. There are many qualified specialists in Moscow who can help you connect the plug to the oven.
Connecting the cable/cord to the oven
Connecting an oven often involves the need to connect a cable or cord. For these purposes, there is a terminal block on the rear wall of the case. It is covered with a lid. The cover can be metal or plastic, held on by latches or screws. The options vary from manufacturer to manufacturer, but it’s impossible to make a mistake—there’s nothing else.
To 220 V network
First, remove the cover. Under it we see terminals with multi-colored wires connected on one side. If you are going to connect the oven to a 220 V network, there will be many more terminals than wires. Some are connected by jumpers. They must be installed, but can be checked. In general, the jumper installation diagram must be on the case. It can be embossed (as in the photo) or painted on (sticker).
What jumpers should be placed on the oven when connecting to a 220 V network?
For a single-phase 220 V network there must be three jumpers. Two phases connect - the first, second and third output. And one stands between the fourth and fifth.
Where to connect the cord
The wires from the cable/cord are connected as follows:
- To the third phase.
- By the fifth - neutral. The wire is blue or light blue.
- To zero (can be before the first or after the fifth) - grounding. With a yellow-green color.
The connection should be in exactly this sequence. Then the wires must be connected to the three-pin plug in this order: on the top pin - yellow-green, on the right - phase, on the left - zero (blue).
To 380 V network
When connecting to a three-phase network, there is only one jumper left - on the fourth and fifth terminals.
Installation of jumpers for 380 V network
Connecting the cord conductors according to the following diagram.
Connecting the cord to the oven for a three-phase network
RCD
Experts recommend installing an automatic machine, which plays the role of ensuring the safety of equipment from overheating. It is necessary to integrate an RCD into embedded equipment, since in this way you can protect the device from a possible short circuit. That is, if a voltage surge occurs, the machine will automatically turn off the device.
Choosing a location for an outlet
It is worth noting that in order to connect the oven to an outlet, you need to choose the right place for its location. The distance from the electric oven to the outlet should be such that there is a reserve left from the cord. The plug coming from the oven should easily reach the outlet. Don't forget to put the machine on the oven.
What kind of socket is needed for the oven?
Please note that the choice of the outlet to which you plan to connect the equipment should be based on the technical characteristics of the equipment. The electrical cabinet is connected based on the number of phases. The most common is a single-phase version, less often - a three-phase one.
Installing the Terminal Block
In order to connect an electric oven, you must use a terminal block. This ensures a reliable and safe connection to electricity. However, there is a drawback to connecting a built-in oven through a block - difficult opening of the circuit.
Selecting a location
Before installing the electric oven, you will need to carry out a number of preparatory operations.
- First of all, you should decide on the place where you intend to install the product. Its choice depends on the requirements of building codes, as well as on the type of oven purchased (open or built-in model).
- It is necessary to select the area for placing the connecting block or socket (if included in the kit).
- You should also evaluate the possibility of installing the hood in the location chosen for the cabinet.
These factors are important because they indirectly affect how you connect to the electrical network.
Depending on the location, the length of the power cable laid to it and the installation area of the socket with a grounding contact will be selected.
Oven installation
Before installing and connecting it, you must carefully study all the nuances of installing the machine, evaluate your capabilities and, if necessary, use the help of highly qualified specialists. When connecting an electric oven to the mains or a gas oven to a gas source, you must begin by preparing a niche for its future location.
Connecting an electric oven will be correct if you take into account the following distances during installation:
- 40 mm – from the back wall;
- 50 mm – from the left and right edges;
- 90 mm – from the bottom of the oven.
It is very important that there are no distortions, as the equipment will quickly break due to improperly distributed heat. To properly carry out installation work on the oven, you need a level. There is also a risk that wooden furniture may smolder, which, in turn, can lead to a real fire.
If you decide to connect it yourself, it is important to study all the nuances associated with embedding it into this or that furniture. Remember that the connection of a built-in oven directly depends on both the version of the hob and the material of the kitchen unit.
Connecting the cable to the oven
Not all manufacturers connect the power cable to the device at the factory. The wire comes included and you have to connect it yourself. The same events are held here as with the outlet. The terminal box is opened, which is closed with a cover secured with screws. Below it is a block with three connecting terminals. They are necessarily indicated by letters of the Latin alphabet or icons. For example, “L” is phase, “N” is zero, and the ground symbol.
The cable is routed through the fixing gland, where it will be held tightly. The cores are connected in accordance with their intended purpose. In this case, it does not matter whether the blue and brown wires are connected to which terminals (L and N). For a single-phase network this does not matter. It is only important to accurately connect the ground wire.
Read also: Voltage stabilizer on LM317 circuit
After connecting all the wires, the terminal box is closed with a lid. Then the device is checked to ensure its correct operation: the plug is plugged into the socket and switched on to any mode. If suddenly the backlight bulb burns out and the other components are working, don’t panic. Moving the oven into the room and the temperature difference create conditions for condensation to appear inside the appliance. This often causes the lamp to burn out. It just needs to be replaced with a new one. Now we move on to installing the oven in the kitchen set.
The layout of the oven in the kitchen set is determined by the conditions for safe operation of the device. The installation location can be different: a floor cabinet, a pencil case or a hanging cabinet. The main thing is to match the dimensions of the cabinet with the dimensions of the oven. They are determined by the ventilation gaps, with the help of which the heat emanating from the oven will be removed from the furniture set.
- There should be a distance of at least 5 centimeters from the back wall of the cabinet to the oven.
- 5 centimeters from the side walls.
- 10 centimeters from the floor.
Attention! It is prohibited to install the oven near a kitchen sink. There should be a distance of at least 60 centimeters between the two devices.
Before using, the oven must be washed and calcined at high temperature.
Examination
The final step in connecting the oven to a regular outlet is to perform a functional test and start it up for the first time. To do this, just plug the plug into the outlet and make sure that everything works properly.
- The equipment must be launched at full power.
- Set the panel to the maximum temperature and wait until the lubricant melts.
Do not forget that an automatic machine is installed on the oven, which corresponds to the power of the device.
Selecting a location
Before installing the electric oven, you will need to carry out a number of preparatory operations.
- First of all, you should decide on the place where you intend to install the product. Its choice depends on the requirements of building codes, as well as on the type of oven purchased (open or built-in model).
- It is necessary to select the area for placing the connecting block or socket (if included in the kit).
- You should also evaluate the possibility of installing the hood in the location chosen for the cabinet.
These factors are important because they indirectly affect how you connect to the electrical network.
Depending on the location, the length of the power cable laid to it and the installation area of the socket with a grounding contact will be selected.
Safety
It is very important to be safe if you plan to connect your kitchen appliances to electricity. This is due to the fact that the electric oven has high energy consumption, and because of this it is necessary to connect an additional branch under it using an intact cable with a small cross-section.
Remember that the current-carrying conductor is connected through a special machine, to which electric cooking equipment can also be connected. Auto safety parameters should be selected based on the existing load with a ten percent margin.
It is very important to remember that ovens are connected to electricity only by professionals. This is due to the following reasons:
- specialists know all the nuances of this process;
- If the device is damaged due to improper connection to the electrical network, the manufacturer's warranty will become void.
It is worth noting that when operating an oven, the machine is a general safety rule that should be strictly adhered to:
- use exclusively for household use;
- Make sure the electrical wiring is in good condition.